

I would like to share my experience with SQL Server. We have spent years fighting with SSIS packages, stored procedures, and endless ETL scripts. Many of you know how tough it is to keep data pipelines clean and easy to work with. For the last year, I have been doing research on dbt (data build tool), and honestly, it's changed everything. Using it with SQL Server through the dbt-sqlserver adapter has made my work so much smoother, and I didn't even have to leave my favorite database.
In this article, I show how I got dbt working on SQL Server. We'll cover the basics, go through the setup, build a simple project, and I'll share some problems I ran into along the way (this is most of the time I have spent to setting the environment). At the end of this article, I have shared all the issues. As a data engineer tired of messy scripts or a DBA who wants to try modern tools, this should help you get started.
My takeaway from using dbt is that it made me feel like a real programmer while working on data engineering projects. I had the kind of support I usually see in software development, such as a clear project structure, built-in testing, documentation, lineage tracking, and, most importantly, strong data-quality checks.
Why I Chose dbt for SQL Server
dbt isn't just another ETL tool. It's a transformation layer that lets you write SQL models in pieces, test them, document them, and schedule them all in a version-controlled repo. Think of it like Git for your data warehouse code, with built-in tracking of how everything connects.
For us SQL Server folks, here's why it's great:
- You already know this stuff: Just write T-SQL queries as dbt models. No weird new language to learn.
- Break things into smaller pieces: Turn huge transforms into parts you can reuse.
- Testing is built right in: Catch mistakes early with tests you can write yourself.
- Works with other tools: Connects easily to things like Airflow or dbt Cloud.
I used this to fix a messy reporting pipeline at my last job. Cut deployment time in half and made code reviews way easier. If you're running Azure SQL or on-prem SQL Server 2019 or newer, you're good to go.
What You Need Before Starting
Let me tell you what you'll need first. I'm assuming you're on Windows (dbt works great there), but Mac or Linux users can make it work with Docker.
- SQL Server: Version 2016 or later. I tested mine on 2022 with the latest updates. Make sure TCP/IP is turned on in SQL Server Configuration Manager and write down your instance name and port.
- Python: Version 3.8 to 3.11. Get it from python.org. Don't use 3.12 or 3.13 as dbt stopped supporting them and I learned that the hard way. (Here I have to un install latest python version and kept only 3.11)
- Git: For version control.
- A database: Make a new schema for dbt models, something like dbt_demo. Give your user db_datawriter and db_ddladmin permissions.
Quick tip: If you're on Azure SQL Database, the hyperscale tier handles bigger models better because of how it deals with parallel processing.
Let's run through all the steps I ran in PowerShell.
Installing dbt and the SQL Server Adapter
To keep your dbt installation isolated from other Python packages on your system, you should create a dedicated virtual environment.
These commands must be executed in a Command Prompt (CMD) window.
Open CMD and run:
python -m venv dbt_env
This command creates a new folder named dbt_env that contains an isolated Python environment.
Next, activate the virtual environment. (Still in CMD, inside the same directory):
dbt_env\Scripts\activate
Once activated, your CMD prompt will show (dbt_env) indicating that the environment is active.
Step 2: Install dbt-core and the SQL Server Adapter
After activating the virtual environment, install dbt-core and the dbt-sqlserver adapter. These commands are also run in the CMD shell:
pip install dbt-core
and then:
pip install dbt-sqlserver
The first command installs dbt’s core engine, while the second adds support for SQL Server as your dbt target.
You can confirm installation by running the version command. We run this command to verify that dbt has been installed correctly and that your environment can detect both dbt-core and the SQL Server adapter. The command checks your setup and prints the installed versions of each component. If everything is configured properly, you will see a version report instead of an error.
dbt –version
You should see something similar to the output below, which shows the installed version, the latest available version, and the status of each plugin.

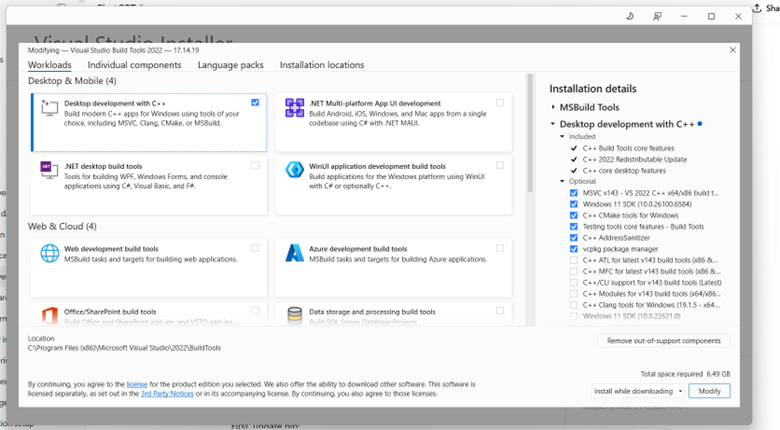
While executing the above step, you may need to install additional software depending on your Windows configuration. This simply means that some systems require extra tools such as Python, MS ODBC drivers, or Visual Studio Build Tools before the installation can complete successfully.
The screenshot below shows examples of the prerequisite files that may be required. These include Python, MS ODBC SQL drivers, Visual Studio Build Tools, and SQL Server Management Studio (SSMS). Your system may need one or more of these components based on what is already installed. When using Visual Studio Build Tools, make sure the correct workload is selected. The image below shows the required configuration. You must enable "Desktop development with C++", which installs essential components such as the MSVC compiler, Windows SDK, and CMake tools. Thes
You can confirm installation by running:
Setting Up Your dbt Profile
Before dbt can run any commands, it needs to know how to connect to your database. dbt stores all connection information in a file, called profiles.yml. This file contains details such as your server name, database name, authentication settings, and which adapter dbt should use.
You must create this file manually if it does not already exist.
- On Windows, the required path is: C:\Users\<YourUserName>\.dbt\profiles.yml
- On macOS / Linux, the path is: ~/.dbt/profiles.yml
More details about this file can be found in the official dbt documentation: https://docs.getdbt.com/docs/core/connect-data-platform/connection-profiles
Below is an example profile for connecting dbt to a local SQL Server instance using the SQL Server adapter
  target: dev
  outputs:
    dev:
      type: sqlserver
      driver: "ODBC Driver 18 for SQL Server"
      server: "127.0.0.1,1433"                  # TCP direct – bypasses instance resolution
      database: Sales
      schema: dbt_demo
      user: sa
      password: MyStrong@123
      port: 1433
      encrypt: false
      trust_server_certificate: true
      threads: 4
This configuration tells dbt how to connect to SQL Server when you run commands such as dbt run, dbt test, or dbt debug. You should adjust the values (server, user, password, schema, etc.) to match your environment.
After creating your profiles.yml file, you should verify that dbt can read the profile and connect to your SQL Server database. dbt provides a built-in diagnostic command for this:
dbt debug
This command checks whether:
- dbt can find your profiles.yml file
- the profile is valid
- the SQL Server adapter is installed correctly
- dbt can successfully connect to your database using the credentials you provided
If everything is configured correctly, you will see output similar to the screenshot below.
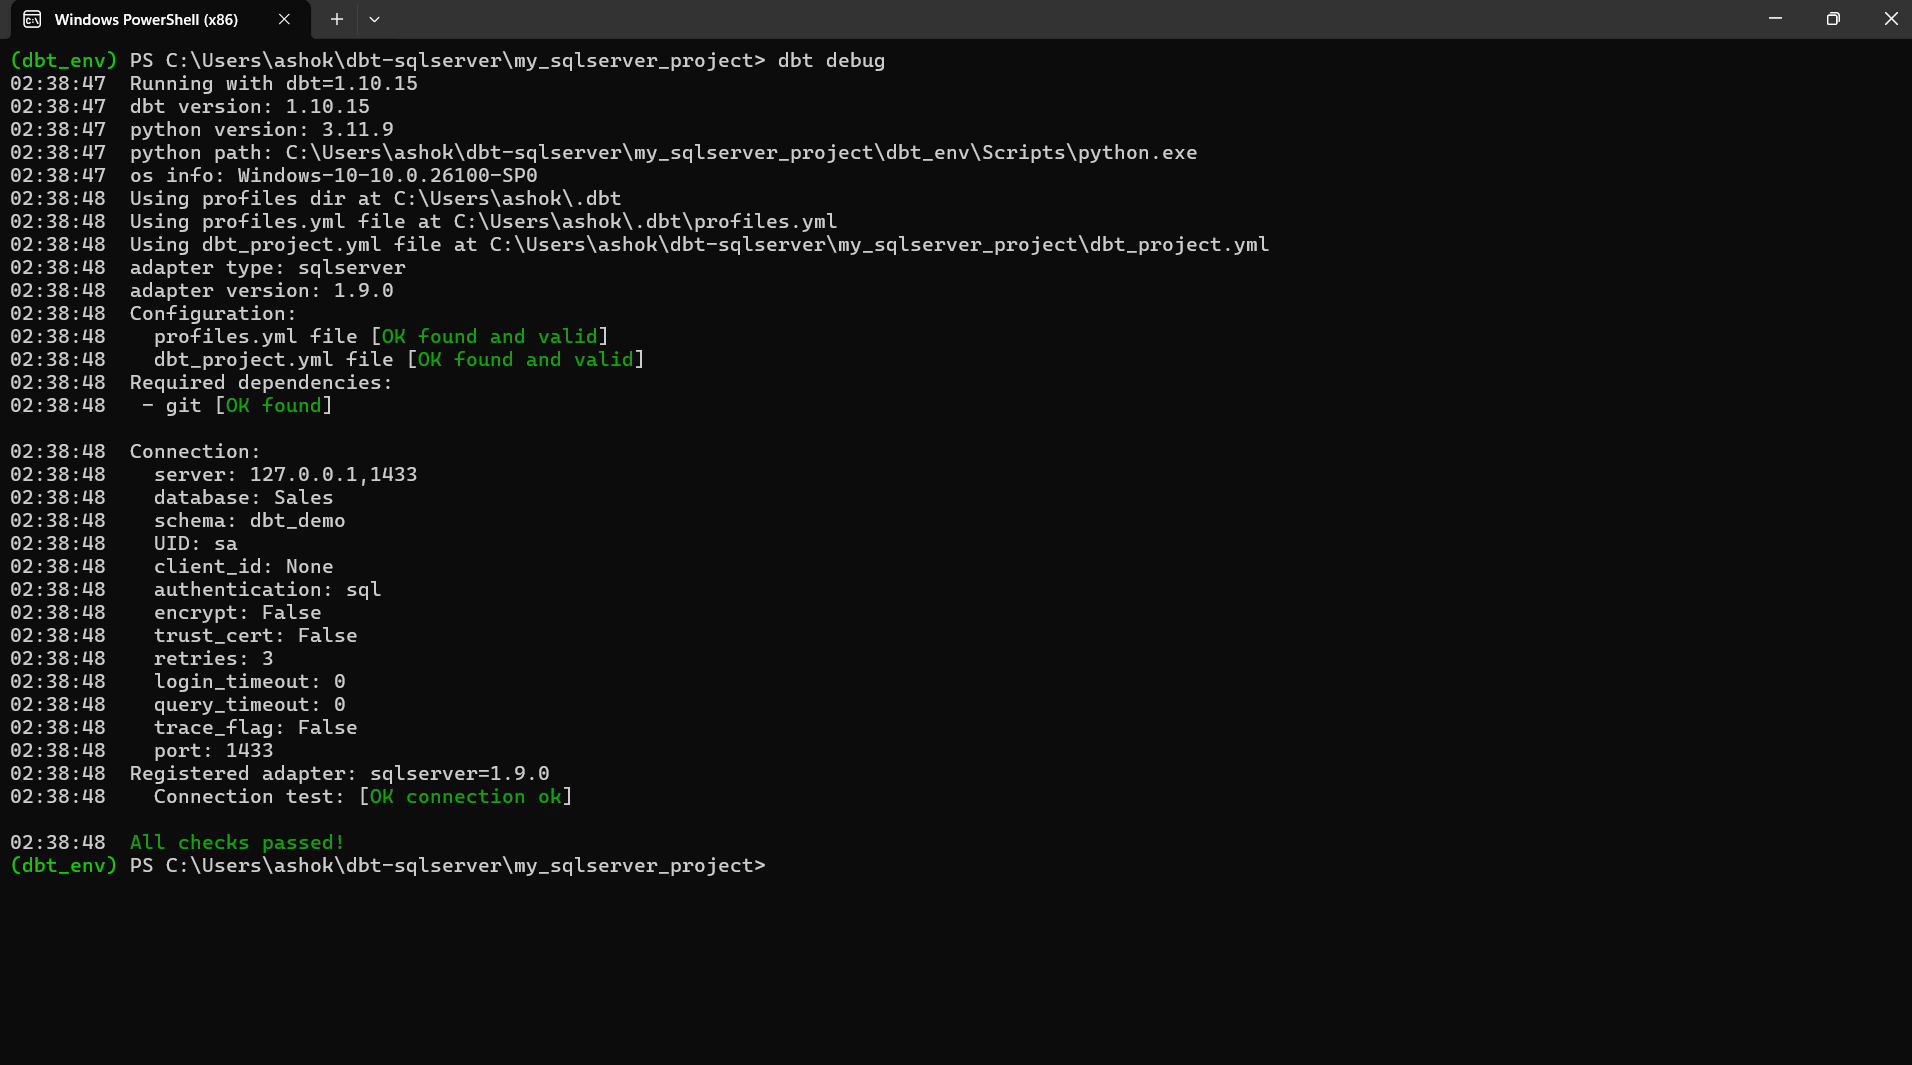
The image shows:
- dbt detecting your Python and dbt installation
- dbt successfully locating your profiles.yml and dbt_project.yml files
- confirmation that the SQL Server adapter is installed
- a successful connection test, including server, database, schema, and user information
- “OK found and valid” messages for all required components
A successful dbt debug output means your environment is correctly set up and dbt is ready to run models against your SQL Server database.
Creating Your First dbt Project
Once dbt is installed and your connection profile is working, the next step is to create a new dbt project. A dbt project contains all your models, tests, configurations, and documentation. dbt provides a command that automatically creates the required folder structure and starter files for you.
Run the following commands to create and enter a new project:
dbt init my_sqlserver_project

cd my_sqlserver_project
The dbt init command does the following:
- Creates a new directory named my_sqlserver_project
- Generates the standard dbt project folder structure (models/, tests/, macros/, etc.)
- Creates a dbt_project.yml file for project configuration
- Prompts you to choose the profile to use (the profile you created earlier)
- Sets up a clean starting point for building models and transformations
After changing into your project directory, you are ready to start building your SQL models with dbt.
When dbt creates a new project, it also generates a file called dbt_project.yml. This file controls how dbt behaves inside the project for example, where to find models, tests, macros, and other resources.
One important setting inside this file is the profile parameter. This tells dbt which connection profile from your profiles.yml file it should use when running commands. In other words, this is how you tell the project, “Use this database connection.”
Here is an example dbt_project.yml with the profile specified:
name: 'my_sqlserver_project'
version: '1.0.0'
# This setting configures which "profile" dbt uses for this project.
profile: 'demo_profile'
# These configurations specify where dbt should look for different types of files.
# The `model-paths` config, for example, states that models in this project can be
# found in the "models/" directory. You probably won't need to change these!
model-paths: ["models"]
analysis-paths: ["analyses"]
test-paths: ["tests"]
seed-paths: ["seeds"]
macro-paths: ["macros"]
snapshot-paths: ["snapshots"]
clean-targets:         # directories to be removed by `dbt clean`
  - "target"
  - "dbt_packages"
In simple terms: “Point it to your profile” means set the profile: value here to match the name of your profile in profiles.yml.
For example, if your profiles.yml contains:
demo_profile:
  outputs:
    dev:
      ...
  target: dev
Then your dbt_project.yml must also use:
profile: 'demo_profile'
This ensures your project knows how to connect to SQL Server when running dbt run, dbt test, or dbt debug.
Configuring Models in dbt
Once your project is created, the next step is to control how dbt builds your models. A “model” in dbt is simply a .sql file that contains a SELECT statement. dbt can build that SQL as a:
- table (data stored physically)
- view (logical layer, virtualized SQL)
- ephemeral model (CTE-style inline transformation)
- incremental model (table that loads only new or changed records)
dbt lets you configure these behaviors in two ways:
- Globally inside dbt_project.yml
- Individually inside each model using the {{ config(...) }} macro
The following example shows how to apply global configurations in your project. In the snippet below:
- All models inside the staging/ folder will be materialized as views
- All models inside the marts/ folder will be materialized as tables
This allows you to maintain consistent build behavior across your project without repeating settings in each file.
Here is the example configuration:
# Configuring models

# Full documentation: https://docs.getdbt.com/docs/configuring-models

# In this example config, we tell dbt to build all models in the example/
# directory as views. These settings can be overridden in the individual model
# files using the `{{ config(...) }}` macro.
models:
  my_sqlserver_project:
    staging:
      +materialized: view
    marts:
      +materialized: table
In simple terms: This tells dbt how to build different groups of models based on their folder location.
For example:
- Staging models are usually lightweight cleanup transformations - views are ideal
- Mart models (fact/dimension tables) often need physical storage - tables are preferred
This setup is common in dbt projects that follow the staging marts pattern.
Adding Test Data with dbt Seeds
To keep things simple while learning dbt, it's helpful to work with small sample datasets. dbt allows you to load CSV files directly into your database by placing them in a folder called seeds/. These files are known as seeds in dbt, and they are a convenient way to load static or reference data such as lookup tables, small test datasets, or metadata.
When you run the command dbt seed, dbt will:
- read all CSV files inside the seeds/ directory
- create corresponding tables in your target schema
- load the CSV data into those tables
This makes seeds perfect for creating quick, realistic examples without needing an external data source.
Example: Creating a Sample Customers Dataset
Create a new file named raw_customers.csv inside your project’s seeds/ folder. Here is a simple example you can use:
id,name,email

1,Ashok Gadiparthi,ashok.gadiparthi@example.com

2,Jane Smith,jane@example.com
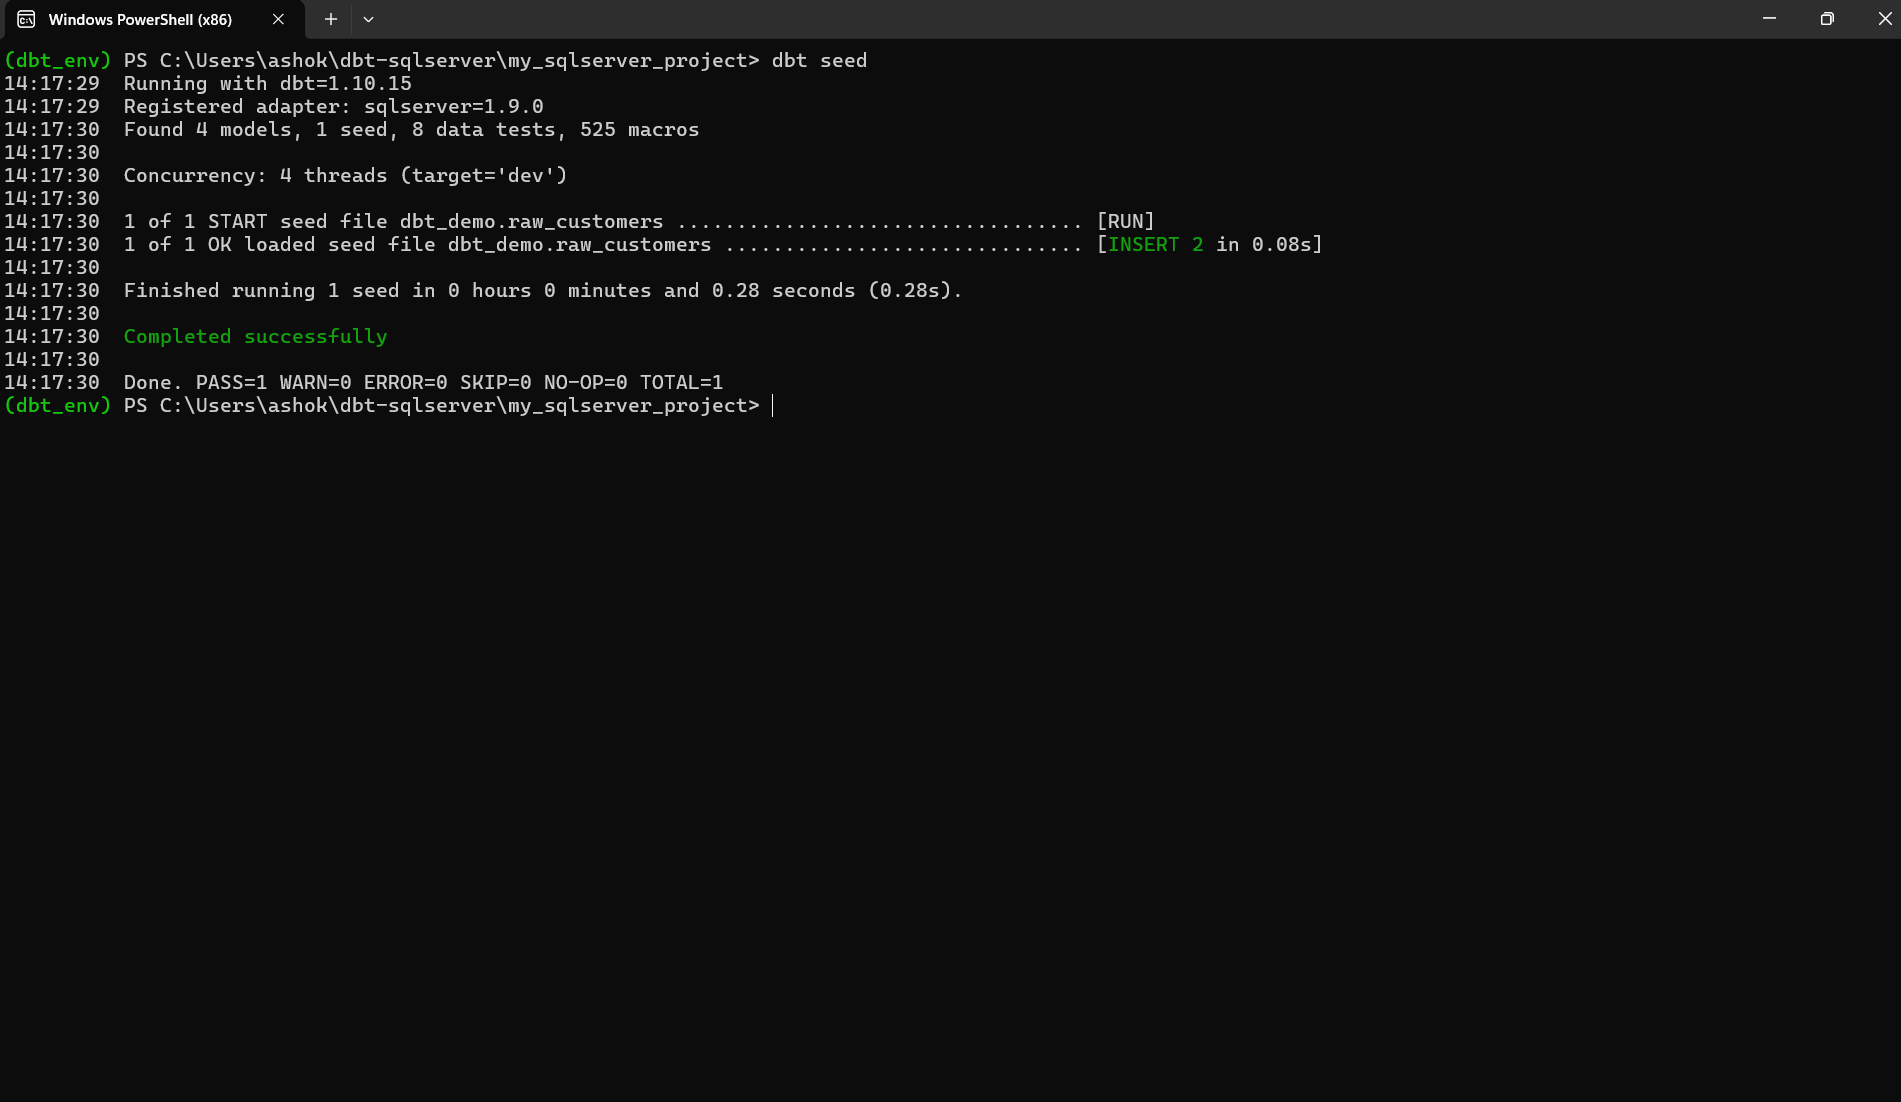
After adding the file, you can load this data into SQL Server by running the seed command. This command reads each CSV file located in the seeds/ directory and creates (or overwrites) a table with the same name in your target schema. dbt will also insert the rows from the CSV into the table. dbt will create a table named raw_customers in your schema and populate it with the two sample rows above. You can then reference this table in your staging models.
dbt seed
If the seed runs successfully, you should see output similar to the screenshot below. This confirms that dbt:
- detected your seed file
- created a table named raw_customers in the target schema
- inserted the two rows from your CSV
- completed without errors
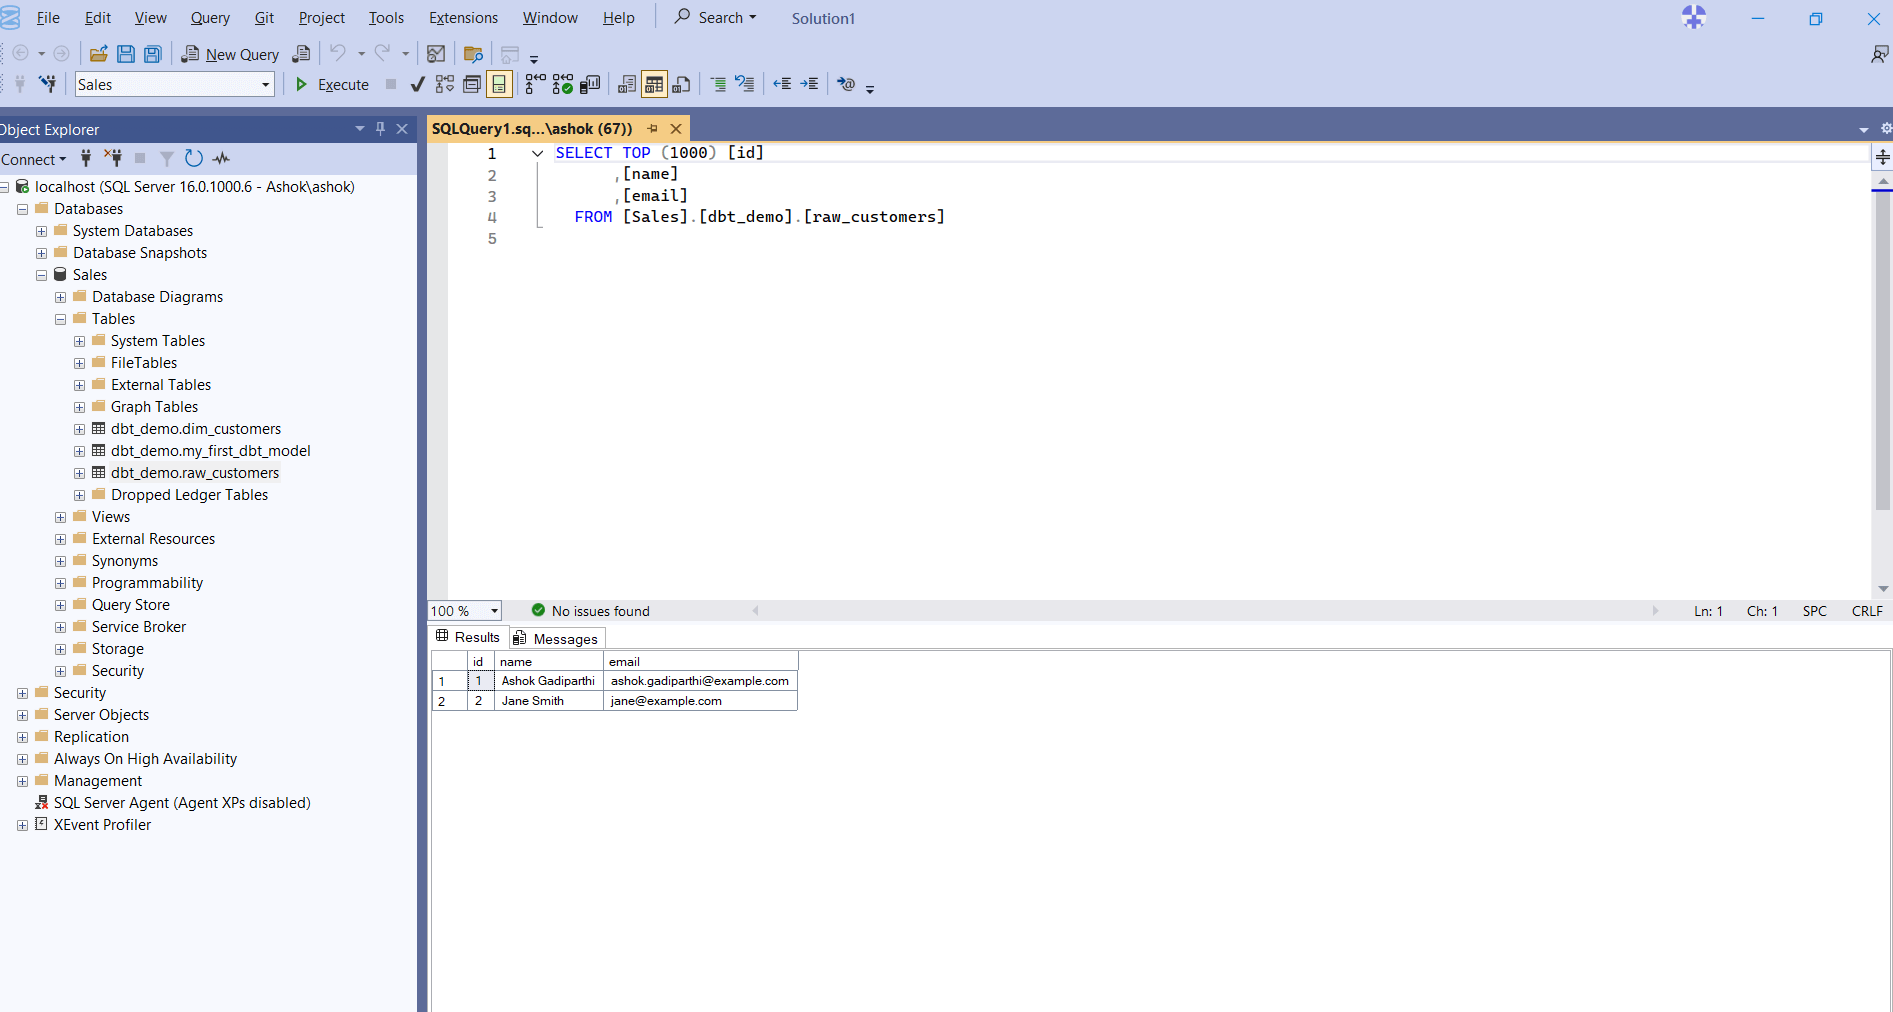
Next, you can open SQL Server Management Studio (SSMS) to verify that the data has been loaded correctly. The screenshot below shows:
- the new table dbt_demo.raw_customers inside your database
- a simple SELECT query executed against the table
- the two expected rows ("Ashok Gadiparthi" and "Jane Smith") returned in the Results pane
This confirms that dbt successfully created the table and populated it with your seed data.
Now that the raw data is available in your database, you can begin building staging models that reference this raw_customers table.
Building and Running Your Models
Now that your seed data is loaded into the database, you can begin building dbt models. In dbt, a model is simply a SQL file that contains a SELECT statement. dbt turns these SQL files into tables or views in your database, depending on how you configure them.
We will build two models:
- A staging model that cleans and standardizes the raw CSV data
- A mart model that produces a dimension table based on that staging model
This small example demonstrates how dbt handles dependencies and builds a transformation pipeline automatically.
Creating the Staging Model
Create a file named: models/staging/stg_customers.sql. This staging model selects the raw data, adds a timestamp, and filters out invalid email rows. Placing it in the staging/ folder also applies the configuration we set earlier (materialized: view).
Here is the file:
{{ config(materialized='view') }}
select
    id,
    name,
    email,
    current_timestamp as loaded_at
from {{ ref('raw_customers') }}
What’s happening here?
- {{ ref('raw_customers') }} - dbt uses ref() to point to another model or seed. This automatically creates dependency graphs and ensures dbt runs things in the correct order.
- materialized='view'- This tells dbt to create a view instead of a table.
Creating the Dimension Model (Mart Layer)
Next, create a model that cleans and restructures your customer data. Create the file: models/marts/dim_customers.sql
Add this content:
{{ config(materialized='table') }}
with cleaned as (
    select
        id,
        trim(name) as customer_name,
        lower(email) as email
    from {{ ref('stg_customers') }}
)
select * from cleaned
What this does:
- It references stg_customers, which means dbt will build the staging model first.
- It trims names, converts emails to lowercase, and materializes the output as a table.
- This pattern staging ? marts is standard dbt design.
Running the Models
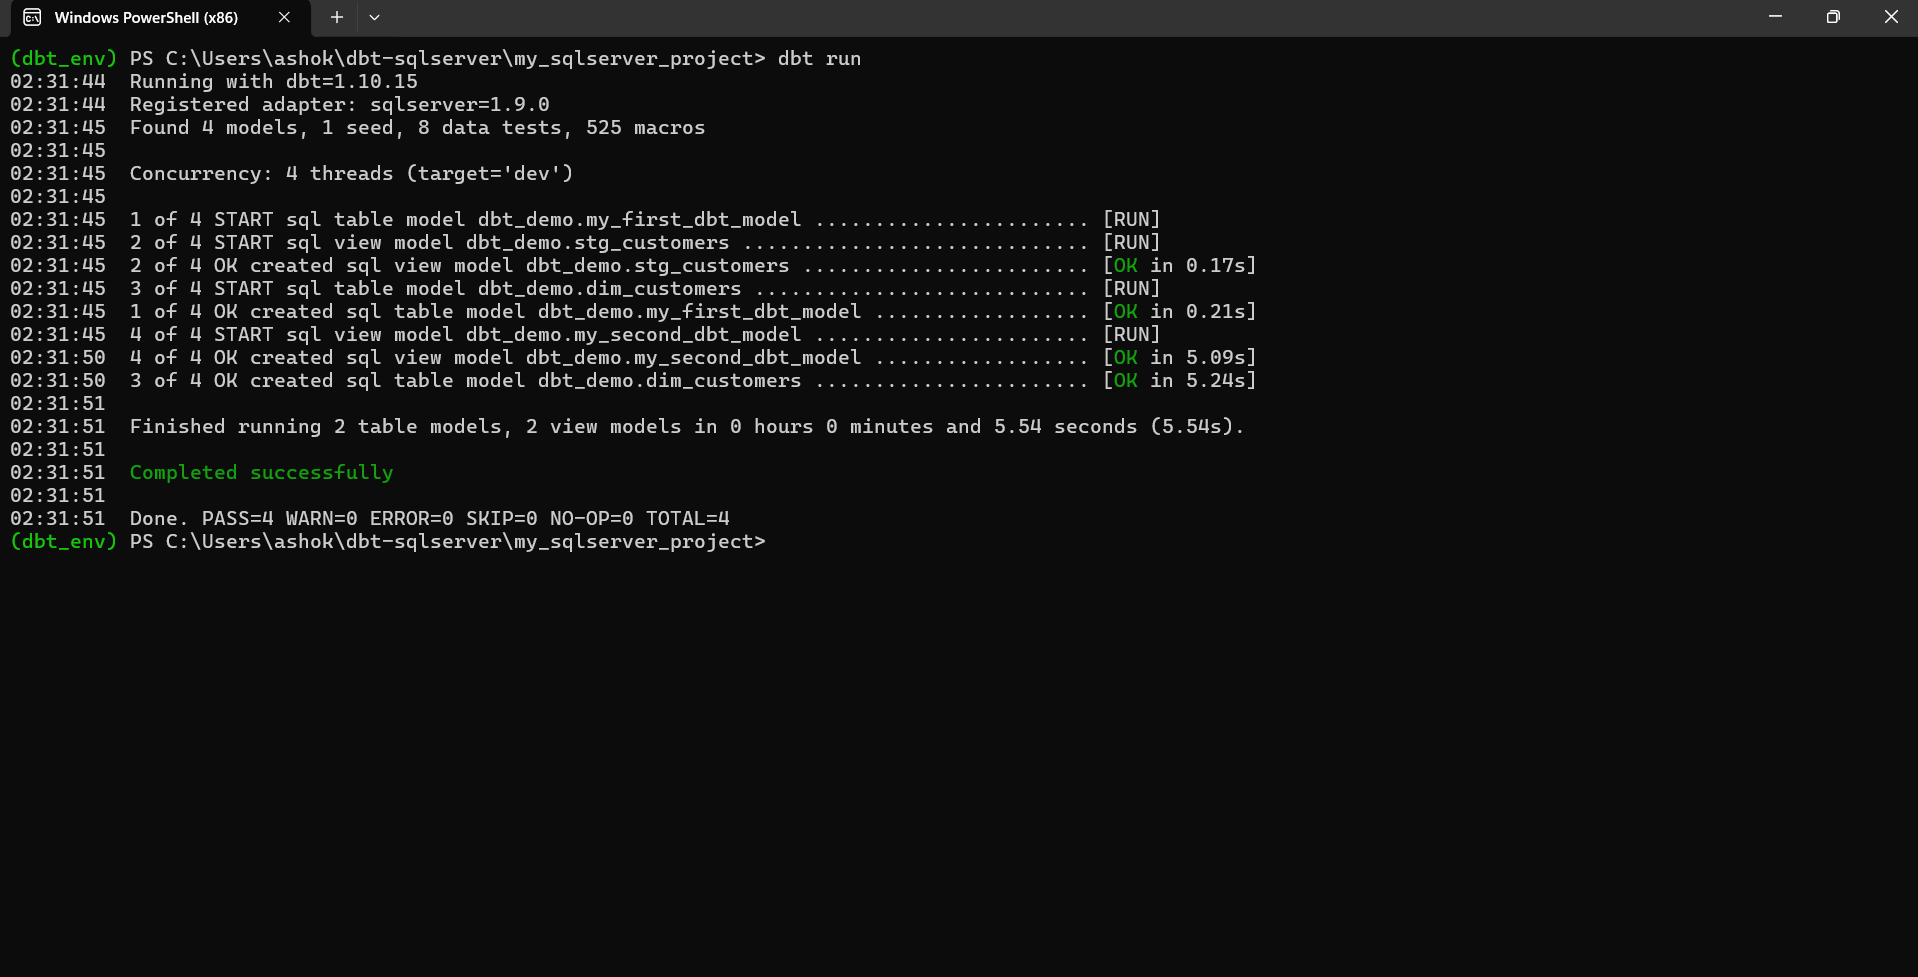
Now run everything with this command:
dbt run
What dbt run does:
- Compiles all your models into SQL
- Determines the correct execution order using ref()
- Builds the models in your SQL Server schema
- Shows detailed logs about what executed and how long each step took
After running the command, you should see output like the screenshot below.This screenshot shows:
- dbt detected 4 models
- 2 were materialized as tables
- 2 were created as views
- All models ran successfully
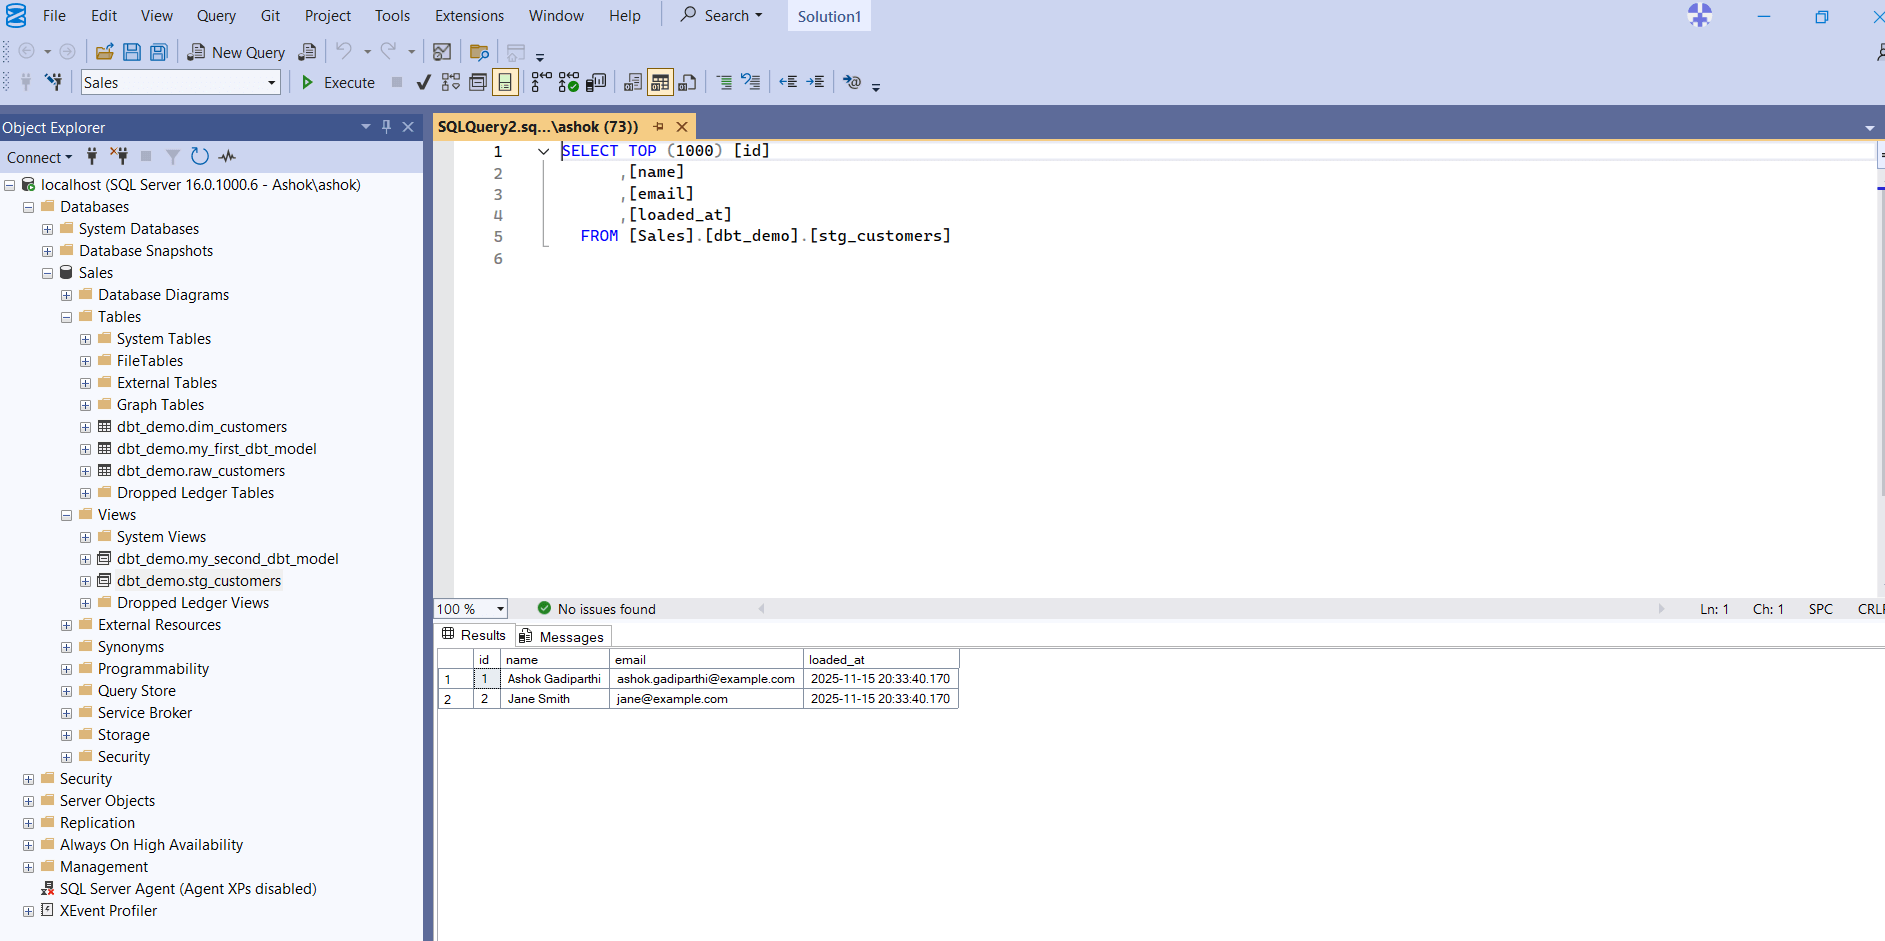
Verifying the Models in SQL Server
You can now open SSMS to confirm that the models were created correctly. You should see:
- A view named stg_customers
- A table named dim_customers
- Both located under your target schema (e.g., dbt_demo)
- The transformed data when you run a SELECT query
The screenshot below shows a query on the stg_customers view returning the expected data.
Testing and Documentation
One of dbt’s strongest features is its built-in testing framework. Tests allow you to validate your data quality before it moves further down your pipeline. Tests are defined in YAML files, usually placed next to your models, and dbt executes them using the dbt test command.
There are two main types of tests:
- Build-in tests</li
- Custom or package-based tests
Each is described below.
Built-in tests are simple, generic rules such as:
- not_null
- unique
- accepted_values
Custom or package-based tests are more advanced tests that come from packages like dbt_utils, for example:
- expression_is_true
- recency
- relationships
Defining Tests in YAML
Create or update a file named models/schema.yml:
version: 2
models:
  - name: stg_customers
    columns:
      - name: id
        tests:
          - not_null
          - unique
      - name: email
        tests:
          - accepted_values:
              arguments:
                values: ['example.com', 'test.com']


  - name: raw_customers
    columns:
      - name: customer_name
        tests:
          - dbt_utils.expression_is_true:
              expression: "customer_name IS NOT NULL AND customer_name <> ''"
What this file does
- Ensures every id in the staging model is present and unique
- Validates that email contains only specific domain names
- Uses a dbt_utils test to ensure customer_name is never null or empty
Running the Tests
Now run this command to execute your tests:
dbt test
This command:
- Compiles all the tests
- Executes them in SQL Server
- Reports which passed or failed
If some results fail or error out, dbt will show them in red, like the screenshot below.
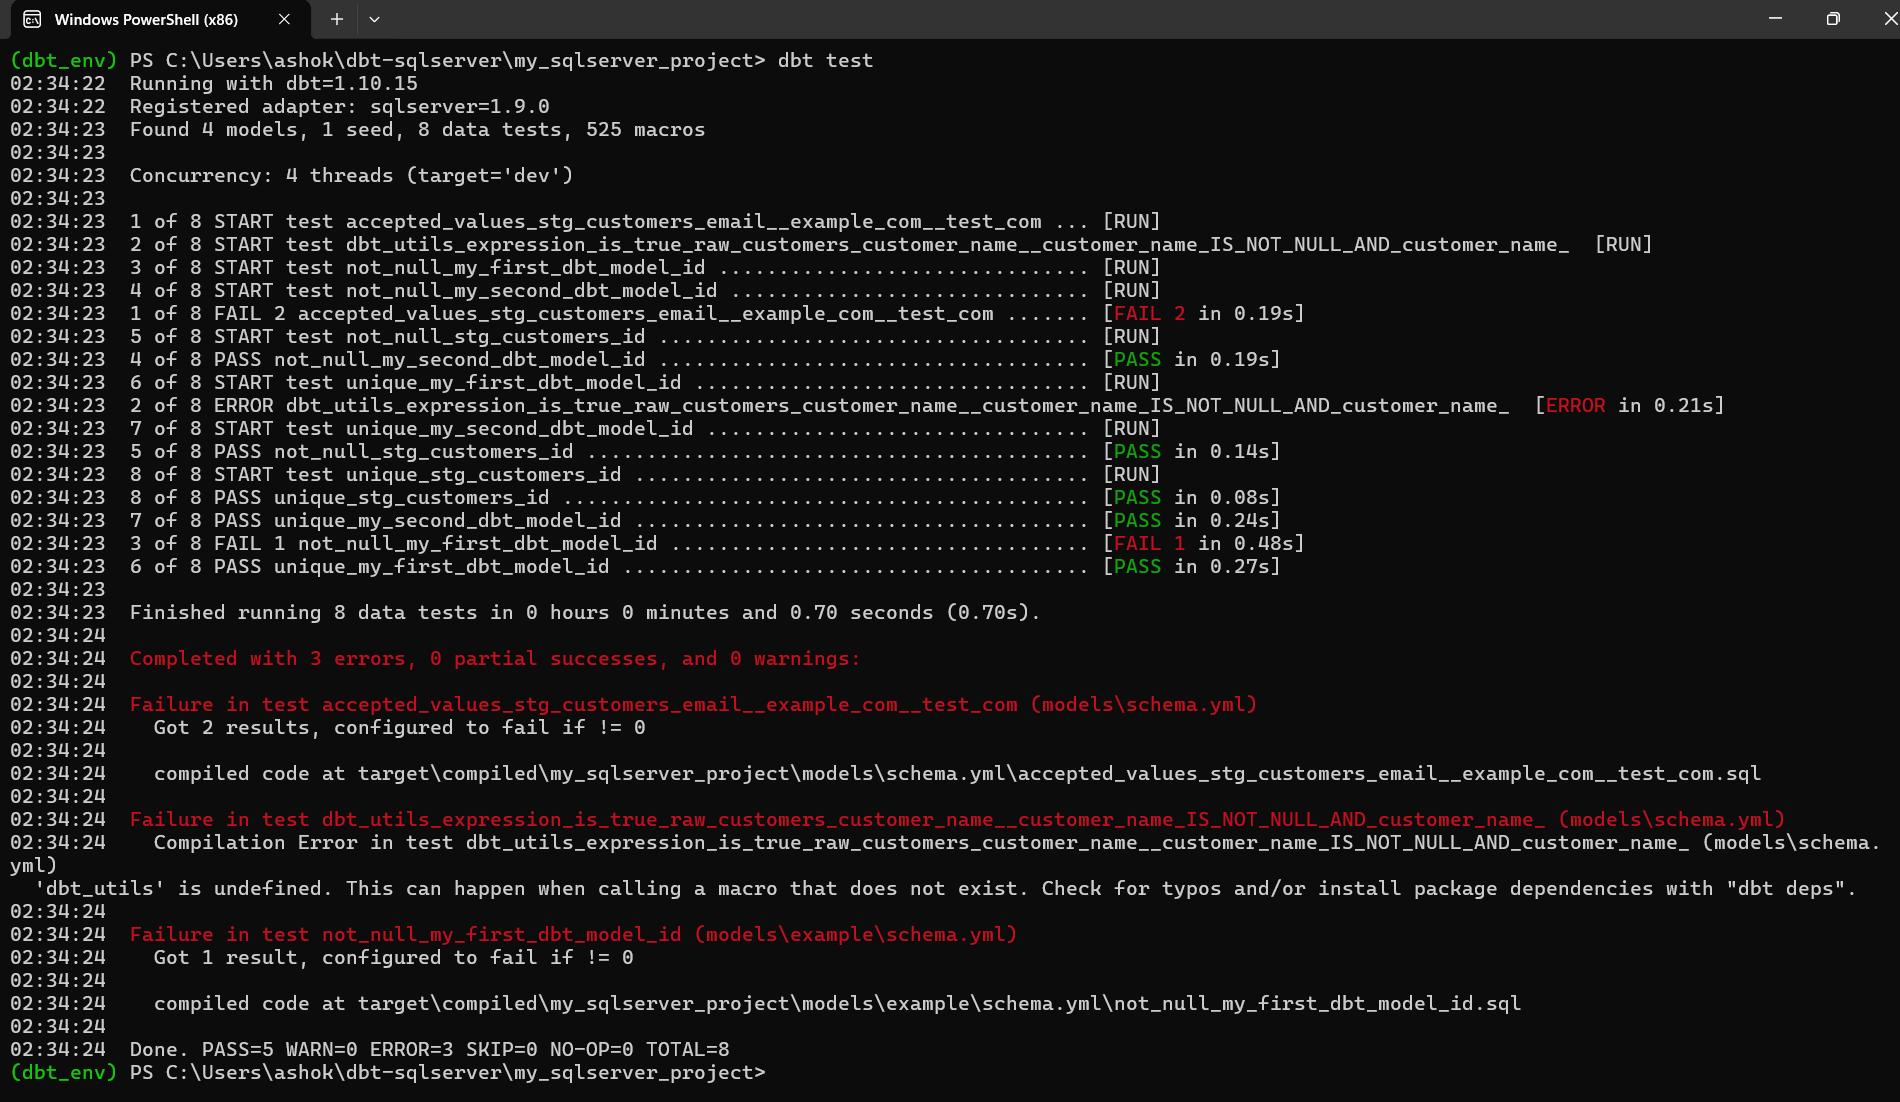
What the screenshot shows
The output illustrates that dbt ran 8 tests and:
- Several passed successfully (green)
- Three failed or produced an error (red)
Most importantly, we can see the reasons:
The accepted_values test failed because your emails (ashok@example.com, jane@example.com) contain the full address not just the domain portion the values don't match the test: values: ['example.com', 'test.com']. dbt compared the entire email to those strings, causing a failure.
We received a dbt_utils.expression_is_true error. This happens because:
- The model raw_customers does not have a customer_name column
- The test references dbt_utils, but the package is not installed
To fix this, you must install dbt_utils:
dbt deps
and update the model or test so that the columns match.
The not_null test failed. The failure indicates that one of your sample rows had a null value for the field being tested. dbt shows these issues early to protect downstream models and dashboards.
Conclusion
dbt-sqlserver makes it easy to build reliable, testable data pipelines on SQL Server even on a fresh Windows setup. By following the steps and fixes in this guide, you can get a fully working dbt environment and start building models with confidence.

