

Overview
In this article, we will cover what Policy Based Management (PBM) is and how you can leverage its power to better manage your environment. We'll see what it can and cannot do to help you enforce standards in your enterprise. We will cover and demonstrate PBM from creating and evaluating policies to receiving alerts on policy violations.
Policy Based Management
Policy Based Management gives us centralized management of our SQL Servers. It allows us to evaluate, configure, and enforce standards across the enterprise. If you are familiar with Active Directory Group Policy Objects then you will see a direct resemblance between the two technologies. PBM allows us to create rules for our SQL Servers so that we can ensure a consistent configuration across our enterprise. You can use it to evaluate these rules and change any settings that do not conform. In some instances you can even prevent users from making changes that do not conform to your rules.
PBM can only run from SQL Server 2008 or above instances. It is supported on any edition except Express, Web, and Compact. It is a common misconception that PBM is supported in Express Edition. In Express Edition you will see Policy Management under the Management node in SSMS, but if you attempt to enable it, you will receive an error that it is not supported on that edition.
Even though PBM is only supported on SQL Server 2008 and above, that restriction is only for the management server that houses your policies. You can, however, use that PBM management server instance to evaluate policies against both SQL Server 2000 and 2005 servers.
PBM stores all of its policies and configuration in the MSDB system database, so make sure you back up that database regularly.
Terminology
The first thing you will want to familiarize yourself with is the terminology surrounding PBM. Here is a list of the terms you will want to become familiar with along with a description.
- Facet – These are a grouping of properties based on a feature or particular aspect of SQL Server. Be sure to look through these after you enable PBM to get a better idea of how Microsoft has organized the available properties. Examples would be properties grouped around server level settings, databases, stored procedures, and triggers.
- Condition – Conditions define and scope the object types you are looking to evaluate. They are also used as filters for target servers and restrictions on server types like SQL Server versions.
- Target – Targets are the objects that contain the properties you are looking to evaluate. For example, you may have chosen the database facet, but you can use a condition to define your target as a specific database.
- Server Restriction – Again you can use a condition to restrict your policy to a particular type of server. An example would be restricting to only servers running SQL Standard Edition.
- Policy – Policies are containers that hold and describe the facets, conditions, targets, evaluation modes, and server restrictions you have chosen.
- Category – Categories are logical groupings of policies. You might have 5 different policies that evaluate things regarding SOX audit compliancy. You can add all 5 policies to a SOX audit category and then apply the category to the servers that require them.
Creating Policies
Policy definitions can either be created manually or imported. With manual policy creation, you can use the GUI or T-SQL, but the steps are the same. First you create a check condition and then you create the policy. The policy will include the check condition, a target condition, the evaluation mode, and a server restriction.
The T-SQL method is almost always more flexible since it can be used to deploy policies to several servers at a time. However, the stored procedures used to create the policies are undocumented. It is suggested to create the policy you want to mass deploy in the GUI and then export it to get the proper creation code. Discussing these undocumented stored procedures is beyond the scope of this paper, but they are listed here as a reference for the more adventurous.
- dbo.sp_syspolicy_add_condition
- dbo.sp_syspolicy_add_object_set
- dbo.sp_syspolicy_add_target_set
- dbo.sp_syspolicy_add_target_set_level
- dbo.sp_syspolicy_add_policy
We will walk through creating a policy to evaluate the status of “Auto Create Statistics” on our server named “File2”. First we need to open SQL Server Management Studio and connect to our server. Then we need to enable Policy Management by expanding the Management node, right clicking on Policy Management, and selecting Enable.
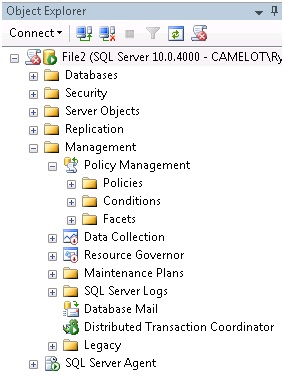
You will notice three folders under the Policy Management node. If explore them you will see that the Policies and Conditions folders are empty while the Facets folder contains many items. Facets are created by Microsoft and you cannot create your own. The other folders are empty because we have not yet created any policies. This is a good time to browse through the facets and open a few to get an idea of what they contain.
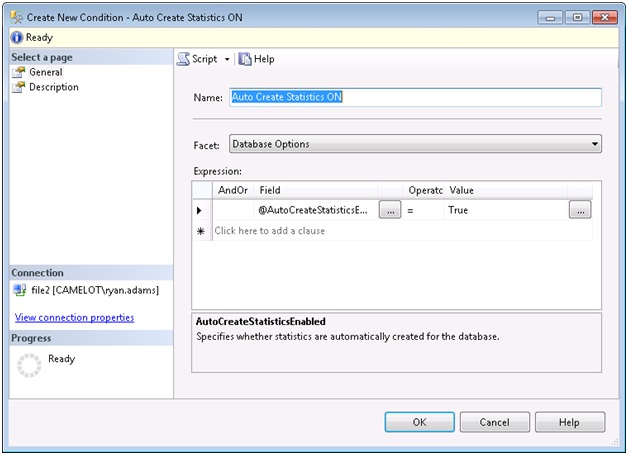
We want Auto Create Statistics to be turned on for all our databases, so let’s start by right clicking on the Conditions folder and selecting New Condition. This opens our create condition dialog box where we define the condition name, the Facet that contains the properties we want to evaluate, and the expression used to evaluate those properties. This is what those options should look like:
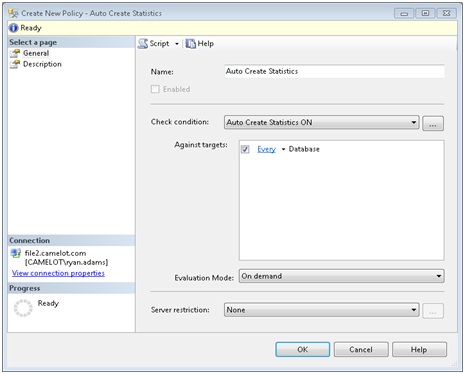
Now that our condition is defined, we’re ready to create our policy. Right click the policies folder under the Management node and select Create Policy. We need to give it a name, select the check condition we created previously, define the targets to apply it to, choose the evaluation mode, and select any server restrictions. Here is what our example will look like:
Now that we have our policy configured let’s test it out by evaluating it against our local server and reviewing the results. Simply right click our new “Auto Create Statistics” policy and select Evaluate. This will cause the policy to be evaluated immediately on the local SQL instance. Here is what we get:
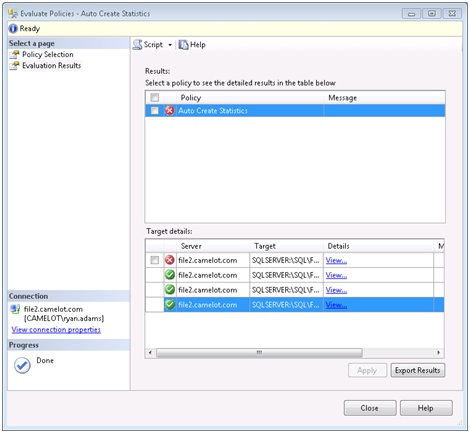
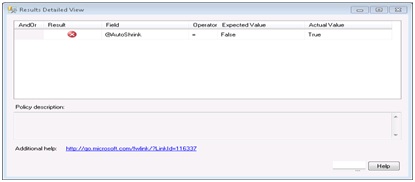
We can see that our server has four databases and one of them has violated our policy. If you check the box next to the offending database and select apply, PBM will bring that database into compliance by changing the Auto Create Statistics setting from false to true. Before we do that we can also select the View hyperlink in the details column to see the exact settings that caused this policy to be violated.
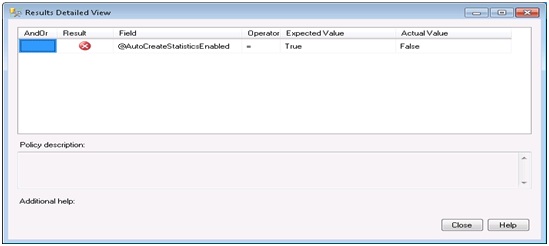
We can see that the policy expected AutoCreateStatisticsEnabled to be set to True, but the actual value was False.
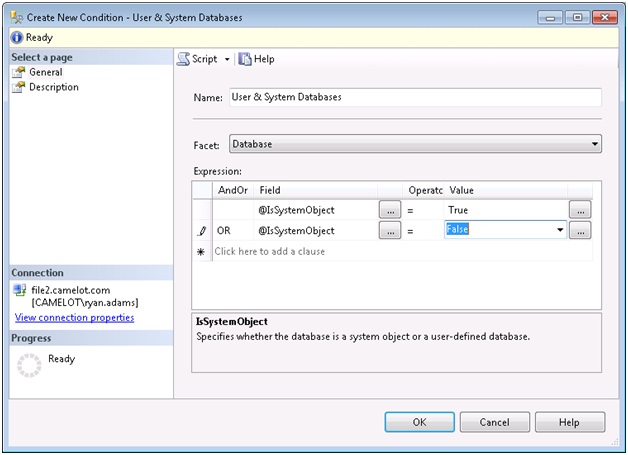
There is one other important thing to notice about our evaluation results. It showed that the policy was checked against four databases on our server, but none of them were system databases. You will remember when we created our policy, we accepted the default target condition of “Every” Database. The “Every” condition is a built-in condition that cannot be changed and does not include system databases. If you want to include the system databases in your policy you need to create a new condition that includes both user and system databases. Once you have created the condition you will want to go back to any policies that need this change and alter the target condition to point to your newly created condition. Here is what that condition might look like:
Importing Policies
We can also import policies into our PBM server, so we don’t have to manually create them every time. You can import policies that you have exported from other servers, and you can also import Microsoft Best Practice Policies. The Microsoft policies are a great place to start learning what you can do with PBM, by simply importing them and inspecting their various configurations. They are installed by default and simply need to be imported from the following directory.
%installdir%\100\tools\policies\
Under that directory there are several others separated by technology like SSIS and SSAS. We will focus on the policies in the “%installdir%\100\tools\policies\Databaseengine\1033” folder. Let’s import the Microsoft Best Practice Policy named “Database Auto Shrink”. Right click on the policies folder and select import. In the Import dialog, click the ellipsis next to “File to Import” and navigate to the policies folder mentioned above. We want to select the “Database Auto Shrink.xml” file. Here are the options we want to choose for our import:
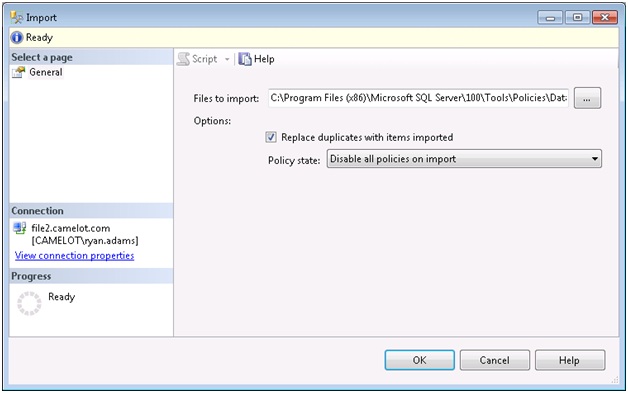
We have two options to select after providing the path to our policy import file. The first option is “Replace duplicates with items imported”. This option will replace any policies in your PBM server that have the same name as the one you are importing. This can come in handy if you have to make a change to the policy and re-deploy it to several servers in your environment. It is also great to use if you suspect the policy has been altered and you want to ensure the settings are replaced. The real jewel to this setting is that it does not replace the evaluation history for that policy.
The other option is “Policy State” and describes what state we want the policy to be put in after the import. Here are the choices we have.
- Preserve State – Whatever state the policy was exported in, is the state we want after we import it. If the policy was in a disabled state when it was exported then it will be in a disabled state after we import it.
- Enabled – Imports the policy and enables it regardless of the export state.
- Disabled – Imports the policy and disables it regardless of the export state.
If you are not familiar with the policy being imported, including the Microsoft Best Practice Policies, it is always suggested to import the policy in a disabled state. You need to open and evaluate the policy for yourself and your environment before you import it.
Evaluation Modes
PBM has four evaluation modes that provide us with flexibility in the way we evaluate policies against our SQL instances. In the previous example you’ll notice that we used the “On Demand” mode to evaluate our Auto Create Statistics policy. Here are the options and what we can use them for.
- On Demand – This is a manual policy evaluation. Policies in this mode can only be evaluated by the administrator performing a policy evaluation in SSMS.
- On Schedule – This allows you to automate the evaluation of policies. Policies in this mode require a schedule and are executed via SQL Agent jobs.
- On Change: Log Only – This mode only evaluates a policy in response to a SQL Event. The action performed by the user is allows to complete and the result is logged in PBM.
- On Change: Prevent – This mode only evaluates a policy in response to a SQL Event. The action performed by the user is wrapped in a transaction and automatically rolled back if it violates the policy.
We have already seen how the On Demand evaluation mode behaves in our previous example. We can also see from the description that the "On Change" modes behave the same, but the "Log Only" mode simply logs the user action. What we want to focus on is the behavior of On Schedule and On Change Prevent. Let’s use the Database Auto Shrink policy we imported earlier and see how it works with the On Schedule mode.
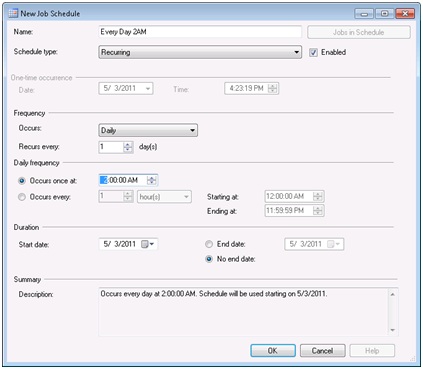
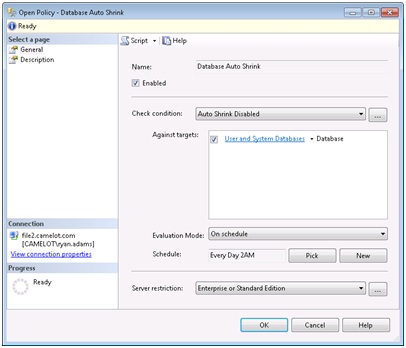
Double click on the Database Auto Shrink policy. We want this policy to apply to both user and system databases so change the “Against Targets” to the “User and System Databases” condition we created earlier. Next we need to change the evaluation mode to On Schedule. As soon as you make this change you will notice a red warning appear at the top of the dialog stating that you must assign a schedule. You can either pick an existing schedule using the Pick button or create a new on with the New button. We need to click the new button and create a new schedule called “Every Day 2AM”. Here is what the schedule should look like.
Back in the policy dialog you will notice that Microsoft has created and used a condition for the server restriction option. They are restricting this policy to only apply to Standard and Enterprise Editions. This will be fine for our example. All we need to do now is check off the Enable box and click OK to close the dialog.
If you go look at your SQL Server Agent jobs you will notice a new job with the prefix “syspolicy_check_schedule” followed by a unique identifier. Run this job to test out our new policy. The job will report success even if a policy violation occurs because the violation will be stored in PBM. If you right click the Database Auto Shrink policy and select history we can see the results.
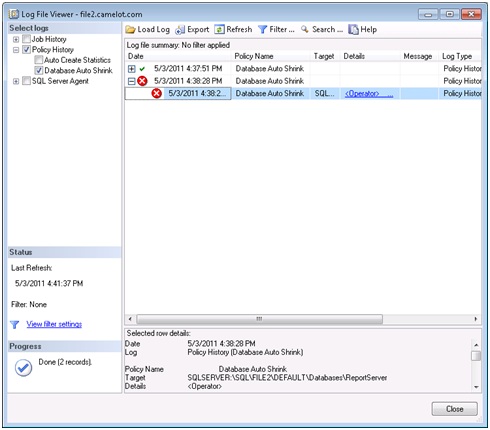
We can see that the most recent evaluation had a policy violation and we can see the results in the details pane. Our ReportServer database has violated the policy and that’s easy to see in the details pane, but we only evaluated one policy against a handful of databases. You’ll notice that the detail information is stored in XML format and could be time consuming to navigate if the job had a broader scope. To get a better view of the result we can click the hyperlink in the details column to get a graphical view like we had in our “On Demand” example.
Now that we know how to schedule a policy evaluation let’s take a look at On Change Prevent. This method will allow us to prevent something from happening. Instead of just evaluating and seeing which databases have auto shrink turned on, we could prevent the change from occurring altogether.
It should be noted that this evaluation method will only work when evaluating something on your SQL Server that raises a DDL event. You also need to be aware that this method puts a CLR wrapper around the event to put it into a transaction that can be rolled back. This means that anything satisfying this policy will be allowed to occur and then rolled back. Be aware of the consequences this can have with large transactions.
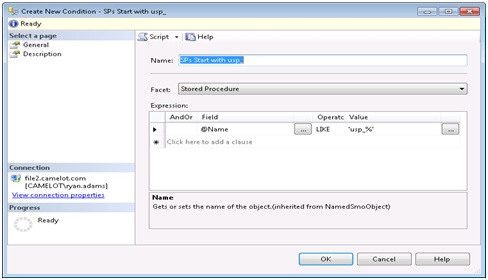
We are going to create a new policy to help enforce a naming standard. We want to make sure that all stored procedures start with “usp_”. We start by creating a new condition called “SPs Start with usp_”.
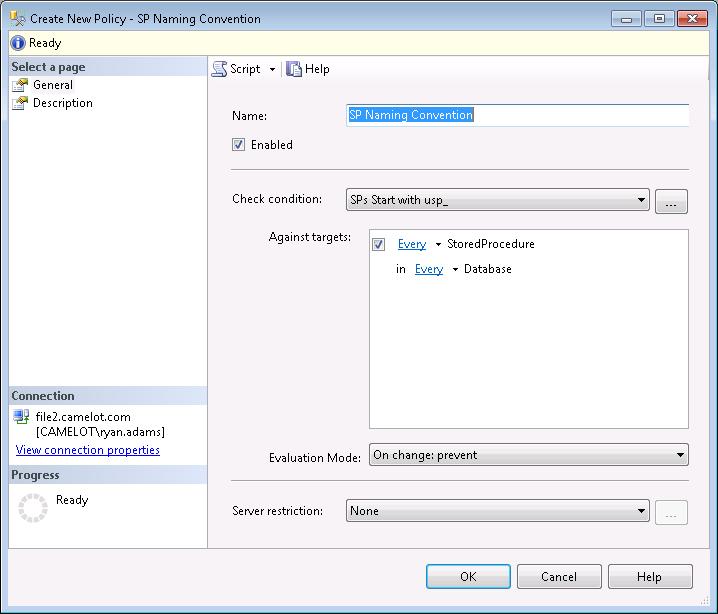
Next we create a new policy named “SP Naming Convention”. We will take the default targets and simply check the enable check box and select “On Change: Prevent” for the evaluation method.
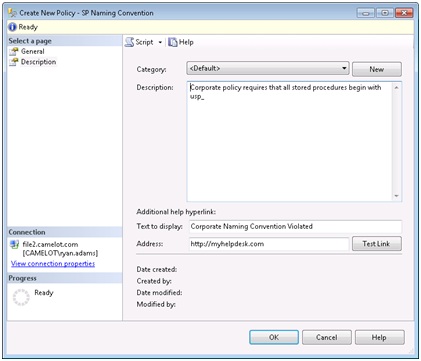
This method returns information to the user when they violate the policy so we need to click the Description page in the left navigation pane and provide additional information. We need to provide a meaningful description of why they received the policy violation error, the text to display, and we can even provide a link to further internal documentation or the help desk.
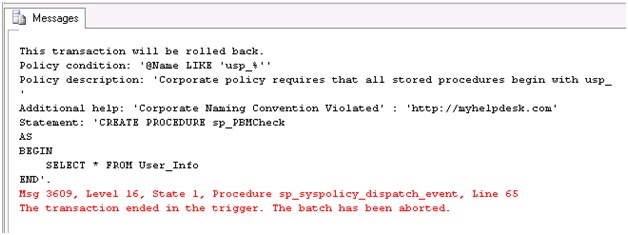
Now we can test the policy by opening a new query window to a database on our system and trying to create a stored procedure that violates our policy. We will receive an error that our transaction will be rolled back, the information we provided for the user in our policy, and the statement that was executed.
Evaluation Methods
There are four different ways we can evaluate policies in our environment.
- We can evaluate a single policy against a single instance by simply right clicking on the policy and selecting evaluate.
- We can evaluate multiple policies against a single instance by right clicking the Policies node and selecting evaluate. This opens a dialog where we can choose multiple policies to evaluate against the local instance.
- We can evaluate a single policy against multiple instances. This is where the power of Central Management Server comes in. You can right click on a group in your CMS, select evaluate policies, choose your PBM server source, and select a policy to evaluate against the instances in the group.
- We can evaluation multiple policies against multiple instances. We use our CMS again just like the previous bullet point, but simply select multiple policies to evaluate.
Alerts
PBM raises errors for policy violations. We can create alerts on those errors to be notified of policy violations. In order to setup alerts on these errors there are three prerequisites. Note that violations for the “On Demand” evaluation mode do not raise errors. A policy must be set to “Enabled” to raise an error, and On Demand policies are always in a disabled state. Here are the prerequisites to setting up alerts on your PBM SQL Server.
- Database Mail must be enabled and configured
- Operators must be created to receive notifications of alerts
- Alert system notifications must be enabled on your SQL Server Agent
There are four error numbers that we can setup alerts for, and that will provide us with notifications for any policy using any evaluation mode. Here are the error numbers we want to setup alerts for.
- On Change: Prevent (Automatic) – 34050
- On Change: Prevent (On Demand) – 34051
- On Schedule – 34052
- On Change: Log Only – 34053
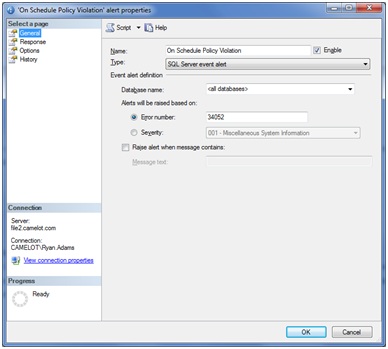
Let’s take a look at creating an alert for an “On Schedule” error. Right click alerts under SQL Server Agent in SSMS and select New Alert. In the Alert Properties box we need to give the alert a name and enable it. We need to select which databases we want it to apply to, and select that the error number to alert on will be 34052.
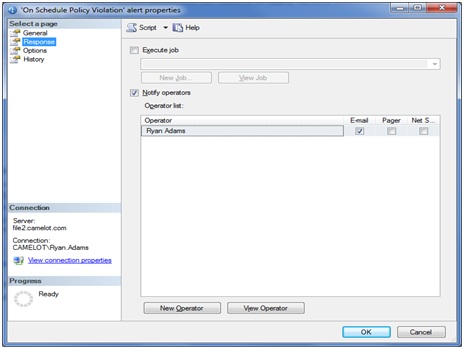
Now we need to select the Response page in the left hand pane. Here we want to select “Notify Operators” and check the email column for the operator we want to be notified.
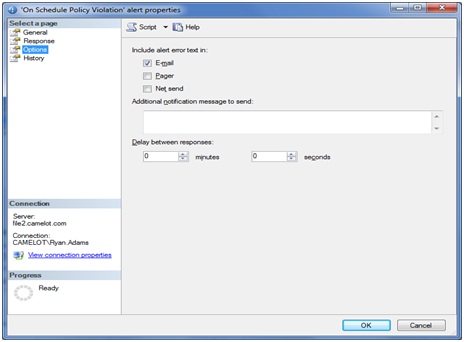
Last we need to select the Options page in the left hand pane. Here we want to select to include the error text for email notifications.
Use Cases
Here is a list of use cases to help get you started using PBM and give you an idea of the kinds of things you can check.
- Auto Shrink Disabled
- Authentication Mode
- SQL Password Expiration
- SQL Password Policy
- Guest Permissions
- Last Backup Time
- Auto Grow
- Auto Create Statistics
- Auto Update Statistics
- Enforce Naming Convention
- Database Compatibility Level
- Recovery Model
- Database Encryption
- Is Trustworthy Option
- Login Auditing
- Database Mail Enabled
- SQLMail Disabled
- Extended Stored Procedures Disabled
- Backup Compression
- SQL Server Agent is running
- Agent jobs have notification on failure
- Monitor SQL Agent Jobs http://www.mssqltips.com/tip.asp?tip=2192
- Transaction Log Backups for Full and Bulk-Logged
Conclusion
In this paper we took a look at what Policy Based Management is and how we can leverage it to standardize the servers in our environment. We looked at how to manually create policies as well as import policies, including the Microsoft best practice policies. We also discussed the various methods for evaluating policies, and saw how we can create alerts to monitor any policy violations.

