You may find that you only get to discover the various incorrect configurations in your servers as a consequence of investigating script failures, poor performance, or worse, a security breach; a process of exception-based management of Database servers. A better way is to prevent, or alert on, any deviations from the standard configurations by defining and applying standard configurations to groups of server instances. This is typically called intent-based management, and as you’ve probably guessed, that’s exactly what we can now achieve using the new policy-based management feature in SQL Server 2008.
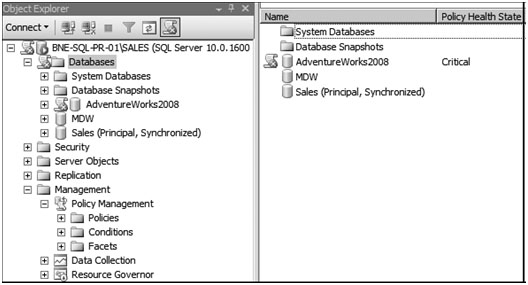
Figure 1: Policy-based management is found in SQL Server Management Studio under the Management node.
Figure 1 shows the location of policy-based management in SQL Server Management Studio along with the new Data Collection and Resource Governor features.
Policy-based management for ensuring consistent configuration
Policy-Based Management takes a role that is analogous to Active Directory for SQL Server. Active Directory is used in simplifying the process of administering thousands of domain users and computers. Similarly, policy-based management is a way of ensuring that your SQL Server configurations are consistent, and like Active Directory, the approach becomes more valuable in as the number of server instances grows.
The entities managed by a policy are referred to as ‘targets’ and may be SQL Server instances, databases, tables, and so forth. In the example in figure 2, the target chosen for a table name policy is every table in every database.
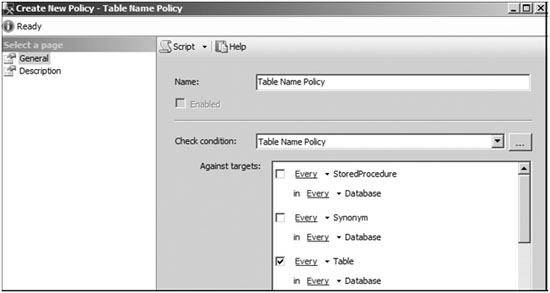
Figure 2: When creating a policy, you choose a target. In this example, the target for Table Name Policy is “Every Table in Every Database.”
A target type can implement a management ‘facet’, which is the name given to a predefined group of configurable properties that are appropriate for a certain number of targets. For example, as shown in figure 8.4, the Surface Area Configuration facet, applicable to the Server target, contains properties such as DatabaseMailEnabled, CLRIntegrationEnabled, and XPCmdShellEnabled.
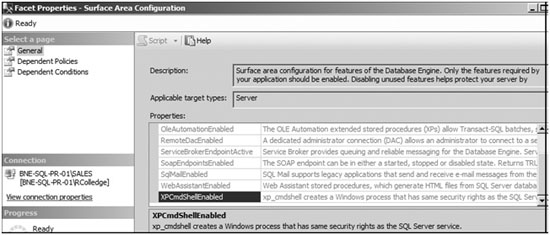
Figure 3 Facets, such as Surface Area Configuration, contain a number of properties that can be used in defining policy conditions.
A ‘condition’ describes the state of one or more facet properties. For example, the condition shown in figure 4 contains the required state of ten properties belonging to the Surface Area Configuration facet.
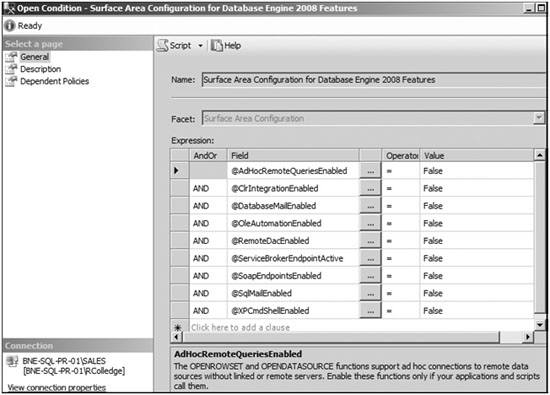
Figure 4: A condition contains the required value of one or more facet properties.
Putting it all together, a policy contains a condition, a target, and an evaluation mode, which defines how the policy conditions will be enforced. Evaluation modes, some of which are only available for certain facets, are as follows:
- On Change – Prevent -this mode ensures that policy violations are prevented. It is done by using DDL triggers that roll back any changes that violate policy. The mechanism used for the rollback (DDL trigger) limits the situations in which this evaluation mode can be used.
- On Change – Log Only -this mode logs violations upon any change that violates an enabled policy. Corresponding alerts can then be set up as appropriate.
- On Schedule -Using SQL Agent jobs, the ‘On Schedule’ evaluation mode will periodically check policy compliance, and log any violations if appropriate. This mode is useful in reducing the performance impact of a large number of enabled policies.
- On Demand -this evaluation mode is used when creating ad hoc checks. The policies are created as disabled and, as such, have no performance impact on a running instance.
With these terms in mind, let’s take a look at the process of importing, creating, and evaluating policies.
Policies in action
SQL Server 2008 ships with a number of predefined policies that can be imported and evaluated. These policies encapsulate best practices such as those for securing the surface area of a SQL instance. As well as importing these policies, you can create new policies and export them to file for later use on other server instances. This enables you to
Importing policies from file
Before the arrival of SQL Server 2008, tools such as Best Practices Analyzer and Baseline Security Analyzer could be used to check a SQL Server instance occasionally. In SQL Server 2008, policy-based management can be used to import predefined policies that encapsulate best practice settings.
Once imported, depending on the evaluation mode, the policies remain in place, actively checking, preventing, and/or logging violations. This provides a more active approach than is possible with Best Practices Analyzer, and it can be customized.
It is easy to import an existing policy using SQL Server Management Studio . You should right-click the Policies menu under Policy Management, choose ‘Import Policy’, and specify the location of the policy definition file. SQL Server 2008 ships with a number of predefined policies that can be imported. These policies are located in C:\Program Files\Microsoft SQL Server\100\Tools\Policies.
In this directory, or the equivalent installation directory, there are three subdirectories containing polices for the Database Engine, together with Reporting Services and Analysis Services. The policies for Reporting and Analysis Services are limited to surface area configuration checks, and the Database Engine directory contains approximately 50 policies covering a wide variety of best practices. Here are some examples of best practices that can be monitored by these policies:
- Backup files must be on separate devices from the database files.
- Data and log files should be on separate drives.
- The default trace should be enabled.
- Max Degree of Parallelism should be less than 8.
- No unexpected system failures should be detected.
- Backups should be performed frequently.
- No I/O delay messages should be detected.
One of the nice things about the supplied policies is that some of them can be used with previous versions of SQL Server. For example, the File Growth for SQL Server 2000 policy can be used to check for the existence of SQL Server 2000 databases larger than 1GB whose AutoGrowth property is set to a percentage-based value rather than fixed size.
Although policies can be defined and executed against versions of SQL Server prior to 2008, there are some restrictions, and we’ll cover these, and some workarounds, later in this article.
In the example shown in figure 5, we’ll import the supplied Surface Area Configuration for Database Engine 2008 Features. Once the file is selected, the only other option we need to specify is ‘Policy State’. By default, the ‘policy state’ is preserved on import: it will be enabled on import if the policy is enabled in the definition file. Alternatively, we can explicitly enable or disable the policy as part of the import process.
Figure 5: You can import existing policies to check SQL instances for compliance based on predefined configuration files.
Now that we’ve imported a policy, let’s look at the process of evaluating it.
Evaluating policies
There are a number of ways in which checks and violations can be defined and managed at an individual policy level.
I’ve already described the four evaluation modes: ‘On Change – Prevent’, ‘On Change – Log Only’, ‘On Schedule’, and ‘On Demand’. Let’s take a look at an example of each of these methods, starting with ‘On Demand’.
ON DEMAND
When you create a policy using the ‘On Demand’ evaluation mode, the policy is created in a disabled state. You can then use it in an ad hoc manner as required by right-clicking the policy and choosing ‘Evaluate’. Let’s do this for the ‘Surface Area Configuration’ policy we imported earlier. Figure 6 shows the evaluation results of this policy. In this example, the evaluation failed because the target server has Database Mail enabled.
In addition to clicking ‘View’ to see the details of the evaluation, you can click ‘Apply’, which will reconfigure the server to comply with the policy.
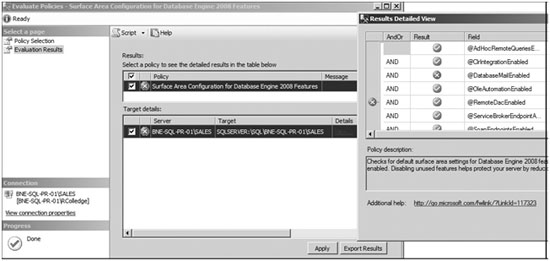
Figure 6: You can manually evaluate a policy by right-clicking it and choosing Evaluate.
ON CHANGE – PREVENT
You may wish to enforce certain policies so that violations are prevented from occurring. Unfortunately, this is only possible for a certain class of conditions, specifically those able to be rolled back with DDL triggers.
As an example, figure 7 contains the error message returned when a table create statement violates a table name condition specifying that tables must be created with a tbl_ prefix.
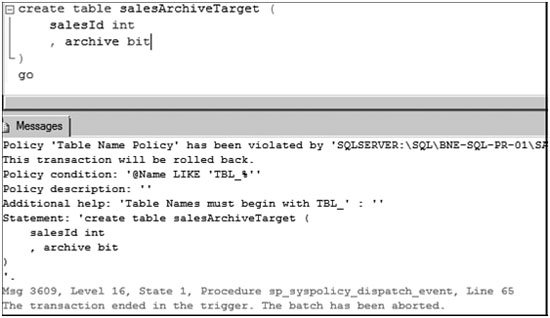
Figure 7 The On Change – Prevent evaluation mode will actively prevent changes that violate policy conditions.
ON CHANGE – LOG ONLY
Like ‘On Change – Prevent’, ‘On Change – Log Only’ actively monitors for policy violations, but rather than roll back the violation, it logs the violation to the SQL Server log. Regardless of the evaluation mode, all policy failures are logged, allowing you to set up custom ‘policy failure’ alerts. Figure 8 shows such a policy failure error in the SQL Server log.
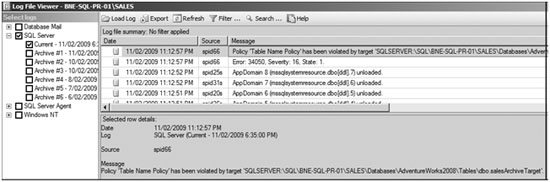
Figure 8 All policy violations are recorded in the SQL Server log.
ON SCHEDULE
The ‘On Schedule’ evaluation mode lets you enable policies to be checked on a scheduled basis. This mode ensures that the overhead of active policy checking doesn’t impact performance. When you choose this mode, the policy creator selects a schedule, which creates SQL Agent jobs to run the scheduled policy checks.
Now that we’ve looked at the process of importing policies and covered the evaluation modes, let’s walk through the process of creating a new policy to check database properties such as AutoClose and AutoShrink.
Creating a database properties policy
The first step in creating a new policy is to right-click ‘Policies’, under ‘Policy Management’, and choose ‘New Policy’. You then enter a policy name and either choose an existing condition or create a new condition.
In the example shown in figure 9, we’ll create a policy called ‘Database Properties Policy’ and create a new condition. We’ll use the Database facet and specify that both ‘AutoClose’ and ‘AutoShrink’ should be set to false.
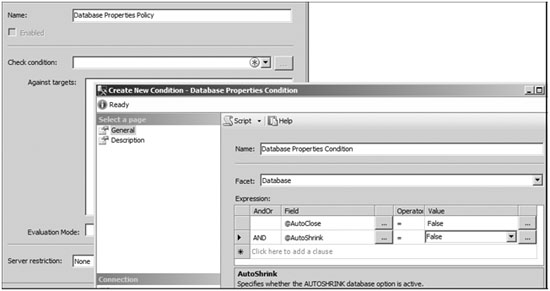
Figure 9: After selecting a condition’s facet, we build the expression.
After clicking ‘OK’, we’re returned to the policy definition screen shown in figure 9. Here we select ‘Every Database’ for the condition’s target. For the evaluation mode, we’ll choose ‘On Schedule’ and create a new schedule for Nightly 11PM.
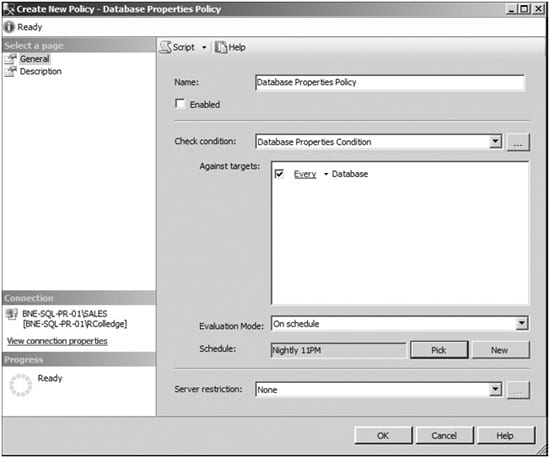
Figure 10: When you’re creating a policy, after choosing a condition, you select the condition target and evaluation mode.
At this point, the policy is created and will run according to the defined schedule. One of the really useful features of the new SQL Server Management Studio is that it’s aware of policy failures. As shown in figure 11, any server and/or database that has failed a policy will be marked with a red cross icon. In this example, the AdventureWorks2008 database is set to ‘AutoShrink’ and ‘AutoClose’, contrary to the policy we just created.
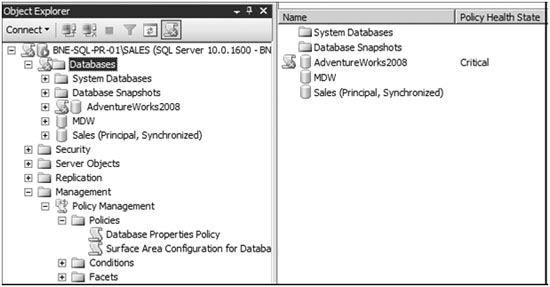
Figure 11: SQL Server Management Studio includes visual aids to make policy violations stand out. In this case, the AdventureWorks2008 database has failed a policy.
To correct the policy failure, rather than manually setting these two database properties we can simply right-click the database and choose ‘Polices’ > ‘Evaluate’ to view the policy failure, and then click ‘Apply’ to force the server’s properties to comply with the policy conditions.
Once created, policies can be easily exported, and doing so enables a number of important management functions.
Exporting policies
Policies can be exported in one of two ways. First, you can simply right-click an existing policy and choose ‘Export Policy’. The resulting dialog box allows you to select a location in which to save the XML-based policy file.
The other method is based on an instance facet. By right-clicking on a registered SQL Server instance, you can choose ‘Facets’. The ‘View Facets’ window allows you to view the instance properties on a facet-by-facet basis, but more important, you can choose the option ‘Export Current State as Policy’.
Figure 12 shows the Server Performance facet of the BNE-SQL-PR-01\SALES instance. By clicking the ‘Export Current State as Policy’ button, we’re able to create a new policy file based on the Server Performance properties of this server.

Figure 12 The Export Current State as Policy button allows us to create a policy file based on an instance’s facet configuration.
This function is important, because we’re able to configure a single server to be exactly how we want all servers to be configured, and then create policies based on the individual facets. Doing so makes the configuration of multiple servers very simple, a process we’ll cover next.
Enterprise policy management
In opening this article, we discussed the challenges faced by a DBA in maintaining consistent best practice configuration across many SQL Server instances. We’ve looked at the new policy-based management feature and how it can be used to create, import, and evaluate policies.
Although the new feature is unquestionably useful, there still remains a significant challenge in being able to deal with instances running into the hundreds or thousands, particularly when the instances are spread across a number of categories such as production, test, and development, each of which may have individual configuration requirements.
What’s really needed is a way of defining a template server for each environment, and then applying the configuration of that server to all other servers in that category so as to make all those production servers just like this one. Using policy-based management in conjunction with Central Management Servers allows us to do exactly that.
Before we look at combining these two features, let’s start with a look at Central Management Servers.
Central Management Servers
In SQL Server 2005 we could use the ‘registered servers’ feature to register and group frequently co-managed servers. For example, we could create a production group, containing several production servers, and a test group containing many test servers. By exporting the registration information to a file, DBAs could import it and quickly see the same groups and servers in their copy of SQL Server Management Studio.
In SQL Server 2008, this facility still exists, and it’s referred to as ‘local server groups’. In addition to this feature, we now have ‘Central Management Servers’. Unlike local server groups, Central Management Servers store the group and server registration details within the server itself, thereby avoiding the import/export process. This way, DBAs can simply register an existing central management server and automatically see its groups and registered servers.
Unlike local server groups, Central Management Servers only support the registration of servers using Windows authentication mode. As such, even though multiple DBAs can register the central management server, they’ll only have access to the registered servers if permitted via Windows authentication. This makes it harder to administer servers outside the domain.
Along with the ability to share a central repository of registration information, configuration servers allow two additional features: You can run a query against several servers simultaneously, and evaluate a policy against several servers.
In the example in figure13, BNE-SQL-PR-01\CONFIG has been registered as a central management server with a production servers group containing the BNE-SQL-PR-01\Marketing and BNE-SQL-PR-01\Sales instances. By clicking Production Servers and then New Query, we can execute a query against all servers in the group. The result set includes an extra column to enable us to distinguish results from the different servers.
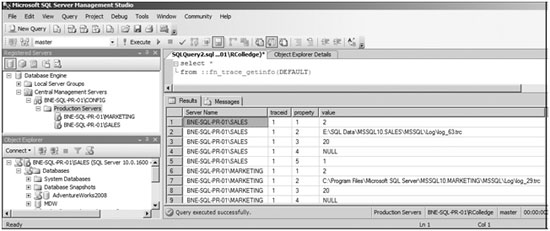
Figure 13 You can run multiserver queries against central management server groups. The result set includes an extra column for the server name.
One of the things to note about figure 13 is the red/pink status bar at the bottom of the screen denoting that this is a multiserver query. Production Servers is included in the status bar to help us easily determine which group of servers the query was executed against. In fact, when registering a server (including through the Central Management Servers feature) we can use the ‘Connection Properties’ page to associate a custom color with the registration. That way, all subsequent queries against the registered server will display this color in the status bar. Such a feature comes in handy for those who accidentally run queries in the wrong environment!
Central Management Servers are great for the central management of policies.
Policy-based management with Central Management Servers
Earlier in this article, we covered the process of importing and evaluating a policy against a single server. Using Central Management Servers, we’re able to do that against all of the registered servers in one action. Further, each server that fails the policy validation can then be configured at the click of a button.
To demonstrate, let’s use the central management server from figure 13. Under the Production Servers group, we have two registered servers. In reality, we’d obviously have more servers and more groups. Let’s right-click on the ‘Production Servers’ group and select ‘Evaluate Policies’. In the window that opens (shown in figure 14), we can select the location of a policy file. This can be either one of the predefined policies or one that we’ve exported from an existing instance. Let’s select the predefined Surface Area Configuration policy.
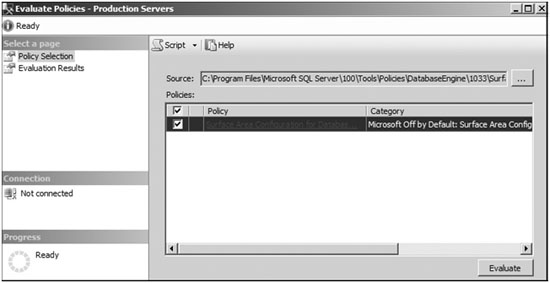
Figure 14 After right-clicking a central management server group and choosing Evaluate Policies, we can choose the policy source and click Evaluate.
By clicking ‘Evaluate’, we’re evaluating the policy across all of the servers in the configuration group. In our example, as shown in figure 15, one of the servers passed validation and one failed. The great thing about evaluating policies in this manner is that you can reconfigure servers that fail validation by simply selecting the check box next to that server name and clicking ‘Apply’.
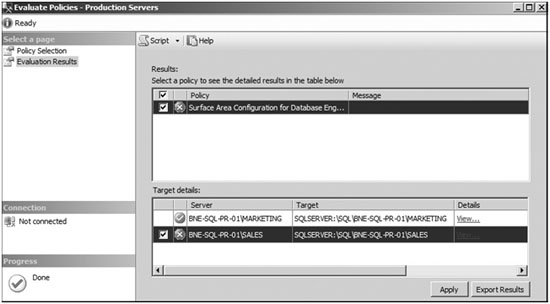
Figure 15 Evaluating a policy against a central management server group lets you evaluate and reconfigure groups of servers in a single step.
By grouping the servers with Central Management Servers, you can validate policies across groups of servers, and you can easily reconfigure those that fail validation by clicking the Apply button. If you were to be assigned to a poorly-managed shop and were presented with the task of assessing a large number of servers for best practice, then this would be the way to get things into better shape.
Once they’re configured, you can import policies into each of the servers with a scheduled evaluation mode to ensure their ongoing compliance. To make this even easier, import the policies against a central management server group, which will perform the import against each of the servers in the group.
Documentation
At best, the process of documenting server configuration produces an historical snapshot of how a server looked at a given moment. At worst, it’s a monumental waste of time, particularly if the configuration changes in an uncontrolled manner. In contrast, policy-based management provides a much more efficient “living” document of server configuration. Better still, its ‘Apply’ function enables simple reconfiguration should the server deviate from the desired state.
Let’s wrap up this article with a brief look at some advanced policy-based management techniques.
Advanced policy-based management
The policies we’ve looked at so far have all been based on static server properties, such as checking the value of various surface area configuration properties to determine whether xp_cmdshell is enabled. In this section, we’ll look at ways of enabling more advanced, or dynamic, policy checks. We’ll also cover the benefits of combining policy-based management with PowerShell.
ExecuteWql() and ExecuteSql()
Earlier in the article, we covered some of the policies included with SQL Server 2008 that can be imported for evaluation. One of these policies is used to detect the presence of I/O delay messages in the Windows Event Log. Clearly, this is a very different type of policy from those we’ve covered so far.
Let’s import the policy file “Windows Event Log I_O Delay Warning.xml” and have a look at its condition. As shown in figure 16, we can see that rather than use one of the familiar condition fields such as @AutoClose, it uses what appears to be a function call.
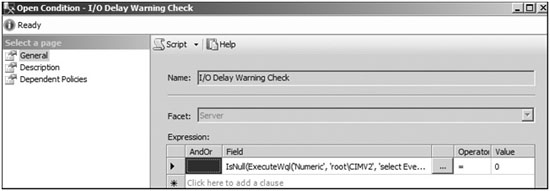
Figure 16 The condition definition of the Windows Event Log I/O Delay Warning Check policy uses the ExecuteWql function.
By clicking the ellipsis button next to the field, we enter the Advanced Edit mode, as shown in figure 8.18. Here, we can see that this policy uses the ExecuteWql() function to query the Windows Event Log for a particular error event code.
The ExecuteWql() function permits you to use Windows Management Instrumentation (WMI), specifically the WMI Query Language (WQL), to query the operating system for information. The usage shown here is one example of a nearly limitless number of possible uses.
Note in figure 17 the other functions available. Directly above ExecuteWql() is ExecuteSql(), which you can use to run a traditional T-SQL query. In a similar manner to ExecuteWql(), this function can run any T-SQL code, and can therefore be used to create advanced policies.
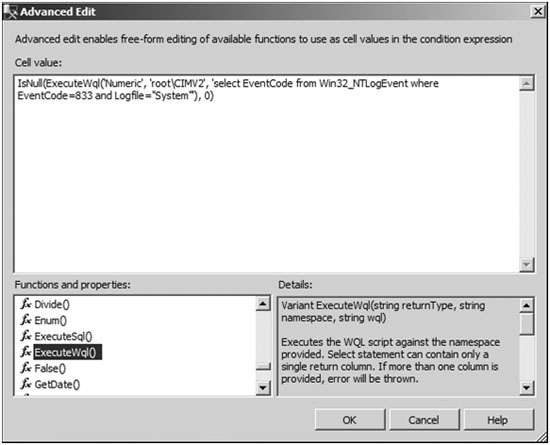
Figure 17 The Advanced Edit mode lets you use functions such as ExecuteWql() and ExecuteSql() to create advanced policies.
When using the ExecuteSql() function, you must keep in mind a few things. First, the value returned needs to be something that can be evaluated in the condition editor. For example, you can use a case statement to return a single numeric value and compare that to an expected value in the condition editor.
Second, given the fact that ExecuteSql() accepts and runs any SQL (including delete statements), take into account the security implications. One of the new fixed database roles in the MSDB database is called PolicyAdministratorRole. Members of this role are able to execute policy checks. To prevent such users from executing ExecuteSql()-based policies that elevate their privileges, the ##MS_PolicyTsqlExecutionLogin## SQL Server login is used as a proxy account for the execution of this function. As such, not only does this login have to be enabled, the appropriate permissions need to granted on the objects referenced in the ExecuteSql() function.
Despite the wide range of facets and included policies, certain aspects of SQL Server instances and databases can’t be checked in SQL Server 2008. An example is checking that all tables use data compression . Data compression is a partition property, and there’s no facet for partitions in SQL Server 2008. As such, you could use the ExecuteSql() function to query for the existence of any tables that aren’t compressed, using a function like this:
|
1 2 |
Executesql('Numeric', 'select count(*) from sys.partitions p where p.data_compression=0') |
If the results of this query return a nonzero value, that means tables are present that aren’t compressed. You’d use such a function in a condition like the one shown in figure 18.
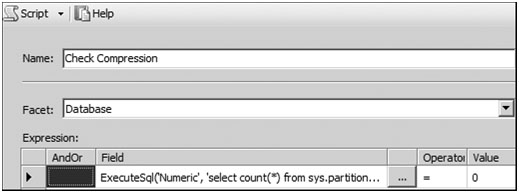
Figure 18 Use a custom expression to check for the existence of uncompressed tables.
Both the ExecuteSql() and ExecuteWql() functions, fully documented in SQL Server BOL, enable you to create policies with almost limitless flexibility, and could potentially be used to check policy compliance of items completely unrelated to SQL Server.
In closing the article, let’s examine how SQL Server’s support of PowerShell can be used to overcome some of the limitations with using policy-based management against earlier versions of SQL Server.
PowerShell
Windows PowerShell is a command line-based scripting language used to perform administrative tasks using cmdlets. It was released in 2006 and included in Windows Server 2008. SQL Server 2008 is PowerShell aware and exposes its management interface via its own cmdlets.
Earlier in the article, we briefly covered the ability to evaluate policies against earlier versions of SQL Server. For example, by registering a SQL Server 2005 instance with the 2008 Management Studio tool, you can right-click 2005 objects and manually evaluate policies. What you can’t do, without using PowerShell, is store policies within a 2005 instance for scheduled evaluation as you can with a 2008 instance.
Enter PowerShell. Using the Invoke-PolicyEvaluation cmdlet, you can evaluate policies against SQL Server instances (2000, 2005, or 2008) as a PowerShell script. SQL Server 2008 also includes the ability to run PowerShell-based SQL Agent job steps, so the combination of these two features enables you to schedule policy evaluation against a variety of SQL Server versions.
Right-click a SQL Server 2008 instance in Management Studio and click Start PowerShell, to open a PowerShell interface from which you can (among other things) evaluate a policy. In the example shown in figure 19, after using the sl command to change directory to the location containing the policy files, we’ve used the Invoke-PolicyEvaluation cmdlet to evaluate a policy against a SQL Server 2005 instance using the PowerShell interface.
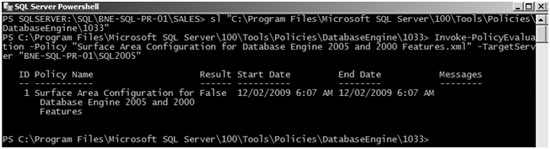
Figure 19: Using the Invoke-PolicyEvaluation cmdlet to evaluate a policy using the PowerShell interface
As you can see in the Result column, the server failed evaluation. One of the nice things about the Invoke-PolicyEvaluation cmdlet is the variety of parameters it takes, a few of which are as follows:
- The -Policy option is used to specify the required policy to execute. An alternate use of this option is to supply a comma-separated list of policies, allowing multiple policies to be executed as part of the one command.
- The gci option allows Invoke-PolicyEvaluation to receive input from a pipe. For example, gci | Invoke-PolicyEvaluation -TargetServer “BNE-SQL-PR-01\SQL2005” will evaluate every policy in the current directory against the specified server.
- -OutputXml allows you to direct the output of the evaluation to a file for later inspection. This option is particularly useful when running scheduled evaluations.
- -AdHocPolicyExecutionMode “Configure” implements the policy conditions. Should the evaluation fail, the server will be reconfigured according to the policy.
So in order to schedule policy checks against earlier SQL Server versions, we can take our policy script and create a PowerShell-based SQL Server Agent job step, as shown in figure 20. Note that we formatted the script for visibility by adding extra line breaks.
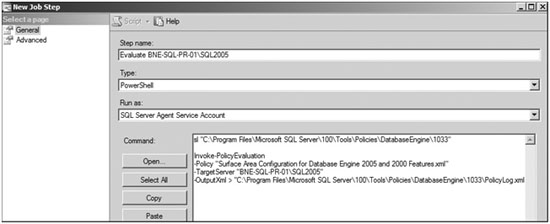
Figure 20: Creating a SQL Agent Job step to execute a PowerShell script enables the scheduled evaluation of policies against a SQL Server 2000/2005 instance.
We can optionally enhance the job step using the additional parameters described earlier to reconfigure the server in case it fails evaluation and/or to evaluate multiple policies at once.
In summary, the combination of policy-based management, Central Management Servers, and PowerShell cmdlets enables a whole new level of powerful management possibilities for the enterprise DBA.
Best practice considerations: policy-based management
As an enterprise DBA who struggles with best practice implementation on a daily basis, I’m excited about the potential of policy-based management:
- Policies (and their evaluation history) are stored in the MSDB database. You should back up this database on a regular basis, or at least each time a policy definition changes.
- Implement proactive DBA checks as automated policies where possible. As well as saving time that can be spent on other tasks such as performance baselining, creating policies enables you to configure new servers faster and more reliably than with manual methods.
- Create Central Management Servers to maximize the power of policy-based management. Where classes of servers exist, such as production, test, and development use individual central management server groups to check groups of servers in a single action.
- If using the On Change – Prevent mode, ensure the policies are tested in a load-testing environment for their potential performance impact. If a measurable impact is detected, implement policies as On Schedule.
- Consider creating alerts for policy violations. All policy failures are logged to the SQL Server error log with an error code of 34050 through 34053.
- If you use the ExecuteSQL() function to create custom policy conditions, ensure the permissions of the ##MS_PolicyTsqlExecutionLogin## account are set to the minimum required, particularly if you’re using the MSDB PolicyAdministratorRole.
Additional information on the best practices covered in this article can be found online at http://www.sqlCrunch.com/policy.
This is an excerpt from Chapter 8 of SQL Server Administration in Action by Simple-Talk author Rod Colledge. Reprinted with the express approval of Manning Publications.
Manning Publications is extending a 35% discount on SQL Server Administration in Action to our community. Please use promo code: “sqladmin35” when purchasing Rod’s book at Manning.com.

Load comments