Overview
PostgreSQL is a free and general purpose open source object-relational database system that uses and extends the SQL language while Hibernate is probably the most popular ORM tool. If you are not familiar with PostgreSQL then I suggest you to go through this link below before going ahead in this article.
This article is a step to step tutorial of how to setup and use Hibernate with PostgreSQL. Over the course of the article we will cover the following topics:
- Assumptions
- Software Setup
- Introduction to Hibernate
- Understanding of Hibernate Configuration File and Integration with PostgreSQL
- Project Setup
- Database CRUD Operations in Java
- Execution and Verification of data at PostgreSQL
Assumptions
This article assumes that the reader has basic knowledge of Java and RDBMS. The example has been tested to run with the following software setup:
- Java 1.8
- PostgreSQL 10
- Psql Terminal
- Eclipse IDE - Version: 2021-03 (4.19.0)
Note - Any other Java version or IDE, like Netbeans or JDeveloper, can also used for development purpose keeping in mind the jar files version may differ. PGAdmin can also be used to execute the queries and verify data.
The software setup requires PostgreSQL and an IDE for Java. Instructions for each are listed below:
- PostgreSQL - The following tutorial covers the installation of PostgreSQL on Windows: https://www.sqlservercentral.com/articles/installing-postgresql-11-on-windows-step-by-step-instruction. The following tutorial covers the installation of PostgreSQL on Linux: https://www.sqlservercentral.com/articles/postgresql-jdbc-tutorial-on-linux.
- Eclipse is world's most popularly used IDE for Java programming language. It is free and open source and can be downloaded from here: https://www.eclipse.org/downloads/
Introduction to Hibernate
Hibernate is a open source, lightweight, ORM tool specifically designed for Java to interact with the database. Hibernate is preferred over JDBC and widely used in the industry because it has several advantages over it. Let us see a few:
- Open source and lightweight
- Fast performance
- Database independent Query
- Automatic Table creation
Hibernate simplifies mapping of Java classes to database tables by the use of xml configuration.
Understanding of Hibernate Configuration Files and Integration with PostgreSQL
The hibernate.cfg.xml file states the set of properties required by Hibernate to connect to the database. It acts like a connecting bridge between the programming layer and database layer. Is is not always mandatory to use a xml file to handle the configuration. Instead, a property file can also be used to serve the purpose.
A few important parts of the file below:
- The Connection settings section mentions the Driver class needed to connect to PostgreSQL database, the server url, server username and password.
- "hibernate.dialect" denotes the kind of database used in Hibernate. Hibernate is a database agnostic language and generates appropriate type of SQL statements. In this example we use the PostgreSQL specific dialect that is "org.hibernate.dialect.PostgreSQLDialect".
- "hibernate.hbm2ddl.auto" is a configuration property which supports the Hibernate database schema generation process and it allows values such as validate | update | create | create-drop
hibernate.cfg.xml
<?xml version="1.0" encoding="UTF-8"?>
<!DOCTYPE hibernate-configuration PUBLIC
        "-//Hibernate/Hibernate Configuration DTD 3.0//EN"
        "http://www.hibernate.org/dtd/hibernate-configuration-3.0.dtd">

<hibernate-configuration>
    <session-factory>

        <!-- Connection settings -->
        <property name="hibernate.connection.driver_class">org.postgresql.Driver</property>
        <property name="hibernate.connection.url">jdbc:postgresql://localhost:5432/student</property>
        <property name="hibernate.connection.username">postgres</property>
        <property name="hibernate.connection.password">postgres</property>

        <!-- SQL dialect -->
        <property name="hibernate.dialect">org.hibernate.dialect.PostgreSQLDialect</property>

        <!-- Print executed SQL to stdout -->
        <property name="show_sql">true</property>

        <!-- Update database on startup -->
        <property name="hibernate.hbm2ddl.auto">update</property>

        <!-- Annotated entity classes -->
        <mapping class="tutorial.hibernate.postgresql.Student"/>

    </session-factory>
</hibernate-configuration>
In this example we use 'update' which instructs Hibernate to validate and update the existing schema.
Project Setup
We will use Eclipse to execute the following Java programs. If you are not familiar with Java programming in Eclipse look at this tutorial on creating a java project.
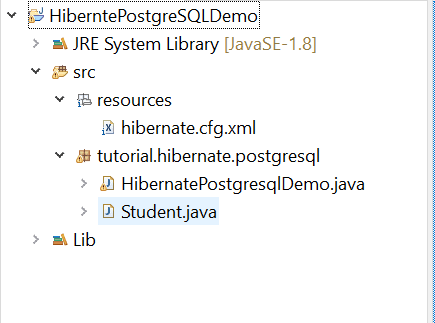
Create a new Java Project in Eclipse. The project structure should be as shown below:
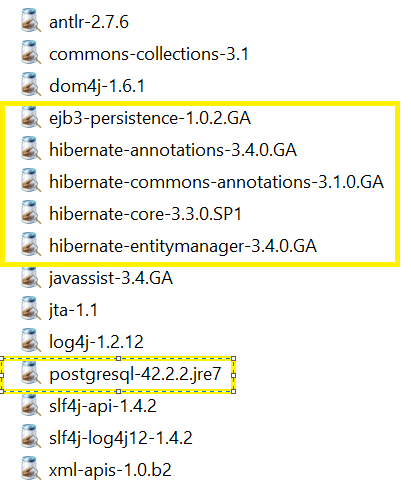
The Lib folder should contain the following Jar files. All files are open source and are readily available over the internet. Jar files highlighted in yellow are Hibernate and PostgreSQL specific required to inject their respective components in development.
Database CRUD Operations in Java
To get started the first thing we need is a Java POJO class. POJO stands for Plain Old Java Object. This class contain all the fields and their respective table mappings which we will use in our CRUD operations going forward . Precisely this class represents a row in the database table.
@Entity represents a table in the database, @Table specifies the table name. If no table name is specified here, the class name would be the default table name. The primary key is specified by the @Id annotation. @Column signifies the name of the column mapped against each variable.
The code is shown here:
Student.java
package tutorial.hibernate.postgresql;

import java.io.Serializable;

import javax.persistence.Column;
import javax.persistence.Entity;
import javax.persistence.GeneratedValue;
import javax.persistence.Id;
import javax.persistence.Table;

import org.hibernate.annotations.GenericGenerator;

@Entity
@Table(name = "STUDENT")
public class Student implements Serializable{

private static final long serialVersionUID = 1L;

@GenericGenerator(name = "generator", strategy = "increment")
@Id
@GeneratedValue(generator = "generator")
@Column(name = "ID")
private Integer id;

@Column(name = "TXT_FIRSTNAME")
private String firstName;

@Column(name = "TXT_LASTNAME")
private String lastName;

@Column(name = "NUM_ROLL")
private Integer roll;

@Column(name = "TXT_STANDARD")
private String standard;

public Integer getId() {
return id;
}

public void setId(Integer id) {
this.id = id;
}

public String getFirstName() {
return firstName;
}

public void setFirstName(String firstName) {
this.firstName = firstName;
}

public String getLastName() {
return lastName;
}

public void setLastName(String lastName) {
this.lastName = lastName;
}

public Integer getRoll() {
return roll;
}

public void setRoll(Integer roll) {
this.roll = roll;
}

public String getStandard() {
return standard;
}

public void setStandard(String standard) {
this.standard = standard;
}

}
Create, Read, Update, Delete Operations
We will first see the program as a whole, followed by explanation of each function. Our first task is to load the hibernate configuration. Next using the SessionFactory, we obtain and open a session. This session is then subsequently passed to all functions of the program.
package tutorial.hibernate.postgresql;

import java.io.File;
import java.util.List;

import org.hibernate.Query;
import org.hibernate.Session;
import org.hibernate.SessionFactory;
import org.hibernate.cfg.AnnotationConfiguration;

public class HibernatePostgresqlDemo {

public static void main(String[] args) {

String confFile = "resources/hibernate.cfg.xml";
ClassLoader classLoader = HibernatePostgresqlDemo.class.getClassLoader();
File f = new File(classLoader.getResource(confFile).getFile());
SessionFactory sessionFactory = new AnnotationConfiguration().configure(f).buildSessionFactory();
Session session = sessionFactory.openSession();

//CREATE
saveStudentRecord(session);

                //READ
fetchStudentRecord(session);

//UPDATE
updateStudentRecord(session);

//DELETE
deleteStudentRecord(session);

session.close();

}

private static void deleteStudentRecord(Session session) {

int id = 6;
Student student1 = (Student) session.get(Student.class, new Integer(id));
session.beginTransaction();
session.delete(student1);
session.getTransaction().commit();
System.out.println("Record deleted succesfully...");

}

private static void updateStudentRecord(Session session) {
int id = 3;
Student student1 = (Student) session.get(Student.class, new Integer(id));
student1.setRoll(05);
student1.setStandard("B");

session.beginTransaction();
session.saveOrUpdate(student1);
session.getTransaction().commit();

System.out.println("Record updated succesfully...");
}

private static void fetchStudentRecord(Session session) {
Query query = session.createQuery("FROM Student");

List<Student> Students = query.list();

Students.forEach(obj -> System.out.println(obj.getFirstName()));

System.out.println("Reading student records...");
for (Student studentObj : Students) {
System.out.println("First Name" + studentObj.getFirstName());
System.out.println("Last Name" + studentObj.getLastName());
System.out.println("Roll Number" + studentObj.getRoll());
System.out.println("Standard" + studentObj.getStandard());
}
}

private static void saveStudentRecord(Session session) {
Student student1 = new Student();
student1.setFirstName("Jason");
student1.setLastName("Roy");
student1.setRoll(01);
student1.setStandard("A");

session.beginTransaction();
session.save(student1);
session.getTransaction().commit();

System.out.println("Record saved succesfully...");
}

}
Execution and Verification of Data at PostgreSQL
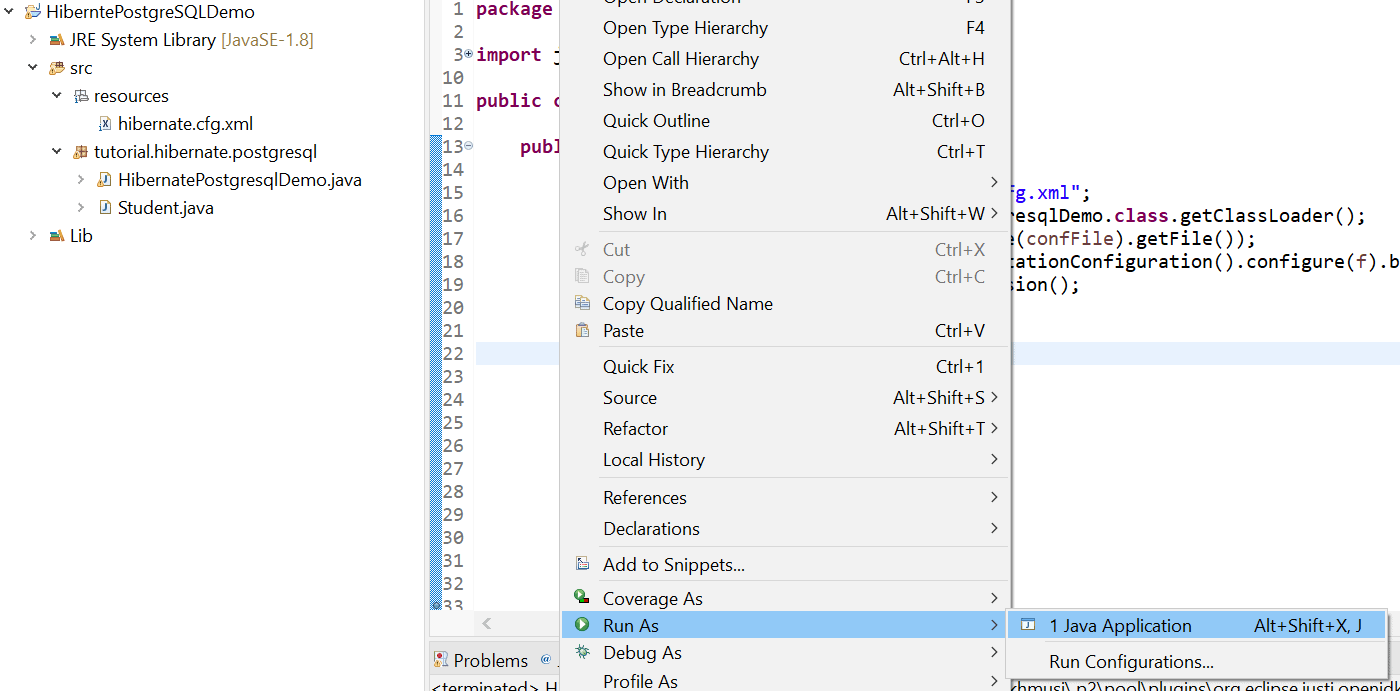
Our code is now ready, we will execute the HibernatePostgresqlDemo class as shown below. Right click on the class file, navigate to Run As->Java Application.
Create
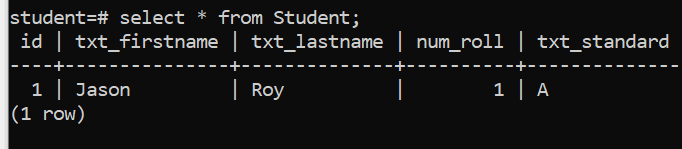
This section explains how we can insert a new row in the table. To add records, we need to create a newStudentinstance, begin a transaction, save the object, and then commit the transaction.
How does this Hibernate save work? Hibernate selects the maximum ID from the Student table before doing the insert. Next it uses this ID to insert the new row. All these queries are triggered internally by Hibernate when its 'Save' function is executed. As mentioned earlier, the queries executed are PostgreSQL specific as determined by the 'hibernate.dialect' property.
Console:

Psql Terminal: 1 row inserted
Update
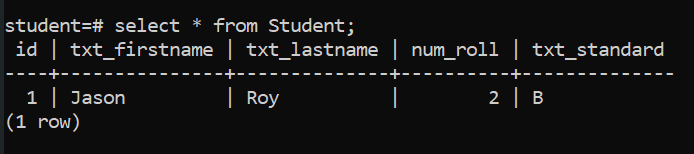
In this section we will see how we can update record(s) of a table. To update, we get the record based on the primary key, set the new values, update the fetched object and finally commit it.
How does the update work? Hibernates fetches the row based on the ID passed in the function 'session.get(Student.class, new Integer(id))'. Next using the 'session.saveOrUpdate(student1)' function, Hibernate updates the fetched row with the new values and commits.
Console:
![]()
Psql Terminal: 1 row updated
Select
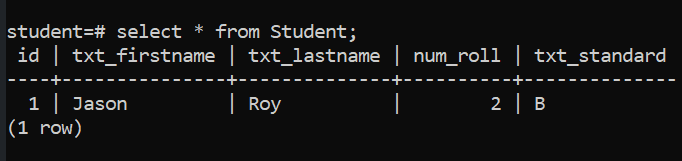
In this section we will see how we can fetch record(s) from table. Fetching records is probably the easiest of all database operations and in Hibernate the complexity is further reduced.
To read records, we create a query and then get a list of the objects from the query. The interesting thing to note here is we pass a hibernate query which gets converted internally to its corresponding PostgreSQL query. This is handled by the 'hibernate.dialect' property as discussed earlier in the article.
To retrieve all data from table the syntax is as simple as "FROM Student" where Student is the POJO class name.
Console:

Psql Terminal:
Delete
This section shows how we can delete row(s) from table using Hibernate. To delete a record, we get the record by specifying the primary key and then invoking a delete transaction.
How does the delete work? Similar to the update section, Hibernates fetches the row based on the ID passed in the function 'session.get(Student.class, new Integer(id))'. Next using the 'session.delete(student1)' function, Hibernate deletes the fetched row and commits.
Console:

Psql Terminal:

Conclusion
This article gives an overview on how to integrate Hibernate with PostgreSQL using xml configuration and there after how we can work with the basic CRUD operations. We hope this article will help you get started on your Hibernate with PostgreSQL journey.