

Use Operations Manager to Monitor Your Instances of MSSQL
Like many shops, the number of servers and applications under our roof has grown over time. As a result we have many rogue installations of MS SQL running on our network. And with our recent switch to Operations Manager (OpsMgr) as our primary monitoring tool, the number of servers running an instance of MS SQL was found to be more than twice the number of instances being managed by our team.
Now, OpsMgr is very effective in identifying these instances, but we wanted OpsMgr to be equally effective in displaying information pertinent to only the subset of servers we administer. The easy answer was to create custom groups, thereby allowing us to create views on these custom groups. But since we wanted to avoid having to explicitly define the servers, we were searching a solution that was dynamic.
Create New Group
In OpsMgr you create a new group from the Authoring tab. The initial screen is as follows:
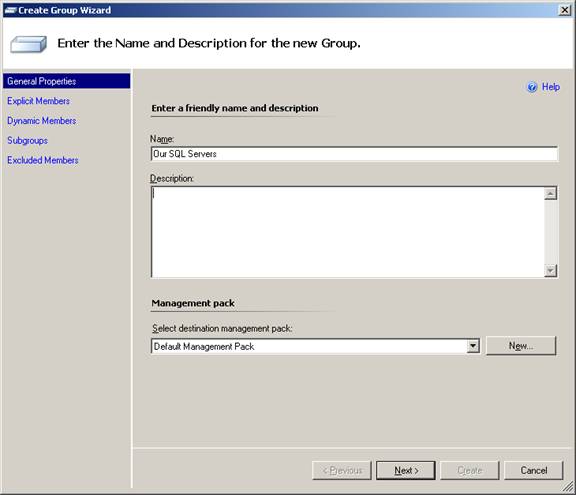
Figure 1
In Figure1, I have named the group ‘Our SQL Servers’. On the left you will see options for Explicit and Dynamic Members. Since we wanted to avoid the explicit listing of servers, we needed to find a way to dynamically populate this group. Doing so required us to find something that the servers we administered had in common that the rogue installations did not.
The answer for our team was to focus on the service accounts being used to run the instances. If the instance was using one of our accounts, then the assumption would be that we must have done the install, and therefore we would want this server to be in our newly defined group in OpsMgr. The next problem we had was to find a way for OpsMgr to recognize the accounts being used to run all instances.
Create a New Attribute
The answer lay in the use of attributes. We decided that we wanted to create three groups in total. One group for our SQL 2000 instances, another for our SQL 2005 instances, and the third group would simply contain the first two. This way if we ever had the need to target a particular version of MS SQL, we would be able to do so easily. So, we needed to create a new attribute for the SQL 2000 DB Engine and SQL 2005 DB Engine targets. This attribute would examine a registry key and return the value.
We got started by creating a new attribute. This is done from the Authoring tab by doing a right-click on ‘Attributes’ (Figure 2)

Figure 2
The initial screen for creating a new attribute is shown in Figure 3 below. Select a name that clearly identifies the attribute and select ‘Next’.
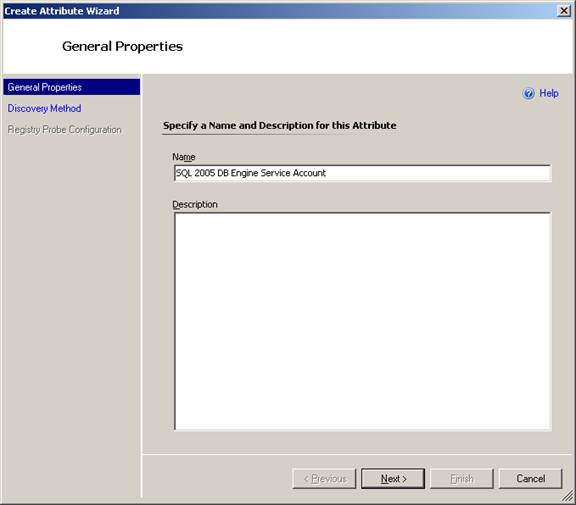
Figure 3
The next screen is for identifying the method that OpsMgr will use to capture, or discover, the attribute (Figure 4). The discovery type we are going to use is ‘Registry’, and we now need to define a target and management pack. Originally I had selected the ‘SQL 2005 DB Engine’ target, but Figure 4 shows that my target was modified, and you can also see the message displayed below that explains why.
The SQL management pack is considered ‘Sealed’. If you navigate to the Administration tab and click on the Management Packs you will see a view of all installed management packs including a column showing if they are sealed. The SQL management packs are sealed, which means you cannot make changes to them. So, when we selected this target and new target was created by default, and this new target will then be associated with the management pack of our choosing. In this case, I have selected the Default Management Pack, but most likely you would want to create yourself a new management pack.
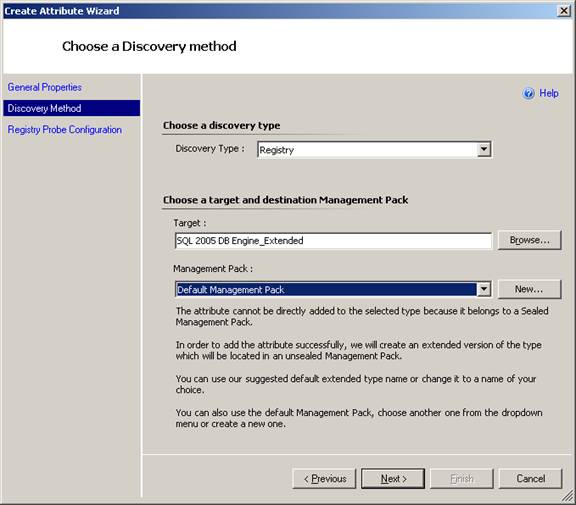
Figure 4
We then click ‘Next’, and are shown the screen in Figure 5.
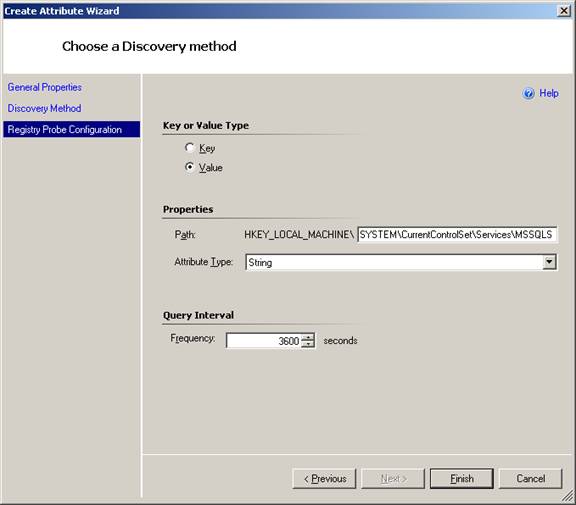
Figure 5
We define the key path here (SYSTEM\CurrentControlSet\Services\MSSQLSERVER\ObjectName), and also define that we want a value, that the Attribute Type is a String, and to check every hour. Now we can use this attribute to dynamically populate the groups we want to create. So, going back to Figure 1, we can continue with the new group creation.
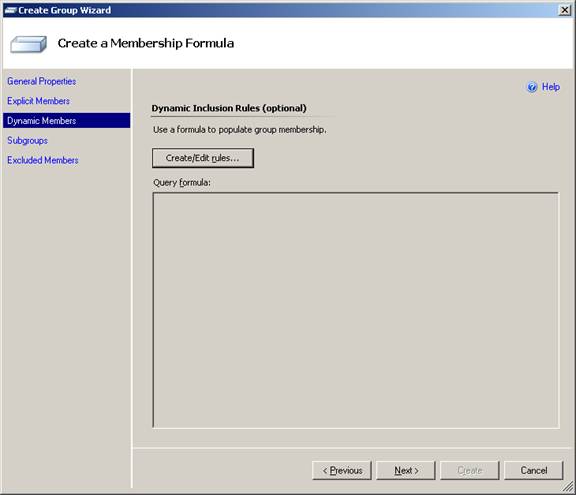
Figure 6
Figure 6 shows the screen used to dynamic include instances inside of the group. Click on ‘Create/Edit rules’ and you will be prompted with the screen in Figure 7.
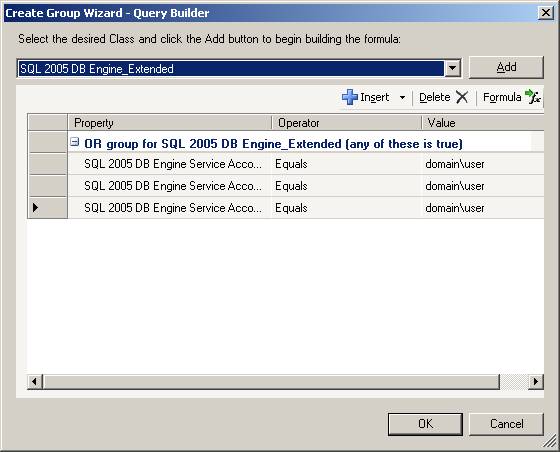
Figure 7
Here you will use the drop down to select the target class created previously (SQL 2005 DB Engine_Extended), then click ‘Add’. You will see that I have inserted three rows as we have three accounts that can be used to run our instances at this time. I have placed a generic domain\user in this example. When complete, click ‘OK’, and then verify the formula that will be displayed. It should be similar to the following:
( Object is SQL 2005 DB Engine_Extended AND ( SQL 2005 DB Engine Service Account Equals domain\user ) OR ( SQL 2005 DB Engine Service Account Equals domain\user) OR ( SQL 2005 DB Engine Service Account Equals domain\user) )
Create a New State View
Then, in the management pack used during the creation of the new attribute, create a new database engine view. You do this by right-clicking on the name of the management pack, select ‘New’, and then ‘State View’. You should see something similar to Figure 8 below.
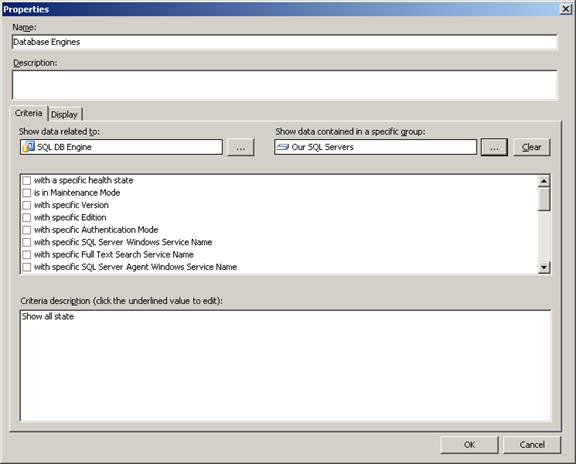
Figure 8
You will want to show data related to the SQL DB Engine, and narrow your focus by navigating to the group you have just created. The end result should be a view of only the database engines that you want to see. This is the view that our team uses every day to make certain our servers are available. With one look we can quickly see what servers need our immediate attention (Figure 9).
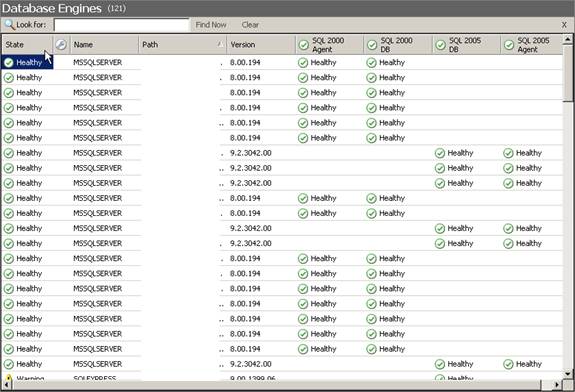
Figure 9
I hope you find this information useful. OpsMgr is a useful tool for any DBA to have, especially in shops that are growing in the number of servers administered. Being able to customize OpsMgr allows for a DBA to narrow their focus on the servers that are the most important. In short, OpsMgr allows for a DBA to use their time efficiently.
