

Introduction
In my last article, Loading data in Azure Synapse Analytics using Azure Data Factory, I discussed the step-by-step process for loading data from an Azure storage account to Azure Synapse SQL through Azure Data Factory (ADF). ADF basics are covered in that article.
In this article I will go through the process for the incremental load of data from an on-premises SQL Server to Azure SQL database. Once the full data set is loaded from a source to a sink, there may be some addition or modification of the source data. In that case, it is not always possible, or recommended, to refresh all data again from source to sink. Incremental load methods help to reflect the changes in the source to the sink every time a data modification is made on the source.
There are different methods for incremental data loading. I will discuss the step-by-step process for incremental loading, or delta loading, of data through a watermark.
Watermark
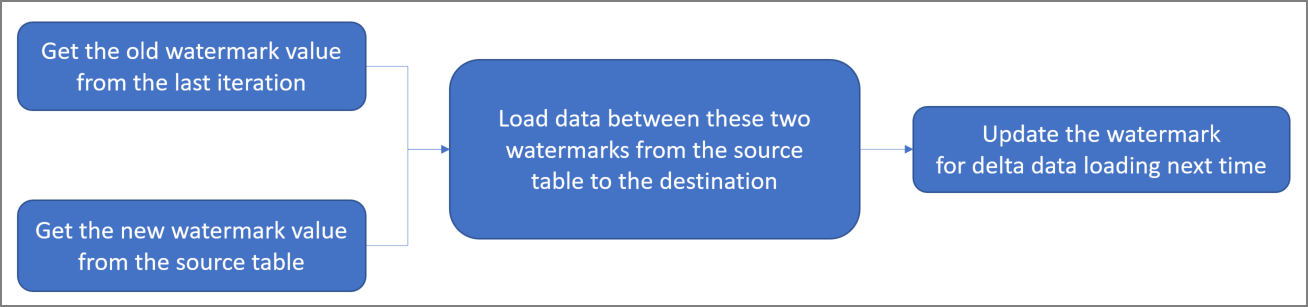
A watermark is a column in the source table that has the last updated time stamp or an incrementing key. After every iteration of data loading, the maximum value of the watermark column for the source data table is recorded. Once the next iteration is started, only the records having the watermark value greater than the last recorded watermark value are fetched from the data source and loaded in the data sink. the latest maximum value of the watermark column is recorded at the end of this iteration.
The workflow for this approach can be depicted with the following diagram (as given in Microsoft documentation):
Here, I discuss the step-by-step implementation process for incremental loading of data.
Step 1: Table creation and data population on premises
In on-premises SQL Server, I create a database first. Then, I create a table named dbo.student. I insert 3 records in the table and check the same. This table data will be copied to the Student table in an Azure SQL database. The updateDate column of the Student table will be used as the watermark column.
CREATE TABLE [dbo].[Student](
[studentId] [int] IDENTITY(1,1) NOT NULL,
[studentName] [varchar](100) NULL,
[stream] [varchar](50) NULL,
[marks] [int] NULL,
[createDate] [datetime2] NULL,
[updateDate] [datetime2] NULL
) ON [PRIMARY]
GO

INSERT INTO dbo.Student (studentName,stream,marks,createDate,updateDate)
VALUES
('xxx', 'CSE',90,GETDATE(), GETDATE()),
('yyy', 'CSE',90,GETDATE(), GETDATE()),
('zzz', 'CSE',90,GETDATE(), GETDATE())

SELECT studentid, studentName,stream,marks,createDate,updateDate
FROM dbo.Student
Step 2: Table creation and data population in Azure
I create an Azure SQL Database through Azure portal. I connect to the database through SSMS. Once connected, I create a table, named Student, which is having the same structure as the Student table created in the on-premise SQL Server. The studentId column in this table is not defined as IDENTITY, as it will be used to store the studentId values from the source table.
I create another table named stgStudent with the same structure of Student. I will use this table as a staging table before loading data into the Student table. I will truncate this table before each load.
I create a table named WaterMark. Watermark values for multiple tables in the source database can be maintained here. For now, I insert one record in this table. I put the tablename column value as 'Student' and waterMarkVal value as an initial default date value '1900-01-01 00:00:00'.
CREATE TABLE [dbo].[stgStudent](
[studentId] [int] NOT NULL,
[studentName] [varchar](100) NULL,
[stream] [varchar](50) NULL,
[marks] [int] NULL,
[createDate] [datetime2] NULL,
[updateDate] [datetime2] NULL
) ON [PRIMARY]
GO

CREATE TABLE [dbo].[Student](
[studentId] [int] NOT NULL,
[studentName] [varchar](100) NULL,
[stream] [varchar](50) NULL,
[marks] [int] NULL,
[createDate] [datetime2] NULL,
[updateDate] [datetime2] NULL
) ON [PRIMARY]
GO

CREATE TABLE [dbo].[WaterMark](
[tableName] [varchar](50) NULL,
[waterMarkVal] [datetime2] NULL
) ON [PRIMARY]
GO

INSERT INTO [dbo].[WaterMark]
([tableName],[waterMarkVal])
VALUES
('Student','1900-01-01 00:00:00')

SELECT tableName,waterMarkVal
FROM [dbo].[WaterMark]
Step 3: Create a Self-Hosted Integration Runtime
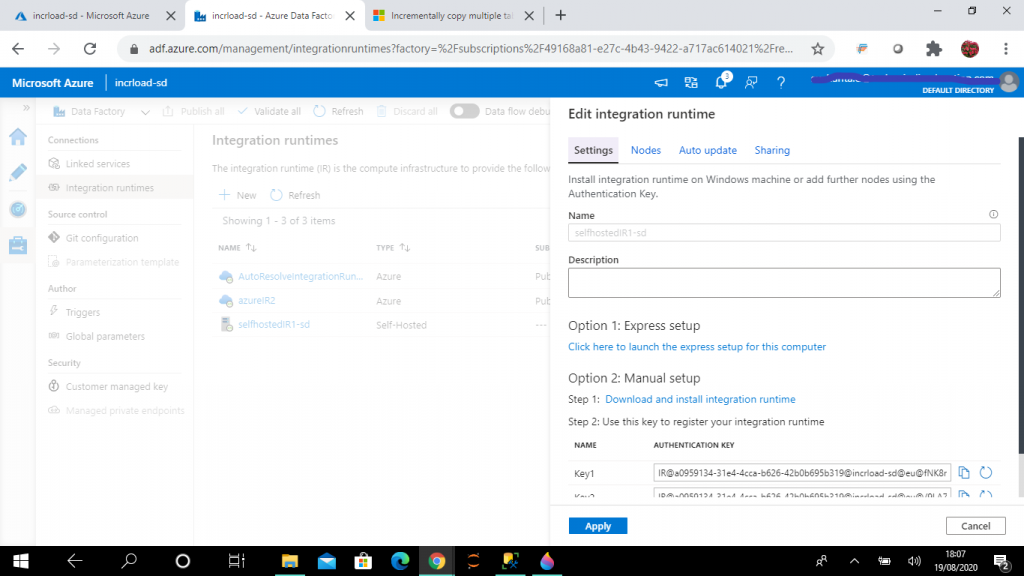
Next, I create an ADF resource from the Azure Portal. I open the ADF resource and go the Manage link of the ADF and create a new self-hosted integration runtime. The Integration Runtime (IR) is the compute infrastructure used by ADF for data flow, data movement and SSIS package execution. A self-hosted IR is required for movement of data from on-premise SQL Server to Azure SQL.
I click the link under Option 1: Express setup and follow the steps to complete the installation of the IR. The name for this runtime is selfhostedR1-sd.
Step 4: Create the Azure Integration Runtime
An Azure Integration Runtime (IR) is required to copy data between cloud data stores. I choose the default options and set up the runtime with the name azureIR2.

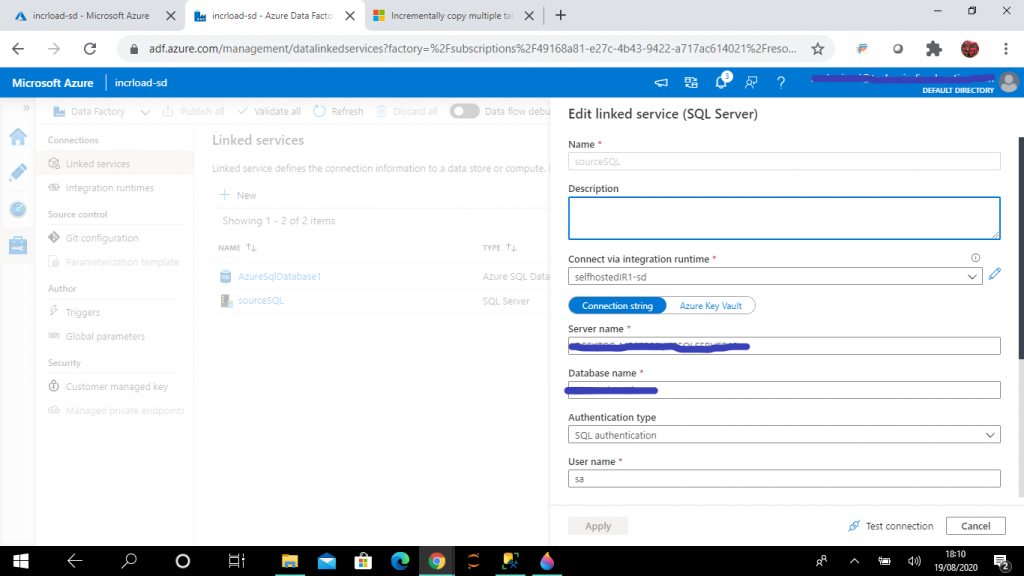
Step 5: Create a Linked Service for SQL Server
The linked service helps to link the source data store to the Data Factory. A Linked Service is similar to a connection string, as it defines the connection information required for the Data Factory to connect to the external data source.
I provide details for the on-premise SQL Server and create the linked service, named sourceSQL. There is an option to connect via Integration runtime. I select the self-hosted IR as created in the previous step.
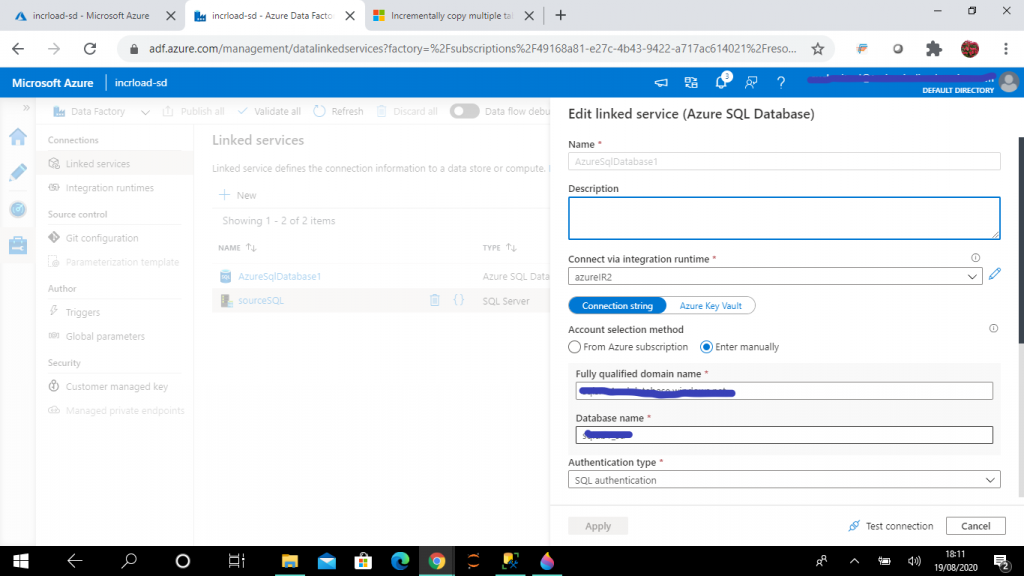
Step 6: Create a Linked Service for Azure SQL
I provide details for the Azure SQL database and create the linked service, named AzureSQLDatabase1. In the connect via Integration runtime option, I select the the Azure IR as created in the previous step.
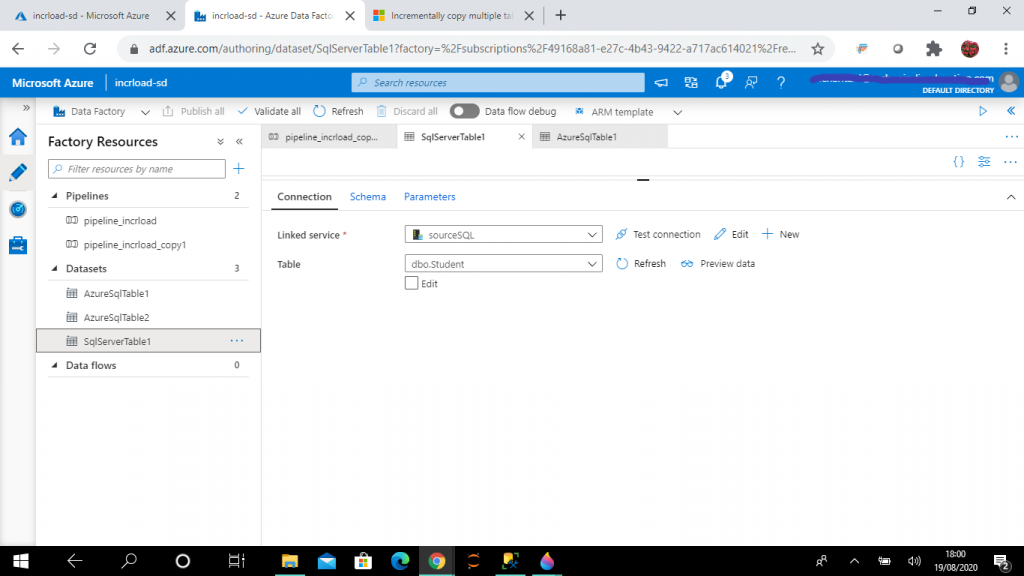
Step 7: Create the Dataset for the SQL Server table
A dataset is a named view of data that simply points or references the data to be used in the ADF activities as inputs and outputs. I create this dataset, named SqlServerTable1, for the table, dbo.Student, in on-premise SQL Server.
Step 8: Create a second Dataset for the Azure table
I create this dataset, named AzureSqlTable1, for the table, dbo.stgStudent, in the Azure SQL database.

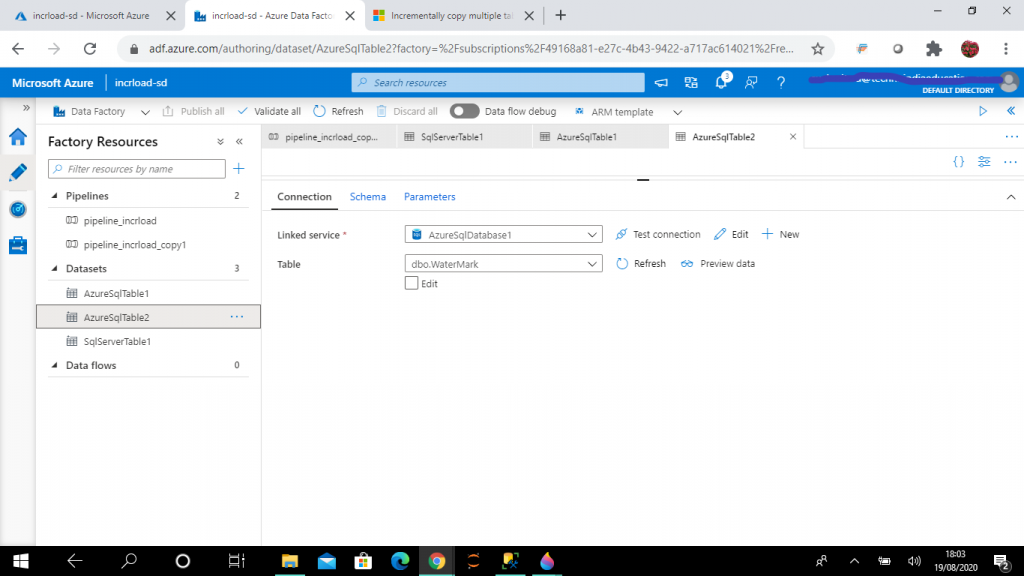
Step 9: Create the Watermark Dataset
I create this dataset, named AzureSqlTable2, for the table, dbo.WaterMark, in the Azure SQL database.
Step 10: Create a Pipeline
I go to the Author tab of the ADF resource and create a new pipeline. I name it pipeline_incrload.
Step 11: Add Parameters
I go to the Parameters tab of the pipeline and add the following parameters and set their default values as detailed below.
- finalTableName (default value: Student)
- srcTableName (default value: Student)
- waterMarkCol (default value: updateDate)
- stgTableName (default value: stgStudent)
- storedProcUpsert (default value: usp_upsert_Student)
- storedProcWaterMark (default value: usp_update_WaterMark)
These parameter values can be modified to load data from different source table to a different sink table.

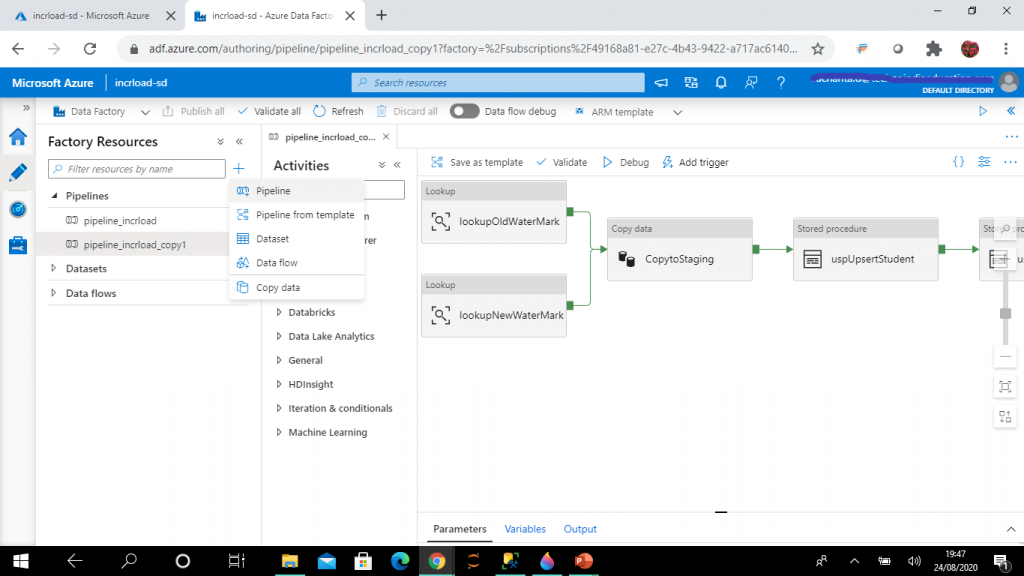
Step 12: Create the Lookup Activity
A Lookup activity reads and returns the content of a configuration file or table. It also returns the result of executing a query or stored procedure. The output from Lookup activity can be used in a subsequent copy or transformation activity if it's a singleton value.
I create the first lookup activity, named lookupOldWaterMark. The source dataset is set to AzureSqlTable2 (pointing to dbo.WaterMark table). I write the following query to retrieve the waterMarkVal column value from the WaterMark table for the value, Student. Here, tablename data is compared with finalTableName parameter of the pipeline. Based, on the value selected for the parameter at runtime, I may retrieve watermark data for different tables.
I click on the First Row Only checkbox, as only one record from the table is required.
SELECT waterMarkVal
FROM [dbo].[WaterMark]
WHERE tableName = '@{pipeline().parameters.finalTableName}'
Step 13: Create a Second Lookup activity
I create the second lookup activity, named lookupNewWaterMark. The source dataset is set to SqlServerTable1, pointing to dbo.Student table in on-premise SQL Server.
I write the following query to retrieve the maximum value of updateDate column value of Student table. I reference the pipeline parameters in the query. I may change the parameter values at runtime to select a different watermark column from a different table.
Here also I click on the First Row Only checkbox, as only one record from the table is required.
SELECT MAX(@{pipeline().parameters.waterMarkCol}) AS NewwaterMarkVal
FROM @{pipeline().parameters.srcTableName}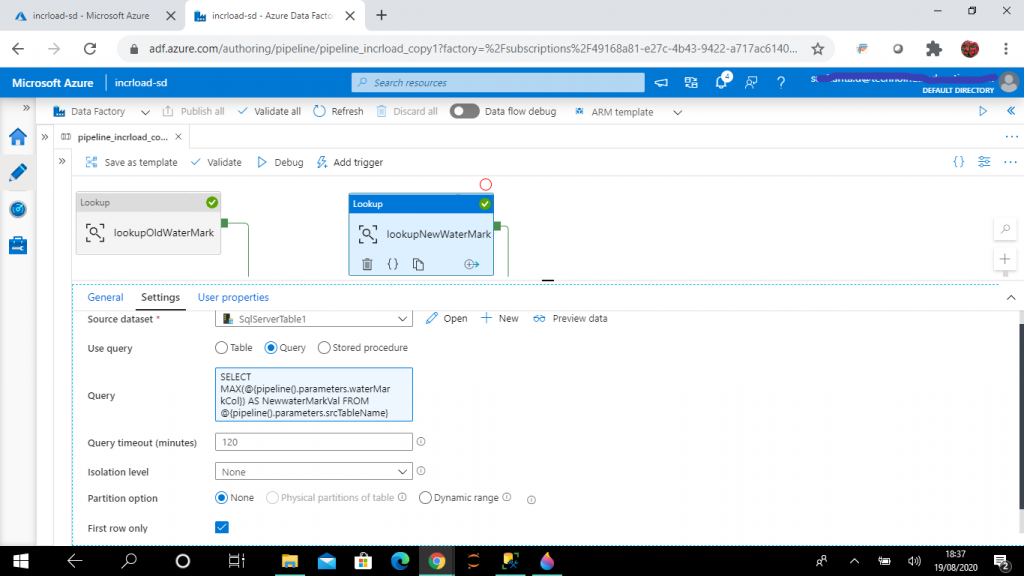
Step 14: Create a Copy data activity
A Copy data activity is used to copy data between data stores located on-premises and in the cloud. I create the Copy data activity, named CopytoStaging, and add the output links from the two lookup activities as input to the Copy data activity.
In the source tab, source dataset is set as SqlServerTable1, pointing to dbo.Student table in on-premise SQL Server. Then, I write the following query to retrieve all the records from SQL Server Student table where the updateDate column value is greater than the updateDate value stored in the WaterMark table, as retrieved from lookupOldWaterMark activity output. I also check that the updateDate column value is less than or equal to the maximum value of updateDate, as retrieved from lookupNewWaterMark activity output.
I have used pipeline parameters for table name and column name values.
--query for source
select * from @{pipeline().parameters.srcTableName}
where @{pipeline().parameters.waterMarkCol} >
'@{activity('lookupOldWaterMark').output.firstRow.waterMarkVal}'
and @{pipeline().parameters.waterMarkCol} <=
'@{activity('lookupNewWaterMark').output.firstRow.NewwaterMarkVal}'
In the sink tab, I select AzureSQLTable1 as the sink dataset. This points to the staging tabke dbo.stgStudent. I write the pre copy script to truncate the staging table stgStudent every time before data loading.
I want to load data from the output of the source query to the stgStudent table.
--pre copy script for sink
TRUNCATE TABLE @{pipeline().parameters.stgTableName}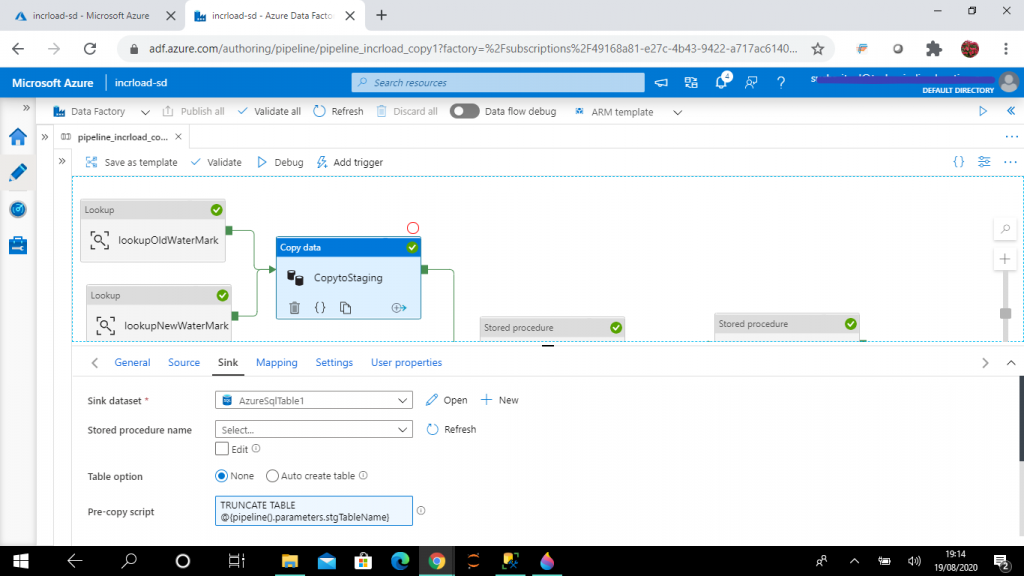
Step 15: Create the Stored Procedure activity
I create a stored procedure activity next to the Copy Data activity. This will be executed after the successful completion of Copy Data activity. I set the linked service to AzureSqlDatabase1 and the stored procedure to usp_upsert_Student.
Here is the code for the stored procedure. The purpose of this stored procedure is to update and insert records in Student table from the staging stgStudent. If the student already exists, it will be updated. New students will be inserted.
CREATE PROCEDURE dbo.usp_upsert_Student
AS
BEGIN
  MERGE dbo.Student AS t
  USING (SELECT studentId,studentName,stream,marks,createDate,updateDate FROM dbo.stgStudent)
  AS s (studentId,studentName,stream,marks,createDate,updateDate)
  ON (t.studentId = s.studentId)
  WHEN MATCHED THEN
      UPDATE SET studentName = s.studentName,
stream = s.stream,
marks = s.marks,
createDate = s.createDate,
updateDate = s.updateDate
  WHEN NOT MATCHED THEN
      INSERT (studentId,studentName,stream,marks,createDate,updateDate)
      VALUES (s.studentId,s.studentName,s.stream,s.marks,s.createDate,s.updateDate);
END
GO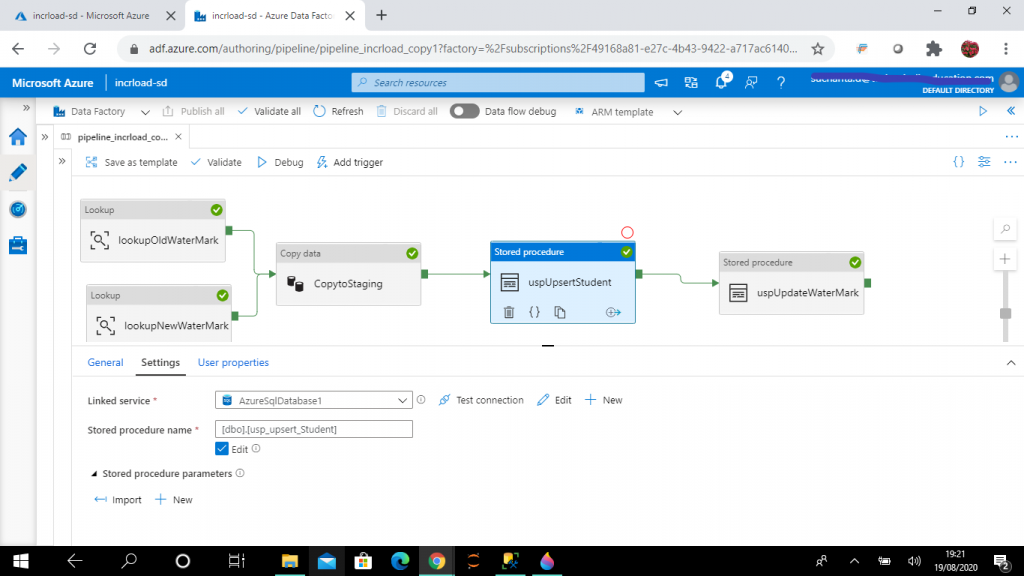
Step 16: Create the Stored Procedure to Update the Watermark
I create the second Stored Procedure activity, named uspUpdateWaterMark. It will be executed after the successful completion of the first Stored Procedure activity named uspUpsertStudent. I set the linked service as AzureSqlDatabase1 and the stored procedure as usp_write_watermark.
The purpose of this stored procedure is to update the watermarkval column of the WaterMark table with the latest value of updateDate column from the Student table after the data is loaded. This procedure takes two parameters: LastModifiedtime and TableName. The values of these parameters are set with the lookupNewWaterMark activity output and pipeline parameters respectively.
The LastModifiedtime value is set as @{activity('lookupNewWaterMark').output.firstRow.NewwaterMarkVal} and TableName value is set as @{pipeline().parameters.finalTableName}.
CREATE PROCEDURE [dbo].[usp_write_watermark] @LastModifiedtime datetime, @TableName varchar(100)
AS
BEGIN
    UPDATE [dbo].[WaterMark]
    SET waterMarkVal = @LastModifiedtime
WHERE tableName = @TableName
END
GO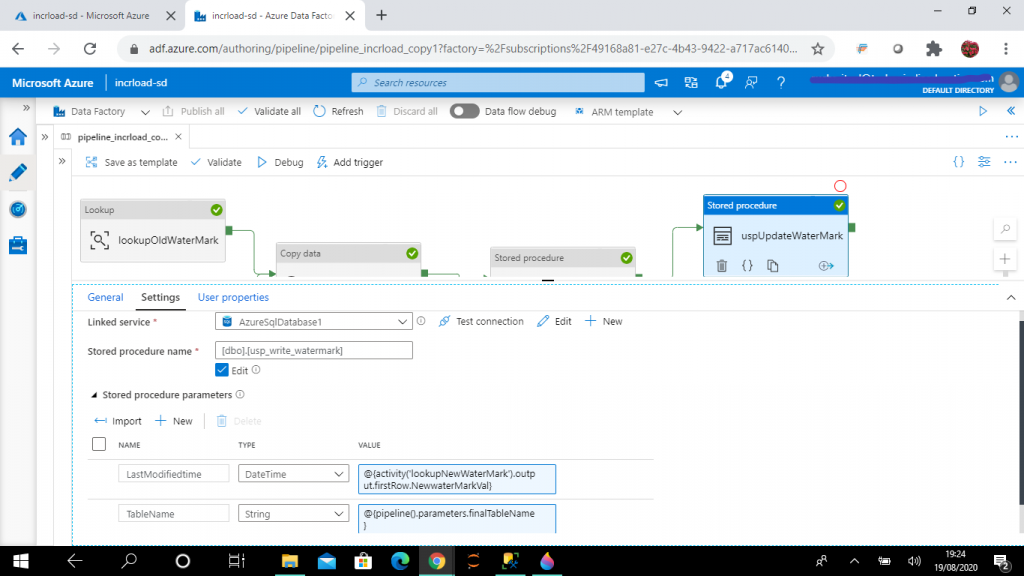
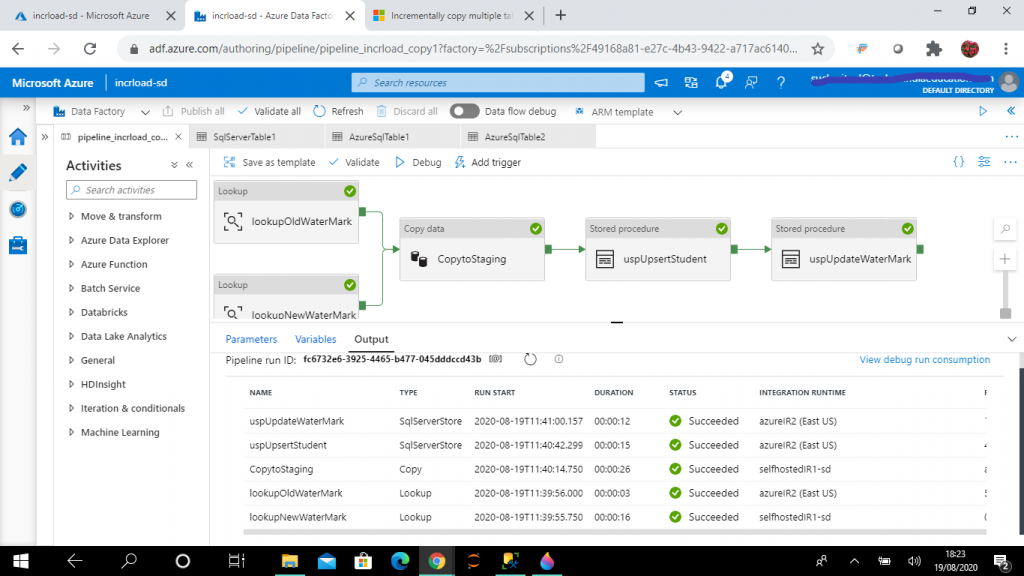
Step 17: Debugging the Pipeline
Once all the five activities are completed, I publish all the changes. Then, I press the Debug button for a test execution of the pipeline. The output tab of the pipeline shows the status of the activities.
I follow the debug progress and see all activities are executed successfully.
Step 18: Check the data in Azure SQL Database
As I select data from the dbo.WaterMark table, I can see the waterMakVal column value has changed, and it is equal to the maximum value of the updateDate column of the dbo.Student table in SQL Server.
As I select data from dbo.Student table, I can see all the records inserted in the dbo.Student table in SQL Server are now available in the Azure SQL Student table.
SELECT tableName,waterMarkVal
FROM dbo.WaterMark

SELECT studentid, studentName,stream,marks,createDate,updateDate
FROM dbo.Student
Step 19: Update and Insert Data in SQL Server
Now, I update the stream value in one record of the dbo.Student table in SQL Server. The updateDate column value is also modified with the GETDATE() function output. I also add a new student record. The inserted and updated records have the latest values in the updateDate column.
In the next load, only the update and insert in the source table needs to be reflected in the sink table. The other records should remain the same.
UPDATE dbo.Student
SET stream = 'ECE',
updateDate = GETDATE()
WHERE studentId = 3

INSERT INTO dbo.Student (studentName,stream,marks,createDate,updateDate)
VALUES
('aaa', 'CSE',100,GETDATE(), GETDATE())
Step 20: Debug the Pipeline
I execute the pipeline again by pressing the Debug button. I follow the progress and all the activities execute successfully.
Step 21: Check Data in Azure SQL Database
As I select data from dbo.WaterMark table, I can see the waterMarkVal column value is changed. It is now equal to the maximum value of the updateDate column of dbo.Student table in SQL Server. As I select data from dbo.Student table, I can see one existing student record is updated and a new record is inserted.
So, I have successfully completed incremental load of data from on-premise SQL Server to Azure SQL database table.
SELECT tableName,waterMarkVal
FROM dbo.WaterMark

SELECT studentid, studentName,stream,marks,createDate,updateDate
FROM dbo.Student
Conclusion
The step-by-step process above can be referred for incrementally loading data from SQL Server on-premise database source table to Azure SQL database sink table. Pipeline parameter values can be supplied to load data from any source to any sink table. The source table column to be used as a watermark column can also be configured. Once the pipeline is completed and debugging is done, a trigger can be created to schedule the ADF pipeline execution.