

Introduction
In my last article, Incremental Data Loading using Azure Data Factory, I discussed incremental data loading from an on-premise SQL Server to an Azure SQL database using a watermark. In this document, I will discuss the step-by-step process for incremental data loading using Change Tracking. The source and target for data remain the same as in the last article. The Student table data will be loaded incrementally from an on-premise SQL Server to an Azure SQL database.
Change Tracking
Change tracking is a lightweight solution in SQL Server database that provides an efficient change tracking mechanism for applications.
Change tracking must first be enabled for the database and then for the tables to track changes in data. The table definition does not have to be changed and no triggers are created. After change tracking is configured for a table, change tracking information for each row modified by DML statements is recorded. The primary key of the tracked table with the change information is recorded.
For cleanup, each table enabled for Change Tracking has an internal on-disk table, which is used by Change Tracking functions to determine the change version and the rows that have changed since a particular version. Every time the auto cleanup thread wakes up, it scans all the user databases on the SQL Server instance to identify the change tracking enabled databases. Based on the retention period setting of the database, each internal on-disk table is purged of its expired records.
Step-by-Step process for incremental data loading using Change Tracking
I explain the steps and the related details here.
Step 1: Configuration and Table Creation in SQL Server
I start SSMS and connect to the existing on-premise SQL Server and open a SQL script in the existing database, named ResearchWork. First, I alter the database to set change tracking.
--1. change tracking set to ON for the database
ALTER DATABASE ResearchWork
SET CHANGE_TRACKING = ON
(CHANGE_RETENTION = 2 DAYS, AUTO_CLEANUP = ON)
Once this is done, I drop and create the Student table and enable change tracking on Student.
The TRACK_COLUMNS_UPDATED = ON setting ensures that extra information about the columns updated through UPDATE statement is also recorded in the internal tracking table. Column tracking information may help in identifying the columns modified through the UPDATE statement. This option is set as OFF by default to avoid extra storage overhead.
--2. drop the table Student
DROP TABLE [dbo].[Student]


--3. create the table Student
CREATE TABLE [dbo].[Student](
[studentId] [int] IDENTITY(1,1) NOT NULL PRIMARY KEY,
[studentName] [varchar](100) NULL,
[stream] [varchar](50) NULL,
[marks] [int] NULL,
[createDate] [datetime2] NULL,
[updateDate] [datetime2] NULL
) ON [PRIMARY]
GO


--4. alter the table to set change tracking
ALTER TABLE [dbo].[Student]
ENABLE CHANGE_TRACKING
WITH (TRACK_COLUMNS_UPDATED = ON)
Step 2: Create and Populate the ChangeTrackingStore Table
I create a table, named ChangeTrackingStore, to maintain the change tracking version information for the Student table. Information for multiple tables can also be maintained here.
The CHANGE_TRACKING_CURRENT_VERSION() function is used to retrieve the change tracking version associated with the last committed transaction of the database. I insert the table name and the version value in ChangeTrackingStore table and verify the data after insertion. This version information will be used as a reference for reflecting the changes from source to target tables.
--5. create the ChangeTrackingStore table
create table dbo.ChangeTrackingStore
(
    tableName varchar(255),
    SYS_CHANGE_VERSION BIGINT,
);


--6. retrieve the latest value from CHANGE_TRACKING_CURRENT_VERSION()
DECLARE @changeTrackingVersion BIGINT
SET @changeTrackingVersion = CHANGE_TRACKING_CURRENT_VERSION();


--7. populate data in ChangeTrackingStore for Student table
INSERT INTO dbo.ChangeTrackingStore
VALUES ('Student', @changeTrackingVersion)


--8. select data from ChangeTrackingStore table
SELECT tableName,SYS_CHANGE_VERSION
FROM dbo.ChangeTrackingStore
Step 3: Add Data in the Student Table
I insert 2 records in the Student table . This table data will be copied to the Student table in the Azure SQL database.
--9. populate data in student table
INSERT INTO dbo.Student (studentName,stream,marks,createDate,updateDate)
VALUES
('aaa','CSE',94,GETDATE(), GETDATE()),
('bbb','CSE',95,GETDATE(), GETDATE())
Step 4: Create the Staging and Final Tables in Azure
I create a staging table, named stgStudentCt. This table has extra columns other than the Student table columns. These three columns will be returned from the CHANGETABLE function. This function is used to return all changes for a table or change tracking information for a specific row.
When CHANGETABLE is used with the CHANGES option, it returns tracking information for all the changes to a table that have occurred since the version that is specified by the last_sync_version argument. The table name is also supplied as argument in this function.
CHANGETABLE returns records with many columns along with the primary key of the table. So, a primary key is a prerequisite for implementing change tracking on a table. Here are the columns returned:
- SYS_CHANGE_VERSION : contains the version value that is associated with the last change to the row.
- SYS_CHANGE_OPERATION: specifies the type of change: U(Update), I(Insert), and D(Delete)
- SYS_CHANGE_COLUMNS: lists the columns that are changed since the last_sync_version for update operation.
I drop the Student table and create it again in the Azure SQL database.
--1. create staging table for Student
CREATE TABLE [dbo].[stgStudentCt](
[studentId] [int] NULL,
[studentName] [varchar](100) NULL,
[stream] [varchar](50) NULL,
[marks] [int] NULL,
[createDate] [datetime] NULL,
[updateDate] [datetime] NULL,
SYS_CHANGE_VERSION BIGINT,
SYS_CHANGE_OPERATION CHAR(5),
SYS_CHANGE_COLUMNS VARBINARY(50)
) ON [PRIMARY]
GO


--2. drop the final table Student
DROP TABLE [dbo].[Student]


--3. create the final table Student again
CREATE TABLE [dbo].[Student](
[studentId] [int] NOT NULL,
[studentName] [varchar](100) NULL,
[stream] [varchar](50) NULL,
[marks] [int] NULL,
[createDate] [datetime] NULL,
[updateDate] [datetime] NULL
) ON [PRIMARY]
GO
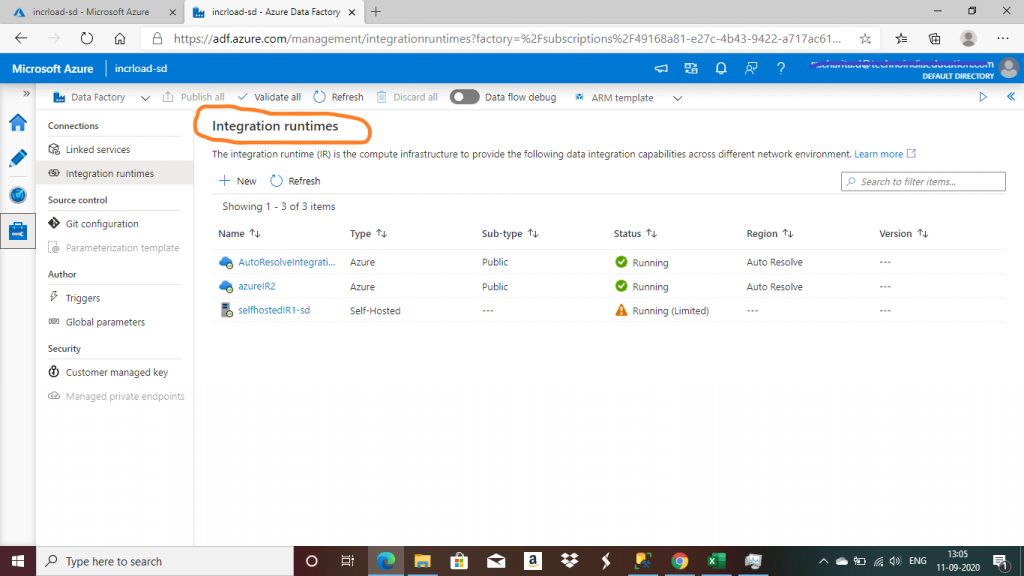
Step 5: Integration Runtime
The Integration Runtime (IR) is the compute infrastructure used by ADF for data flow, data movement and SSIS package execution. I have already created two Integration Runtimes. A self-hosted IR, mine is named selfhostedIR1-sd, is required for movement of data from an on-premise SQL Server to an Azure SQL Database.
An Azure Integration Runtime, I have one named azureIR2, is required to copy data between cloud data stores.
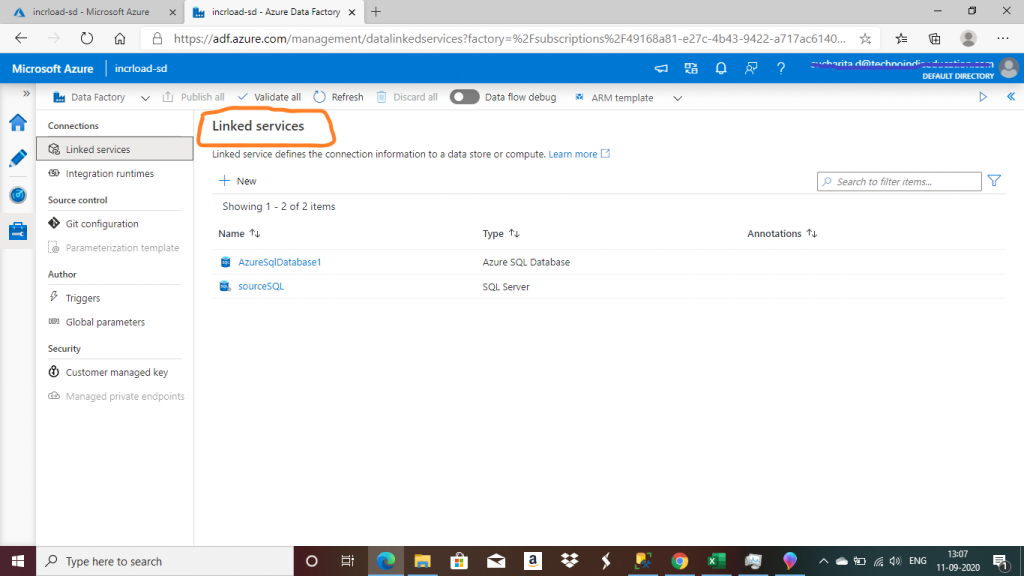
Step 6: Linked Services
The linked service helps to link the source data store to the Data Factory. A Linked Service is similar to a connection string, as it defines the connection information required for the Data Factory to connect to the external data source.
I created the Linked services alread. The one named sourceSQL is the linked service for the SQL Server on-premise and AzureSqlDatabase1 is the linked service for the Azure SQL database.
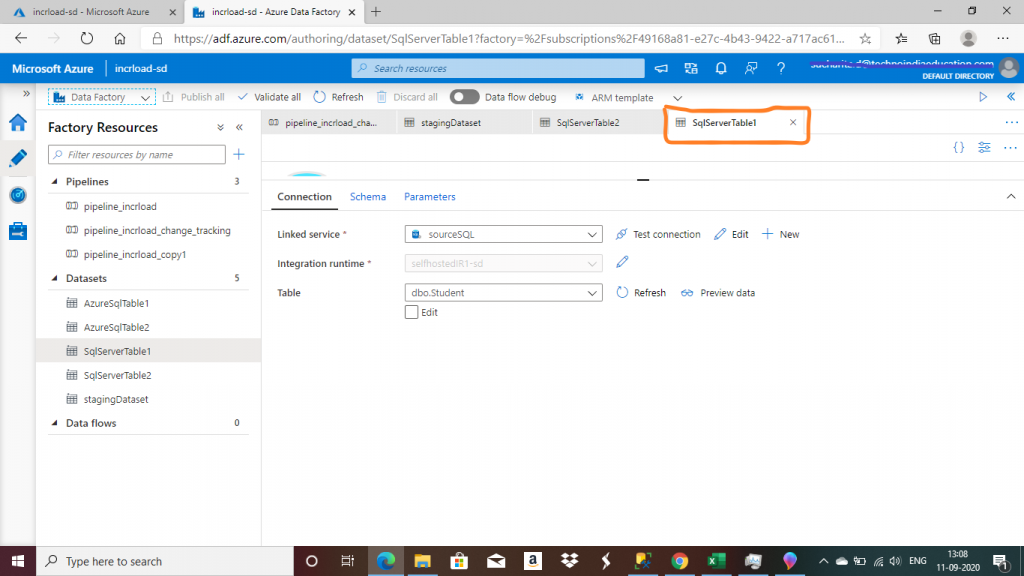
Step 7: Create a Dataset
A dataset is a named view of data that simply points or references the data to be used in the ADF activities as inputs and outputs. I created the dataset, named SqlServerTable1, for the table, dbo.Student, in the on-premise SQL Server database.
Step 8: A Second Dataset
I create a dataset, named SqlServerTable2, for the ChangeTrackingStore table in the on-premise SQL Server database.

Step 9: The Student Dataset for Azure
I create a dataset, named stagingDataset, for the stgStudentCt table in the Azure SQL database.

Step 10: Create a Pipeline
I go to the Author tab of the ADF resource and create a new pipeline. I name it pipeline_incrload_change_tracking.
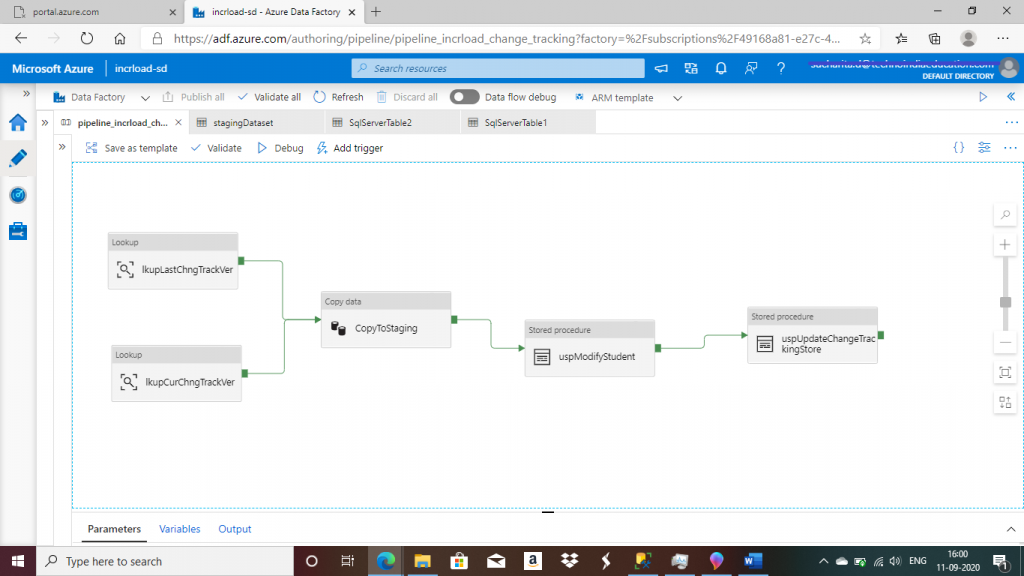
Step 11: Create a Lookup Activity
A Lookup activity reads and returns the content of a configuration file or table. It also returns the result of executing a query or stored procedure. The output from a Lookup activity can be used in a subsequent copy or transformation activity if it's a singleton value.
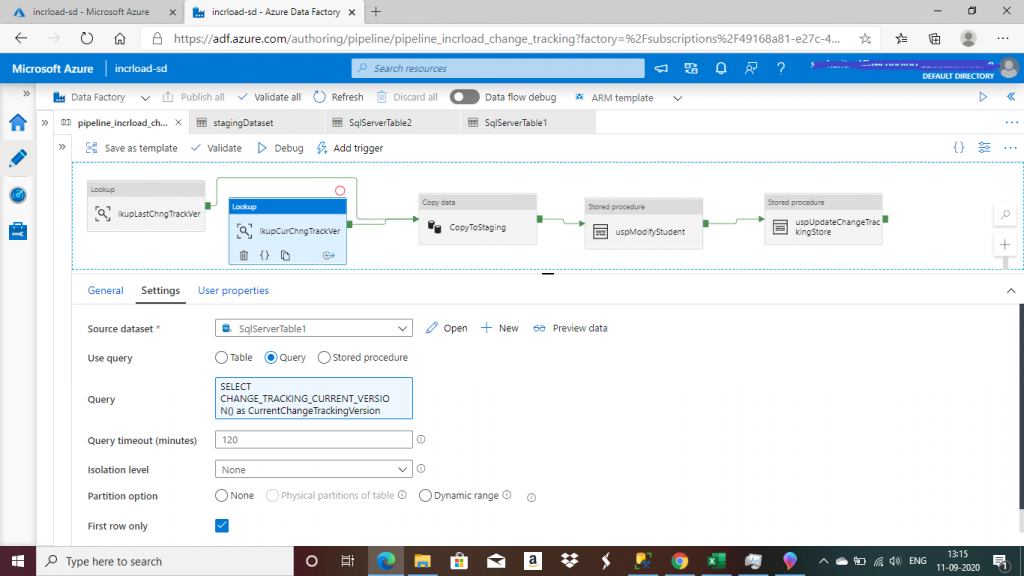
I create the first Lookup activity, named lkupLastChngTrackVer. The source dataset is set as SqlServerTable2, pointing to dbo.ChangeTrackingStore table. This activity returns the first row of the table that contains the change tracking version value for Student. All the changes made in the source Student table after this version will be considered for loading (insert, update, delete) in the target Student table.
I assume here that before this version, the source Student table was empty.

Step 12: Create a Lookup Activity for Changes
I create the second Lookup activitym, named lkupCurChngTrackVer, with the source dataset set to SqlServerTable1. This points to the dbo.Student table in the on-premise SQL Server.
I write the following query to retrieve the change tracking version associated with the last committed transaction of the database. In this task, the 'First Row Only' checkbox is selected.
SELECT CHANGE_TRACKING_CURRENT_VERSION() as CurrentChangeTrackingVersion.
I will consider tracking the changes in the source table up to this version. In the next iteration of data loading, all the changes completed after this version will be considered for the incremental loading of data. This way, the output of the two lookup activities helps to decide from which change tracking version to which version are changes to be considered for data loading at each iteration of the ADF execution.
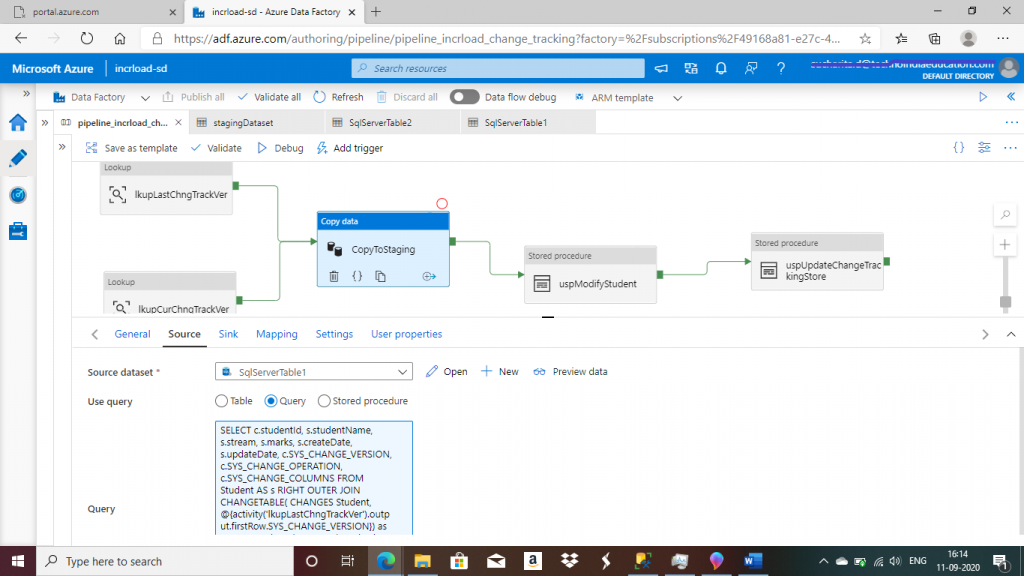
Step 13: Create a Copy Activity
I create the Copy data activity and add the output links from the two lookup activities as input to the Copy data activity. In the source tab, the source dataset is set to SqlServerTable1. Then, I write the following query to retrieve all the records from the Student table with the change operation and the change version details after performing a left outer join with CHANGETABLE. Extra records from CHANGETABLE are also retrieved for deleted records from the Student table.
--source query for copyStaging activity
SELECT
c.studentId,
s.studentName,
s.stream,
s.marks,
s.createDate,
s.updateDate,
    c.SYS_CHANGE_VERSION,
c.SYS_CHANGE_OPERATION,
    c.SYS_CHANGE_COLUMNS
FROM Student AS s
RIGHT OUTER JOIN CHANGETABLE(
CHANGES Student, @{activity('lkupLastChngTrackVer').output.firstRow.SYS_CHANGE_VERSION}) as c
ON s.[studentId] = c.[studentId]
where c.SYS_CHANGE_VERSION <=
@{activity('lkupCurChngTrackVer').output.firstRow.CurrentChangeTrackingVersion}
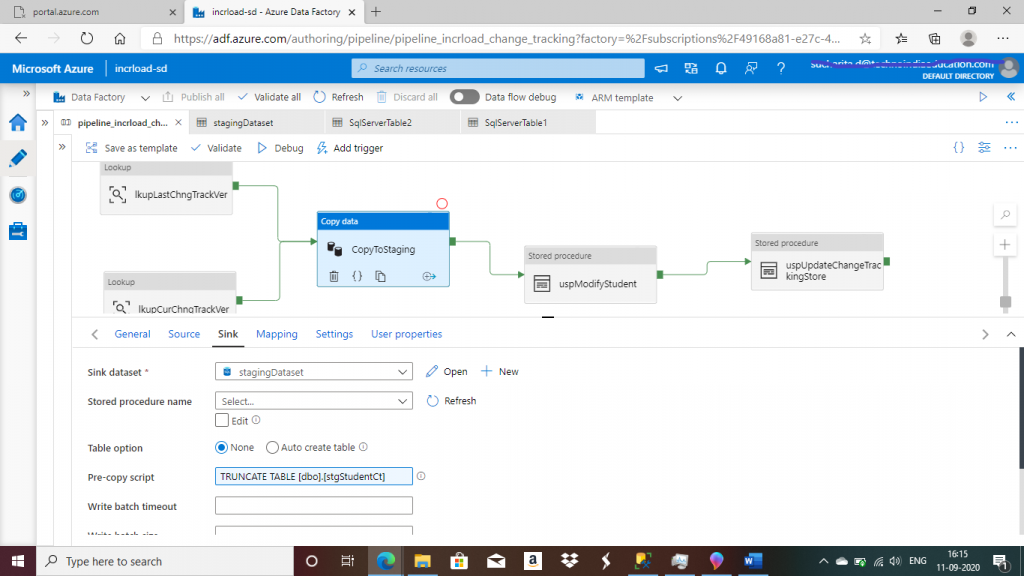
In the sink tab, I select stagingDataset as the sink dataset. I write the pre copy script to truncate the staging table stgStudentCt every time before data loading.
TRUNCATE TABLE [dbo].[stgStudentCt]
I want to load data from the output of the source query to stgStudentCt table.
Step 14: Create a Stored Procedure Activity
I create a Stored Procedure activity next to the Copy Data activity. I select the linked service, AzureSqlDatabase1, and the stored procedure, usp_Modify_Student. The purpose of this stored procedure is to delete the records from Azure SQL Student table that are already deleted from the source Student table after the last data load. The update and insert of records are also executed against the Student table from the staging stgStudentCt, based on the SYS_CHANGE_OPERATION column value.
CREATE PROCEDURE dbo.usp_Modify_Student
AS
BEGIN

BEGIN TRY
BEGIN TRANSACTION
  DELETE FROM dbo.Student
  FROM dbo.Student AS S
  INNER JOIN dbo.stgStudentCt AS Ct ON S.studentId = Ct.studentId
  WHERE Ct.SYS_CHANGE_OPERATION = 'D'


  INSERT INTO dbo.Student (studentid, studentName,stream,marks,createDate,updateDate)
  SELECT studentid, studentName,stream,marks,createDate,updateDate
  FROM dbo.stgStudentCt
  WHERE SYS_CHANGE_OPERATION = 'I'


  UPDATE dbo.Student
  SET studentName = Ct.studentName,
  stream = Ct.stream,
  marks = Ct.marks,
  createDate = Ct.createDate,
  updateDate = Ct.updateDate
  FROM dbo.Student AS S
  INNER JOIN dbo.stgStudentCt AS Ct ON S.studentId = Ct.studentId
  WHERE Ct.SYS_CHANGE_OPERATION = 'U'
COMMIT TRANSACTION
END TRY

BEGIN CATCH
ROLLBACK TRANSACTION
RETURN -1
END CATCH

RETURN 0
END
GO

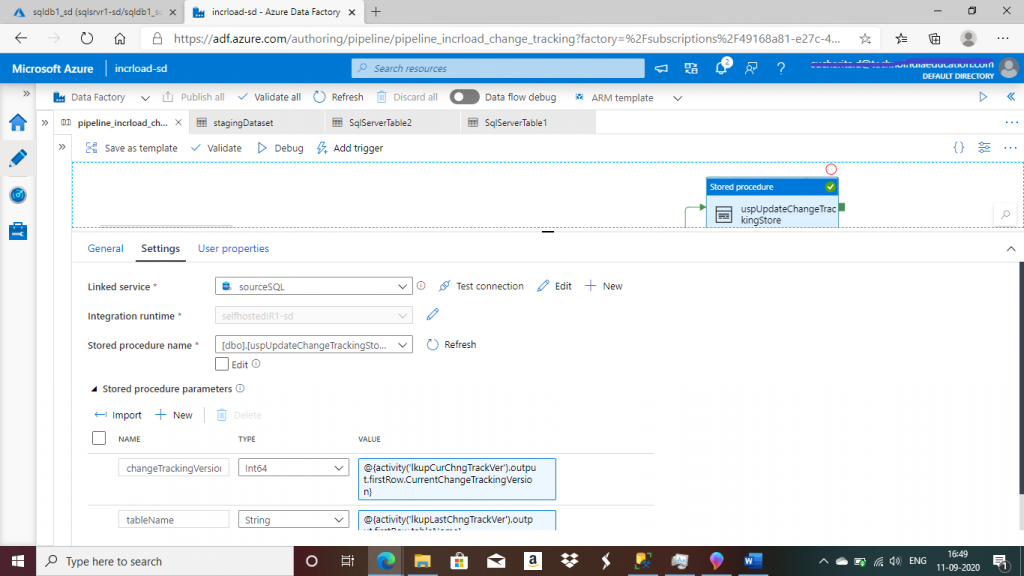
Step 15: Create a Second Stored Procedure Activity
I create the second Stored Procedure activity. I select the linked service, sourceSQL, and stored procedure, uspUpdateChangeTrackingStore. The purpose of this stored procedure is to update the SYS_CHANGE_VERSION column value of ChangeTrackingStore table with the current value of change tracking version.
This procedure takes two parameters: changeTrackingVersion and tableName.
CREATE PROCEDURE dbo.uspUpdateChangeTrackingStore @changeTrackingVersion BIGINT, @tableName varchar(255)
AS
BEGIN

    UPDATE dbo.ChangeTrackingStore
    SET SYS_CHANGE_VERSION = @changeTrackingVersion
WHERE tableName = @tableName

END
--parameter values
changeTrackingVersion -- @{activity('lkupCurChngTrackVer').output.firstRow.CurrentChangeTrackingVersion}
tableName -- @{activity('lkupLastChngTrackVer').output.firstRow.tableName}
Step 16: Debug the Pipeline for the Initial Data Load
Once all the five activities are completed, I publish all the changes. Then, I press the debug button for test execution of the pipeline. The output tab of the pipeline shows the status of the activities.

Step 17: Check the data in the Target Student Table
I can see all the records inserted in the source table are present in the staging table with SYS_CHANGE_VERSION as 'I'. The final Student table in Azure SQL database also contains these two records.
--select data from staging table
SELECT
[studentId] ,
[studentName] ,
[stream] ,
[marks] ,
[createDate] ,
[updateDate],
SYS_CHANGE_VERSION,
SYS_CHANGE_OPERATION,
SYS_CHANGE_COLUMNS
FROM [dbo].[stgStudentCt]


--select data from final table
SELECT
[studentId] ,
[studentName] ,
[stream] ,
[marks] ,
[createDate] ,
[updateDate]
FROM [dbo].[Student]
Step 18: Modify Data On-Premises
Now, I connect to the source SQL database. I delete a record and update another record in Student table. Also, I insert two new records in the table.
--delete existing record
DELETE FROM dbo.Student
WHERE studentId = 8


--update existing record
UPDATE dbo.Student
SET stream = 'EE'
WHERE studentId = 9


--new records inserted
INSERT INTO dbo.Student (studentName,stream,marks,createDate,updateDate)
VALUES
('ggg','CSE',96,GETDATE(), GETDATE()),
('hhh','CSE',97,GETDATE(), GETDATE())
Step 19: Debug the pipeline again for incremental data load
I execute the pipeline again by pressing the Debug button. I follow the debug progress and the execution of all the activities completed successfully.
Step 20: Check Data the Azure SQL Database
Now, I check data in both the staging table stgStudentCt and final table Student again in the Azure SQL database. I can see stgStudentCt has entries for the inserted, updated and deleted records. In case of deleted record, only studentid column has value and rest of the Student table columns contain NULL. Because, in case of deletion, record does not exist in Student table in on-premise SQL Server database, But, the primary key of the deleted record is returned from CHANGETABLE.
Conclusion
When data is transferred from a source to a target data store, there is almost always a requirement for the incremental loading of data. The Change Tracking feature is available in SQL Server 2019 and Azure SQL database, so building an incremental load is easy and not very time consuming. The change tracking mechanism helps to identify the inserted, updated and deleted records in the source table, which can be performed on the target table. No schema changes are required for tracking the changes, and a built-in cleanup process helps to remove old change tracking data to be removed automatically. Change Tracking is a very easy, convenient and useful technique for incremental data loading in SQL Server or Azure SQL Database.