

The demand for increasingly scalable, capable, and inexpensive database, backup, and recovery solutions has never been higher than it is now, as digital transformation reaches its pinnacle. Restoring is the process of recovering data from a backup and applying logged transactions to the data. Backups are used to restore data. Restoring returns the backup file to its original state as a database.
When it comes to AWS, the Relational Database System (RDS) is the go-to solution for managing databases. It offers a lot of features as a managed service, such as reliability, security, availability, enhanced monitoring, etc. Just like other DB solutions in the market, RDS also provides backups and restore functionalities. The AWS term for this is Snapshots.
What is a Snapshot?
A snapshot is a copy of the RDS database instance's storage volume. It is not simply a backup of a single database; it is a backup of the entire database instance. Snapshots contain the size of the data inside, such as temporary files and transaction logs. The first snapshot of a DB instance captures the data for the whole DB instance. Any subsequent snapshots of the same DB instance are incremental, meaning that only the data that has changed since the previous snapshot is stored [1].
If you are an AWS user and if you have dealt with RDS before, you must know that there are two kinds of database backups in AWS RDS [2].
Manual Snapshot
- Manual snapshots are initiated by the user.
- To take a manual snapshot, the user must supply the database instance name.
- Manual snapshots are taken in real-time from the standby database instance.
- These do not have an expiration date.
- 100 manual snapshots per region.
- It is advisable to export manual snapshots to an archival solution such as Amazon S3.
Automated Snapshot
- Automated snapshots are system generated.
- Users must enable the automated backups to feature for it to work.
- On the RDS side, the user must provide a maintenance window and a retention period (0-35 days) during which backups are enabled.
- These are not created if the configured DB instance is in a stopped state.
- RDS instances and databases inside go offline for some time until the automated snapshots are taken.
- You can retain automated backups when you delete a DB instance.
Amazon RDS does not allow DB instances with the same name at the same time. Imagine something happens to your existing database and you want to restore it using a backup. Amazon RDS database endpoint URL is bound with the database name that we specify. Therefore, you need the new DB name as the same as the previous one because you cannot lose the DB connectivity if you disarrange the DB endpoint URL. Tricky, Isn’t it? Fortunately, there are some steps that you need to do to restore a DB backup with the existing DB instance name. Follow along in the below topics to learn how to do this the correct way.
How to take a manual snapshot?
A database can be restored by both kinds of snapshots. Let us check how to take a manual snapshot of a DB instance in RDS in this section.
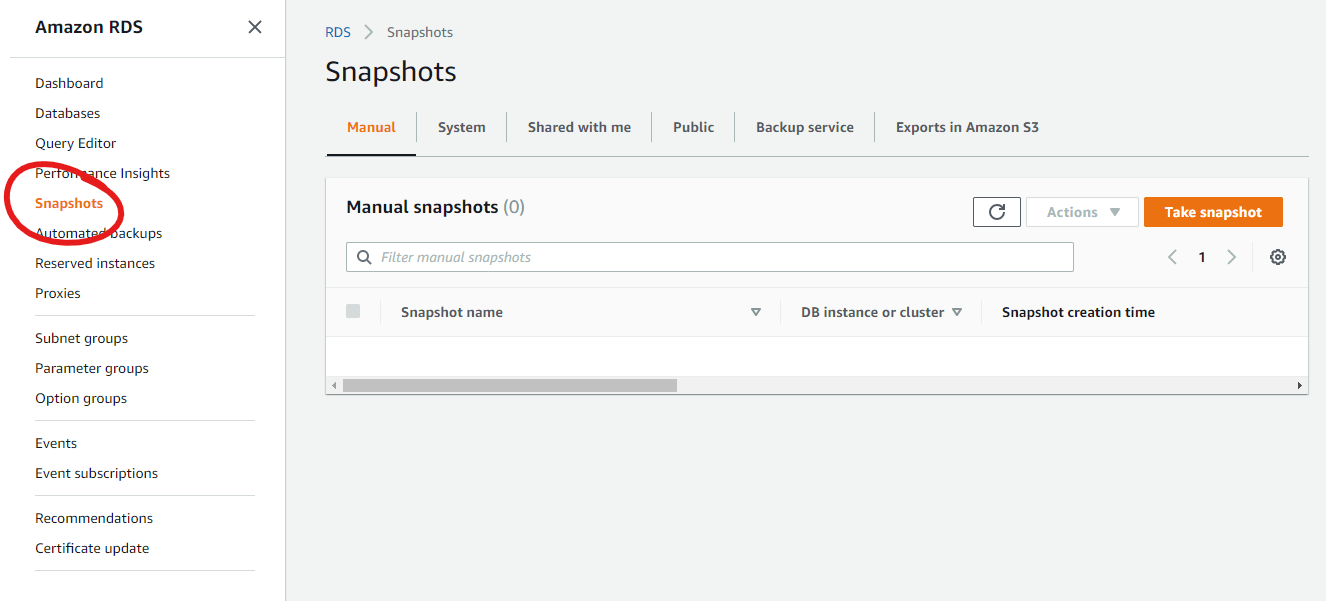
Check the left navigation pane in the RDS console for the “Snapshots” button. Click on that button to visit the snapshots page.
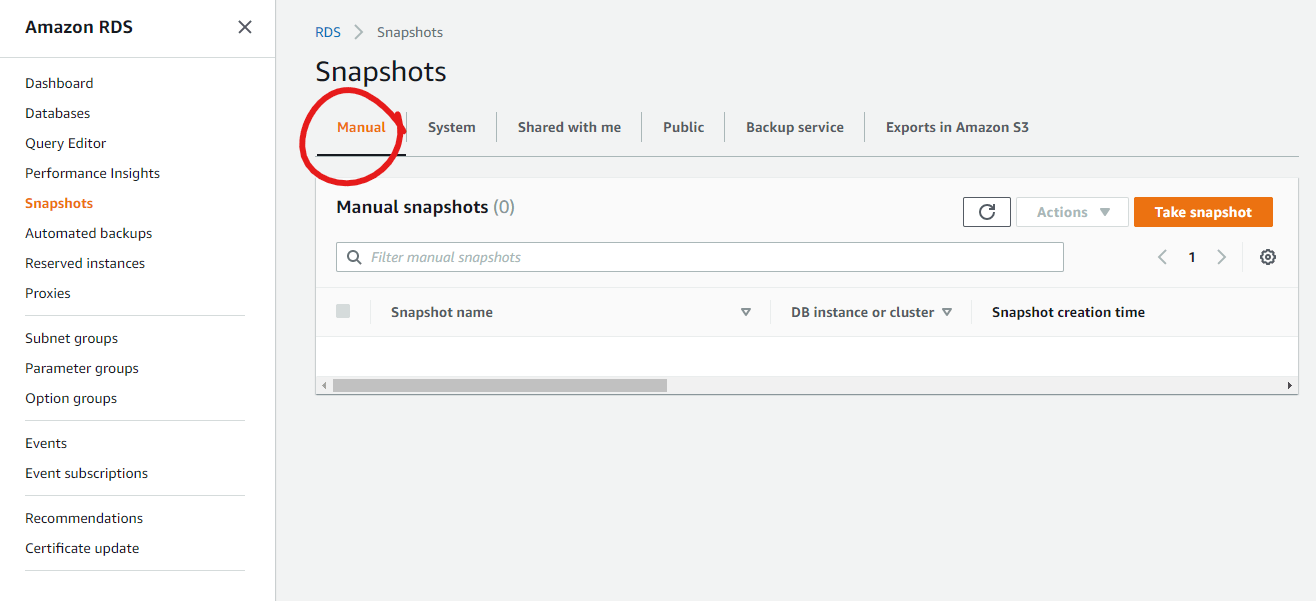
As you can see there are several tabs on this page. What we are on the lookout for is “Manual”. Choose the “Manual” tab to check the manual snapshots that you have created.
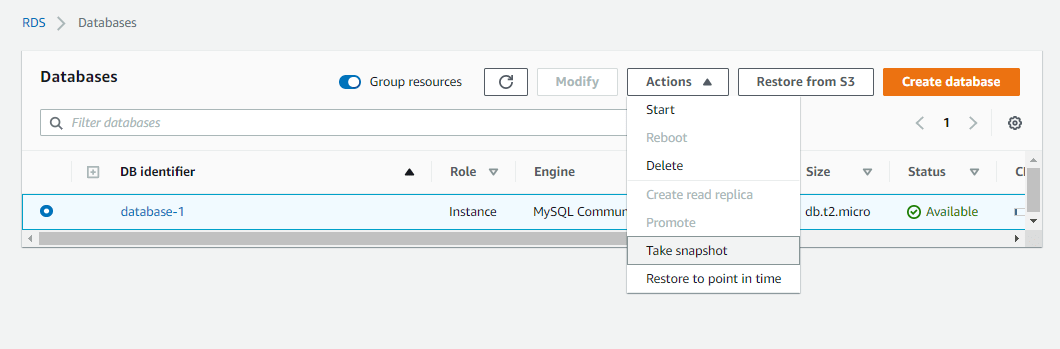
To create a manual snapshot, select the RDS instance that you want to backup. Click on the “Actions” button in the right upper corner and select “Take a snapshot”.
This will redirect you to a page like below.
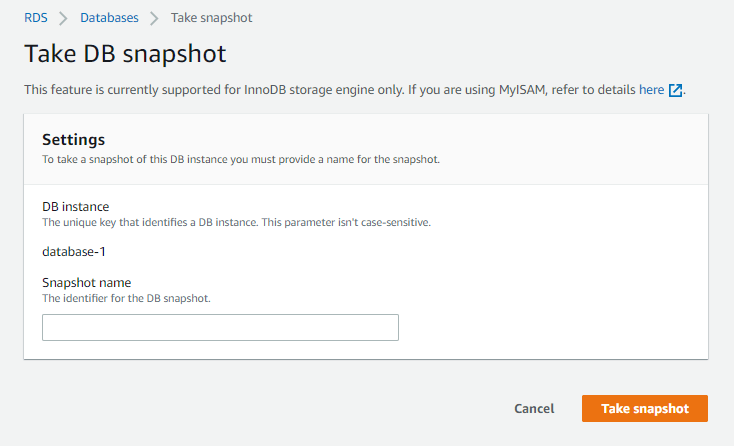
Provide a meaningful name for the snapshot and click “Create snapshot”.
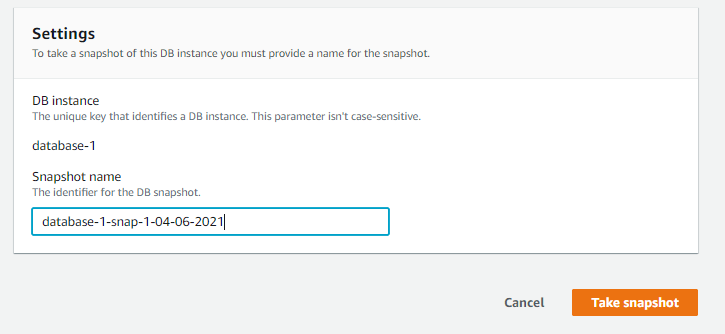
This will create a manual snapshot of the DB instance that you created.

How to check automated snapshots?
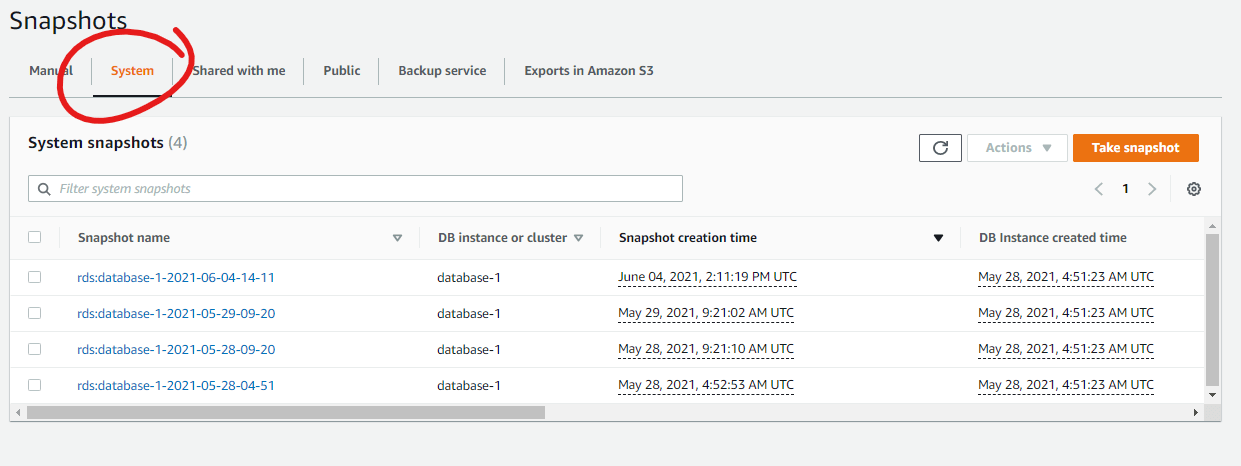
Automated snapshots are system-generated backup which happens periodically according to the user configuration. If you have multiple RDS instances finding a particular automated snapshot will be a hard task.
Move into the next tab called “System” to find automated snapshots. As you can see, snapshots are listed along with the system-generated snapshot name, relevant DB instance name, snapshot creation time, and the DB instance creation time.
How to modify and rename the instance?
Modifying a DB instance name is a tricky task. If you look at the DB endpoint, you can see that it is engaged with the DB instance name. If something goes wrong in this section, all users who access the DB using that endpoint URL will lose connectivity to the database. Here are some facts about renaming a DB instance according to AWS documentation [3].
- You need to redirect your traffic to the new URL after renaming an instance.
- When you rename a DB instance, the old URL endpoint gets immediately deleted.
- It takes about 10 minutes to create a new endpoint URL with the new DB instance name.
- All read replicas linked with a DB instance continue associated with that instance after it is renamed.
- DB instance tags are kept with the DB instance even if it is renamed.
- For a renamed DB instance, snapshots are retained.
Select the DB instance you want to rename. Choose the “Modify” button.

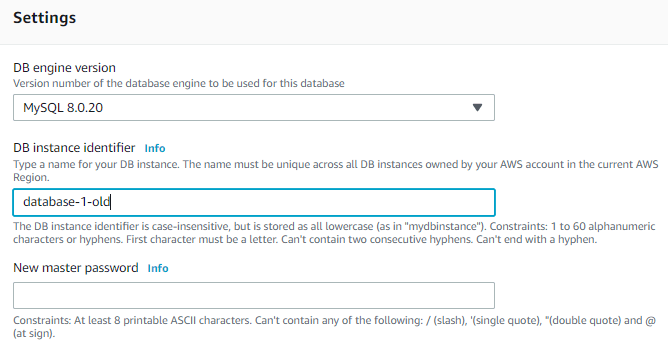
This will redirect you to the “Modify” page.

As shown in the above image, this will give you the option to modify many settings and configurations in the existing database. You can modify the DB engine version, DB instance identifier, DB instance class, Storage specifications, Additional configurations such as changing the maintenance windows, backup settings, etc. Since we only want to change the name, move onto the “DB instance identifier” section where the current name of the DB exists.
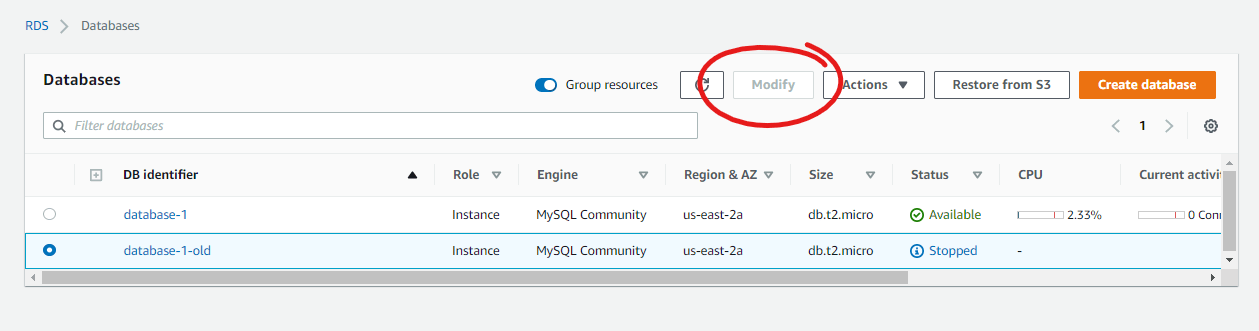
Interesting tip!! You cannot modify a DB instance if it is stopped. As shown in the below image, the DB instance is stopped and the “Modify” button is disabled.
Change the DB instance name into a meaningful name of your liking. If you want to modify any other configurations, you can do them at this stage. After changing that, click on “Continue” to review the changes done.
This is a page where you can review the changes you have done. As I only changed the name, it shows the old DB instance name with the DB endpoint and the new one with the new DB endpoint.
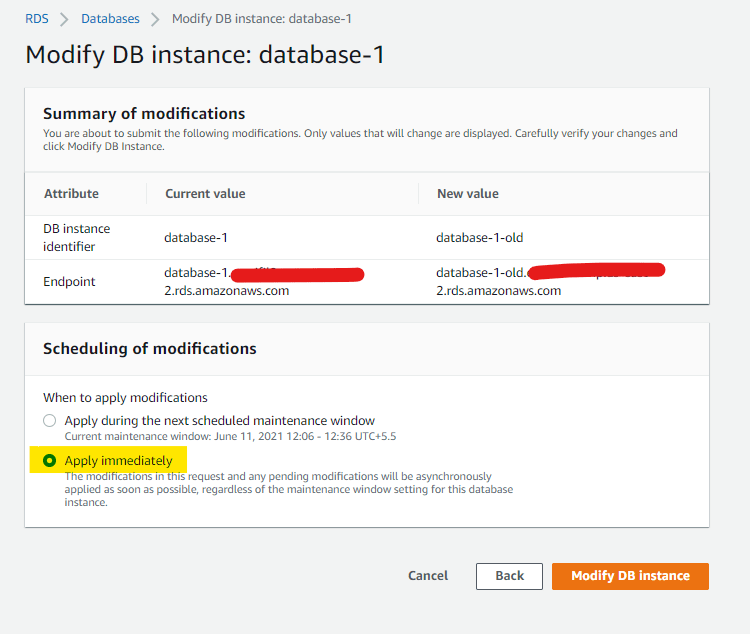
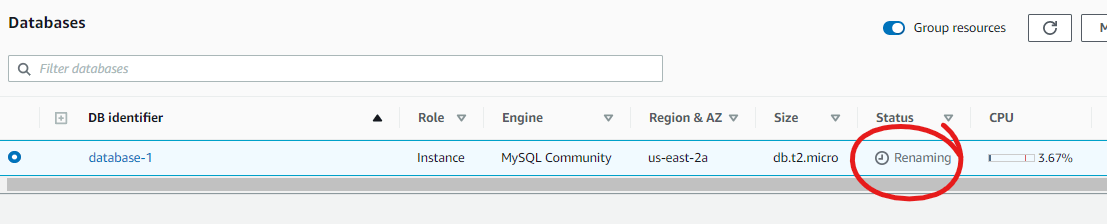
The modifications can be done in two ways. You can choose to apply the modifications during the next scheduled maintenance window, or you can apply the changes immediately. Choose an option of your liking and click “Modify DB instance” to start the renaming process. If you choose to apply immediately, you will see the status of the DB changes into “Renaming”.
How to stop the DB instance?
Now that you have modified the DB instance name, you can stop the DB instance without causing any downtime or problems. As a best practice, take a snapshot of the DB instance now as well. If something goes wrong, you will always have the latest snapshot of your DB instance.
To stop the DB instance, choose the DB instance and click on the “Stop” option under the “Actions” dropdown list.

This will transit your DB instance into a stopped state. It takes some time to stop a DB instance. Please wait until it is showing “Stopped” under the “Status” column before you make any changes.

How to restore the DB instance?
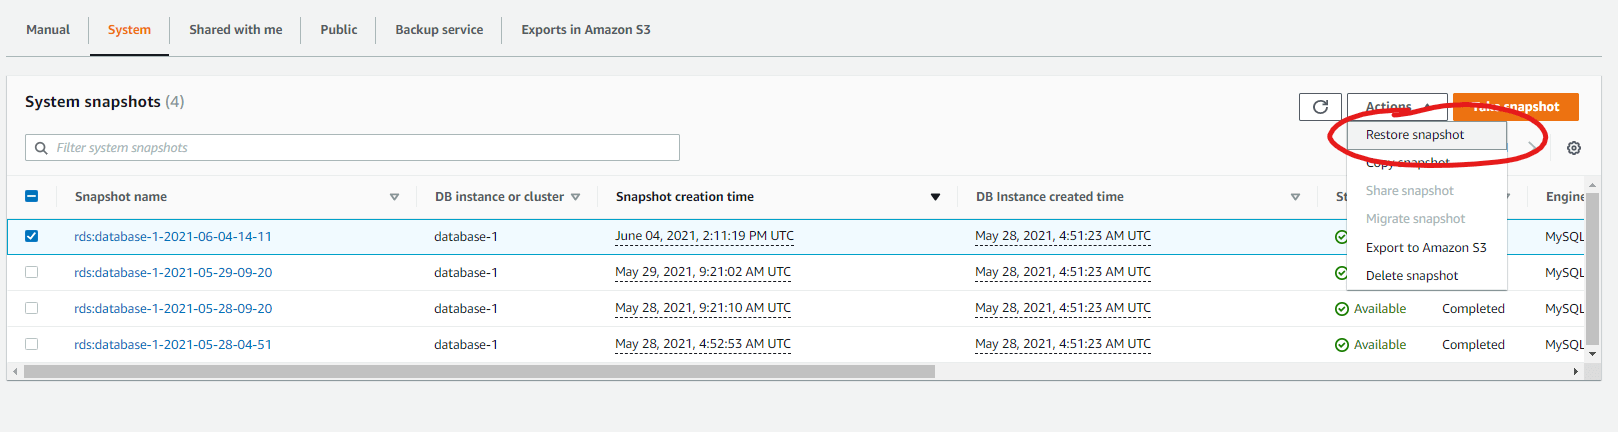
This is the final step. You have successfully modified the DB instance name and stopped the instance. To restore a DB from a snapshot, navigate to the “Snapshots” page.

As mentioned earlier, you can restore a DB either from manual snapshots or automated snapshots. For this tutorial, I am using a system-generated snapshot to restore. To continue, select the snapshot you want to restore. Always make sure to double-check the DB instance name and date before restoring a database. Click on the “Restore snapshot” button under the “Actions” dropdown list.
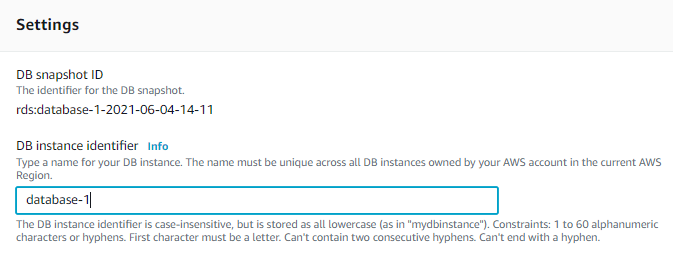
When you click that button, it will redirect you to a page like below.

You can change the VPC settings, security groups, DB instance class, storage specifications, parameter groups, maintenance settings, etc. Now that we want to restore the DB instance with the old identifier name, you can provide the name of your old DB instance inside the “DB instance identifier” field. This will not be an issue because we have already changed the old DB instance with another name.
If you want to make the new DB instance just like the old one, make sure to match all the configurations in both instances. Provide the security group, availability zone, parameter groups if any just as same as the old DB instance. Once you provide these configurations, click “Restore DB instance”.

As you can see, a new DB instance is created in the RDS database console.

Conclusion
We all get to restore a database at some point in our lives. The most common reason is to restore data from a database snapshot or a recovery from a certain moment in time (PITR). You can replace the database instance without having to alter any application code that accesses the database instance by renaming it. I hope you learned how to carefully rename a DB instance in RDS and restore it with the same DB instance identifier name. Happy learning!
Bibliography
| [1] | I. Amazon Web Services, "Creating a DB snapshot," [Online]. Available: https://docs.aws.amazon.com/AmazonRDS/latest/UserGuide/USER_CreateSnapshot.html. [Accessed 04 06 2021]. |
| [2] | I. Amazon Web Services, "Working with backups," [Online]. Available: https://docs.aws.amazon.com/AmazonRDS/latest/UserGuide/USER_WorkingWithAutomatedBackups.html. [Accessed 03 06 2021]. |
| [3] | I. Amazon Web Services, "Renaming a DB instance," [Online]. Available: https://docs.aws.amazon.com/AmazonRDS/latest/UserGuide/USER_RenameInstance.html. [Accessed 05 06 2021]. |
