

Introduction
In this article I explain how to create an SSIS Project that outputs a dynamically named flat file to a specified location using a variable and then sends the output file to a FTP server. In a second article, I explain how to run this SSIS Project as a SQL Job from within SSMS.
Scenario
My company created a requirement to read data from a SQL table and output to a flat file ‘xxx.xxx’ using a specific naming convention and then send the output to a FTP Server.
“Can it be done?” I was asked.
“Sure”, I said, “Let me finish my coffee.”
OK. I have some knowledge of SSIS as I have used it in the past, but not since the SQL Server 2005 days. Like many SQL projects I have previously worked on, my journey began with ‘Google’ followed by a visit to “sqlservercentral.com”. My research into this problem taught me a few new techniques, such as how to use variables within SSIS Packages. I was introduced to the new Control Flows, such as the FTP and Script Tasks as well as the dark art of scripting using a bit of Microsoft Visual C++.
On that note let me begin.
Create a Database
For this step you will need:
- SQL Server (version used in article was SQL Server 2014 Standard v12.0.2000)
- SQL Server Management Studio (SSMS)
Let’s create a dummy database to test with. We can reference this test database later in this article. To create the dummy database open up SQL Server Management Studio and run the code below. The full script is attached in the references section below.
USE [master]
GO
/***Create Database***//****** Object:  Database [sql-central]    Script Date: 01/04/2015 09:26:23 ******/CREATE DATABASE [sql-central]
 CONTAINMENT = NONE
 ON  PRIMARY
( NAME = N'sql-central', FILENAME = N'E:\Data\sql-central.mdf' , SIZE = 3072KB , MAXSIZE = UNLIMITED, FILEGROWTH = 1024KB )
 LOG ON
( NAME = N'sql-central_log', FILENAME = N'E:\Logs\sql-central_log.ldf' , SIZE = 1024KB , MAXSIZE = 2048GB , FILEGROWTH = 10%)
GO
USE [sql-central]
GO
/***Create table***//****** Object:  Table [dbo].[Contracts]    Script Date: 01/04/2015 08:32:40 ******/CREATE TABLE [dbo].[Contracts](
[Contract] [bigint] IDENTITY(1,1) NOT NULL,
[ContractId] [nvarchar](110) NOT NULL CONSTRAINT [DF_Contracts_ContractIdentifier]  DEFAULT (''),
[ContractDescription] [nvarchar](300) NOT NULL CONSTRAINT [DF_Contracts_ContractDescription]  DEFAULT (''),
CONSTRAINT [PK_Contracts] PRIMARY KEY CLUSTERED
(
[Contract] ASC
)WITH (PAD_INDEX = OFF, STATISTICS_NORECOMPUTE = OFF, IGNORE_DUP_KEY = OFF, ALLOW_ROW_LOCKS = ON, ALLOW_PAGE_LOCKS = ON) ON [PRIMARY]
) ON [PRIMARY]
GO
/***Insert some test data into table***/SET IDENTITY_INSERT Contracts ON
GO
INSERT INTO Contracts (Contract,ContractID,ContractDescription)
SELECT '1','CON1','Contract 1' UNION ALL
SELECT '2','CON2','Contract 2' UNION ALL
SELECT '3','CON3','Contract 3' UNION ALL
SELECT '4','CON4','Contract 4' UNION ALL
SELECT '5','CON5','Contract 5' UNION ALL
SELECT '6','CON6','Contract 6' UNION ALL
SELECT '7','CON7','Contract 7' UNION ALL
SELECT '8','CON8','Contract 8' UNION ALL
SELECT '9','CON9','Contract 9' UNION ALL
SELECT '10','CON10','Contract 10' UNION ALL
SELECT '11','CON11','Contract 11' UNION ALL
SELECT '12','CON12','Contract 12' UNION ALL
SELECT '13','CON13','Contract 13' UNION ALL
SELECT '14','CON14','Contract 14' UNION ALL
SELECT '15','CON15','Contract 15' UNION ALL
SELECT '16','CON16','Contract 16' UNION ALL
SELECT '17','CON17','Contract 17' UNION ALL
SELECT '18','CON18','Contract 18' UNION ALL
SELECT '19','CON19','Contract 19' UNION ALL
SELECT '20','CON20','Contract 20' UNION ALL
SELECT '21','CON21','Contract 21' UNION ALL
SELECT '22','CON22','Contract 22' UNION ALL
SELECT '23','CON23','Contract 23' UNION ALL
SELECT '24','CON24','Contract 24' UNION ALL
SELECT '25','CON25','Contract 25'
SET IDENTITY_INSERT Contracts OFF
GO
/***Create a login***/CREATE LOGIN [sql-central] WITH PASSWORD = 'sql123';
GO
/***Make login a sysadmin***/EXEC master..sp_addsrvrolemember @loginame = N'sql-central', @rolename = N'sysadmin'
GO
After running createTestDB.txt the following will happen.
- The dummy database, [sql-central], will be created.
- The table, [Contracts], will be created and populated with test data.
- A new SQL Login, [sql-central] with password ‘sql123’, will be created as a sysadmin.
Create an SSIS Project
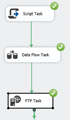
In this step, you will create your Integration Services Project. You will use Visual Studio 2013 to do this. First, open Visual Studio and create a new ‘Integration Services Project.’ Give the project a meaningful name. I called my project ‘FTP’. My solution is shown below.

Creating Variables
In the next step, you will create a variable. The idea of using a variable came from an article I read by decipherinfosys, entitled “SSIS: Exporting data to a text file using a package”. The variable is used to specify the location of the destination text file.
In the Control Flow pane, right click and select Variables. Create a new variable named ‘FileLocation’. In the ‘Value’ field type the path where you wish to save your destination text file. I used ‘C:\sql-central.’

Add Data Flows
This step has you adding a Data Flow Task and configuring an OLE DB Source to connect to the dummy database created in the first step. To start, drag and drop the Data Flow Task from the Control Flow Tool Box into the Control Flow Designer as shown below.

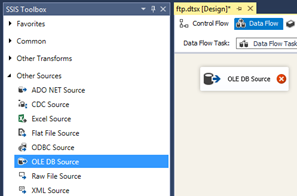
Double click on the Data Flow Task. Drag and drop an OLE DB Source from the SSIS Toolbox as shown below.
Double click the OLE DB Source task to open the OLE DB Source Editor.
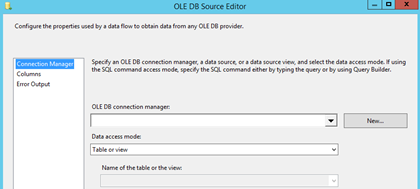
Now you want to connect to your database. Create the new OLE DB source connection manager by clicking on the “New” button on the OLE DB Source Editor. This opens up the Configure OLE DB Connection Manager. Select ‘New’ to open the Connection Manager.

Next you will configure a connection to the dummy database.
- In Server Name type ‘localhost.’
- In Log on to the server select ‘Use SQL Server Authentication’
- For user name enter ‘sql-central’
- For password enter ‘sql123’
Your connection manager should look as follows;

Test that you are able to connect to the dummy database.

Retrieving Data
With the connection setup the next step is to retrieve some data from our newly created source. The data access mode option in the OLE DB source editor gives us various options of retrieving the data from the database. These options are:
- Table or View
- Table Name or View Name Variable
- Sql Command
- Sql Command from Variable
To retrieve data from my OLE DB Source I used the SQL Command option as I wanted to retrieve data from a table in a database. In the SQL command text pane write the following SQL command:
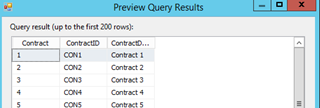
SELECT Contract, ContractID, ContractDescription
 FROM Contracts
Select ‘Preview’. The results of your query will be returned as shown below.
Add a Destination
In this step, you will configure a Flat File Destination and a Data Flow Task using the variable created in step three. This will be the location the output destination file is saved to when the package is executed.
On the Data Flow tab, drag and drop the Flat File Destination from the Other Destinations section in the SSIS Tool Box. Drag the path (blue arrow) from the OLE DB Source and join to the Flat File Destination as shown below. This will add the connection to our file to which we want to transfer data.

Double click on the Data Flow Task. Drag and drop an OLE DB Source from the SSIS Toolbox as shown below.
Double click on the Flat File Destination task. This opens up the Flat File Destination Editor. Click on ‘New’ to create a new Flat File Destination Connection Manager. It will open up a Flat File Format window listing the options shown below.
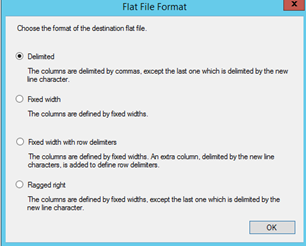
Initially I chose ‘Delimited’, however on review of the output destination text file I was advised the format needed to be ‘Fixed Width.’ After a bit of trial and error I settled on the ‘Ragged right’ option.
Click on OK and SSIS will open up the GUI for configuring the connection manager for the Flat File Destination. Rename the Connection Manager Name if desired. For the File Name Option type, the path referenced is the variable created in step 3, ‘C:\sql-central.’
Click ‘OK’.

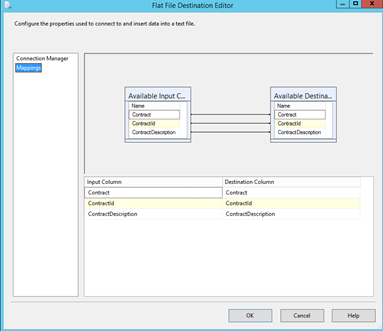
Click Mappings. Confirm the mappings are correct and then click OK.
Specify the Location
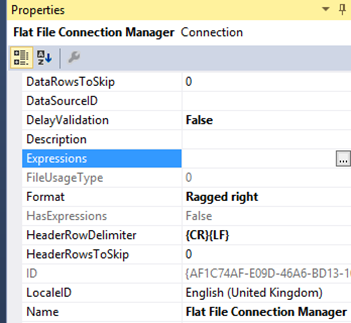
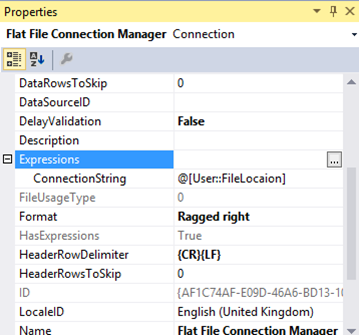
In this step, we will use the variable created in step 3 to specify the location to save the destination text file. Click on the Flat File Connection Manager from ‘Connection Managers’ pane.

In the Properties pane, scroll down and select the ellipses next to Expressions.
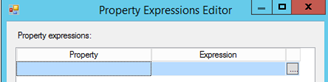
The Property Expressions Editor will be displayed.
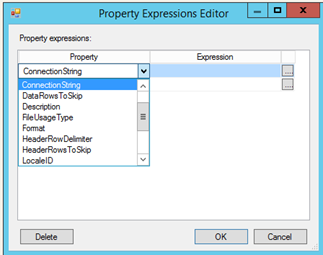
From the Property menu list select Connection String.
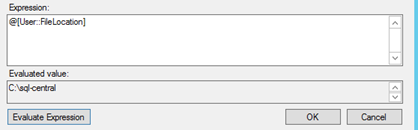
Click Expression. This will open the expression builder. Expand Variables and Parameters. Drag parameter created earlier, User::FileLocation, into the expression pane as shown below.

Click Evaluate Expression to ensure the expected value, ‘C:\sql-central’, is returned.
Click OK to close. The Flat File Connection Manager Expressions row should now look as shown below.
The Script Task
Now you will add a Script Task to generate the dynamic file name. To do this go to the Control Flow Task and drag a Script Task into the design window.

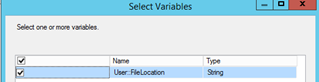
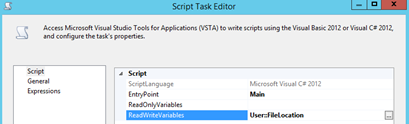
Double click the Script Task to open the Script Task Editor. Whilst in the Script Page, click the ellipses next to ReadWriteVariables.

The Select Variables window will open. Select User::FileLocation as shown below.
The Script Task Editor should now look as shown below.
Next you are going to configure the Script Task to name the destination text file dynamically. To do this click Edit Script button on the Script Task Editor. This will open up a dialog where you will write the code to generate the file name. I was asked to generate a destination text file in a specific format ‘xxxxddmmyyyy.txt’
The article I have referred to previously by decipherinfosys advised using the code shown below to generate the dynamic file name for our destination file.
Dts.Variables(“User::FileLocation”).Value = Dts.Variables(“User::FileLocation”).Value.ToString + “\CustomerOrders_” + CStr(Format(Now(), “MMddyyyy_hhmmss”))
The above code did not compile so I amended to read as shown below.
public void Main()
      {
       string test = "" + DateTime.Now.Day + DateTime.Now.Month + DateTime.Now.Year;
       Console.Write(test);

       // TODO: Add your code here

      Dts.Variables["User::FileLocation"].Value = Dts.Variables["User::FileLocation"].Value.ToString()+ "\\ccpr" + test + ".txt";

      Dts.TaskResult = (int)ScriptResults.Success;
     }
The revised code compiled and generated a dynamically named file however the format was not quite right as the ddmmyyyy was applied as dmyyyy. I amended the DateTime.Now.Day and DateTime.Now.Month to include .ToString("d2").
The working code is as follows;
public void Main()
     {
      string test = "" + DateTime.Now.Day.ToString(“D2”) + DateTime.Now.Month.ToString("d2") + DateTime.Now.Year;
      Console.Write(test);

      // TODO: Add your code here

      Dts.Variables["User::FileLocation"].Value = Dts.Variables["User::FileLocation"].Value.ToString()+ "\\ccpr" + test + ".txt";
      Dts.TaskResult = (int)ScriptResults.Success;
     }
The script pane should look as shown below.

To test the destination text file is dynamically named execute the project by clicking Start.
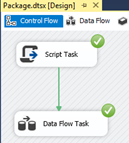
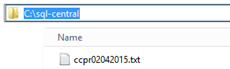
The dynamically named text file is created to the location specified in the variable created in step 3.
The FTP Task
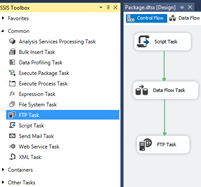
In this step, you will add an FTP Task to send the dynamically named destination text file to a FTP Server. To do this whilst in the Control Flow, drag the FTP task into the design window as shown below.
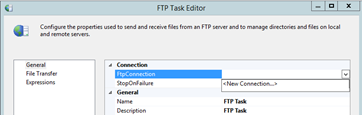
Double click the FTP Task to launch the FTP Task Editor. With the General tab selected in the left pane, select <New Connection> from the menu list next to FtpConnection as shown below.
Enter your FTP connection details.

Test the connection. It should succeed. If not, double check your credentials.

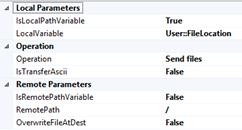
Next you are going to specify the location of the file you want to FTP. With File Transfer selected in the left pane, set IsLocalPathVariable to ‘True’. For LocalVariable, select the variable created in step 3 as shown below.
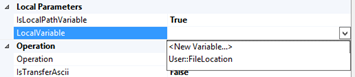
Your settings should now look as shown below.
To test execute the project by clicking Start.
Build
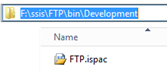
The final step is to Build your project. This will create a file with a .ispac extension within the project's ‘bin' folder. The .ispac file will be used in a subsequent article.
To create the .isac file right click your project, FTP in my example, then select Build.
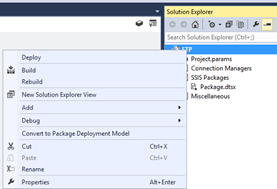
This creates an FTP.ispac file under the project's 'bin' folder as shown below.
Summary
This article explains how to extract data from an OLE DB Source, and then using a SQL command run against the OLE DB Source to retrieve data to output to a dynamically named destination text file in a format specified in Microsoft Visual C+ code within a Script Task. The destination text file ‘xxx.xx’ is then sent to a FTP server whose address is specified in the FTP Task.
In a subsequent article I explain how to run the FTP Project as a SQL Job from within SSMS.

