

Introduction
Azure Storage is the service for storing different types of data. A storage account is created first. The storage account provides a unique namespace for different types of Azure storage data accessible from anywhere in the world over HTTP or HTTPS. Data in the Azure storage account is durable and highly available, secure, and massively scalable. Core storage services offer object store for data objects, disk storage for Azure virtual machines (VMs), a file system service for the cloud, a messaging store for reliable messaging, and a NoSQL store.
I will discuss the different features, redundancy, and types of Azure Storage. I will go through the step-by-step process of creating an Azure storage service for Blobs.
Features of Azure Storage
The different features of Azure Storage are detailed below:
- Durable and highly available: There is a provision to replicate the data in the region where the service is created (primary region) and in other regions (secondary region) as well. Data redundancy helps to ensure durability and high availability of data in case of any unexpected outage or natural disaster in a region of the World.
- Secure: Data is secure due to the encryption policies and the strict access control methods. No unauthorized user or application may ever access any data in Storage.
- Scalable: Azure Storage is designed for massive scalability. So, a huge increase in data volume can be managed without performance impact.
- Managed: The user needs to manage only the data. Hardware maintenance, updates and critical issues are managed by Azure itself.
- Accessible: Data in Azure Storage is accessible from anywhere in the world over HTTP or HTTPS if adequate permission is given. Azure portal and Azure Storage Explorer offer easy and convenient visual solution for working on the data.
Data Redundancy Models
Data redundancy helps to maintain high availability and durability of the stored data in case of any type of failures and outage. There are four different redundancy models. When the availability increases, the cost also increases. So, the appropriate redundancy model should be selected based on the nature and requirement of the data stored.
I will discuss the different redundancy models, but before that I will explain about Azure regions. Azure operates in multiple datacenters around the world. These datacenters in a specific geographic region are grouped together to form a Azure Region. The user may choose a specific region for creating a resource.
- Locally redundant storage (LRS): data is replicated three times within a single data center in the primary region. LRS is the lowest cost redundancy option and offers the least durability compared to the other redundancy models.
- Zone-redundant storage (ZRS): data is replicated synchronously across three Azure availability zones in the primary region. Each availability zone is a separate physical location with independent power, cooling, and networking.
- Geo-redundant storage (GRS): data is copied synchronously three times within a single physical location in the primary region using LRS. Data is then copied asynchronously to a single physical location in the secondary region.
- Geo-zone-redundant storage (GZRS): data is copied synchronously across three Azure availability zones in the primary region using ZRS. Data is then copied asynchronously to a single physical location in the secondary region.
Types of Azure Storage
Azure Storage includes different data services.
- Azure Blobs: stores massive amount of unstructured data. Blob storage data is accessible via HTTP/HTTPS by the user and client application.
- Azure Files: fully managed file shares in the cloud accessible using Server Message Block (SMB) protocol and Network File System (NFS) protocol. Azure Files can be used to completely replace or supplement traditional on-premise file servers. Also, Azure files may be used to write the logs and metrics by the cloud applications.
- Azure Queues: service for storing large numbers of messages. These messages are accessible from anywhere in the world using HTTP/HTTPS with required authentication. Queues are commonly used to create a backlog of work to process asynchronously.
- Azure Tables: stores non-relational structured data in the cloud. Azure Tables provide a key/attribute store with a schemaless design. Table storage is useful for storing different flexible datasets like user data for web applications, address books, device information, or any service metadata.
- Azure Disks: block-level storage volumes managed by Azure and used with Azure Virtual Machines (VM). Azure Disks are like a physical disk in an on-premise server but virtualized. A disk needs to be provisioned for the VM usage. The available types of disks are ultra disks, premium solid-state drives (SSD), standard SSDs, and standard hard disk drives (HDD).
I will now discuss Azure Blob Storage in detail.
About Blob Storage
Blob storage may store different types of unstructured data. Blob storage has many applications, as few of which are listed here:
- to serve any document or image to a web browser
- to stream video and audio files
- to store data for analytics and reporting
- to store data for record management, backup and restore, archival
To create a place for blob storage, first you must create a storage account. Inside the storage account, one or more containers should be created. Under each container, Blobs are created or uploaded. A container is similar to a directory in a file system that helps to organize the blobs inside it.
A storage account provides a unique namespace in Azure. Every object in the Azure Storage has an unique address that includes the unique account name. The account name and the blob endpoint forms the base address for each object stored in Azure Storage.
In the later sections of the article, I will explain how the blob address looks like and how to access the blob using this address.
Blob Types
There are three types of blobs that may be created.
- Block Blobs: store text and binary data. A block blob is composed of blocks, and there can be a maximum of 50000 blocks in each blob. A block may have different sizes. The blocks can be managed individually using a set of existing commands.
- Append Blobs: made up of blocks like block blobs. But, append blobs are optimized for append operations. Blocks can be appended at the end of blob. Updating and deleting the existing blocks are not allowed.
- Page Blobs: collection of 512-byte pages optimized for random read and write operations. Page blobs store virtual hard drive (VHD) files and serve as disks for Azure virtual machines.
Azure storage offers different types of access tiers allowing to store blob object data in the most cost-effective manner. Hot and Cool access tiers can be set at both account level and blob level. But, archive level may be set only at blob level. Access tier set at account level is inherited at the blob level as well. For each blob, the access tier may be set, if required.
Access Tiers
- Hot: optimized for data accessed frequently. It has the highest storage cost and the lowest access cost as compared to the other tiers. Data which is in active use or expected to be read from or written to should be kept in hot tier.
- Cool: has lower storage cost and higher access cost compared to hot storage. Data which is not used frequently but expected to be available immediately when required, should be stored in cool tier. Data should remain in this tier for at least 30 days.
- Archive: has the lowest storage cost but higher data retrieval cost as compared to hot and cool tiers. Data should remain in this tier for at least 180 days. Otherwise, a deletion charge needs to be paid. Blob data is offline in archive storage and should be rehydrated to an online tier (hot or cool) before accessing. Blob metadata remains online and can be used to list the blob.
About Data Lake Storage Gen2
Data Lake Storage Gen2 is a set of capabilities dedicated to big data analytics. It converges the capabilities of Azure Data Lake Storage Gen1 with Azure Blob storage. Data Lake Storage Gen2 provides file system semantics, file-level security, and scale, which are inherited from Gen1. All these capabilities are built on Blob storage resulting in low cost, tiered access and high availability, and durability. Data Lake Storage Gen2 is designed to manage and process multiple petabytes of information with hundreds of gigabits of throughput.
Data Lake Gen2 builds on blob storage with file system capabilities. A hierarchical namespace mechanism allows Azure Data Lake Storage Gen2 to provide file system performance at object storage scale and prices.
Hierarchical Namespace
The Hierarchical namespace allows the collection of objects to be organized into a hierarchy of directories and nested subdirectories similar to a file system in a computer. The file system like hierarchical structure of the data helps in optimization of the big data analytics workload. Also, the familiarity with the file system and its hierarchical structure helps the developers and users to access the data easily.
Hierarchical namespace should be enabled at the time of storage account creation, and it can't be reverted later. Hierarchical namespace cannot be enabled for any existing storage account. This option should be set for an account only when the dataset is required for big data analytics or the dataset requires a high degree of organization.
Key features of Data Lake Gen2
The key features of Azure Data Lake Storage Gen2 are detailed below:
- Performance: is optimized because it is not required to move or transform data before analysis. Hierarchical namespace greatly improves the performance of directory management operations resulting in improved overall job performance.
- Easier Management: Files can be organized through directories and subdirectories.
- Security: The security model for Data Lake Gen2 supports ACL and POSIX permissions along with some extra granularity specific to Data Lake Storage Gen2.
- Cost effectiveness: Data Lake Storage Gen2 is built on top of Blob Storage, so the storage capacity and transaction costs are lower. Also, it is not required to move or transform data before analysis resulting in saving cost for data movement or transformation.
- Optimized driver: Azure Blob File System driver (ABFS driver) is part of Apache Hadoop and is included in many of the commercial distributions of Hadoop. Data Lake Storage Gen2 allows applications and frameworks to access data in Azure Blob Storage using this driver without writing any extra code.
- Hadoop compatible access: ABFS driver used by Data Lake Storage Gen2 is available within all Apache Hadoop environments like Azure HDInsight, Azure Databricks, and Azure Synapse Analytics. So, data in Data Lake Storage Gen2 are manageable and accessible from the different Hadoop environments.
- Scalability: Azure Storage is scalable by design whether it is accessed via Data Lake Storage Gen2 or Blob Storage interface. Azure Storage is able to store and serve many exabytes of data (exabyte is two to the sixtieth power of 1 byte).
- Multiple usage: Data Lake Storage Gen2 is built on top of Blob Storage. So, it can be used as both Blob Storage and Data Lake as per the requirement of the data processing.
Create a BLOB Storage and Data Lake Storage Gen2
I will first create a Storage account and a container inside the account. After that, I will upload a file from my local drive as a block blob.
Create a Storage Account
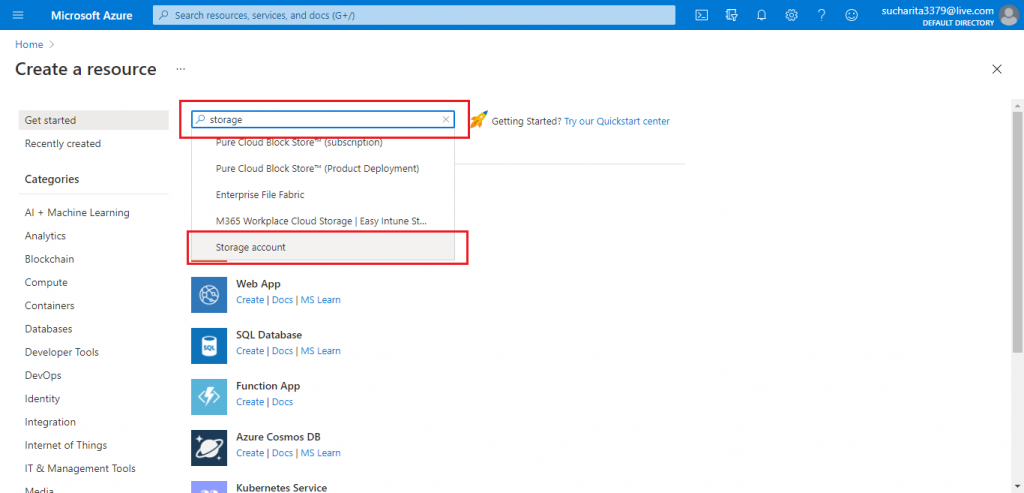
I search for the resource, Storage account in the Create a resource section of the portal. Then, I select Storage Account from the drop-down list (shown below).
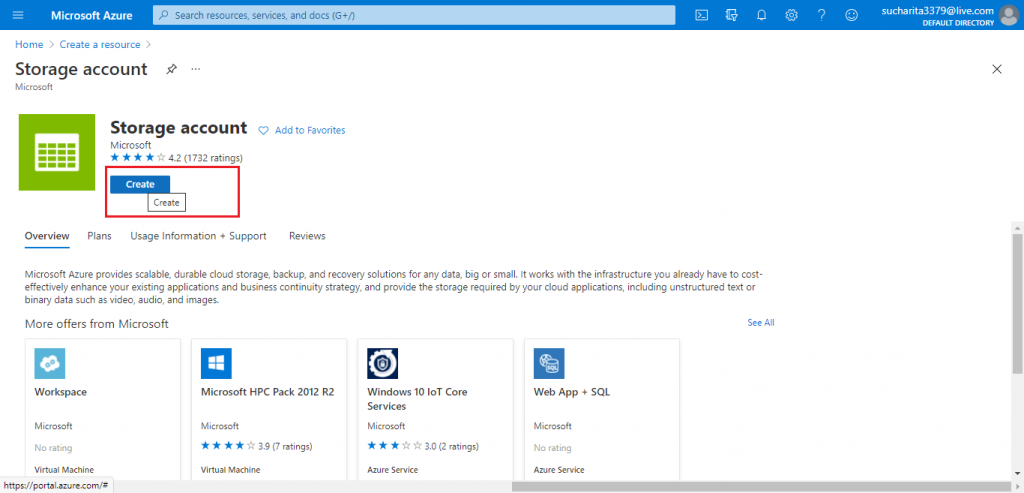
In the next screen, I press the Create button.
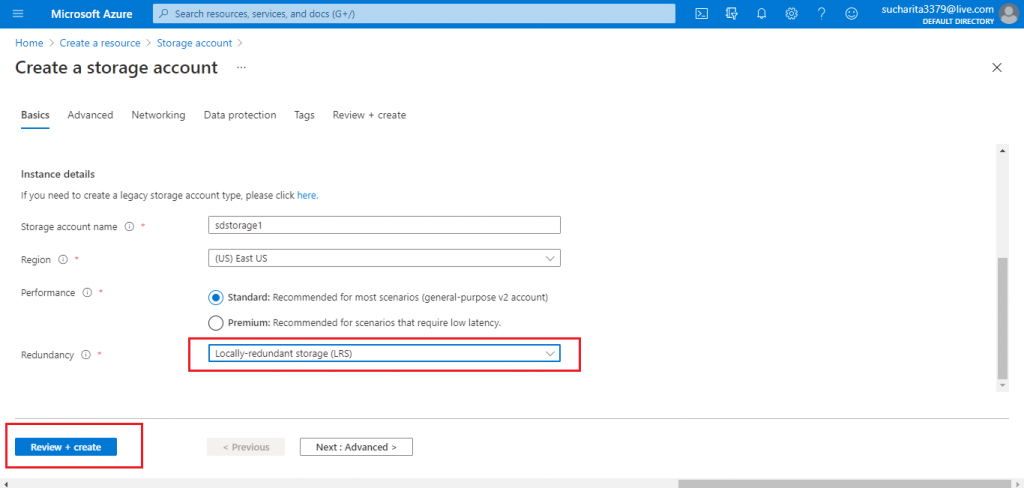
Add Details on the Basics tab
I provide the details of the account in the Basics tab. I need to select one of the four Redundancy options available. I select LRS. Also, I keep the Performance model with the default value Standard.
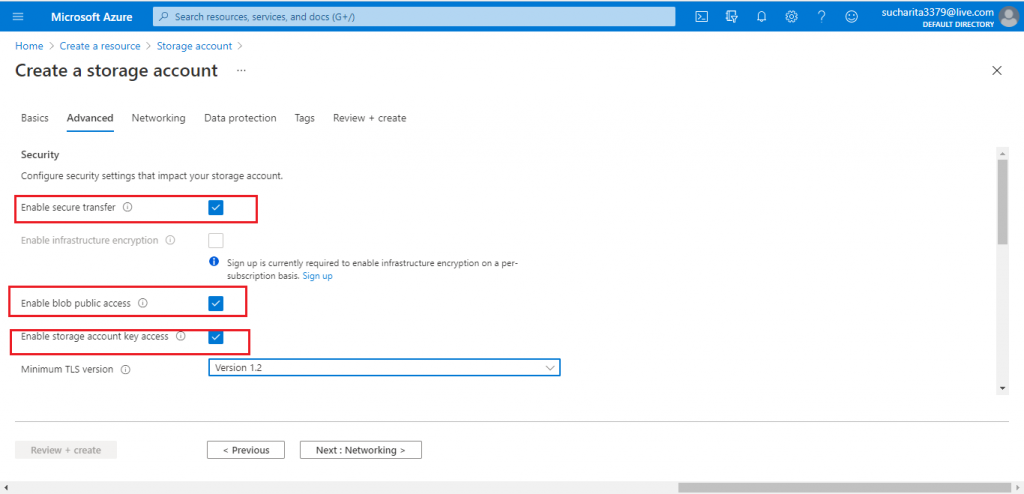
Add Advanced Details
Next, I move to the Advanced tab. I keep the default options set for the security and access related parameters. Change these if your requirements need any of these altered.
The Networking Tab
Next, I move to the Networking tab. I keep the default options for the parameters like Connectivity method and Routing preference.
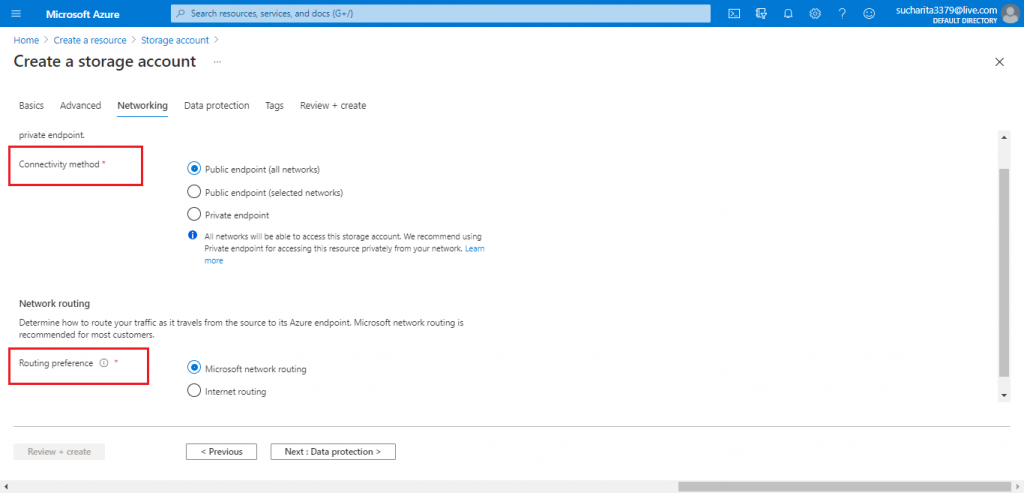
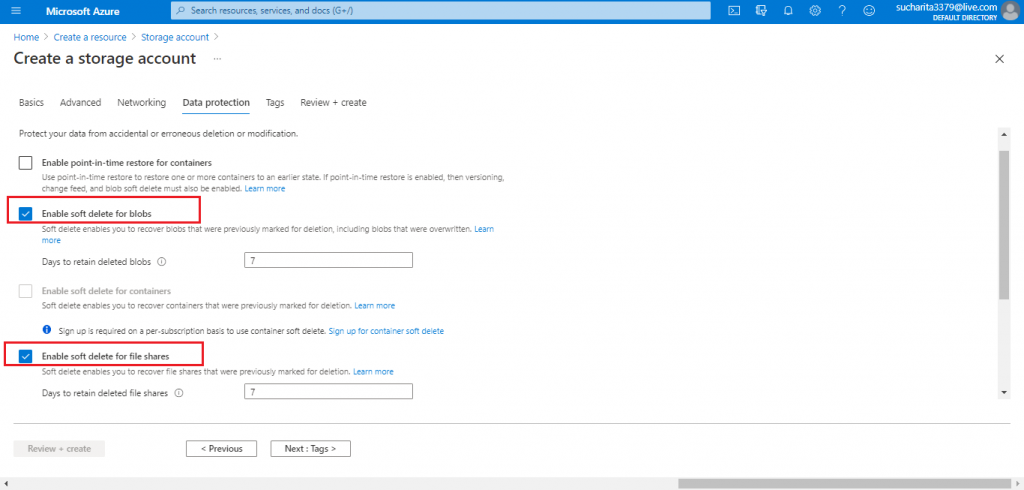
Configure Data Protection
In the Data protection tab, I enable the soft delete option for blobs. Soft delete helps to retrieve the deleted blob in case it was deleted accidentally.
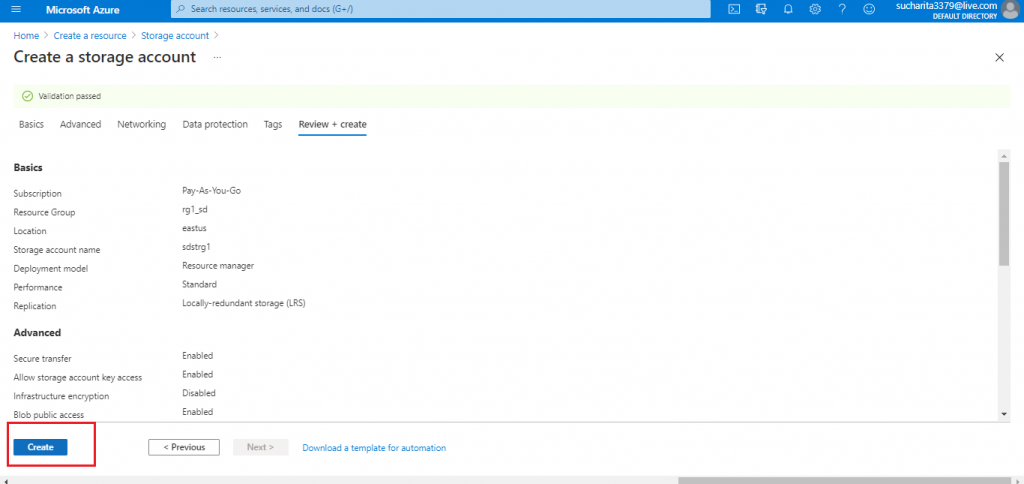
Review the Details and Create the Account
In the Review+Create tab, I review the details provided for the Storage account and press the Create button.
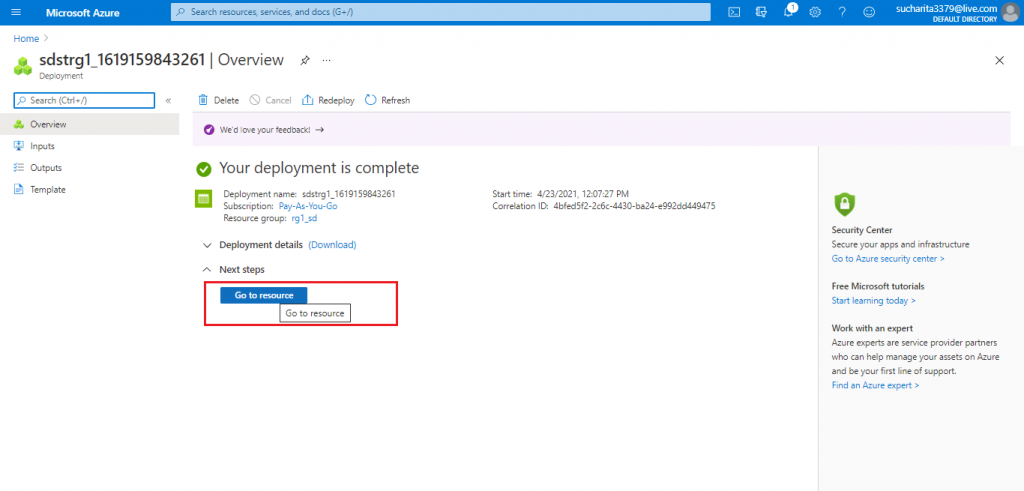
Account Deployment Complete
Once I press the Create button, Account deployment starts. Once the Account deployment is complete, I press the 'Go to resource' button to access the Storage account created.
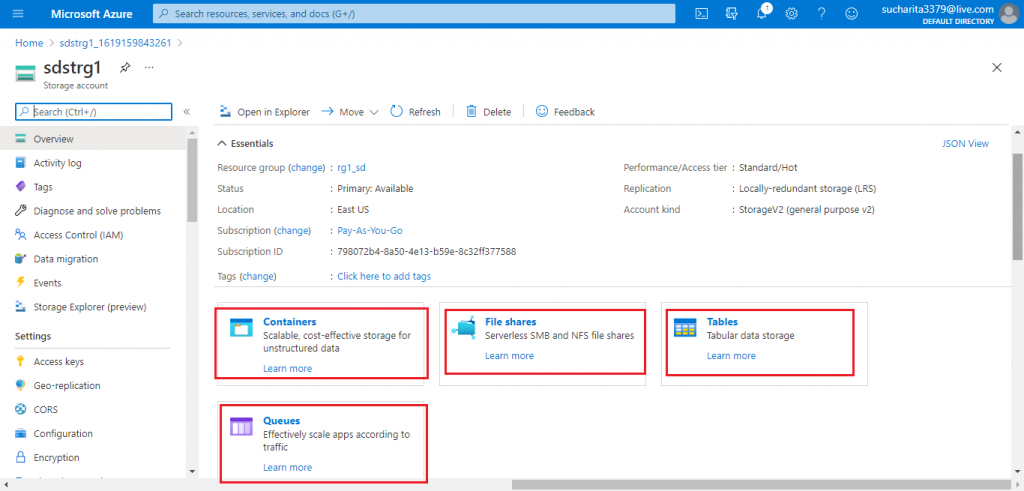
Storage Account Overview
I am in the Overview page of the Storage Account (shown below). As I scroll down, there are options to create and access four types of storage -- Containers, File Shares, Tables and Queues. I press on the Containers link to create Blob storage.
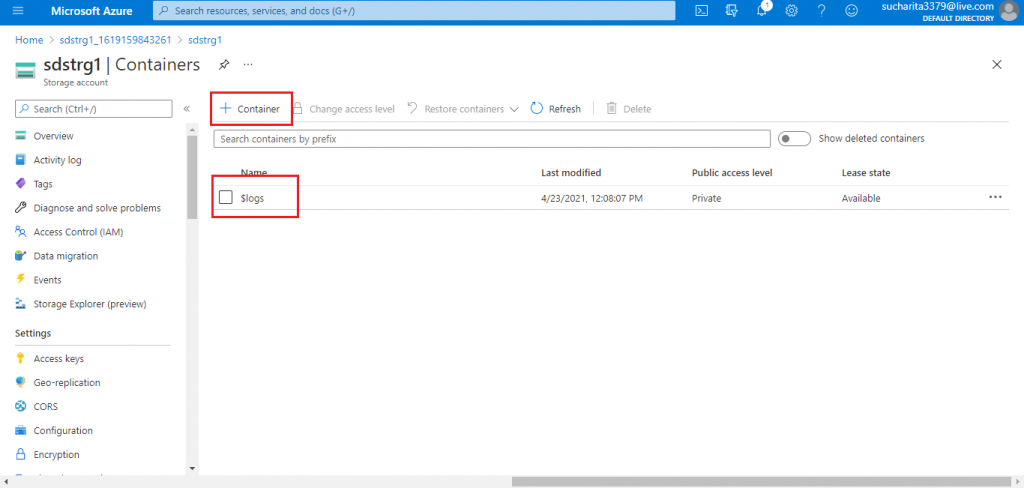
Add a Container
In the next screen, I first need to add a Container. The default container named $logs is available already for storing log data. I press the button '+ Container'.
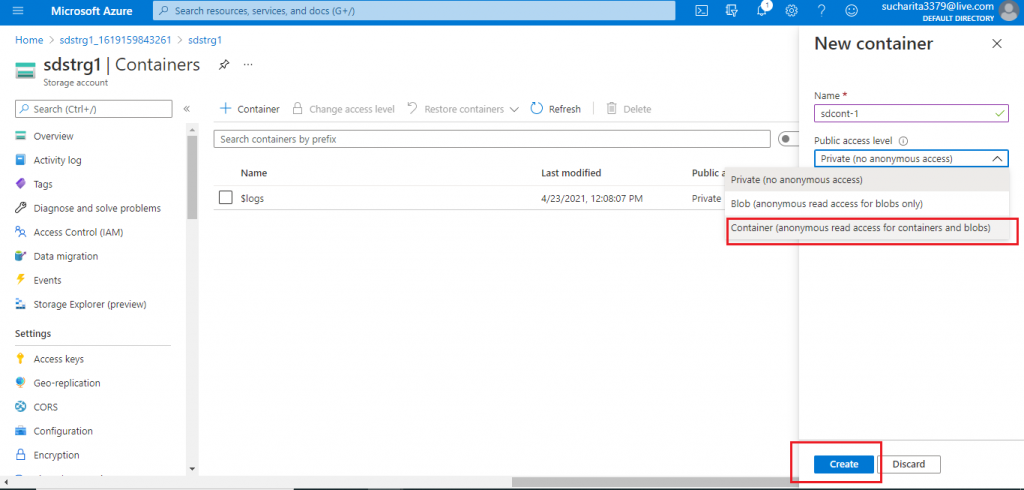
Set the Details
A new pop-up window opens where I need to provide the details for the new container. I supply a name for the container. I select the Container access level from the drop-down list. This access level allows to access the container and its blobs by any user. Next, I press the Create button.
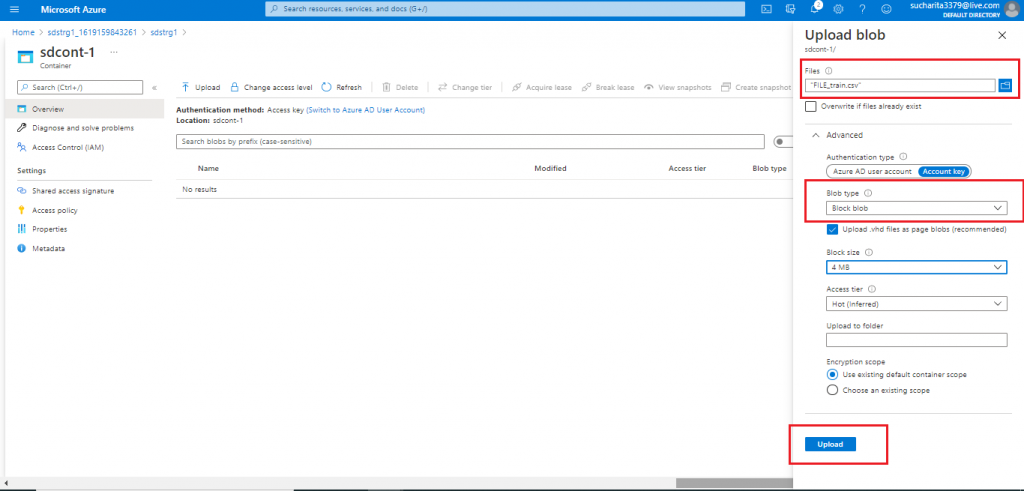
Upload the Blob
Once the container is created, I press the 'upload' button at the top. A new blade opens. In the blade, I need to supply the Blob details. I select a .csv file from my local drive to upload. In the Advanced tab, there is option to choose the Blob type, size and few other details. I keep the default option of Block Blob. Then I press the 'Create' button.
Blob Upload Complete
Once the Blob upload is complete, it is available as an item inside the container. There are options to change the access level and tier for a particular Blob. I may delete the Blob also from here.

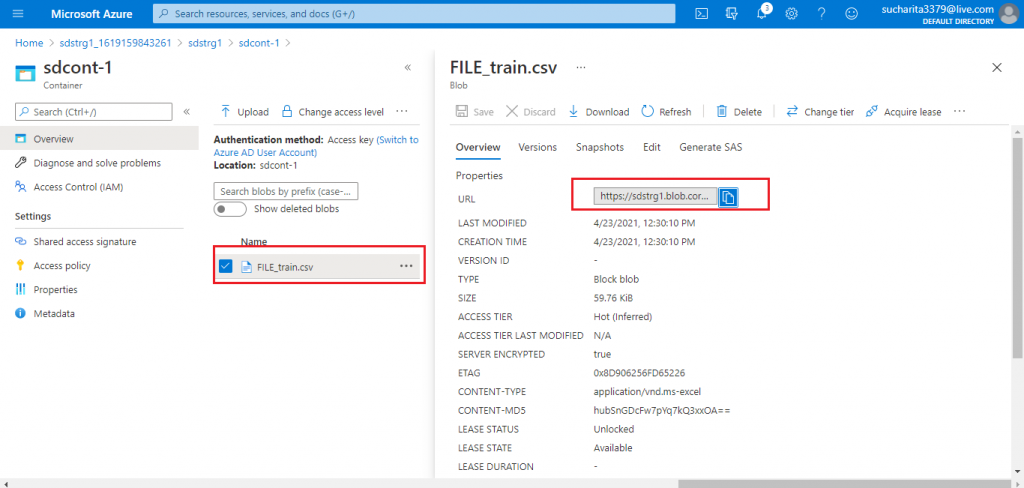
The Blob Link
I click on the Blob and the details page for the Blob is available. I copy the URL given and paste it in the browser and press enter. The file gets downloaded in my local drive as required permission is available for the file.
The link for the blob is: https://sdstrg1.blob.core.windows.net/container1/FILE_train.csv
where sdstrg1 is the name of the storage account, container1 is the name of the container, and FILE_train.csv is the uploaded blob.
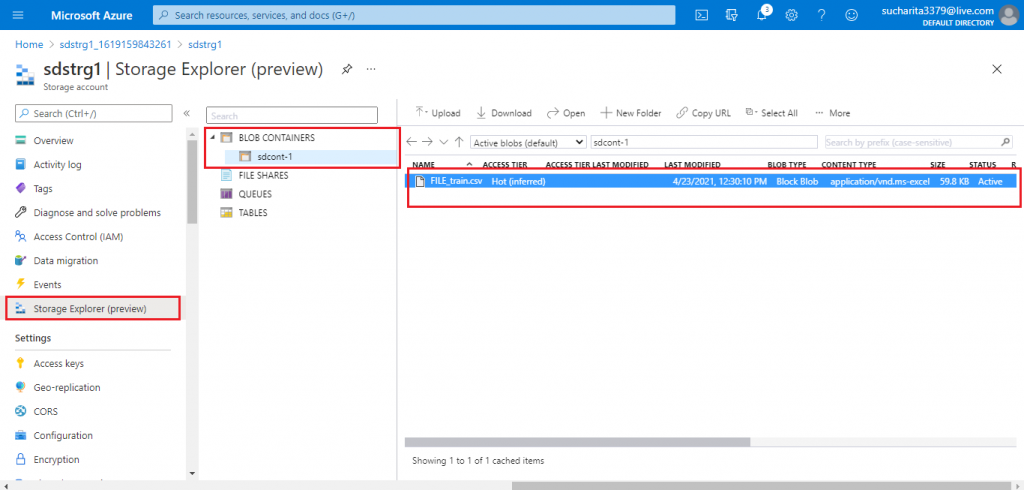
Storage Explorer for the Blob Account
I go to the Storage Explorer tab of the Blob Storage account. This is in preview mode as of April 2021. Storage Explorer helps to view and explore all types of Storage available in the account. The container and the blob inside it are shown under the BLOB Containers tab.
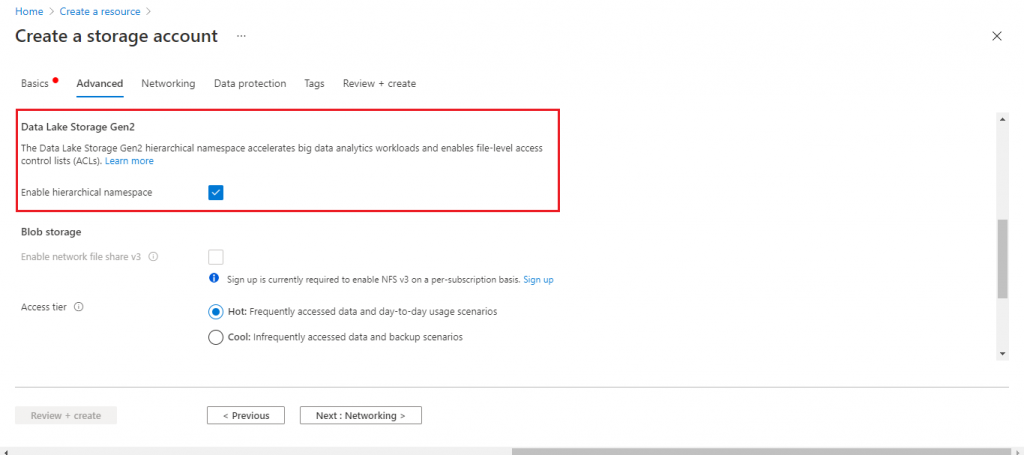
Create Azure Data Lake Storage Gen2 Account
I create another storage account. This time I enable the hierarchical namespace parameter value as it is important for Data Lake Storage Gen2. I provide the other required details and press the Create button.
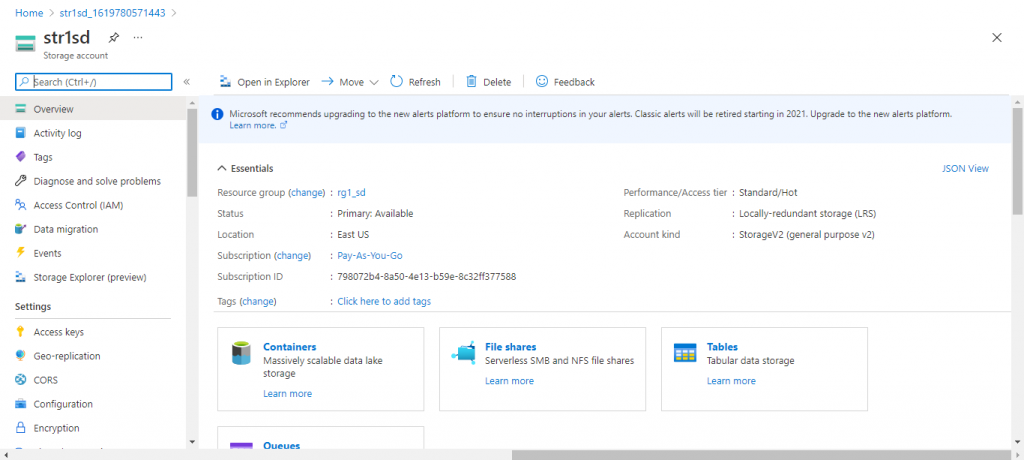
Create a Container
Once the data lake storage account deployment is completed, I go to the Overview page and create a new container.
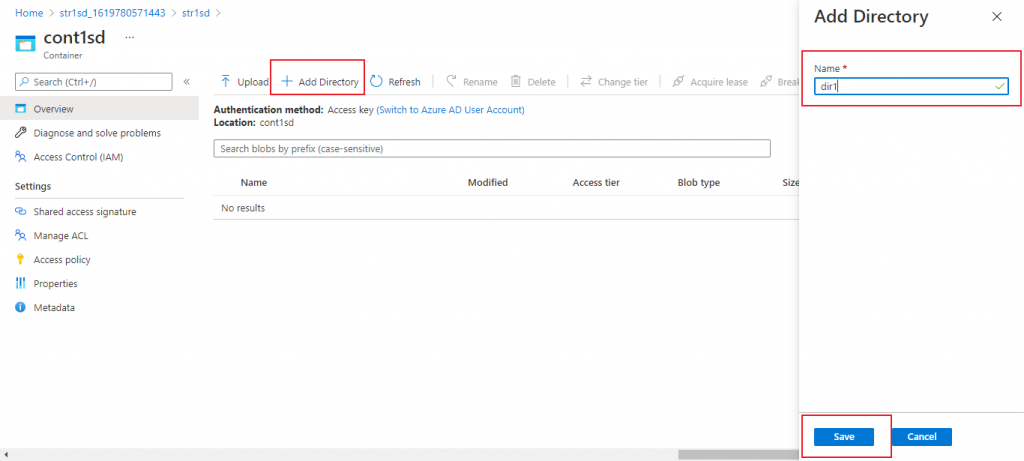
Add a Directory
In the container Overview page, I press the 'Add Directory' button. For Data Lake storage Gen2 account, it is possible to create hierarchical directories before placing the file in the appropriate location. I create a directory named dir1.
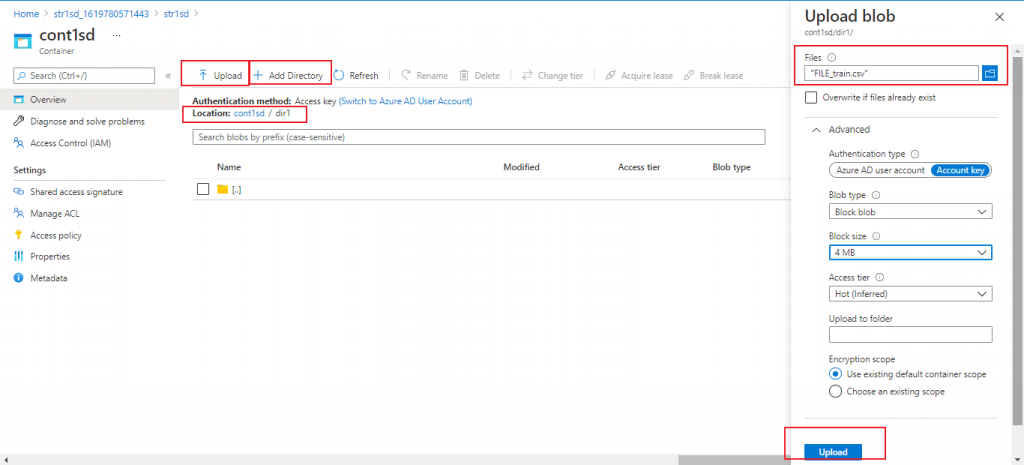
Upload the Blob
Now I am in the Overview page of the directory dir1. I may create another directory under dir1 or I may upload blob. I press the Upload button and provide the required details in the pop-up window.
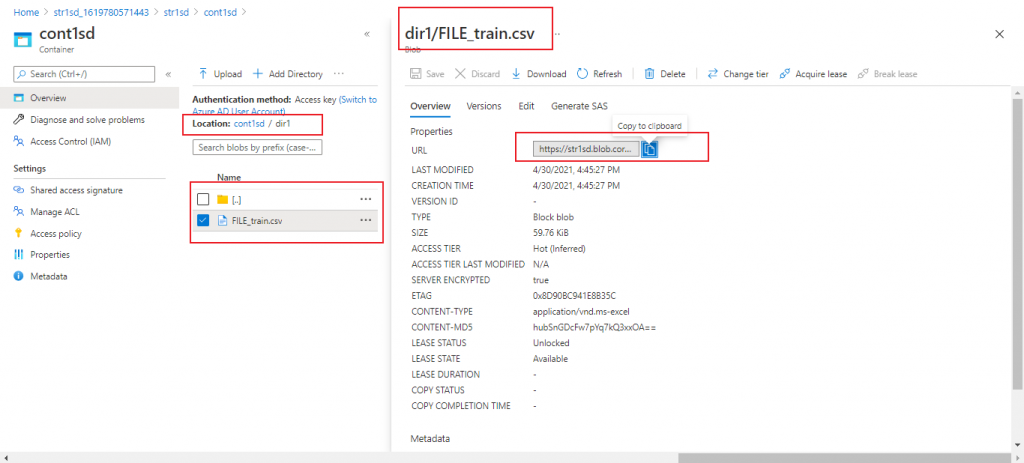
Link of the File
I click on the file as created under dir1 and the details page for the file is available. I copy the URL given and paste it in the browser and press enter. The file gets downloaded in my local drive as required permission is available for the file.
The link is: https://str1sd.blob.core.windows.net/cont1sd/dir1/FILE_train.csv
where str1sd is the name of the data lake Gen2 storage account, cont1sd is the name of the container, dir1 is the location of the file inside the container and FILE_train.csv is the uploaded blob.
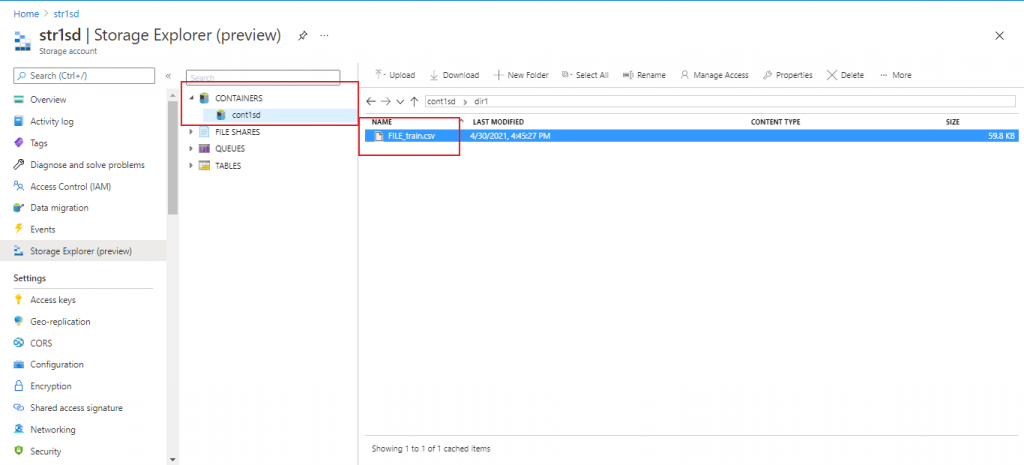
Storage Explorer for the Data Lake Gen2 Account
I go to the Storage Explorer tab of the Data Lake Gen2 account. The container is shown under the Containers tab. I click on the container and the directory created under the container is open. Further clicking on the directory, the file present inside is also listed.
Conclusion
Azure Blob and Azure Data Lake Storage Gen2 are used by other Azure services mainly for data storage and data processing. In this article, I discussed about Blob and Data Lake storage features and their creation steps. The following articles may be referred to see the step-by-step process for loading data from Azure Storage (Blob storage and Data Lake Gen 2 Storage) to Azure Synapse SQL for further processing: Loading data in Azure Synapse using Copy , Loading data in Azure Synapse Analytics using Azure Data Factory and Access external data from Azure Synapse Analytics using Polybase .