

In the 1st part of this series, we implemented and analyzed two approaches to process JSON data in SSIS: reading from 1) files and 2) databases. We used the new JSON functionality in SQL Server, which appeared in SQL Server 2016, and the Json.NET library as two different methods to process the same data. In this part, we’ll consider processing JSON row by row and will form our final conclusion based on both parts of the series.
Approach 3: Processing JSON Row by Row
Usually, I don’t consider sending individual rows to SQL Engine for separate processing as a good idea. Performance is usually better when we process multiple rows in a single query. So, I was very curious to compare the performance of a package that uses the OLE DB Command to process every row (with constant calls to SQL Engine) to a package with the Script Component (processing rows using C# code).
We already created packages in the 1st part to process a JSON array containing multiple records stored in the database. We could even slightly modify the packages to process the same JSON coming from an API. Instead, let’s consider a situation where we’d need to read data row by row coming from an API or from multiple files, since it gives us another unique case to review.
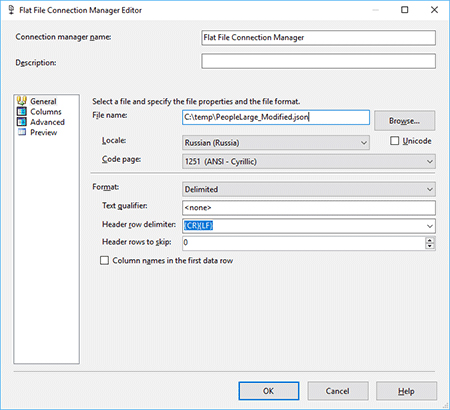
In this example, for simplicity, let’s use the same PersonLarge.json and PersonLarge_Intented.json files. To simulate downloading rows from a service, let’s modify the Connection Manager of the Flat File Sources to split the content of the files into individual JSON rows. It will help us stick with the main goal of the article and avoid spending time on implementing logic for downloading data from real services.
I removed the square brackets from the beginning and the end of the files, along with the last curly bracket. It will allow us to use “},” as a row separator. In order to get a valid JSON for each row, we’ll just need to add a curly bracket to the end of every row. The modified data was saved in PeopleLarge_Modified.json and PeopleLarge_Indented_Modified.json, accordingly. Here is how to configure the Flat File Source to read these files and split the content into multiple rows:
- Drop the Flat File Source to the Data Flow and Double-click on it
- Click on the New… button to create a file connection
- Select the PersonLarge_Modified.json file in the File name field
- Uncheck the Column names in the first data row checkbox

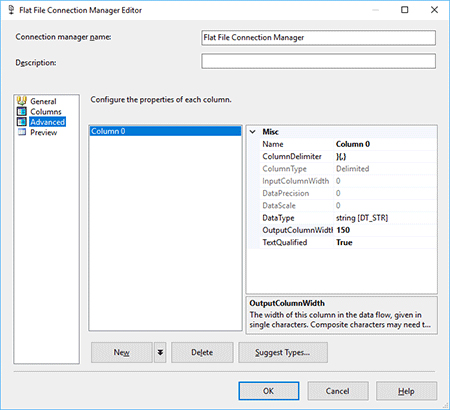
- Go to the Advanced tab and add one column (it’s named Column 0 by default). Its default DataType would be string [DT_STR], we can leave it as it is. I’ve set the OutputColumnWidth property value to 150 and ColumnDelimiter to }{,}
- In the Columns tab, make sure that multiple rows are shown in the Preview rows window.
- Click OK.

Using SQL Functionality
We saw in the 1st part that the implementation of packages with the SQL’s native JSON functionality was simpler than with Json.NET. In this approach, the SQL method is going to be the most complex among all the packages we’ve been considering.
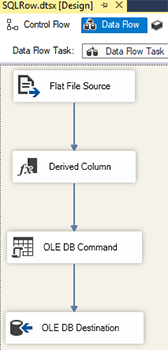
- Create a package (I named it SQLRow.dtsx), add the Data Flow Task, navigate into it and drop the Flat File Source configured as described above to the Data Flow.
- Add the Derived Column to the Data Flow and connect the Flat File Source to it. Since we currently have only one column in the data flow as output of the Flat File Source, we need to add corresponding columns where the parsed data will be stored. Let’s edit the Derived Column:
- Id – Expression: NULL(DT_I4)
- FirstName – Expression: ""
- LastName – Expression: ""
- BirthDate – Expression: NULL(DT_DBTIMESTAMP)
- Add the OLE DB Command and connect the Derived Column to it. Double-click on the OLE DB Command to open the editor. Once the editor opens:
- Select the JsonTest connection in the Connection Managers tab.
- Insert the following into the SqlCommand field in the Component Properties tab:
DECLARE @json VARCHAR(MAX) = ? + '}'

SELECT
  ? = JSON_VALUE(@json, '$.Id'),
  ? = CAST(JSON_VALUE(@json, '$.FirstName') AS VARCHAR(50)),
  ? = CAST(JSON_VALUE(@json, '$.LastName') AS VARCHAR(10)),
  ? = CAST(JSON_VALUE(@json, '$.BirthDate') AS DATETIME)
- Go to the Column Mappings tab and apply the following mapping:
Column 0, Id, FirstName, LastName, BirthDate to Param_0, Param_1, Param_2 and Param_3, accordingly
- Add the OLE DB Destination and connect the OLE DB Command to it. Double-click on the added OLE DB Destination to open the editor. Select the JsonTest connection, then Table or view as Data access mode and the Person table right under.


That’s it! Implementation is a bit complex, but its performance will surprise you, as we’ll see in the conclusion.
Using Json.NET
Like the previous package, I named this one NETRow.dtsx. The structure of it is going to be very similar to the NETDBSource.dtsx created in the 1st part, so I just copied and renamed it. Then
- Replace the OLE DB Source with the Flat File Source configured as described in the beginning of this approach
- Double-click on the Script Component and click on the Edit Script… button to edit its code. We will just replace the Input0_ProcessInputRow method’s content to process a single row rather than multiple rows:
public override void Input0_ProcessInputRow(Input0Buffer Row)
{
    var jsonConverted = System.Text.Encoding.ASCII.GetString(Row.Column0.GetBlobData(0, Convert.ToInt32(Row.Column0.Length)));
    var record = JsonConvert.DeserializeObject<Record>(jsonConverted + "}");
    Row.Id = record.Id;
    Row.FirstName = record.FirstName;
    Row.LastName = record.LastName;
    Row.BirthDate = record.BirthDate;
}

Our packages are ready for testing!
Execution Results
Json.NET was again faster at processing minified JSON (PeopleLarge_Modified.json), but the SQL method was faster with the indented JSON. The time difference was insignificant though. Considering this, I prefer Json.NET for processing data row by row because its implementation is simpler and I always try to avoid sending multiple individual rows to SQL Engine if I have another option. The SQL method can still be a good solution for those who avoid using Script Components, third-party libraries, or etc.
| Elapsed Time | ||
|---|---|---|
| File Name | SQLRow.dtsx | NETRow.dtsx |
| PeopleLarge_Modified.json | 3:07.468 | 2:53.688 |
| PeopleLarge_Indented_Modified.json | 2:50.797 | 2:52.547 |
Conclusion
Throughout both parts of the article, we were considering three different approaches to import JSON data from files, a database and a flow of rows. All the tests were performed on the same machine with installed SQL Server. When dealing with real enterprise environments and considering data transfer expenses, we need to choose a server for data processing carefully. Our tests showed that performance of the JSON functionality in SQL Server is very good and close to the Json.NET library. It was even faster to process indented JSON stored in the database or the data provided row by row by the Flat File Source. The SQL method was very easy to implement in the first two approaches but took more components to create the package in the last approach. When we used the Json.NET library, the most time consuming part of package creation was to create output columns in the Script Component Editor and add C#/VB code with a record class along with mapping its properties to the output buffer. However, we have neat-looking packages in all approaches as a result.
Considering the execution time and amount of effort in implementing packages, I’d prefer to use Json.NET for processing large files or JSON for row by row importing. If I needed to read small files or process data stored in the database, I’d choose the JSON functionality in SQL.
Please don’t consider this article as a final guide on how to choose a specific approach. Every day, we face different circumstances that can easily affect performance and our ultimate decisions as well.
See the source code on GitHub.