

In a previous article, I used a local Python script to import local Excel files to a Local SQL Server. I liked the outcome so much that I wanted to see how difficult it would be to migrate to a cloud-only scenario, specifically one based entirely on Azure.
My initial plan was to use Azure Functions written in Python to move data from Azure Blob Storage to Azure SQL, all orchestrated by Azure Logic Apps. I was anticipating difficulties and expected to make some changes in the . Unexpectedly, the result was simpler than the initial plan; the function can receive events directly from Blob Storage, so the Logic App was not needed.
It was my first attempt at Azure Functions, and I didn’t know what to expect. I was very surprised at how easy it is to build and publish, even though there are plenty of pitfalls along the way. And cherry on top? The code from the previous article almost didn’t need any changes.
Be advised that all these services are paid. However, since I used the less expensive tiers available, I ended up paying just a fraction of a dollar for all the tests I ran; not much considering what I learned.
I’ll focus only on the task. For the complete code, check the article’s GitHub repository.
Setting Up the Infrastructure
First, we need an Azure Blob Storage and an Azure SQL database. There are plenty of options and decisions involved in setting them up, but that is beyond the scope of this article. For our needs, the lowest-cost configuration is sufficient and requires filling out a page of information and pressing the Create button. The Blob Storage should be V2 (all new ones are), and we are going to use a Blob Container, named wwi.
Apart from these resources, we are only missing the main character, which we will be focusing on next: the Azure Function App. Create one with the Flex Consumption plan. For this project, the other options add unnecessary complexity and cost.
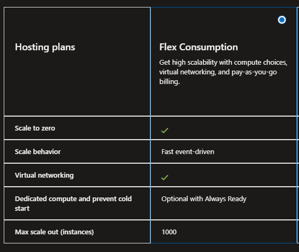
Figure 1 Creating the Azure Function App
Name your function accordingly and choose Python 3.12 as the runtime stack. At the time of writing, versions newer than this don’t work with DuckDB. Also, select the smallest instance size, as it is sufficient for this project.
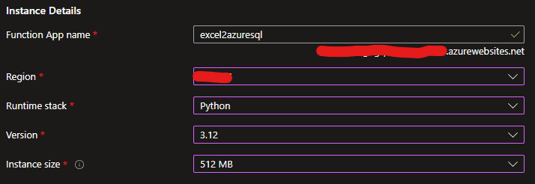
Figure 2 Choosing the Instance Details
To simplify configuration, use the same Storage Account for your application data and Excel files; this avoids manual setup further ahead. To use the same storage account, the Function App and the Storage Account must be in the same Region.
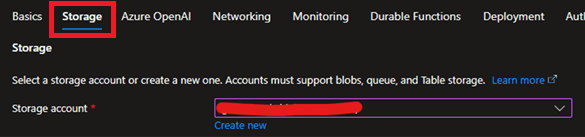
Figure 3 Configuring Storage using the same storage account as the one for the Excel Files
The skeleton is ready, and we can now start coding our function. We will use Azure Functions Core Tools together with a simple text editor. No IDE is required for such a small project. If you, like me, are using Windows, you can install it with:
winget install Microsoft.Azure.FunctionsCoreTools
and we will also be using Azure CLI to do some actions:
winget install Microsoft.AzureCLI
And finally, we will use uv, as it makes Python configuration easier.
Azure Function – the Core of the Solution
We start by preparing the Python environment. In the project folder, which should be empty, run:
uv venv --python 3.12
.venv\Scripts\activate
func init --python
Note that I didn’t run uv init, which I should do if I wanted to have a proper uv project, but I don’t: I just need the environment created so func init can use the correct version of Python. We are not going to use uv, we just need to be sure the environment you create is 3.12.
It’s possible to run azure functions locally if you install and run azurite. It works great for some triggers like HTTP or timer, but we are going to use triggers generated inside Azure that don’t reach the local machine (although it’s possible to simulate them).
Another reason to run it locally is to see if the code runs without errors. You can do it even without azurite. Just install the dependencies you use in the project and run it:
uv pip install -r requirements.txt
func start
The func init --python command created the needed files, including the minimum function_app.py:
import azure.functions as func
import datetime
import json
import logging

app = func.FunctionApp()
We now have an azure function that doesn’t do anything, but which we can publish to test if everything is OK before we start writing code. First, we need to log in to azure:
az login
After logging in, we can publish our empty app. The app must already exist in Azure before you can publish it, so you must use the name of the app you created in the preceding section, in my case: excel2azuresql.
func azure functionapp publish excel2azuresql --build remote
If everything goes right, you should be greeted with "The deployment was successful!” And we can go on to the next step.
Azure Event Grid
Azure Event Grid is a service that distributes events from Azure resources to “interested subscribers”. In our solution, it will act as a messenger between Blob Storage and our function. Whenever a file is uploaded, Blob Storage uses Azure Event Grid to notify the function. The connection is configured in Blob Storage and points to our Azure Function.
Azure Event Grid is usually unregistered, so the first thing is to check if it’s turned on. We could do this on Azure Portal, but it’s easier with Azure CLI:
az provider show --namespace Microsoft.EventGrid --query registrationState
If it says “unregistered” you need to register it:
az provider register --namespace Microsoft.EventGrid
We proceed now to create the function that will be triggered by the event:
func new
You will be presented with a list of available trigger types, so select Blob trigger (using EventGrid source). Next, you will be asked for the following parameters:
| Parameter | Default Value | Use | Obs |
| Function Name | event_grid_blob_trigger | event_grid_blob_trigger | Just the name the function will have in the app. |
| Container Path | blobname | wwi/{name} | wwi is the name of the blog container used to save the files |
| Storage Account Connection String | BlobStorageConnectionString | AzureWebJobsStorage | That’s where the Function App has the predefined Connection String to the App container. This will only work if you used the same storage account used for Excel files. If you used another, you must create a connection string for it. |
After this, the function will be added to the code:
@app.blob_trigger(arg_name="myblob", path="wwi/{name}", source="EventGrid", connection="AzureWebJobsStorage")

def event_grid_blob_trigger(myblob: func.InputStream):
   logging.info(f"Python blob trigger (using Event Grid) function processed blob"
      f"Name: {myblob.name}"
      f"Blob Size: {myblob.length} bytes")
This function will log a message when a file is uploaded. After publishing the function again, and assuming everything goes as expected, we can head over to the Storage Account and create the event subscription that will connect our storage to the function. Go to your Storage Account, open Events and press Event Subscription.
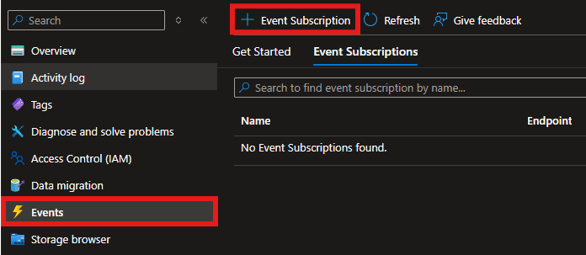
Figure 4 Creating an Event Subscription on the Storage Account
Give a name and a message topic to your event subscription. Choose only Blob Created as the event type and Web Hook as the Endpoint Type. Press configure an endpoint.
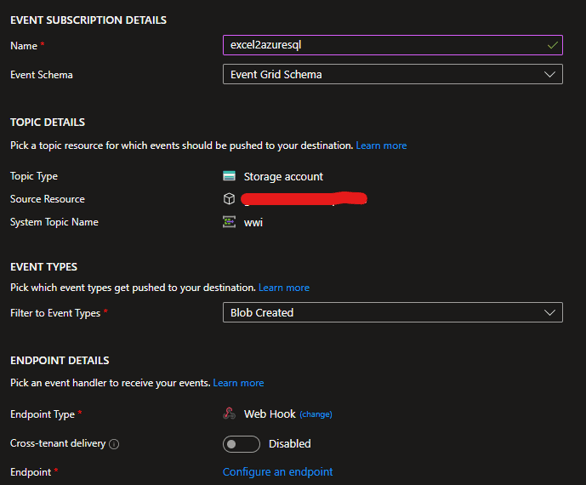
Figure 5 Configuring Event Subscription Details
Now you must enter the path to a Web Hook, which should have this very cryptic structure:
| Part | Example |
| Base function app URL | https://<FUNCTION_APP_NAME>.azurewebsites.net |
| Blob-specific path | /runtime/webhooks/blobs |
| Function query string | ?functionName=Host.Functions.<FUNCTION_NAME> |
| Blob extension access key | &code=<BLOB_EXTENSION_KEY> |
You can see the <FUNCTION_APP_NAME> in the portal:
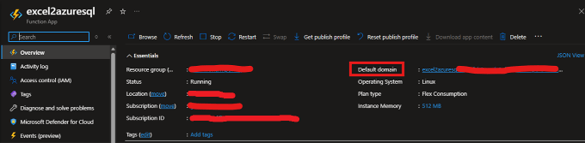
Figure 6 Checking the Azure Function App Name to Use in the Event Subscription
Or you can use Azure CLI:
az functionapp list --query "[].{name:name, defaultHostName:defaultHostName}" -o tableThe <FUNCTION_NAME> is just the name we gave our function, event_grid_blob_trigger, in this case.
For BLOB_EXTENSION_KEY, go to the portal. In the Azure Function App page, look for App Keys:
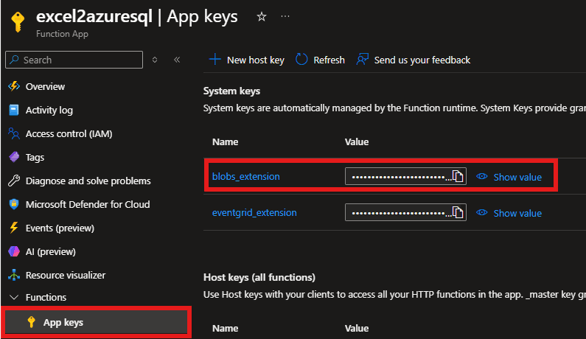
Figure 7 Checking the Blob Extension Key to Use in the Event Subscription
or use Azure CLI :
az functionapp keys list --name excel2azuresql --resource-group <RESOURCE_GROUP> --query "systemKeys.blobs_extension" -o tsv
Join all the parts and enter it on the subscriber end point.
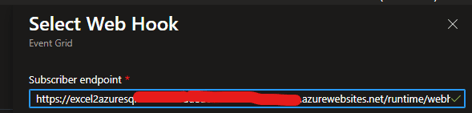
Figure 8 Entering the subscriber endpoint address
We are going to upload our files to the excel-in folder in the wwi blog container. We can filter our event to just fire for those files. Note that we must use the format: /blobServices/default/containers/<OUR CONTAINER>/blobs/<PATH>
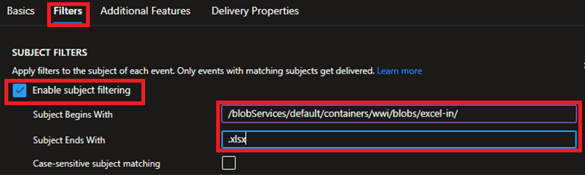
Figure 9 Configuring the filter to just excel files in the wwi/excel-in namespace
And, finally, all the configurations are ready and we can test it!
Processing the files
Let’s upload a file and see what happens. We can use the Azure Portal, the command line AZCopy or Azure Storage Explorer (which is the one we will be using).
One detail worth knowing: if Enable hierarchical namespace is not enabled (the default), there are no real directories. What appears to be directories are actually just prefixes in the blob name, although Azure tools and APIs present them as directories.
Let’s now upload Orders.xlsx to the excel-in folder on the wwi container.
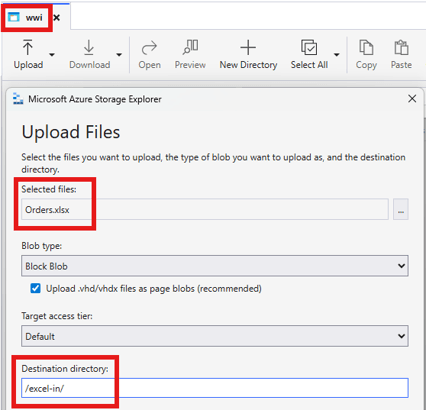
Figure 10 Uploading an excel file in Azure Storage Explorer
This should fire the trigger. Let’s confirm if it’s working. Open your Function App in Azure Portal and press invocations and more for the function.
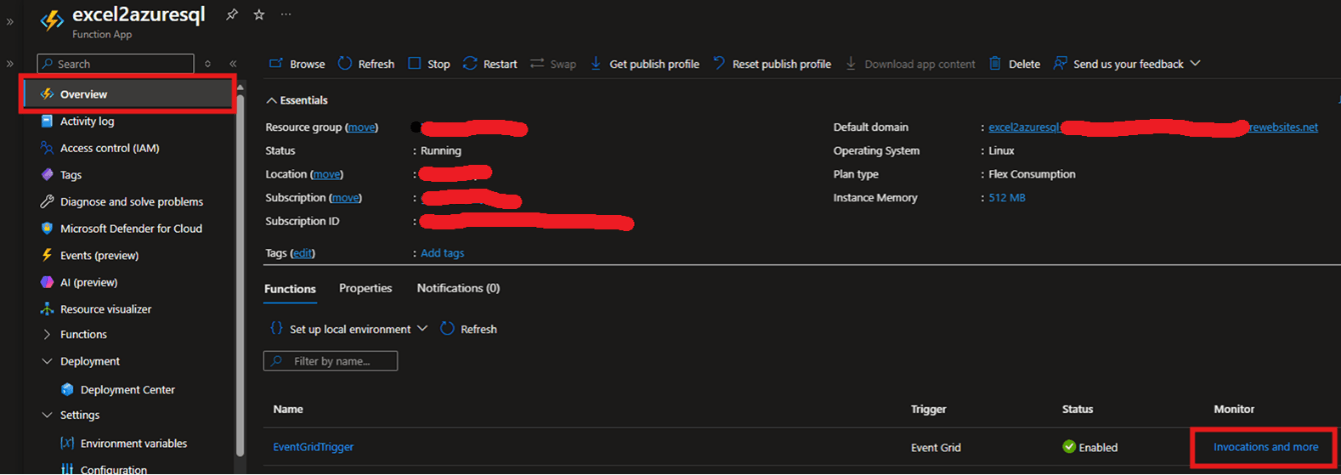
Figure 11 Accessing the Function's Invocation Log
If you see a Success status and the message logged inside the function “Python EventGrid trigger processed and event” it’s now time to celebrate! Getting this workflow operational involves numerous configuration steps, and a single misconfiguration at any stage can break the end-to-end process.
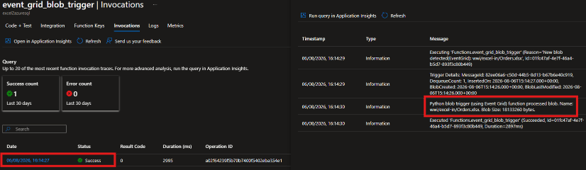
Figure 12 Checking the Function's Invocation Log
From now on, it's just Python!
Saving the file to Azure SQL
We already have the code from the previous article and it just needs a couple of changes.
First we change the trigger function to
def event_grid_blob_trigger(myblob: func.InputStream):
   update_missing_items(myblob.read())
Now we add the update_missing_items function, which will update the SQL database:
def update_missing_items(xlsx_file):
   with tempfile.NamedTemporaryFile(delete=False, suffix=".xlsx") as tmp:
      tmp.write(xlsx_file)
      tmp_path = tmp.name
   rel = duckdb.sql(f"""
      SELECT Suppliers.SupplierName,StockItemName,sum(Quantity-PickedQuantity) MissingQuantity
      FROM read_xlsx('{tmp_path}', sheet='OrderLines') OrderLines
      INNER JOIN read_xlsx('{tmp_path}', sheet='StockItems') StockItems
      ON OrderLines.StockItemId=StockItems.StockItemId
      INNER JOIN read_xlsx('{tmp_path}', sheet='Suppliers') Suppliers
      ON StockItems.SupplierID=Suppliers.SupplierID
      WHERE Quantity <> PickedQuantity
      GROUP BY Suppliers.SupplierName,StockItemName
      ORDER BY SupplierName,StockItemName;
   """)
   df = rel.df()
   n = len(df)
   if n != 0:
      engine = create_engine("mssql+pyodbc://<USERNAME>:<PASSWORD>@<SERVERNAME>.database.windows.net/<DATABASENAME>?driver=ODBC+Driver+18+for+SQL+Server")
      try:
         df.to_sql("MissingItems", engine, if_exists="append", index=False)
      except Exception as e:
          return func.HttpResponse("EXCEL2AZURESQL: Error updating SQL.", status_code=500)
   os.remove(tmp_path)
The biggest difference from the previous code is the creation of a temporary file to use with DuckDB; in the original article we had a file, now we have a variable, and DuckDB needs a file. And previously I used ODBC Driver 17, but in Azure Python 3.12 we must use ODBC Driver 18. I could have used 18 before, no reason not to do it, just happened…
And as a final touch, the code available in the article’s GitHub moves the processed file from excel-in to excel-processed.
Final Comments
What a ride! Getting everything working requires quite a few configurations, and even the smallest mistake can stop the whole process in its tracks. My advice is to take it one step at a time and test each step along the way. I certainly took a few wrong turns before arriving at this working solution, so hopefully this article helps you avoid the same pitfalls.