

Overview
The psycopg2 library makes working with PostgreSQL databases in Python much easier. This has been the most popular PostgreSQL adapter for Python. Whether you're building backend services, data pipelines, or automation scripts, psycopg2 is your go-to library for integrating PostgreSQL with Python.
In this article, we will guide you through everything you need to get started with psycopg2, from installation and basic CRUD operations to best practices for production-ready code.
Prerequisites
To follow along, you'll need:
- Python 3.x installed
- PostgreSQL installed locally or access to a PostgreSQL server
- Basic knowledge of SQL and Python
Step 1: Installing psycopg2
There are two versions:
- psycopg2: Binary, faster to install, includes C dependencies.
- psycopg2-binary: Recommended for development only.
Install via pip:
pip install psycopg2-binary
For production, it's recommended to use:
pip install psycopg2
and compile from source.
Step 2: Create a PostgreSQL Database
If you don’t already have a PostgreSQL database, create one:
CREATE DATABASE testdb;
Also, create a user (if needed) and grant permissions:
CREATE USER testuser WITH PASSWORD 'testpass';
GRANT ALL PRIVILEGES ON DATABASE testdb TO testuser;
Step 3: Connecting to PostgreSQL Using Python
Here's a basic connection example. The psycopg2 library helps to connect to the local PostgreSQL database with the details of the database connection mentioned. Next, we create a cursor on the connection so that we can execute some standard queries and collect the result. Once done, we should carefully close the cursor and the connection in the order they were opened.
import psycopg2

# Establishing the connection
conn = psycopg2.connect(
    dbname="testdb",
    user="testuser",
    password="testpass",
    host="localhost",
    port="5432"
)

# Creating a cursor object
cur = conn.cursor()

# Print PostgreSQL version
cur.execute("SELECT version();")
print(cur.fetchone())

# Close connection
cur.close()
conn.close()
All you need to do is put the above content in a text editor and save the file as postgres_conn.py. Open a command prompt (or similar) terminal from the directory where the file is saved and run the following command:
python postgres_conn.py
If everything is set up properly, you should see the PostgreSQL version printed.

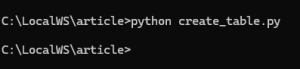
Step 4: Creating a Table
Create a new file named create_table.py and paste the following contents inside it. Save the file and run it the same way as mentioned above.
import psycopg2

conn = psycopg2.connect(
    dbname="testdb",
    user="testuser",
    password="testpass",
    host="localhost",
    port="5432"
)

cur = conn.cursor()

# Create a table
cur.execute("""
    CREATE TABLE IF NOT EXISTS employees (
        id SERIAL PRIMARY KEY,
        name VARCHAR(100),
        department VARCHAR(50),
        salary INTEGER
    )
""")

conn.commit()
cur.close()
conn.close()
If everything is fine, you should see the following output:
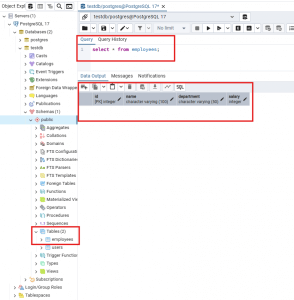
If you navigate to pgAdmin and try to run the query in testdb, you should see the table with no data in it:
Step 5: Insert Data
Next, we will try to insert data into this newly created table. For that, you have to create a new file named: insert_data.py and paste the below content inside it. Save the file and run it as mentioned earlier.
import psycopg2

conn = psycopg2.connect(
    dbname="testdb",
    user="testuser",
    password="testpass",
    host="localhost",
    port="5432"
)

cur = conn.cursor()

# Insert data
cur.execute("""
    INSERT INTO employees (name, department, salary)
    VALUES (%s, %s, %s)
""", ("John Doe", "Engineering", 70000))

conn.commit()
cur.close()
conn.close()
The above code does exactly similar things with the only difference that now with the help of the cursor, we are running an insert query to insert data into the database table.
Note that we use %s in the insert query. This is called a parameterized query. It protects your code from SQL injection attacks. So, it is recommended to always use placeholders!
If everything is fine, you should see the following output:
![]()
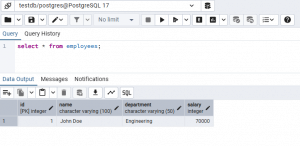
Check from pgAdmin and you should see now the table has a record inserted:
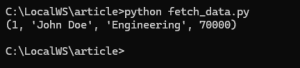
Step 6: Read Data
Similarly, as above, create a new file called fetch_data.py and paste the below contents inside it. Save the file and run it.
import psycopg2

conn = psycopg2.connect(
    dbname="testdb",
    user="testuser",
    password="testpass",
    host="localhost",
    port="5432"
)

cur = conn.cursor()

cur.execute("SELECT * FROM employees;")
rows = cur.fetchall()

for row in rows:
    print(row)

cur.close()
conn.close()
Once you run it, you should see a similar output:
Step 7: Update Data
Create a new file named update_data.py and put the below contents inside it. Save the file and run it to update the existing data.
import psycopg2

conn = psycopg2.connect(
    dbname="testdb",
    user="testuser",
    password="testpass",
    host="localhost",
    port="5432"
)

cur = conn.cursor()

cur.execute("""
    UPDATE employees SET salary = %s WHERE name = %s
""", (80000, "John Doe"))

conn.commit()
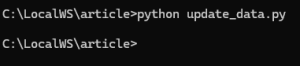
Once you run, you should see a similar output:
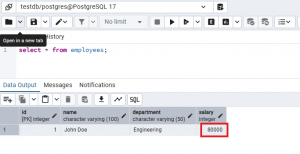
Upon validating from pgAdmin, you should be able to see the changes reflecting there too:
Step 8: Delete Data
Create a new file called delete_data.py and paste the below contents inside. Save the file and run it.
import psycopg2
conn = psycopg2.connect(
dbname="testdb",
user="testuser",
password="testpass",
host="localhost",
port="5432"
)
cur = conn.cursor()
cur.execute("""
DELETE FROM employees WHERE name = %s
""", ("John Doe",))
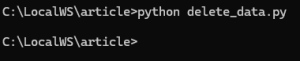
conn.commit()Run the above file and you should get a similar output:
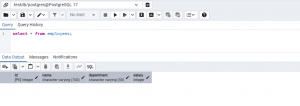
Upon checking from pgAdmin, you should see the table again empty with the only existing record deleted:
Conclusion
We just walked through on how we can install the popular python library psycopg2 and use it inside python script to connect to PostgreSQL database and perform CRUD operations. We can also add try catch blocks in the python script to ensure that in case of database connection and/or operation failures, the exit is handled gracefully and a proper intended error message is shown to the user.