
Now that you know how to get started with PowerShell, it is time to configure PowerShell for SQL Server use. The SQL Server components you need to install or configure are listed below in Table 2.1. What you’ll need to do for set depends on whether or not you have already installed SQL Server 2008 (or later version) tools.
| Item | Description |
| SQL CLR Types | The SQL Server System CLR Types package contains the components implementing the geometry, geography, and hierarchy id types. |
| Shared Management Objects (SMO) | These are objects written to interact with SQL Server via automation. PowerShell is one of those automation tools that leverages these. |
| PowerShell Objects | This includes the SQL Server PowerShell Provider and the PowerShell CmdLets that are in the form of a PowerShell Snapin (PSSnapin) |
Table 2.1 SQL Components to setup for PowerShell use.
If you have the SQL Server tools from 2008 or later, you have what you need already installed.
If you do not have the SQL Server tools from 2008 installed, you need to obtain the components in Table 2.1 or install the SQL Server 2008 tools. You can download these components from http://www.microsoft.com/download/en/details.aspx?displaylang=en&id=16978. You can use Figures 2.1 and 2.2 to ensure that you download the right components. The descriptions you see in the figures will match what you see on the web page. You should choose the processor architecture that you have on your machine. (x86, x64, IA64). Basically this means, 32bit, 64bit or Itanium processors.
Note: When installing on Windows Server 2003, you will need to have Windows Installer 4.5 on the machine in order to install these MSI files.
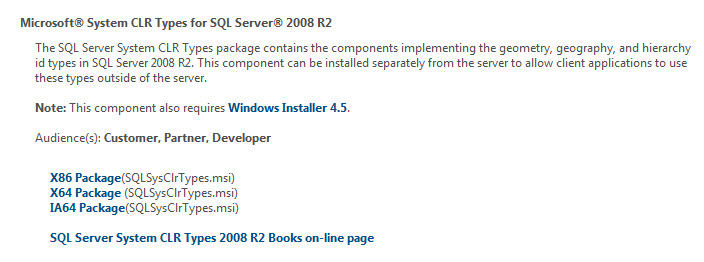
Figure 2.1 Options for downloading CLR types

Figure 2.2 Options for downloading PowerShell Extensions and SMO downloads
Loading SQL PowerShell Provider and CmdLet Snapins
When the components above are installed, you should verify that they are installed correctly and that you can use them. Open a PowerShell window by clicking Start | Programs | Accessories | Windows PowerShell folder and clicking on the Windows PowerShell icon, but be careful not to execute the x86 version of the Shell if you are on a x64 version of the Operating System. When you are inside the window, type the following:
Get-PSSnapin –registeredAfter hitting the ‘enter’ key, you should see something like Figure 2.3. This shows you which Snapins are registered in PowerShell and are available to load. You should make sure that you see the items listed in Table 2.2 in the list of registered Snapins to ensure that the components were installed correctly. Table 2.2 describes these items so that you will be familiar with them. These are the objects that run under PowerShell and give you access to SQL Server as a PowerShell Provider, and also provide two CmdLets to use in PowerShell. To see if they have been loaded already, you can use the command above without the -registered switch. If they are loaded, you will see the items in Table 2.2 in the list.
In Level 1 of this Stairway, you learned about the types of commands that are used in PowerShell, namely Cmdlets, Functions, etc. This provider introduces a Path or Drive (PSDrive) to the objects in the Provider’s path.

Figure 2.3 Get-PSSnapin results
| Snapin Name | Description |
| SqlServerCmdletSnapin100 | This is the Snapin that provides the CmdLets that are available to PowerShell. They include: Invoke-PolicyEvaluation Invoke-Sqlcmd |
| SqlServerProviderSnapin100 | This is the SQL Server Provider that provides a PSDrive called SQLSERVER:\ to navigate into a SQL Server and its objects. You use it just like a drive with SQLSERVER:\SQL\Server\Instance |
Table 2.2 SQL Server Provider and CmdLet offerings
In Figure 2.4 you see how to load the snapins into your PowerShell environment, which you can do after they are registered. In SQL Server’s case, the Provider Path or Drive is SQLSERVER: and shows up in Get-PSDrive results after it is loaded as shown in Figure 2.5. Listings 2.1 and 2.2 give you the code in a form you can use for copying and pasting into your own PowerShell window.

Figure 2.4 Add-PSSnapin for each SQL Server Snapin
Add-PSSnapin SqlServerCmdletSnapin100
Add-PSSnapin SqlServerProviderSnapin100
Listing 2.1 – Commands used to Add Snapins to the current session

Figure 2.5 Get-PSDrive results
Get-PSDriveListing 2.2 – Command to get the Drives from PowerShell
Loading SQL Server Shared Management Objects (SMO)
Next you need to ensure that you have access to SMO for use with PowerShell. These objects are used to interact with SQL Server in many ways and are the same objects that are used by SQL Server Management Studio to perform certain operations. Because they are .NET objects, you load them in a way that they become available to PowerShell much like loading them in Visual Studio. The syntax and results are shown in Figure 2.6 and the reference for the objects that can be used from these libraries are listed at this site http://msdn.microsoft.com/en-us/library/ms162209(v=sql.105).aspx. Listing 2.3 gives you the text you can copy.

Figure 2.6 Load SMO with PowerShell
[System.Reflection.Assembly]::LoadWithPartialName("Microsoft.SqlServer.Smo")
[System.Reflection.Assembly]::LoadWithPartialName("Microsoft.SqlServer.Smo.Extended")
Listing 2.3 – Commands used to load SMO objects into your PowerShell session
The results shown in Figure 2.6 are the objects for SQL 2008 and later versions. The SQL Server 2005 objects have slightly different names, but for now, you have downloaded the SQL 2008 versions of the objects, so you will use Smo and SmoExtended.
With these loaded, you have the necessary tools loaded in your shell to interact with SQL Server using PowerShell. In the previous level you should have set the ExecutionPolicy to RemoteSigned so we will assume that is still in effect.
Building your PowerShell Profile
In the previous Level of this Stairway, you learned about a profile and why you would use it. In this level we will create the profile that will load these components on startup so that you don’t have to load them manually each time. As you learned before, $profile is a variable automatically setup in PowerShell to hold the path to the PowerShell profile that gets loaded each time you start PowerShell. To begin from the last level, in your PowerShell window, type Notepad $profile and the profile will open if the file exists, otherwise it will ask you if you would like to create a new file. When you are inside Notepad and ready to edit the profile, each of the commands will need to be typed or copied into the profile as you see in Listing 2.4.
Add-PSSnapin SqlServerCmdletSnapin100
Add-PSSnapin SqlServerProviderSnapin100

[System.Reflection.Assembly]::LoadWithPartialName(“Microsoft.SqlServer.Smo”)
[System.Reflection.Assembly]::LoadWithPartialName(“Microsoft.SqlServer.SmoExtended”)
Listing 2.4 Code to begin your PowerShell Profile
Save the profile and exit PowerShell, and start PowerShell again. You should see that the Assemblies are being loaded on startup. You can add other things in the profile if you like. There are many scripts available on http://www.poshcode.com and http://www.powershell.com. For example, you may want to change your prompt as you did in Level 1. You may want to load other Snapins or modules like SQLPSX from http://sqlpsx.codeplex.com.
Now let’s put SQL PowerShell to use
Suppose you want to know which version SQL Server is on the local SQL Server. In your PowerShell window, you will see two ways to do get this information, one using the Provider to navigate to the server, and one using SMO to get the SQL Server. Note that both methods eventually end up using an SMO Server object, but the way to obtain the server object can be different. Figure 2.7 shows getting the SQL Server information by using the Provider, like a path to a file system, with the code itself in Listing 2.5. Figure 2.8 shows getting the SQL Server information by using PowerShell syntax to get an SMO object of Server and the code is in Listing 2.6. Both methods can be used to get the Major and Minor versions and the complete Version String of the SQL Server. In this case I am using a local SQL Server, but it is the same as using a remote server, just change the name from localhost to the actual servername and instance. Underlying these two methods, the object that is returned in $server is still a Microsoft.SqlServer.Management.Smo.Server object. It is just obtained in 2 different ways. Figure 2.9 uses the GetType() method to show that these 2 objects are the same type, and the text you can copy and paste is in Listing 2.7

Figure 2.7 Obtain the Major and Minor Versions and Version String via Provider
$server = Get-Item SQLSERVER:\SQL\localhost\default
$server | Select VersionMajor, VersionMinor, VersionString
Listing 2.5 – Commands using the SQL Provider to obtain version information
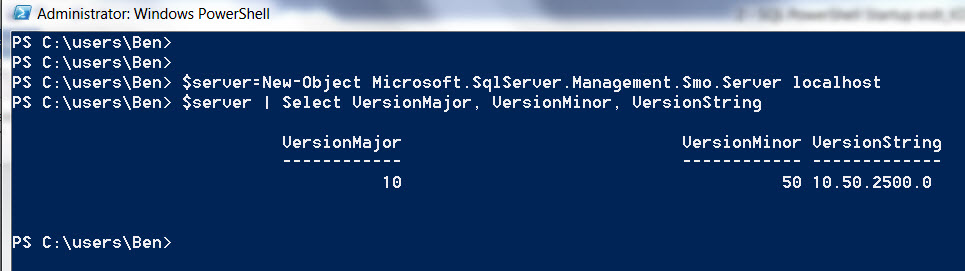
Figure 2.8 Obtain the Major and Minor Versions and Version String via SMO
$server=New-Object Microsoft.SqlServer.management.Smo.Server localhost
$server | Select VersionMajor, VersionMinor, VersionString
Listing 2.6 – Commands using the SMO objects to obtain version information

Figure 2.9 Either way, they are both Smo.Server objects
$server = Get-Item SQLSERVER:\SQL\localhost\default
$server.GetType().FullName

$server = New-Object Microsoft.SqlServer.Management.Smo.Server localhost
$server.GetType().FullName
Listing 2.7 – Commands to get Variable Types using each method
As you can see, the SQL Server Provider for PowerShell and the SMO objects can interact with SQL Server and give you some very good information about your SQL Server instance. You are now ready to go to the next level. Have a little fun and in either window, just type $server and hit enter (it will take some time, be patient) and see what information you get back. Until next level, have a great time with SQL Server PowerShell.