

For this post I am going to talk about one of the methods I use to manage my Azure resources.
The prime driver for this is what I call “Infrastructure as Code +”. In my previous blog post “How Azure can assist the deployment of our applications” I talk about how awesome Infrastructure as Code is. Using PowerShell to spin things up and control/manage them is great – but the Azure platform takes things next level.
Because I can now truly spin up resources in seconds where doing things On-Premises (even in a virtual setting) can still take a little time. Sure I can push a button and walk away know it will be a declarative, standard and automated deploy of infrastructure – but it still takes longer than anything I can do in Azure.
At work I’m a windows guy, at home I run MacOS (it’s a long story – buy me a beer one day and I’ll tell you). I also run some Linux stuff but that is an even longer story…
So one of the first things I did when I was mucking about with Azure was install the Azure PowerShell SDK on my work laptops and then install the Azure CLI on my home Mac.
So I visited https://azure.microsoft.com/en-us/downloads/ to get everything I needed and followed the instructions in https://docs.microsoft.com/en-us/cli/azure/install-azure-cli
Because there are so many articles written on the internet around Azure PowerShell on windows I am going to show how I do things using the Azure CLI on Mac.
So I ran:
curl -L https://aka.ms/InstallAzureCli | bashYou just go with the defaults.
On the Mac I am running:
HamishWatson$ azure –version
0.10.8 (node: 4.7.0)
The install was very painless – as most things in the *nix are (most of the time until that time they aren’t and then it hurts real bad and you google a lot and read a lot of BBS..)
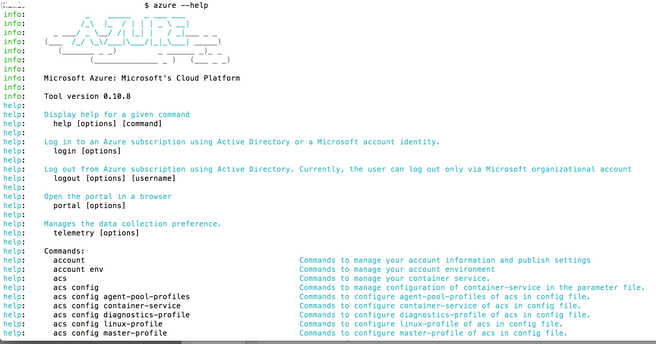
The cool thing is I forget a command I can easily get help by typing:
HamishWatson$ azure –help
One of the first things I did was connect to my existing Azure portal subscription. Which was fairly simple:
HamishWatson$ azure login
info: Executing command login
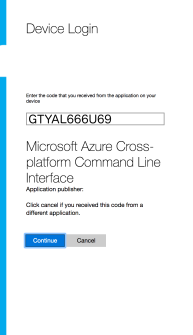
–info: To sign in, use a web browser to open the page https://aka.ms/devicelogin and enter the code GTYAL666U69 to authenticate.
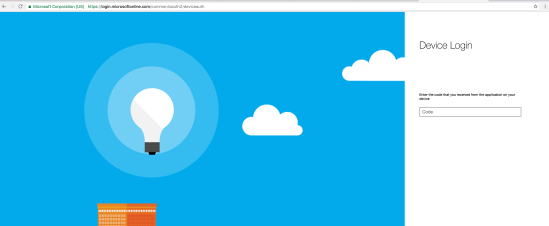
And then enter in the code:
And choose the right account to access Azure:
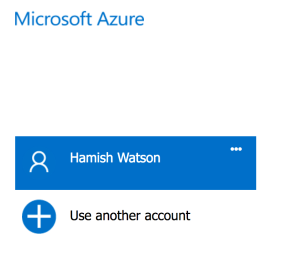
Which then links your terminal session with your Azure Portal session.
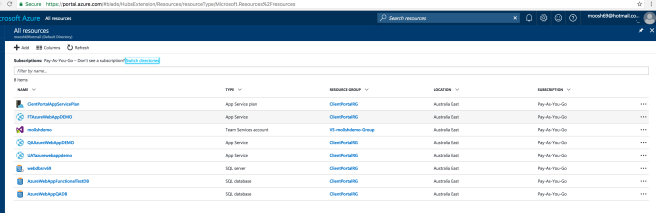
We can now do some familiar tasks like list our resources:

Which looks quite familiar:
Listing resources is one thing but MAKING resources (and ultimately stuff go) is the goal here.
And this is where things got a little weird.
You can use azure or az. Most scripts use az so you need to ensure that you have it installed properly.
The az application resides in /Users/<your username>/bin/ so make sure you update the $PATH with that.
So doing some of the above:
bash-3.2$ az –version
azure-cli (2.0.1)
Remember the help from above – here it is using az:
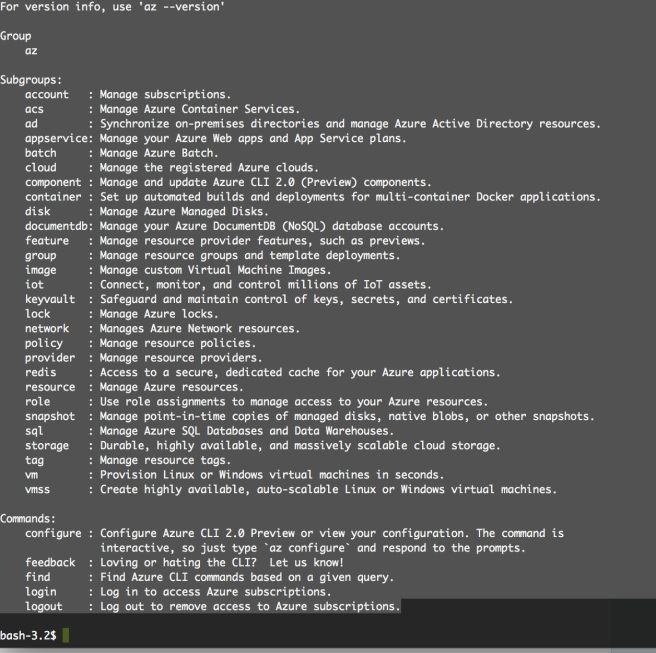
So as you can see – az is very powerful for allowing us to create things – many things.
I’m a database guy so I want to do stuff with the sql command above.
At any step of the wayI can get some help.
So for the sql subgroup:
bash-3.2$ az sql –help
Group
az sql: Manage Azure SQL Databases and Data Warehouses.
Subgroups:
db : Manage databases.
dw : Manage data warehouses.
elastic-pool: Manage elastic pools. An elastic pool is an allocation of CPU, IO, and memory resources. Databases inside the pool share these resources.
server : Manage servers. Servers contain databases, data warehouses, and elastic pools.
And for help about the database part:
bash-3.2$ az sql db –help
Group
az sql db: Manage databases.
Subgroups:
replica: Manage replication between databases.
Commands:
copy : Creates a copy of an existing database.
create : Creates a database.
delete : Deletes a database or data warehouse.
list : Lists all databases and data warehouses in a server, or all databases in an elastic pool.
restore: Creates a new database by restoring from a database backup.
show : Gets a database or data warehouse.
update : Updates a database.
And lastly – to create a database and I’m not sure of the command:
bash-3.2$ az sql db create –help
Command
az sql db create: Creates a database.
Arguments
–name -n [Required]: Name of the Azure SQL Database.
–resource-group -g [Required]: Name of resource group. You can configure the default group using ‘az configure –defaults group=’.
–server -s [Required]: Name of the Azure SQL server.
–collation : The collation of the database. If createMode is not Default, this value is ignored.
–edition : The edition of the database.
–elastic-pool : The name of the elastic pool the database is in. If elasticPoolName and requestedServiceObjectiveName are both updated, the value of requestedServiceObjectiveName is ignored.
–max-size : The max storage size of the database. Only the following sizes are supported (in addition to limitations being placed on each edition): 100MB, 500MB, 1GB, 5GB, 10GB, 20GB, 30GB, 150GB, 200GB, 500GB. If no unit is specified, defaults to bytes (B).
–sample-name : Indicates the name of the sample schema to apply when creating this database. If createMode is not Default, this value is ignored.
–service-objective : The name of the configured service level objective of the database. This is the service level objective that is in the process of being applied to the database. Once successfully updated, it will match the value of serviceLevelObjective property.
–tags : Resource tags.
Global Arguments
–debug : Increase logging verbosity to show all debug logs.
–help -h : Show this help message and exit.
–output -o : Output format. Allowed values: json, jsonc, table, tsv. Default: json.
–query : JMESPath query string. See http://jmespath.org/ for more information and examples.
–verbose : Increase logging verbosity. Use –debug for full debug logs.
Through the use of JSON we can build up a template (or use one of the Azure ones and edit for our own usage).
So to create a database on our existing server – what existing server you ask?
Well let’s find it:
bash-3.2$ az sql server list –resource-group ClientPortalRG
[
{
“administratorLogin”: “azuremanager”,
“administratorLoginPassword”: null,
“externalAdministratorLogin”: null,
“externalAdministratorSid”: null,
“fullyQualifiedDomainName”: “webdbsrv69.database.windows.net”,
“id”: “/subscriptions/5c4fc285-ddba-4280-93cf-3a965cbce836/resourceGroups/ClientPortalRG/providers/Microsoft.Sql/servers/webdbsrv69”,
“kind”: “v12.0”,
“location”: “Australia East”,
“name”: “webdbsrv69”,
“resourceGroup”: “ClientPortalRG”,
“state”: “Ready”,
“tags”: null,
“type”: “Microsoft.Sql/servers”,
“version”: “12.0”
}
]
So now let’s create a database called UATDB1 in the Basic Edition (as I don’t want to pay much for it per month):
az sql db create –name UATDB1 –resource-group ClientPortalRG –server $servername –edition Basic
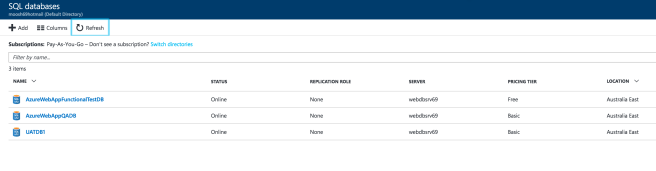
Within about 20 seconds we now have a new database – from the CLI:

And we can see it in the Azure Portal:
So there we have it – how to create an Azure SQL database from the Azure CLI on a Mac…
Yip.

![]()
