

Hello everybody! Thanks for stopping by again. In Part 1 of this series, I gave the background of the project, and the initial steps taken and I left off discussing some code review. I am going to pick up on this blog starting from there.
Identifying Incompatabilities
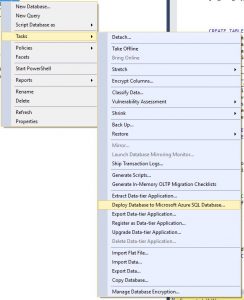
I chose to do the deployment of the smallest database first. I chose this strategy as this would be one of the first migrations I had performed, I wanted to start small and develop my technique before moving onto one of the bigger databases. To start, I logged into the SQL instance hosted on the VM. By right-clicking on the database, I then chose Tasks > Deploy a Database to Microsoft Azure SQL Database(See below picture)
Once you click on Deploy Database to Microsoft Azure SQL Database you are prompted with another wizard to deploy the database. Click next on the first window, and you will see something similar to the below picture:
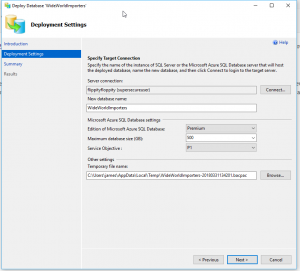
My settings were filled out already, however yours will likely not be. If you click connect next to the Server Connection field, you will receive a login window from SSMS. Put in your DBaaS server name, your username and password, then click on connect. You will be brought back to this screen and you will see your server name in the field along with the user you are deploying the database with. Choose your database name, it does not need to be the same name as it is currently. Now, the next few settings will vary from database to database. I normally choose Premium for my “Edition of Microsoft Azure SQL Database”. Why you ask? Simple. It’s because it’s being written to SSD storage, which normally speeds up the operation. For the “Maximum database size(MB)” I normally choose about 100 GB more then the database size currently. The “Service Objective” will vary from database to database, you can read more about the differences in Service Objectives here: Azure SQL Database Service Tiers. For this database, I chose P1. The last field, this is the location that SQL Server will create the bacpac file that is going to be deployed. What is a bacpac you ask? Great question, a bacpac is simply a ZIP file with the extension of bacpac that contains the metadata and data of your SQL database. Make sure you choose a location that has enough space to store this file.
Once you have all of those settings filled out, click Next to go to the Summary page. Review everything here and go back and make changes to anything that is incorrect. Once everything is right, click finish to begin the process of deploying your database. Now, if everything in your database is compatible you will receive no errors. If you do receive errors, document them down. I like to copy the entire message it gives and save it to a file. Then I begin reviewing the errors, and making the required changes in order to deploy my database to Azure SQL Database.
Code Review
You might be wondering, I thought Jim said we were going to be doing a code review, but all he has talked about so far is deploying the database, did he lie to me!? No, but I needed you to be able to get your own errors so I could discuss how we performed the deployment and reviewed the code! I promise, the code review is next!
With the first database we deployed, we had a few minor errors: Windows login incompatible with Azure SQL Database(Azure AD Authentication is the supported method for this). To fix those, we simply dropped the Windows users from the database and then deployed successfully! Woohoo! It’s going to be so simple I thought. Ha! I was wrong! The next database we wanted to deploy was one of the bigger ones and the main database for my clients applications. It is a good time to mention, I was working with restored copies of the databases, not the actual live ones. I used the same method as I did before by deploying the database from SSMS. This time, I received SOOOO many errors! Here is the error that occurred majority of the time:
Error SQL71562: Error validating element [dbo].[MY_TABLE]: Procedure: [dbo].[UPDATEMYTABLE] contains an unresolved reference to an object. Either the object does not exist or the reference is ambiguous because it could refer to any of the following objects:[dbo].[MYOTHERTABLE]. External references are not supported when creating a package from this platform.
So what does that mean? Does this mean I cannot deploy my database to Microsoft Azure SQL Database!? Absolutely not! It just means that you are going to have to make some changes before the database can be used for Production. The first step I took was document the errors into a notepad, and save them as “DatabaseName-DeploymentErrors”. I then review all of the errors and begin my changes. For the above error, I dropped the Stored Procedure from the copy database. I did this for the rest of the same errors as well, dropping each Stored Procedure that made the cross-database calls. Once all of the procedures were dropped, I then deployed the database again, this time successfully! The database was now being hosted on Azure SQL Database.
Now to fix those procedures that I dropped. I made a list of the procedures that were dropped, so I went to the production database still hosted on the VM and scripted out the create statements for each one. I looked at the cross database queries in each procedure and made a list of all of the table names along with their corresponding databases. The fun part then became to creating the external data sources, and external tables.
First I needed to make two things for EACH database I was going to be making calls to/from. Here is the code I used for those:
CREATE MASTER KEY ENCRYPTION BY PASSWORD = '<SuperSecurePassword>'
GO

CREATE DATABASE SCOPED CREDENTIAL CredentialName
WITH IDENTITY = 'ExistingUserInDatabase',
SECRET = 'PasswordForExistingUser';
GO
It is important to note that the database scoped credential is a user that already exists in the database you are calling from/calling to.
Once I had the above completed, it was time to make the External Data Sources for each table that was being called to. I liked to name mine with the following naming convention to make it easier to troubleshoot if needed: Database name_Table Name. Here is a code example:
CREATE EXTERNAL DATA SOURCE DBNAME_TABLENAME WITH
(TYPE = RDBMS,
LOCATION = 'MYSERVER.database.windows.net',
DATABASE_NAME = 'Databsae Name',
CREDENTIAL = <credential created>
) ;
Once my sources were made, I then created my External Tables. Again, the naming convention I used would be: Database name_Table Name. Here is that code example:
CREATE EXTERNAL TABLE [DatabaseName_BARBRI_TableName](
[Column1] [bigint] NOT NULL,
        [Column2] [nvarchar(50)],
        [Column3] [char(1)],
)
WITH
(
DATA_SOURCE = DatabaseName_BARBRI_TableName, SCHEMA_NAME = N'dbo',OBJECT_NAME = N'Table_Name'
);
GO
Once I had all of the above created, I then tested my External Tables by expanding my Azure SQL Database in SSMS, expanding tables, then expand the External Tables Section. I would then right-click the top table and do a Select Top 1000 Rows. As long as the data returned, I knew the setup was complete. If I would receive an error I would troubleshoot that specific error. Normally it was due to me fudging the password. I would copy the password, but sometimes it would get an extra space at the end.
After everything was created, and validated, I would combine ALL of the creation scripts into one .SQL file and save it as: DatabaseName_ExternalSourceCreations. This way when it came time to do this for Production, all I would need to do is run that script and everything would create via one script run.
Summary
To recap this post, we did the following. 1) We identified the objects that would not deploy to Azure SQL Database due to incompatibilities 2) We made a list of those objects 3) We dropped those objects and saved the script with the name: DatabaseName_DropStatements. 4) We reviewed each of the dropped Stored Procedures in the live database and made a list of all of the cross table calls. 5) We scripted out the creation of a Master Key, a Scoped Database Credential, External Data Source Creation, and External Table Creation. 6) We tested the External Tables returned data. 7) We created a script that contained all of the needed pieces to create External Data Sources and External Tables named: DatabaseName_ExternalSourceCreations.
In our next post, I will work with the procedures that were dropped and modify the cross database calls to use
