

Here is a quick guide to getting started with the SQLUndercover Inspector.
Pre-requisites:
- SQL 2012 or higher
- SQL Server Agent
- A database to store the the data collected by the agent jobs (this can be one you use for your other DBA needs it doesn’t have to be a dedicated database)
Optional:
- For instances with availability groups you will need Linked Servers from your SQL server replicas to point to a central central database, this is so that the backups check can look for backups against all replicas and insert this in a central database allowing the report to aggregate the data. Hopefully in a later version we will be able to remove this requirement.
Quick setup using default options:;
- Grab the setup script from GitHub and paste into a new query window, set the database context to your logging database.
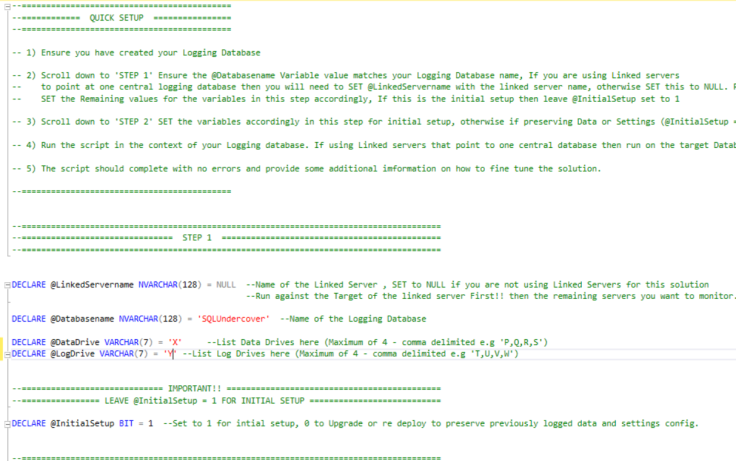
- Scroll down to the ‘Quick Setup’ section and locate ‘Step 1’
- Set the following parameter values as required:

- @LinkedServername – Name of the linked server you will be using or leave as NULL if you are not going to be using linked servers.
- @Databasename – Name of the Logging database (Cannot be NULL)
- @DataDrive – SET the drive letter where your database Data files are stored
- @LogDrive – SET the drive letter where your database Log files are stored
- @InitialSetup – For initial setup leave as 1, if re running or upgrading then set this to 0 to retain all previously logged data
- Scroll down to ‘Step 2’
- Set the following parameter values there are some default values set , these can always be changed at any time by changing the values set in the Inspector.Settings table:
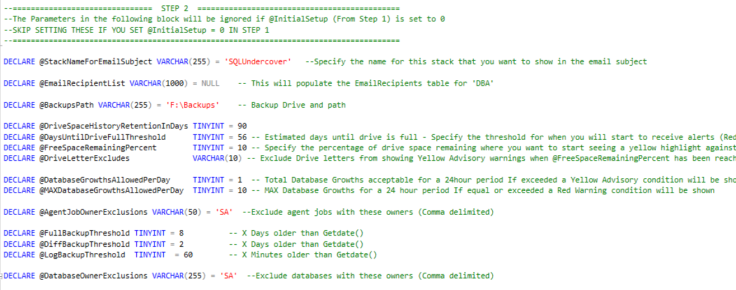
@StackNameForEmailSubject – e.g. ‘SQLUndercover’ Specify a name for the stack you are reporting on that you want to show in the email subject
@EmailRecipientList – Set email recipient addresses (comma delimited) This will populate the EmailRecipients table for ‘DBA’
@BackupsPath – e.g ‘F:\Backups’ – Backup Drive and path
@DriveSpaceHistoryRetentionInDays e.g. 90
@DaysUntilDriveFullThreshold e.g. 56 – Estimated days until drive is full – Specify the threshold for when you will start to receive alerts (Red highlight and Alert header entry)
@FreeSpaceRemainingPercent e.g. 10 – Specify the percentage of drive space remaining where you want to start seeing a yellow highlight against the drive
@DriveLetterExcludes – Exclude Drive letters from showing Yellow Advisory warnings when @FreeSpaceRemainingPercent has been reached/exceeded e.g C,D (Comma Delimited)
@DatabaseGrowthsAllowedPerDay e.g. 1 – Total Database Growths acceptable for a 24hour period If exceeded a Yellow Advisory condition will be shown
@MAXDatabaseGrowthsAllowedPerDay e.g. 10 – MAX Database Growths for a 24 hour period If equal or exceeded a Red Warning condition will be shown
@AgentJobOwnerExclusions e.g. ‘SA’ – Exclude agent jobs with these owners (Comma delimited)
@FullBackupThreshold e.g. 8 – X Days older than Getdate()
@DiffBackupThreshold e.g. 2 – X Days older than Getdate()
@LogBackupThreshold e.g. 60 – X Minutes older than Getdate()
@DatabaseOwnerExclusions e.g. ‘SA’ – Exclude databases with these owners (Comma delimited)
Run the code!
You should now have a bunch of new tables and stored procedures in your logging database and four new SQL Agent jobs with no schedules.
Set schedules for your jobs and that’s it!
I would recommend setting the Collection jobs to run approx 5-10 minutes before the Report jobs to allow sufficient time for the collections to run.
To give it a test kick off the agent job ‘SQLUndercover Inspector Data Collection’ (for all servers if using linked servers) once complete start ‘SQLUndercover Inspector Report’ , if you are using linked servers then this will only produce the report on the target of the linked server.
If you set an email address during the setup or directly in the settings table then you will be receiving an email shortly with the report (make sure you are on the target of your linked server if using linked servers otherwise you won’t be receiving a report). If you didn’t set an email during setup or set in the Inspector.Settings table then you will find the html code stored in the table Inspector.ReportData.
