One of the nice things about SQL Server Integration Services (SSIS) is its extensibility.
If you find you have need for a Data Flow Source, Transformation or Destination that doesn’t come stock with SSIS you can roll one of your own. The same goes if you wanted to manage the Control Flow of the Package in some custom way, in which case you can write a Custom Task or use the Script Task.
You can extend SSIS even further by creating or building Packages entirely in code without the aid of the designer that comes with Visual Studio or Business Intelligence Development Studio (BIDS) and this is what I’ll be looking to demonstrate in this post.
I can tell you straight off that it isn’t as intuitive as it could be but that certainly won’t stop us trying 
I’ll be using SQL Server 2012 Integration Services and C# with Visual Studio 2012 to build our example Package.
Some simple requirements
So what would we have our Package do? Let’s mock up some requirements.
Let’s say that on a fairly frequent basis you receive tab-delimited flat files with a varying number of columns and content from third parties and you need to load the data in each of these files as is into its own staging Table in a Database for further analysis. Now, of course, you can crack open Visual Studio, create a new SSIS Project and write new Packages to load any one of the files but we would be looking to automate that process here.
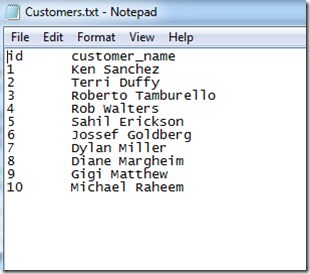
I will be using the small flat file below with a couple of columns and a few rows of fictional customer names as an example.
You can get a copy of the import file here.
The Implementation
To give us a “User Interface” from where we can drive the building and execution of our SSIS Package, we’ll use a simple Console Application.
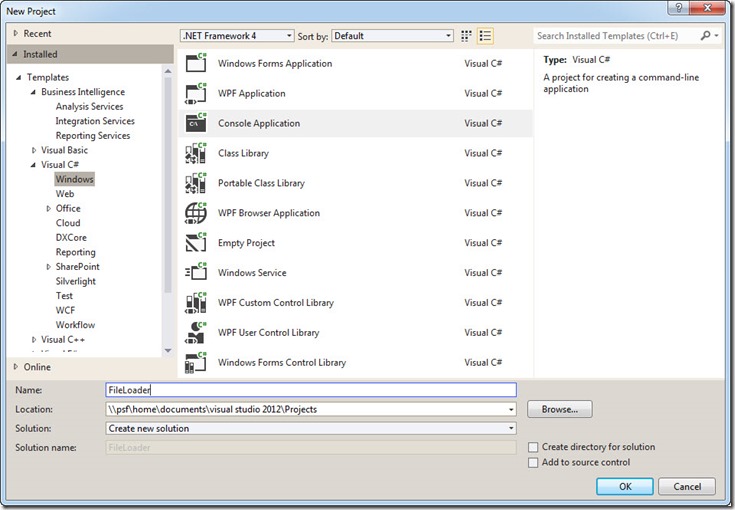
Start up Visual Studio 2012 and create a new C# Console Application Project naming it “FileLoader”.
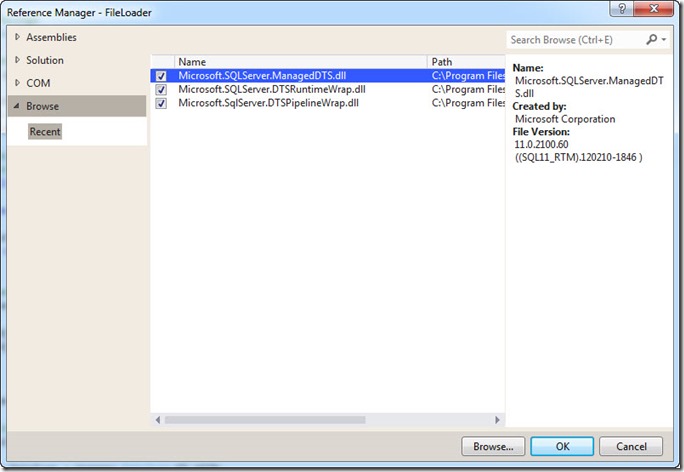
We will need to add references in Visual Studio to the Assemblies that contain the Classes that we need to build our Package.
You can add a reference to an Assembly in Visual Studio by right clicking on the Project References Folder in Solution Explorer and clicking on “Add Reference”.
Browse to the folder SQL Server 2012 is installed. Open the 110 folder, SDK and then the Assemblies folder.
Search for and add references to the following Assemblies:
Microsoft.SqlServer.DTSPipelineWrap
Microsoft.SqlServer.DTSRuntimeWrap
Microsoft.SqlServer.ManagedDTS
Once the references have been added, the Assembly References Folder of your Console Project, when expanded, should look something like this:
You will need to replace the code in the Program.cs file in the Console Project with the code below.
I have omitted any error handling code for the sake of brevity.
using System;
using System.IO;
using System.Text;
using System.Data.SqlClient;
using Microsoft.SqlServer.Dts.Runtime;
using Microsoft.SqlServer.Dts.Pipeline.Wrapper;
using Wrapper = Microsoft.SqlServer.Dts.Runtime.Wrapper;

namespace FileLoader
{
    class Program
    {
        static void Main(string[] args)
        {
            Console.Title = "File Loader";
            Console.ForegroundColor = ConsoleColor.Yellow;

            // Read input parameters
            var file = args[0];
            var server = args[1];
            var database = args[2];

            Console.WriteLine("Building Package...");

            // Create a new SSIS Package
            var package = new Package();

            // Add a Connection Manager to the Package, of type, FLATFILE
            var connMgrFlatFile = package.Connections.Add("FLATFILE");

            connMgrFlatFile.ConnectionString = file;
            connMgrFlatFile.Name = "My Import File Connection";
            connMgrFlatFile.Description = "Flat File Connection";

            // Get the Column names to be used in configuring the Flat File Connection
            // by reading the first line of the Import File which contains the Field names
            string[] columns = null;

            using (var stream = new StreamReader(file))
            {
                var fieldNames = stream.ReadLine();
                if (fieldNames != null) columns = fieldNames.Split("\t".ToCharArray());
            }

            // Configure Columns and their Properties for the Flat File Connection Manager
            var connMgrFlatFileInnerObj = (Wrapper.IDTSConnectionManagerFlatFile100)connMgrFlatFile.InnerObject;

            connMgrFlatFileInnerObj.RowDelimiter = "\r\n";
            connMgrFlatFileInnerObj.ColumnNamesInFirstDataRow = true;

            if (columns != null)
            {
                foreach (var column in columns)
                {
                    // Add a new Column to the Flat File Connection Manager
                    var flatFileColumn = connMgrFlatFileInnerObj.Columns.Add();

                    flatFileColumn.DataType = Wrapper.DataType.DT_WSTR;
                    flatFileColumn.ColumnWidth = 255;

                    flatFileColumn.ColumnDelimiter = columns.GetUpperBound(0) == Array.IndexOf(columns, column) ? "\r\n" : "\t";

                    flatFileColumn.ColumnType = "Delimited";

                    // Use the Import File Field name to name the Column
                    var columnName = flatFileColumn as Wrapper.IDTSName100;
                    if (columnName != null) columnName.Name = column;
                }

                // Add a Connection Manager to the Package, of type, OLEDB
                var connMgrOleDb = package.Connections.Add("OLEDB");

                var connectionString = new StringBuilder();

                connectionString.Append("Provider=SQLOLEDB.1;");
                connectionString.Append("Integrated Security=SSPI;Initial Catalog=");
                connectionString.Append(database);
                connectionString.Append(";Data Source=");
                connectionString.Append(server);
                connectionString.Append(";");

                connMgrOleDb.ConnectionString = connectionString.ToString();
                connMgrOleDb.Name = "My OLE DB Connection";
                connMgrOleDb.Description = "OLE DB connection";

                // Add a Data Flow Task to the Package
                var e = package.Executables.Add("STOCK:PipelineTask");
                var mainPipe = e as TaskHost;

                if (mainPipe != null)
                {
                    mainPipe.Name = "MyDataFlowTask";
                    var dataFlowTask = mainPipe.InnerObject as MainPipe;

                    var app = new Application();

                    if (dataFlowTask != null)
                    {
                        // Add a Flat File Source Component to the Data Flow Task
                        var flatFileSourceComponent = dataFlowTask.ComponentMetaDataCollection.New();
                        flatFileSourceComponent.Name = "My Flat File Source";
                        flatFileSourceComponent.ComponentClassID = app.PipelineComponentInfos["Flat File Source"].CreationName;

                        // Get the design time instance of the Flat File Source Component
                        var flatFileSourceInstance = flatFileSourceComponent.Instantiate();
                        flatFileSourceInstance.ProvideComponentProperties();

                        flatFileSourceComponent.RuntimeConnectionCollection[0].ConnectionManager =
                            DtsConvert.GetExtendedInterface(connMgrFlatFile);

                        flatFileSourceComponent.RuntimeConnectionCollection[0].ConnectionManagerID = connMgrFlatFile.ID;

                        // Reinitialize the metadata.
                        flatFileSourceInstance.AcquireConnections(null);
                        flatFileSourceInstance.ReinitializeMetaData();
                        flatFileSourceInstance.ReleaseConnections();

                        // Add an OLE DB Destination Component to the Data Flow
                        var oleDbDestinationComponent = dataFlowTask.ComponentMetaDataCollection.New();
                        oleDbDestinationComponent.Name = "MyOLEDBDestination";
                        oleDbDestinationComponent.ComponentClassID = app.PipelineComponentInfos["OLE DB Destination"].CreationName;

                        // Get the design time instance of the Ole Db Destination component
                        var oleDbDestinationInstance = oleDbDestinationComponent.Instantiate();
                        oleDbDestinationInstance.ProvideComponentProperties();

                        // Set Ole Db Destination Connection
                        oleDbDestinationComponent.RuntimeConnectionCollection[0].ConnectionManagerID = connMgrOleDb.ID;
                        oleDbDestinationComponent.RuntimeConnectionCollection[0].ConnectionManager =
                            DtsConvert.GetExtendedInterface(connMgrOleDb);

                        // Set destination load type
                        oleDbDestinationInstance.SetComponentProperty("AccessMode", 3);

                        // Create table in destination sql database to hold file data
                        var sql = new StringBuilder();

                        sql.Append("CREATE TABLE ");
                        sql.Append(Path.GetFileNameWithoutExtension(file));
                        sql.Append(" (");

                        foreach (var columnName in columns)
                        {
                            if (columns.GetUpperBound(0) == Array.IndexOf(columns, columnName))
                            {
                                sql.Append(columnName);
                                sql.Append(" NVARCHAR(255))");
                            }
                            else
                            {
                                sql.Append(columnName);
                                sql.Append(" NVARCHAR(255),");
                            }
                        }
                        var connection = new SqlConnection(
                            string.Format("Data Source={0};Initial Catalog={1};Integrated Security=TRUE;", server, database));
                        var command = new SqlCommand(sql.ToString(), connection);

                        connection.Open();
                        command.ExecuteNonQuery();
                        connection.Close();

                        // Now set Ole Db Destination Table name
                        oleDbDestinationInstance.SetComponentProperty("OpenRowset", Path.GetFileNameWithoutExtension(file));

                        // Create a Precedence Constraint between Flat File Source and OLEDB Destination Components
                        var path = dataFlowTask.PathCollection.New();
                        path.AttachPathAndPropagateNotifications(flatFileSourceComponent.OutputCollection[0],
                            oleDbDestinationComponent.InputCollection[0]);

                        // Get the list of available columns
                        var oleDbDestinationInput = oleDbDestinationComponent.InputCollection[0];
                        var oleDbDestinationvInput = oleDbDestinationInput.GetVirtualInput();

                        var oleDbDestinationVirtualInputColumns =
                            oleDbDestinationvInput.VirtualInputColumnCollection;

                        // Reinitialize the metadata
                        oleDbDestinationInstance.AcquireConnections(null);
                        oleDbDestinationInstance.ReinitializeMetaData();
                        oleDbDestinationInstance.ReleaseConnections();

                        // Map Flat File Source Component Output Columns to Ole Db Destination Input Columns
                        foreach (IDTSVirtualInputColumn100 vColumn in oleDbDestinationVirtualInputColumns)
                        {
                            var inputColumn = oleDbDestinationInstance.SetUsageType(oleDbDestinationInput.ID,
                                oleDbDestinationvInput, vColumn.LineageID, DTSUsageType.UT_READONLY);

                            var externalColumn =
                                oleDbDestinationInput.ExternalMetadataColumnCollection[inputColumn.Name];

                            oleDbDestinationInstance.MapInputColumn(oleDbDestinationInput.ID, inputColumn.ID, externalColumn.ID);
                        }
                    }
                    Console.WriteLine("Executing Package...");
                    package.Execute();

                    var dtsx = new StringBuilder();
                    dtsx.Append(Path.GetDirectoryName(file)).Append("\\").Append(Path.GetFileNameWithoutExtension(file)).Append(".dtsx");

                    Console.WriteLine("Saving Package...");
                    app.SaveToXml(dtsx.ToString(), package, null);
                }
            }

            package.Dispose();
            Console.WriteLine("Done");

            Console.ReadLine();
        }
    }
}
The above is the code needed to build and execute our SSIS Package from end to end.
Our Console Application has been set up to take three parameters.
The location of the file we wish to process and the target Server and Database.
As you would were you using Visual Studio or BIDS to design the Package, we start by creating a new Package.
// Create a new SSIS Package
var package = new Package();
We will now go on to add the required Connection Managers, Tasks and Data Flow Components to the Package we have just created.
Our requirements specify the need to copy data from a flat file to a Database so we would need to create and configure Flat File and OLEDB Connection Managers.
You can add a Connection Manager to the Package with the following code:
// Add a Connection Manager to the Package, of type, FLATFILE
var connMgrFlatFile = package.Connections.Add("FLATFILE");

connMgrFlatFile.ConnectionString = file;
connMgrFlatFile.Name = "My Import File Connection";
connMgrFlatFile.Description = "Flat File Connection";
You will need to specify the type of Connection Manager you wish to create as a Parameter to the ADD Method, in our case, it’s “FLATFILE”.
Now we need to further configure the Flat File Connection Manager by specifying it’s Columns, Lengths and Data Types. We will be importing all data simply as text.
The first line of our import file contains the names we need for our Columns so we read that first line from the file and use it to set our Column names for the Flat File Connection Manager.
// Get the Column names to be used in configuring the Flat File
// Connection by reading the first line of the Import File which
// contains the Field names

string[] columns = null;

using (var stream = new StreamReader(file))
{
  var fieldNames = stream.ReadLine();
  if (fieldNames != null) columns = fieldNames.Split("\t".ToCharArray());
}

// Configure Columns and their Properties for the Flat File Connection Manager
var connMgrFlatFileInnerObj = (Wrapper.IDTSConnectionManagerFlatFile100)connMgrFlatFile.InnerObject;

connMgrFlatFileInnerObj.RowDelimiter = "\r\n";
connMgrFlatFileInnerObj.ColumnNamesInFirstDataRow = true;

foreach (var column in columns)
{
  // Add a new Column to the Flat File Connection Manager
  var flatFileColumn = connMgrFlatFileInnerObj.Columns.Add();

  flatFileColumn.DataType = Wrapper.DataType.DT_WSTR;
  flatFileColumn.ColumnWidth = 255;

  flatFileColumn.ColumnDelimiter = columns.GetUpperBound(0)
          == Array.IndexOf(columns, column) ? "\r\n" : "\t";

  flatFileColumn.ColumnType = "Delimited";

  // Use the Import File Field name to name the Column
  var columnName = flatFileColumn as Wrapper.IDTSName100;
  if (columnName != null) columnName.Name = column;
}
We’ll add the OLEDB Connection Manager as well.
// Add a Connection Manager to the Package, of type, OLEDB
var connMgrOleDb = package.Connections.Add("OLEDB");

var connectionString = new StringBuilder();

connectionString.Append("Provider=SQLOLEDB.1;");
connectionString.Append("Integrated Security=SSPI;Initial Catalog=");
connectionString.Append(database);
connectionString.Append(";Data Source=");
connectionString.Append(server);
connectionString.Append(";");

connMgrOleDb.ConnectionString = connectionString.ToString();
connMgrOleDb.Name = "My OLE DB Connection";
connMgrOleDb.Description = "OLE DB connection";
With both our Connection Managers created, we can now go on to add any Tasks or Data Flow Components we require.
In order to fulfill our requirements we will need a Data Flow Task. A Flat File Source and an OLEDB Destination Component will need to be added to the Data Flow Task.
We add a Data Flow Task to the Packages Executables or Tasks with the following:
// Add a Data Flow Task to the Package
var e = package.Executables.Add("STOCK:PipelineTask");
var mainPipe = e as TaskHost;

mainPipe.Name = "MyDataFlowTask";
var dataFlowTask = mainPipe.InnerObject as MainPipe;
Lets add a Flat File Source Component to the Data Flow Task.
// Add a Flat File Source Component to the Data Flow Task
var flatFileSourceComponent = dataFlowTask.ComponentMetaDataCollection.New();
flatFileSourceComponent.Name = "My Flat File Source";
flatFileSourceComponent.ComponentClassID = app.PipelineComponentInfos["Flat File Source"].CreationName;

// Get the design time instance of the Flat File Source Component
var flatFileSourceInstance = flatFileSourceComponent.Instantiate();
flatFileSourceInstance.ProvideComponentProperties();

flatFileSourceComponent.RuntimeConnectionCollection[0].ConnectionManager =
    DtsConvert.GetExtendedInterface(connMgrFlatFile);

flatFileSourceComponent.RuntimeConnectionCollection[0].ConnectionManagerID = connMgrFlatFile.ID;
Finally, the OLEDB Destination Component.
A Table is also created in the destination Database and is given the same name as our import file,
again our Columns are named using the field names retrieved from the first line of our file earlier. This means that the Column names of the Table we create will match the import file’s field names.
// Add an OLE DB Destination Component to the Data Flow
var oleDbDestinationComponent = dataFlowTask.ComponentMetaDataCollection.New();
oleDbDestinationComponent.Name = "MyOLEDBDestination";
oleDbDestinationComponent.ComponentClassID =
app.PipelineComponentInfos["OLE DB Destination"].CreationName;

// Get the design time instance of the Ole Db Destination component
var oleDbDestinationInstance = oleDbDestinationComponent.Instantiate();
oleDbDestinationInstance.ProvideComponentProperties();

// Set Ole Db Destination Connection
oleDbDestinationComponent.RuntimeConnectionCollection[0].ConnectionManagerID = connMgrOleDb.ID;
oleDbDestinationComponent.RuntimeConnectionCollection[0].ConnectionManager =
       DtsConvert.GetExtendedInterface(connMgrOleDb);

 // Set destination load type
 oleDbDestinationInstance.SetComponentProperty("AccessMode", 3);

// Create table in destination sql database to hold file data
var sql = new StringBuilder();

sql.Append("CREATE TABLE ");
sql.Append(Path.GetFileNameWithoutExtension(file));
sql.Append(" (");

foreach (var columnName in columns)
{
 if (columns.GetUpperBound(0) == Array.IndexOf(columns, columnName))
    {
        sql.Append(columnName);
        sql.Append(" NVARCHAR(255))");
    }
    else
    {
        sql.Append(columnName);
        sql.Append(" NVARCHAR(255),");
    }
}
var connection = new SqlConnection(
    string.Format("Data Source={0};Initial Catalog={1};Integrated Security=TRUE;", server, database));
                        var command = new SqlCommand(sql.ToString(), connection);
connection.Open();
command.ExecuteNonQuery();
connection.Close();

// Now set Ole Db Destination Table name
oleDbDestinationInstance.SetComponentProperty("OpenRowset", Path.GetFileNameWithoutExtension(file));
So, we have a Data Flow Task that contains a Flat File Source and an OLEDB Destination Component but no Precedence Constraint connecting the two.
We can define a Precedence Constraint between the Flat File Source and the OLEDB Destination Component like this:
// Create a Precedence Constraint between Flat File Source and OLEDB Destination Components
var path = dataFlowTask.PathCollection.New();
    path.AttachPathAndPropagateNotifications(flatFileSourceComponent.OutputCollection[0],
         oleDbDestinationComponent.InputCollection[0]);
All we need to do now is to make the Output Columns from the Flat File Source Component available to the downstream OLEDB Destination Component and map the Columns as necessary.
// Get the list of available columns
var oleDbDestinationInput = oleDbDestinationComponent.InputCollection[0];
var oleDbDestinationvInput = oleDbDestinationInput.GetVirtualInput();

var oleDbDestinationVirtualInputColumns =
     oleDbDestinationvInput.VirtualInputColumnCollection;

// Reinitialize the metadata
oleDbDestinationInstance.AcquireConnections(null);
oleDbDestinationInstance.ReinitializeMetaData();
oleDbDestinationInstance.ReleaseConnections();

// Map Flat File Source Component Output Columns to Ole Db Destination Input Columns
foreach (IDTSVirtualInputColumn100 vColumn in oleDbDestinationVirtualInputColumns)
{
    var inputColumn = oleDbDestinationInstance.SetUsageType(oleDbDestinationInput.ID,
              oleDbDestinationvInput, vColumn.LineageID, DTSUsageType.UT_READONLY);

    var externalColumn =
            oleDbDestinationInput.ExternalMetadataColumnCollection[inputColumn.Name];

    oleDbDestinationInstance.MapInputColumn(oleDbDestinationInput.ID, inputColumn.ID, externalColumn.ID);
 }
The code to execute the Package as it stands is a one liner.
package.Execute();
We’ll go ahead and save the Package as well so we can have a look at it later.
app.SaveToXml(dtsx.ToString(), package, null);
The Test
Now seeing as we’ve set this all up within the confines of a Console Application we just need to supply the required parameters and run it to build and execute our SSIS Package.
Copy the test import file to a location folder of your choosing.
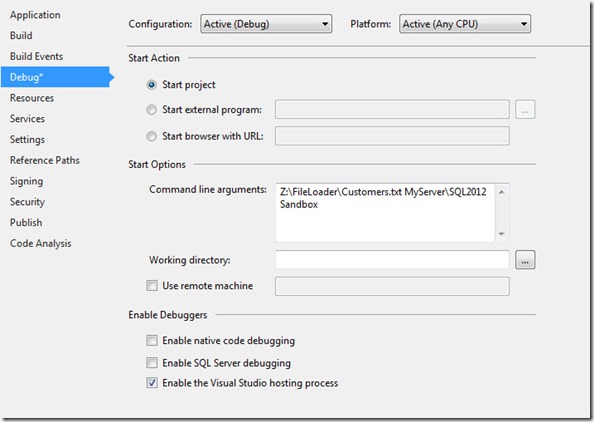
Right click on the Project node in Solution Explorer and click on Properties. Click on the Debug Tab.
Enter the three parameters required in the Command Line Arguments box separated by spaces [file location] [target server] [target database].
Run the Program.
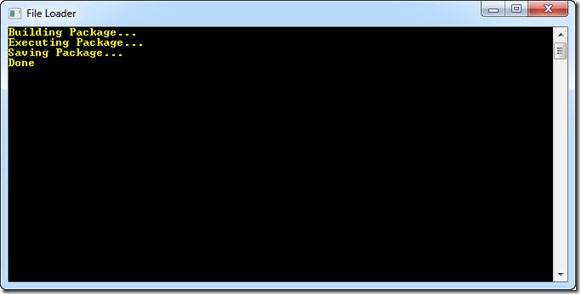
You should see a Console Window come up with a message letting you know when the SSIS Package build and execute process is complete.
We can now check the output of our program.
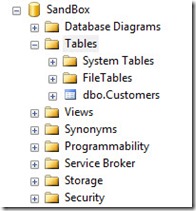
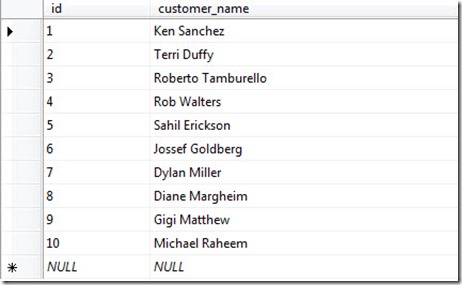
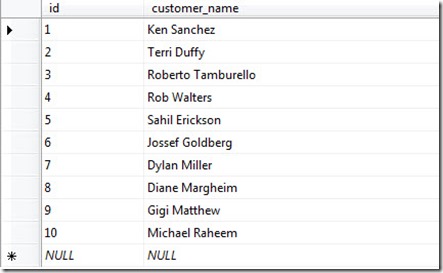
You should find a table with the name “Customers”, in the destination database containing the data from our sample file.
The Program saves a copy of the Package .dtsx file to the location of the test import file.
Create a new SSIS Project within Visual Studio or BIDS adding the saved .dtsx file or package to the Project.
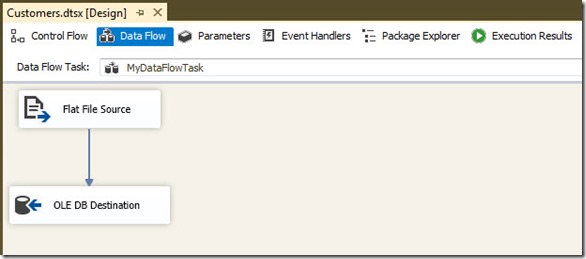
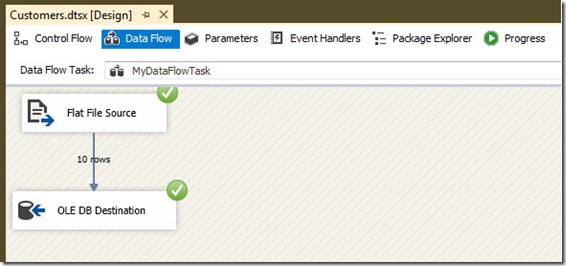
Notice that the package is set up pretty much the same as it would be if you had created it within the Designer or BIDS.
Truncate the Import Table, “Customers”, in the target Database, executing the package from within Visual Studio or BIDS and you should have a successful run.
Check that your destination table is, once again, populated.
We’ll take a look at the EZApi in my next post, I hear that it’s a potentially more intuitive way to automate the building of SSIS Packages.


