

This post is about using the brilliance of PowerShell to script the creation of databases in Azure.
Background:
Apart from the obvious question of why not? The actual reason is one of standards and how I did not adhere to my own standards that I’ve been preaching for the past 17 years.
For background read my post on standards:
The 20 second rule (or why standards matter).
And you will see how badly I strayed…
Exhibit A:
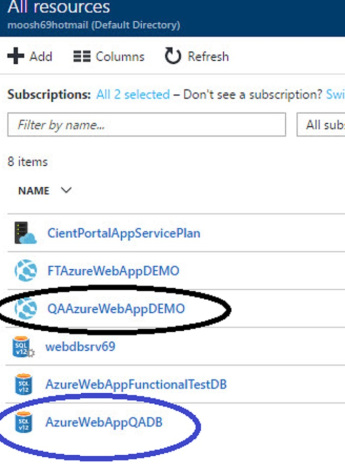
Yes… my application name and database name do not match my standard of “everything should be able to be tracked from web to database via a name”
So of course being a guy who does Data Platform stuff – we’ll create the database first, then the app service then we’ll adjust our release in VSTS. These of course will be split over 2 or more blog posts.
Quick discussion on Tiers in Azure:
There are quite a few different pricing tiers available with Azure for a Microsoft Azure SQL Database.
It allows us to select the capacity metrics that are relevant for our application, without paying too much than what we actually need. Switching between tier plans is very easy. If you have short periods of high performance demand, we can scale up our Azure SQL database to meet those demands. Later on, after the demand diminishes, we can scale the SQL database back down to a lower pricing tier, thus savings us costs.
For this database I’m going to use the Basic tier.
PowerShell Scripts:
So in powershell we’ll log into our Azure subscription:
PS > Login-AzureRmAccount
Which will ask us to login.
We then see our subscription details:
Environment : AzureCloud
Account : moosh69
TenantId : [some hexadecimal numbbers here]
SubscriptionId : [some more hexadecimal numbbers here]
SubscriptionName : [Name of your subscription]
CurrentStorageAccount :
OK, for fun let’s see what databases we have using PowerShell.
Firstly we’ll find out our database server:
PS > Get-AzureSqlDatabaseServer
Which will list our database server and we’ll create a variable $servername using the output of the above.
We now run this command to list the databases in that server:
Get-AzureSqlDatabase -ServerName $servername
Name : AzureWebAppQADB
CollationName : SQL_Latin1_General_CP1_CI_AS
Edition : Free
MaxSizeGB : 0
MaxSizeBytes : 33554432
ServiceObjectiveName : Free
ServiceObjectiveAssignmentStateDescription :
CreationDate : 07/01/2017 8:18:54 AM
RecoveryPeriodStartDate : 27/04/2017 8:29:07 PM
Name : AzureWebAppFunctionalTestDB
CollationName : SQL_Latin1_General_CP1_CI_AS
Edition : Basic
MaxSizeGB : 2
MaxSizeBytes : 2147483648
ServiceObjectiveName : Basic
ServiceObjectiveAssignmentStateDescription :
CreationDate : 08/01/2017 5:57:42 PM
RecoveryPeriodStartDate : 26/04/2017 8:07:56 PM
Name : master
CollationName : SQL_Latin1_General_CP1_CI_AS
Edition : System
MaxSizeGB : 30
MaxSizeBytes : 32212254720
ServiceObjectiveName : System0
ServiceObjectiveAssignmentStateDescription :
CreationDate : 02/01/2017 10:09:58 PM
RecoveryPeriodStartDate :
We’re not too interested in the MASTER database.
So we’re going to create 2 new databases (and eventually point our app services at them).
Here is the very simple code:
# Some variables for our resources
$resourcegroupname = “AzureDEMO_RG”
$databasename1 = “QAAzureWebAppDEMO_DB”
$databasename2 = “FTAzureWebAppDEMO_DB”
New-AzureRmSqlDatabase -ResourceGroupName $resourcegroupname `
-ServerName $servername `
-DatabaseName $databasename1 `
-Edition “Basic”
New-AzureRmSqlDatabase -ResourceGroupName $resourcegroupname `
-ServerName $servername `
-DatabaseName $databasename2 `
-Edition “Basic”
And just like that we’ve created our first database in Azure using Powershell in about 5 seconds.
Yip.

![]()
