


Welcome along to the third part of our series ‘Creating a SQL Server Test Lab On Your Workstation’. If you’ve followed along with the first two parts, you should have a domain setup and a SQL Server joined to it. In this part, we’re going to look at building a cluster and creating an Availability Group.
Other Posts in the Series
- Part One, Installing The Domain Controller
- Part Two, Creating a Domain Account and Joining a SQL Server to the Domain
Building a Second SQL Server
If we’re going to build a cluster, we’re going to need more than one SQL Server. So the first thing that we’re going to need to do is to build a second one. Follow the instructions again in part two to spin up another SQL Server and join it to the domain (obviously you’ll want to give it a different name and IP address to the one that you created previously. I went with the imaginative name of SQL2 and an IP of 10.10.10.101).
Creating the Cluster
Now that we’ve got our second SQL Server up and running, we can get on with creating the cluster.
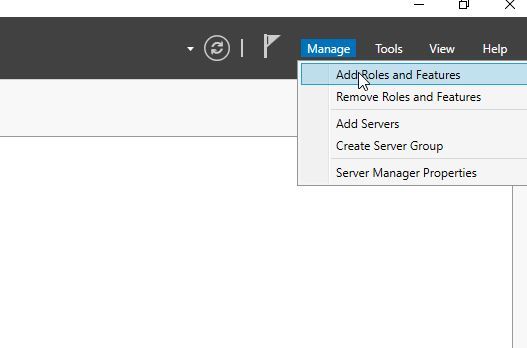
The first thing that we’re going to need to do is to install Failover Clustering on each of our SQL Servers. To do this, open up Server Manager and select Manage/Add Roles and Features.
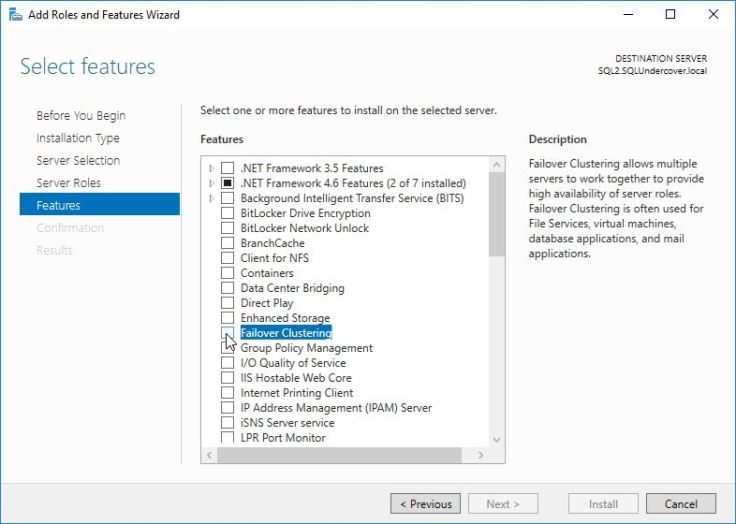
Click ‘Next’ through the screens until you get to ‘Features’, in ‘Features’ select ‘Failover Clustering’.
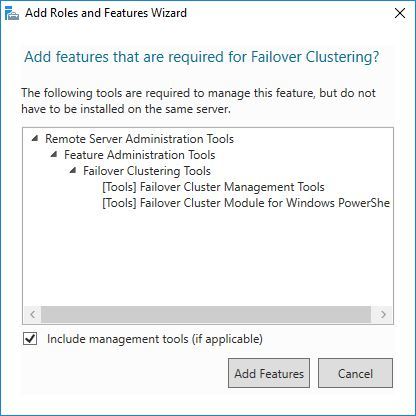
Click ‘Add Features’
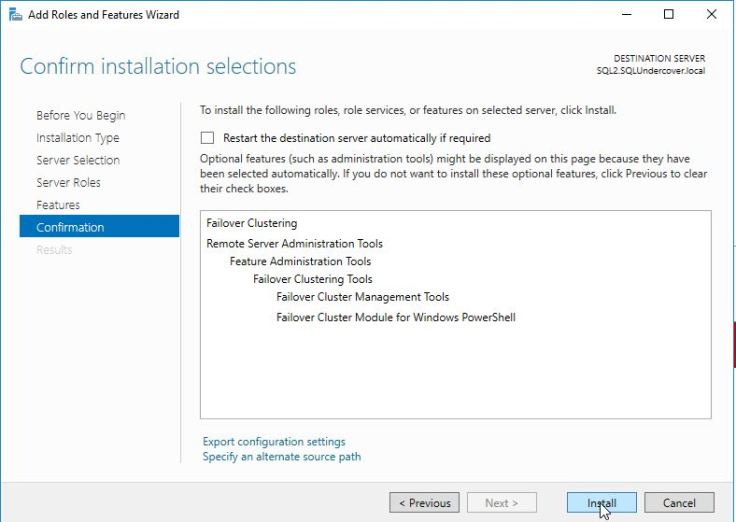
Click next on the Features screen and ‘Install’ on the Confirmation screen.
You can sit back while the Failover Clustering feature installs on your server.
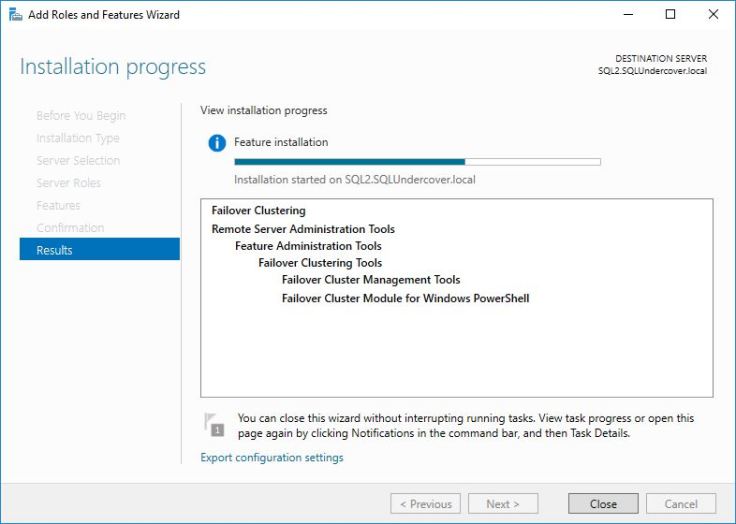
We’re going to need these features on both our SQL Servers so while you’re waiting for this to finish, you might as well pop over to your other one and get it installed on there too.
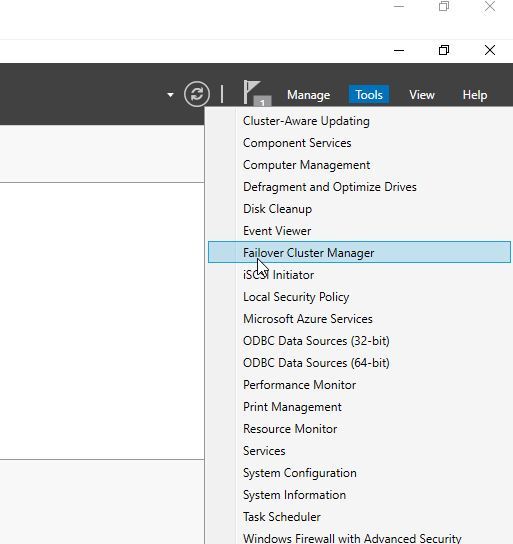
When that’s done, we can open the Failover Cluster Manager and get onto into juicy task of actually getting this cluster running. You can do that by going to Server Manager on either of your SQL Servers and selecting the Failover Cluster Manager from the Tools menu.
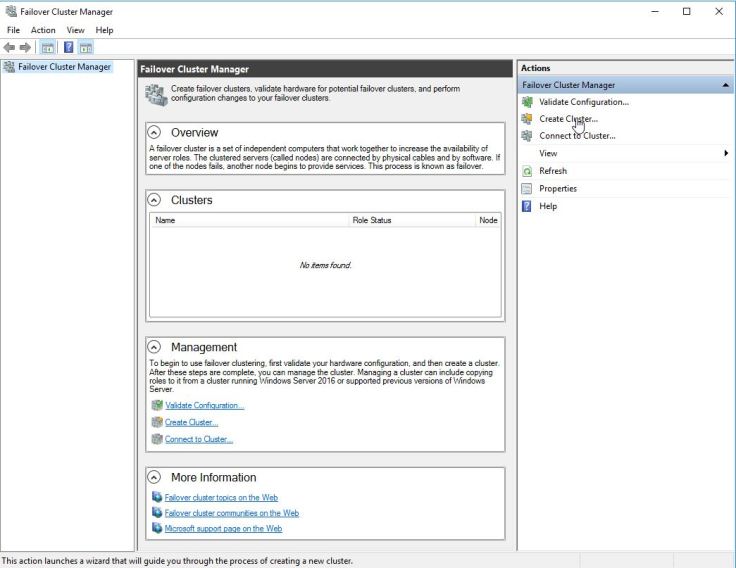
When the Cluster Manager opens, you want to select ‘Create Cluster’.
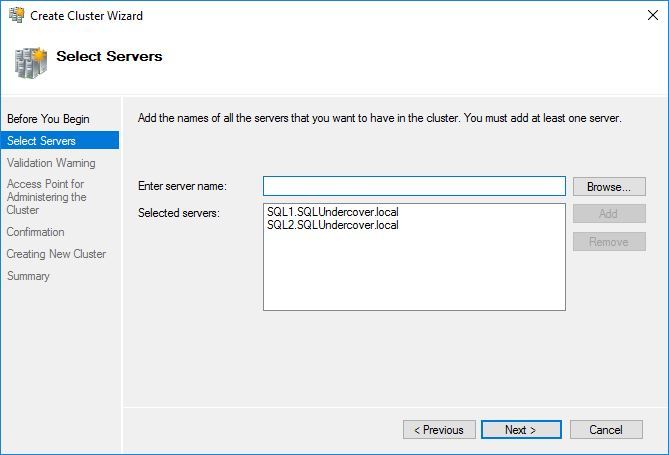
The first thing we need to do is add the servers that are going to be part of the cluster. Just type the names of your SQL Severs one at a time into the ‘Enter Server Name’ box and click ‘Add’. You should see them appear in the ‘Selected Servers’ box. Once that’s done, hit ‘Next’.
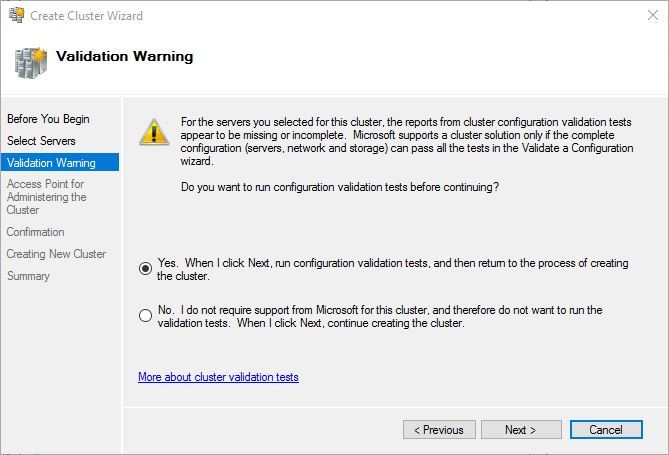
The next screen that you’ll see will ask you if you want to run the validation checks. You can skip these if you want (I doubt that we’re going to be calling on Microsoft to help us out with our workstation based test lab so don’t really need to do them) or just run through the wizard if you’re curious to see what these checks are.
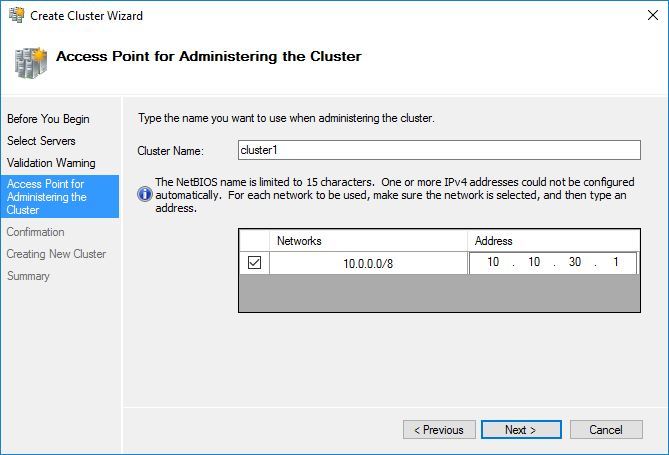
Give your cluster a name and an IP address, I’m being as imaginative as usual. Of course you can choose whatever name that you want, your next door neighbor’s cat’s name if it really tickles your fancy.
Click next on the Confirmation screen and sit back while Windows does its thing and puts your cluster together for you.
When it’s all finished you should see a nice little summary window, click Finish.
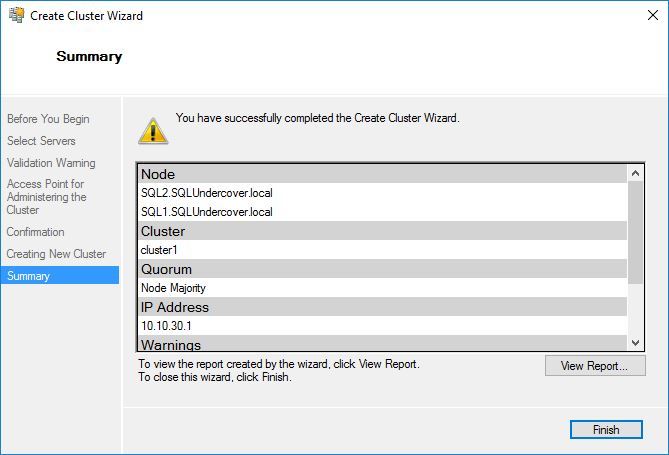
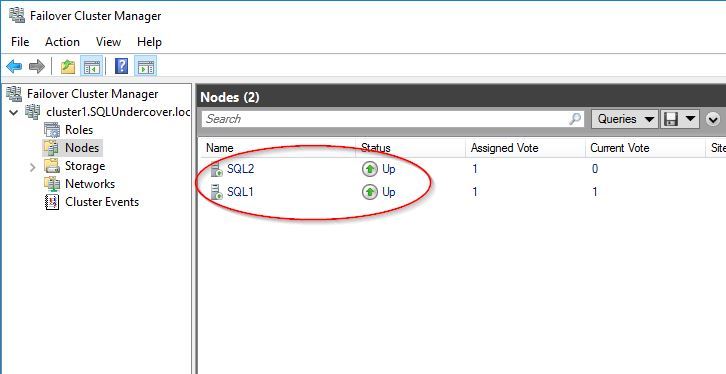
You should now have a shiny new Windows Failover Cluster up and running, you can check the status of it by selecting nodes from the Cluster Manager. You should see both of your nodes reporting online.
Configuring Quorum and a File Share Witness
Now I don’t want to get into the details of Quorum, there are plenty of great posts out there that explain it far better than I can but in a nutshell, each node in the cluster has a vote and we really want the total number of votes to be an odd number. But we’ve only got two servers, does that mean that we need a create another server to make an odd number? Well, no we don’t. What we can use is what’s known as a file share witness, and that’s simply a file share that each of the nodes in the cluster can access. That file share will effectively act as our third vote.
So first thing that you’re going to need to do is create a file share somewhere, the best place for that in our setup would be on the domain controller or somewhere that we know is always likely to be available. So go and do that now, call it what you like but make sure that the servers are going to have full rights to it. As this is just our own personal little test lab and we’re not too worried about best practices you could possibly open it up to EVERYONE (probably not a great idea in a production environment but not the end of the world if we want to be lazy in our own little play pen).
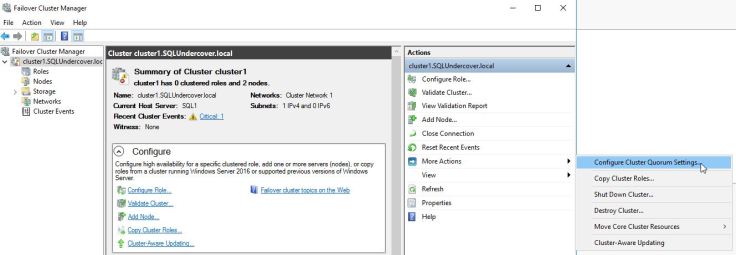
Once you’ve got the file share setup, you’ll need to configure the quorum settings. Select the cluster name from the Cluster Manager and over on the right of the screen select More Actions\Configure Cluster Quorum Settings.
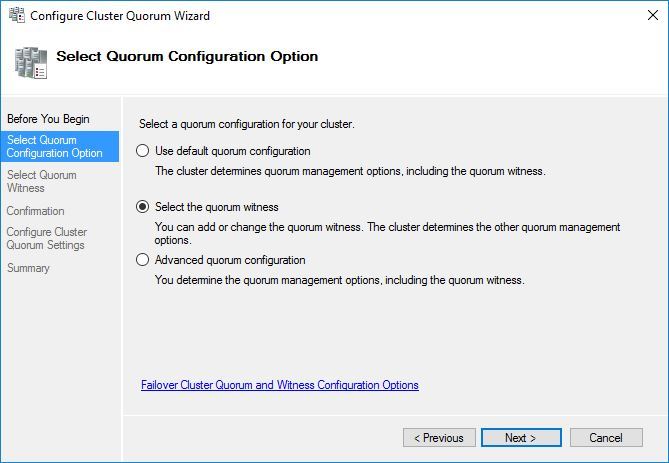
Select the ‘Select the quorum witness’ radio button and hit next.
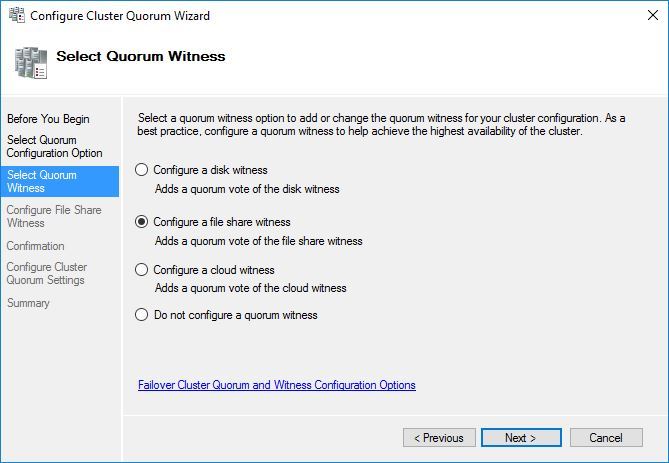
‘Configure a file share witness’
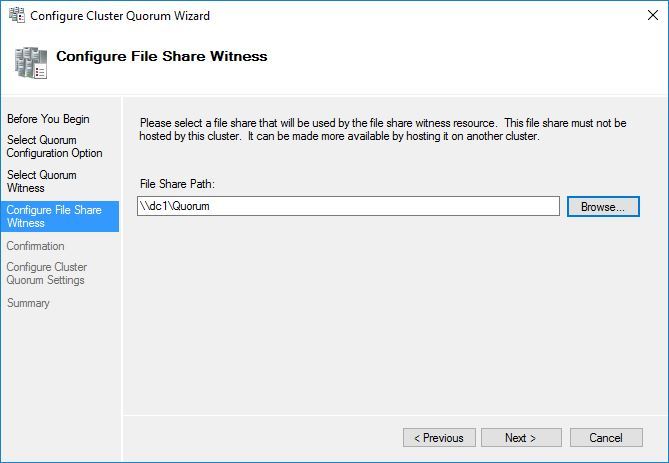
Pop in the path to the file share that you created earlier
Click next on the confirmation page and you’ve just setup a file share quorum for your test lab.
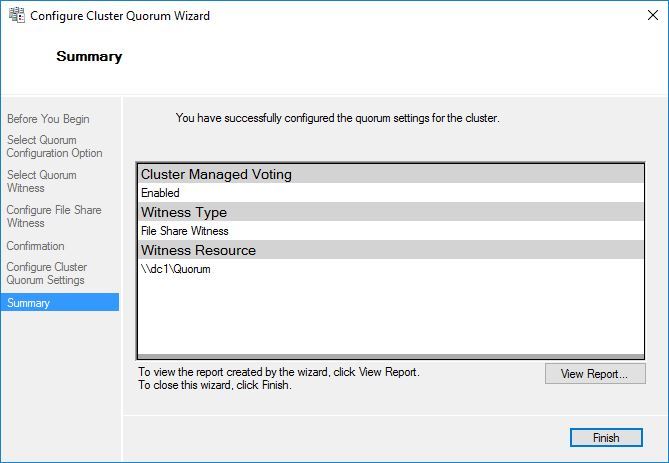
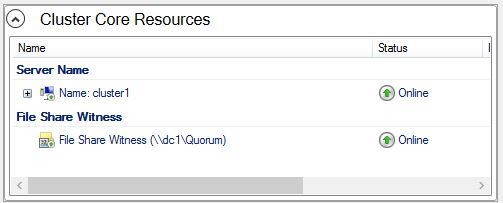
Now if you look at the cluster resources, you should now be able to see the file share witness and if all’s gone well, it’ll be showing online.
With the cluster running, we can now look at setting up our availability group.
Turn Off The Firewall
One thing that’s going to cause us some trouble is the Windows firewall. There are a couple of options open to you here, you can either open up the ports that you need or if you’re lazy and because this is just a little test lab on your workstation, you can just turn the thing off. I’m going to be lazy and just turn it off, not something that I’d recommend you do on in a production environment.
On both your SQL Servers, head into Server Management and click on Tools\Windows Firewall with Advanced Security. When the Firewall manager comes up, hit the link, ‘Windows Firewall Properties’.
![2018-01-24 07_20_59-SQL1 [Running] - Oracle VM VirtualBox](/wp-content/uploads/legacy/20f53a9d727cdec042ff5789a07ef6d728177af2/2018-01-24-07_20_59-sql1-running-oracle-vm-virtualbox.jpg)
Then go through each tab and change the Firewall State to ‘Off’
![2018-01-24 07_23_50-SQL1 [Running] - Oracle VM VirtualBox](/wp-content/uploads/legacy/87e081dcad75aee0d56e1855f0af7a22faa4591a/2018-01-24-07_23_50-sql1-running-oracle-vm-virtualbox.jpg)
Repeat this process on all of your SQL Servers and restart them.
Before anyone says anything, I know this isn’t good practice in production but for our test lab, it’s something that I don’t worry about. If you want to open individual ports, then please feel free
Setting Up a SQL Availability Group
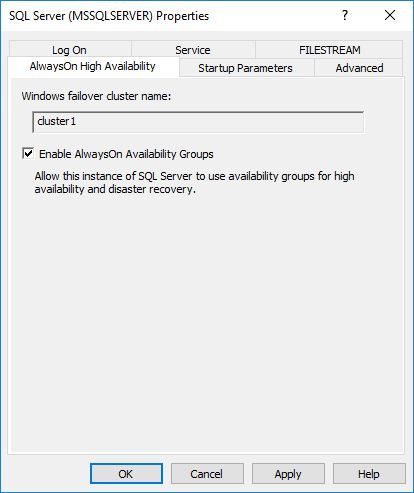
The first thing that we need to do in order to setup an availability group is to enable AlwaysOn Availability Groups. To do this, you need to go into the SQL Configuration Manager on both of your servers, go to the properties of the SQL Service and tick ‘Enable AlwaysOn Availability Groups’. When you’ve done that you’ll need to restart the service.
While you’re in Configuration Manager, you’ll also going to need to allow TCP/IP if you haven’t already. Expand ‘SQL Server Network Configuration’ and click on ‘Protocols for MSSQLSERVER’. You need to enable TCP/IP.
![2018-01-24 07_30_37-SQL2 [Running] - Oracle VM VirtualBox](/wp-content/uploads/legacy/d296a38034cc0401bc86d73c8e9e2b4532de95b6/2018-01-24-07_30_37-sql2-running-oracle-vm-virtualbox.jpg)
Double click on ‘TCP/IP’ and change Enabled to Yes. Hit OK and restart the SQL Service.
![2018-01-24 07_32_56-SQL2 [Running] - Oracle VM VirtualBox](/wp-content/uploads/legacy/7c2e81c231b9706ba2ceec66ecef7a562f66f9e3/2018-01-24-07_32_56-sql2-running-oracle-vm-virtualbox.jpg)
Let’s Get On To Building That AG
Now spark up SSMS and connect to your SQL instance.
We’ll go through the wizard just because it makes things a little easier for us. One thing that we’re going to need to do before we get started is to create a database to join to the new AG so if you’ve not already got one, create one now and take a full backup.
Once the datbase is created, under Availability Groups, you’re going to want to right click and select ‘New Availability Group Wizard’.
![2018-01-24 07_40_53-SQL2 [Running] - Oracle VM VirtualBox](/wp-content/uploads/legacy/7c34b5149010f0196cfa2a0ada8605f29b02ed10/2018-01-24-07_40_53-sql2-running-oracle-vm-virtualbox.jpg)
Give your AG a name, we’ll leave Database Level Health Detection and Per Database DTC alone for now.
![2018-01-24 07_41_57-SQL2 [Running] - Oracle VM VirtualBox](/wp-content/uploads/legacy/978f1180e0ea0e4e0c4bfb4209e97a006bca7452/2018-01-24-07_41_57-sql2-running-oracle-vm-virtualbox.jpg)
Select a database to join to the AG, please note that if you’ve not taken a full backup of your database, you wont be able to select it. If you do need to take a backup, go and do that now then come back and click refresh.
![2018-01-24 07_46_32-SQL2 [Running] - Oracle VM VirtualBox](/wp-content/uploads/legacy/d3992adedeecdffc430f4c5f030ee485b3c13010/2018-01-24-07_46_32-sql2-running-oracle-vm-virtualbox.jpg)
Add your other SQL Server to the replicas. I’ve also set the AG to be synchronous commit and automatic failover but these settings can easily be changed at a later date.
![2018-01-24 07_48_55-SQL2 [Running] - Oracle VM VirtualBox](/wp-content/uploads/legacy/34e6ed184ec04366c385bb02d44b680f69b40715/2018-01-24-07_48_55-sql2-running-oracle-vm-virtualbox.jpg)
Lets now setup a listener, this will allow us to connect to the AG by name. So click on the Listener tab. Give the listener a name, this is the name that you’ll use to connect. Set the port to 1433 and give it an IP address, pick something that you haven’t already used. When you’re done, hit next.
![2018-01-24 08_00_12-SQL2 [Running] - Oracle VM VirtualBox](/wp-content/uploads/legacy/97d085a8552b85db7c34c5b7a137e75357e697be/2018-01-24-08_00_12-sql2-running-oracle-vm-virtualbox.jpg)
You’re now going to sync the database into the new AG. There are a few options here, personally I tend to select ‘Full database and log backup’. You’re then going to need to give SQL a shared path that both SQL servers can access. I’ve created another share on my domain controller called ‘SQLBackups’ for this but it could be anywhere.
![2018-01-24 07_52_55-SQL2 [Running] - Oracle VM VirtualBox](/wp-content/uploads/legacy/4afd485e21cc24316ce2788e6ba711726f0b485b/2018-01-24-07_52_55-sql2-running-oracle-vm-virtualbox.jpg)
SQL will now do a quick validation check, if you’ve done everything right up to this point then you should see a lot of lovely green ticks.
![2018-01-24 08_03_22-SQL2 [Running] - Oracle VM VirtualBox](/wp-content/uploads/legacy/d1b89be5742bd0529ff3748c640b0622c253af2b/2018-01-24-08_03_22-sql2-running-oracle-vm-virtualbox.jpg)
We should now see a little summery of what we’re going to create. Go on, hit ‘Finish’ and sit back and watch SQL do it’s thing.
![2018-01-24 08_04_38-SQL2 [Running] - Oracle VM VirtualBox](/wp-content/uploads/legacy/41660e3354d971230e5bde37c61f780d674a1e49/2018-01-24-08_04_38-sql2-running-oracle-vm-virtualbox.jpg)
You should now have a nice new availability group in your test lab.
In the next part, I’ll take a look at setting up shared storage and an old fashioned failover cluster.
Thanks for reading 
