

Back in my SQL Server Integration Services (SSIS) heavy development times, SSIS solution deployment was a combination of building ispac files and running a set of PowerShell scripts to deploy this file to SSIS servers and update required environmental variables if necessary.
Microsoft introduced DevOps culture for software continuous integration and delivery - https://docs.microsoft.com/en-us/azure/devops/learn/what-is-devops, and I really like their starting line, "DevOps is the union of people, process, and products to enable continuous delivery of value to our end users"!
Recently, they've added a DevOps support for Azure Data Factory as well - https://docs.microsoft.com/en-us/azure/data-factory/continuous-integration-deployment and those very steps I tried to replicate in this blog post.

My ADF pipeline use-case to deploy
So, here is my use case: I have a pipeline in my Azure Data Factory synced in GitHub (my Development workspace) and I want to be able to Test it in a separate environment and then deploy to a Production environment.
In my ADF I have a template pipeline solution "Copy multiple files containers between File Stores" that I used to copy file/folders from one blob container to another one.
In my Azure development resource group, I created three artifacts (which may vary depending on your own development needs):
- Key Vault, to store secret values
- Storage Account, to keep my testing files in blob containers
- Data Factory, the very thing I tend to test and deploy
Creating continuous integration and delivery (CI/CD) pipeline for my ADF
Step 1: Integrating your ADF pipeline code to source control (GitHub)
In my previous blog post (Azure Data Factory integration with GitHub) I had already shown a way to sync your code to the GitHub. For the continuous integration (CI) of your ADF pipeline, you will need to make sure that along with your development (or feature) branch you will need to publish your master branch from your Azure Data Factory UI. This will create an additional adf_publish branch of your code repository in GitHub.
As Gaurav Malhotra (Senior Product Manager at Microsoft) has commented about this code branch, "The adf_publish branch is automatically created by ADF when you publish from your collaboration branch (usually master) which is different from adf_publish branch... The moment a check-in happens in this branch after you publish from your factory, you can trigger the entire VSTS release to do CI/CD"
Publishing my ADF code from master to adf_publish branch automatically created two files:
Template file (ARMTemplateForFactory.json): Templates containing all the data factory metadata (pipelines, datasets etc.) corresponding to my data factory.
Configuration file (ARMTemplateParametersForFactory.json): Contains environment parameters that will be different for each environment (Development, Testing, Production etc.).

Step 2: Creating a deployment pipeline in Azure DevOps
2.a Access to DevOps: If you don't have a DevOps account, you can start for free - https://azure.microsoft.com/en-ca/services/devops/ or ask your DevOps team to provide you with access to your organization build/release environment.
2.b Create new DevOps project: by clicking [+ Create project] button you start creating your build/release solution.
2.c Create a new release pipeline
In a normal software development cycle, I would create a build pipeline in my Azure DevOps project, then archive the built files and use those deployment files for further release operations. As Microsoft team indicated in their CI/CD documentation page for Azure Data Factory, the Release pipeline is based on the source control repository, thus the Build pipeline is omitted; however, it's a matter of choice and you can always change it in your solution.
Select [Pipelines] > [Release] and then click the [New pipeline] button in order to create a new release pipeline for your ADF solution.
2.d Create Variable groups for your solution
This step is optional, as you can add variables directly to your Release pipelines and individual releases. But for the sake of reusing some of the generic values, I created three groups in my DevOps project with the same (Environment) variable for each of these groups with ("dev", "tst", "prd") corresponding values within.
2.e Add an artifact to your release pipeline
In the Artifact section, I set the following attributes:
- Service Connection my GitHub account
- GitHub repository for my Azure Data Factory
- Default branch (adf_branch) as a source for my release processing
- Alias (Development) as it is the beginning of everything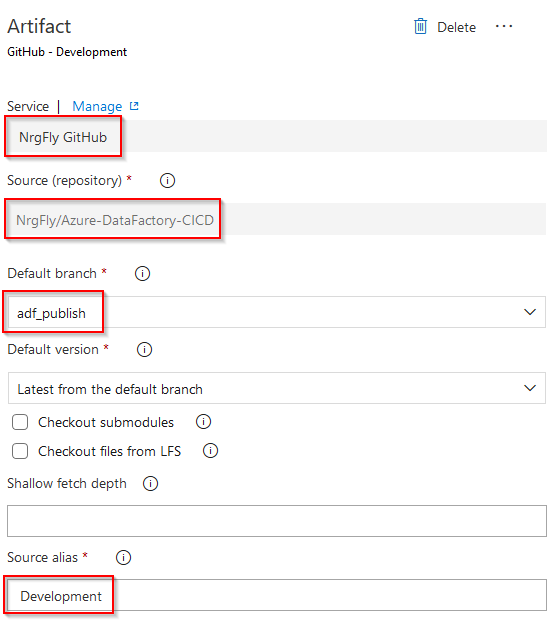
2.f Add new Stage to your Release pipeline
I click [+ Add a stage] button, select "Empty Job" template and name it as "Testing". Then I add two agent jobs from the list of tasks:
- Azure Key Vault, to read Azure secret values and pass them for my ADF ARM template parameters
- Azure Resource Group Deployment, to deploy my ADF ARM template
In my real job ADF projects, DevOps Build/Release pipelines are more sophisticated and managed by our DevOps and Azure Admin teams. Those pipelines may contain multiple PowerShell and other Azure deployment steps. However, for my blog post purpose, I'm only concerned to deploy my data factory to other environments.
For the (Azure Key Vault) task, I set "Key vault" name to this value: azu-caes-$(Environment)-keyvault, which will support all three environments' Key Vaults depending on the value of the $(Environment) group variable {dev, tst, prd}.
For the (Azure Resource Group Deployment) task, I set the following attributes:
- Action: Create or update resource group
- Resource group: azu-caes-$(Environment)-rg
- Template location: Linked artifact
- Template: in my case the linked ART template file location is
$(System.DefaultWorkingDirectory)/Development/azu-eus2-dev-datafactory/ARMTemplateForFactory.json
- Template parameters: in my case the linked ARM template parameters file location is
$(System.DefaultWorkingDirectory)/Development/azu-eus2-dev-datafactory/ARMTemplateParametersForFactory.json
- Override template parameters: some of my ADF pipeline parameters I either leave blank or with default value, however, I specifically set to override the following parameters:
+ factoryName: $(factoryName)
+ blob_storage_ls_connectionString: $(blob-storage-ls-connectionString)
+ AzureKeyVault_ls_properties_typeProperties_baseUrl: $(AzureKeyVault_ls_properties_typeProperties_baseUrl)
- Deployment mode: Incremental
2.g Add Release Pipeline variables:
To support reference of variables in my ARM template deployment task, I add the following variables within the "Release" scope:
- factoryName
- AzureKeyVault_ls_properties_typeProperties_baseUrl
2.h Clone Testing stage to a new Production stage:
2.i Link Variable groups to Release stages:
A final step in creating my Azure Data Factory release pipeline is that I need to link my Variable groups to corresponding release stages. I go to the Variables section in my Release pipeline and select Variable groups, by clicking [Link variable group] button I choose to link a variable group to a stage so that both of my Testing and Production sections would look the following way:
After saving my ADF Release pipeline, I keep my fingers crossed 🙂 It's time to test it!
Step 3: Create and test a new release
I click [+ Create a release] button and start monitoring my ADF release process. 
After it had been successfully finished, I went to check my Production Data Factory (azu-eus2-prd-datafactory) and was able to find my deployed pipeline which was originated from the development environment. And I successfully test this Production ADF pipeline by executing it.
One thing to note, that all data connections to Production Key Vault and Blob Storage account have been properly deployed though by ADF release pipeline (no manual interventions).
Step 4: Test CI/CD process for my Azure Data Factory
Now it's time to test a complete cycle of committing new data factory code change and deploying it both to Testing and Production environments.
1) I add a new "Wait 5 seconds" activity task to my ADF pipeline and saving it to my development branch of the (azu-eus2-dev-datafactory) development data factory instance.
2) I create a pull request and merge this change to the master branch of my GitHub repository
3) Then I publish my new ADF code change from master to the adf_publish branch.
4) And this automatically triggers my ADF Release pipeline to deploy this code change to Testing and then Production environments.
Don't forget to enable "Continues deployment trigger" on your Artifact release pipeline and select the final 'adf-publish' code branch as your filter. Otherwise, all of your GitHub branches code commitment might trigger release/deployment process.
5) And after the new release is successfully finished, I can check that the new "Wait" activity task appears in the Production data factory pipeline: 
Summary:
1) I feel a bit exhausted after writing such a long blog post. I hope you will find it helpful in your own DevOps pipelines for your Azure Data Factory solutions.
2) After seeing a complete CI/CD cycle of my Azure Data Factory where the code was changed, integrated into the main source code repository and automatically deployed, I can confidently say that my data factory has been successfully released! 🙂
Link to my GitHub repository with the ADF solution from this blog post can be found here: https://github.com/NrgFly/Azure-DataFactory-CICD
And happy data adventure!
