

This is the eighth part in the series: SQL Server and Continuous Integration. This post describes the set-up required for GitLab runners to automatically build SQL Server projects after each commit. I use ReadyRoll for my SQL Server projects, but SSDT projects could also be built in the same way. Topics covered so far in this series are:
- Git
- Visual Studio
- ReadyRoll
- GitLab
- tSQLt
- SQL Cover
Building a database project gives us confidence that the changes in the last commit didn’t break anything. To improve our confidence in the changes, we would want to run some tests to make sure the database still operates as expected (this will be covered in the next post).
The build process also generates the packages that will be used to deploy the new version.
Runners are the servers that GitLab uses to build test projects. These can be physical machines, virtual machines or containers.
For this post, a Windows 2012 R2 Hyper-V VM with SQL Server 2012 will be configured as the runner.
Install
The links below will download the runner installer.
gitlab-ci-multi-runner-windows-386.exe
gitlab-ci-multi-runner-windows-amd64.exe
Create the folder C:\Multi-Runner. This is where the runner will check out the Git repositories. Move your downloaded runner installer to this folder.
Start an Administrator PowerShell session and navigate to the Multi-Runner folder. Run the following command to start the installation.
.\gitlab-ci-multi-runner-windows-amd64.exe register
The multi runner will then ask for the URL of the GitLab server , the GitLab CI token, a description of the runner (I used the server name), some tags and the executor.
To find the CI token open the Runners page in the admin section of the GitLab site.

Add some tags, I used the SQL Server and OS version, these are used split runners between projects. Finally, set the executor. This is the shell\CLI on the runner that will be used to execute the build. I’m just using the standard shell but this is where you could hook GitLab up to docker to do lots of cool stuff that I may post about in the future.

Once done, the runner will appear at the bottom of the runners page.

Click the Runner token to configure the runner further. The main thing to do here is to enable the runner for the projects that require it.
Finally, install the runner as a service and then start it up.
.\gitlab-ci-multi-runner-windows-amd64.exe install
It’s possible to pass the credentials of an account to run the Runner as with the –user and –password switches. This can be changed later in the properties of the gitlab-runner service. I recommend creating a dedicated service account for each runner. Add a login, for the service account, to the SQL instance on the runner and give it the dbcreator server role.
.\gitlab-ci-multi-runner-windows-amd64.exe start
The runner should now show as active.
To process a build, the runner will first pull the repository from GitLab. To do this, it requires Git to be installed. Installing Git for Windows will do the job. The installation is straight forward, I run with all the defaults. If you install Git after installing the runner, be sure to restart the runner service as it wont be able to use Git until you do.
Our runner can now pull the repo, but to actually build a Visual Studio project the MSBuild command line application is required. This can be downloaded from here. Installation is straightforward.
To build ReadyRoll projects, copy the ReadyRoll folder in C:\Program Files (x86)\MSBuild from a machine with ReadyRoll installed. Paste this to the same path on the Runner.
We are really close to having a basic Continuous Integration setup, the last thing we need to do is give GitLab the commands to execute on the runner to build our project. This is done with a YAML file.
YAML
Create a YAML (Yet Another Markup Language) file with the name “.gitlab-ci.yml” in the root of the repository. When a commit is pushed to GitLab it will look for this file and execute it’s instructions.
Formatting of YAML files is a bit fiddly, luckily there is a lint tool on the pipelines page that you can paste your file into to check it’s validity.
Here is a basic build file to get us started:
job:
 script: '"C:\Program Files (x86)\MSBuild\14.0\Bin\MSBuild.exe"'
The only instruction I’m passing is to run MSBuild. This command will be executed from the repository folder. With no parameters it will build all the projects in the current folder.
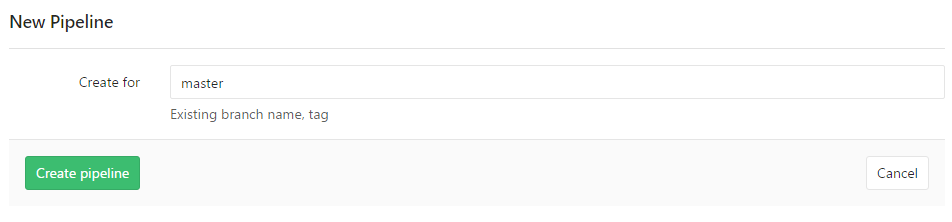
Before we initiate a build, we need a Pipeline. Pipelines are used to organise build jobs. On the pipelines page, click Run Pipeline to create your first pipeline.
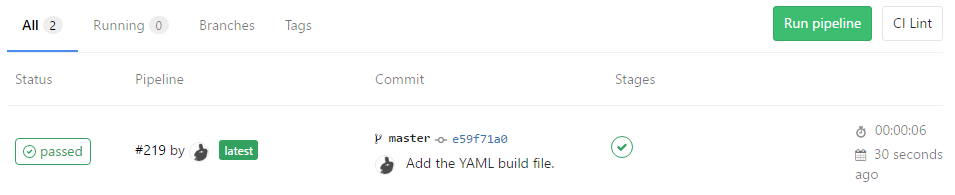
Next, commit the YAML file to the repository and push it to GitLab. The pipelines screen will then display the build status. There will also be some deployment packages sat on the runner. We can collect these to deploy the solution.
In the next post, I will alter the build job to store the deployment packages against the build (useful for deployments). I’ll also add another build job to run some tSQLt unit tests and store the results.
The post Building SQL Server Projects with GitLab Runners appeared first on The Database Avenger.
