

The Problem
You set up a log shipping monitor server, it’s simple, reliable, and it just works so you have left it alone. Over time more servers have been added for it to monitor, but now the server is getting old and needs to be replaced. You built a new server to replace it, and the $64,000 question is how do you move all your existing databases to the new log shipiing monitor server?
The first thing you probably notice when you open the transaction log shipping wizard on an existing log shipping database is that everything related to the monitor server instance is greyed out. One would think there would be an easy way to change the monitor and naturally this would be the place to change it. Sadly this is not the case and there is not a simple way to move to a new monitor server. You could just remove and re-add log shipping using your new monitor server, but my goal was to avoid that. So, let’s dive into the manual way to point your database to a new monitor server without rebuilding anything.
Background on Log Shipping Monitoring
Before we get started I’ll provide some background here to keep the solution cleaner. If you want to skip the technical details, jump right down to the solution.
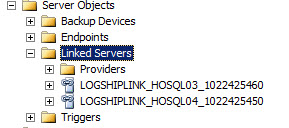
There are two key pieces that make your log shipping monitor work. First and foremost is having a monitor server instance set in your log shipping wizard. I won’t go into detail on this as you should already have that set up on your database for your existing monitor server. The second, and less obvious, piece is a linked server object for your monitor server, which is automatically created for you on both your primary and secondary server when you first set up log shipping using the wizard. One is shown below:

Your log shipping monitor doesn’t actually monitor your primary and secondary servers directly; it just looks at its own log shipping table. Instead, when your primary and secondary server perform log shipping jobs, either backing up, copying, or restoring logs, the jobs themselves reach out to the monitor server and update the monitor server. To do this, they use the linked server object to connect to the monitor server. Once a connection is established, a process writes to the log shipping monitor table to say, for example, this is the last transaction log I restored, and this is the time I restored it.
If you look at all the tables pertaining to log shipping, you will notice that there is nothing that mentions the linked server object. So, the question becomes, how does your primary and secondary server know to use the linked server object? It took some digging through profiler trace logs to figure out how this works but the numbers at the end of the linked server object are actually a checksum of the monitor server name. This allows your log shipping jobs to dynamically calculate the name of your linked server object as LOGSHIPLINK_<Your Monitor Server Name>_ + the checksum of your monitor server name. Once a job calculates the name, it will look for a linked server object that matches that name and execute a link command to update the monitor server.
This means we have to do three things to move your database to the new monitor server. First, we need to create the new linked server objects. Second, we need to add the primary and secondary log shipping records to the new monitor server, and finally we will have to update the primary and secondary databases with the new monitor server name.
The Solution
There are 7 steps to this solution, each of which is described below. We have to create a linked server on your primary and secondary server as well as update the log shipping tables on all 3 servers. (Primary, secondary and new monitor server)
Step 1
Let’s create the new linked server object on your primary and secondary servers. From my digging I was able to come up with this code. This will give us the same linked object name for your new monitor server that the log shipping jobs would calculate.
declare@monitor_server sysnameset@monitor_server ='HOSQL04'--new monitor server nameselect'LOGSHIPLINK_'+substring(@monitor_server, 1, 90) +N'_'+cast(checksum(@monitor_server) asnvarchar(20))
This code will return your linked server name as LOGSHIPLINK_HOSQL04_1022425450
Step 2
Let’s create the linked server on your primary server. Right click on Linked servers and select New Linked Server to bring up the wizard. In the general tab enter the Linked Server name from step 1, and select SQL Server as the server type.

On the Security tab select “Be made using the login’s current security context”.

Next on the server options tab, change RPC and RPC out to True. The rest should already be set. Click OK.
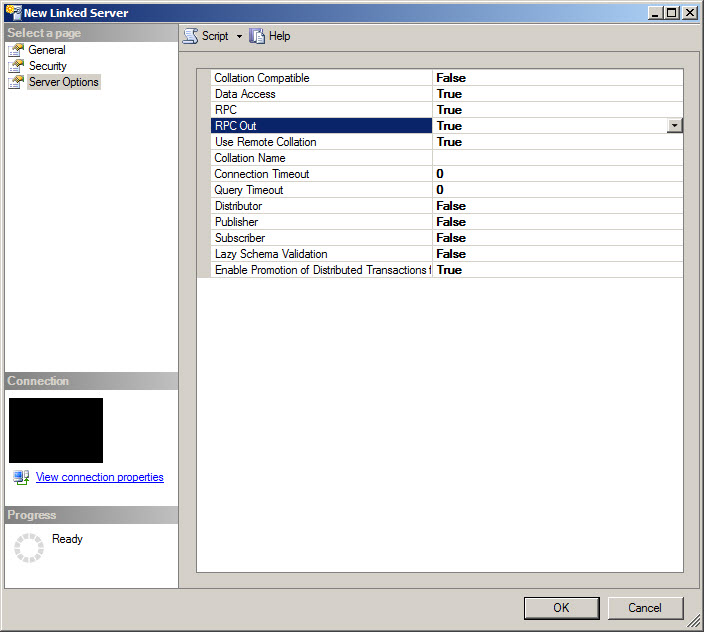
You will get this error as the wizard tries to validate the link connection to the monitor server, but we still need to configure a few more thing found in step 4 before this will work, so click "Yes" to keep and create the linked server.

You should now see your old and new linked servers.
Step 4
Next we need to configure the data_source name of the linked server object in the sys.Servers table so we can connect to the monitor server. When the linked server is created above it is created with the LOGSHIPLINK name from step one but for the link to work we need to change the data_source name to the netbios name of the new monitor server so the link knows which server to connect to.
execsys.sp_setnetname'<linkNameFromStep1>','<New Monitor Server Name>'
For more info on sp_setnetname See:
https://msdn.microsoft.com/en-us/library/ms190318.aspx
Next we need to change the is_system flag to true. This means that only the internal system (SQL Server Agent) can use the linked server connection which is good for security.
exec sys.sp_serveroption '<linkNameFromStep1>', 'system', 'true'
Once that is done you can verify that your new linked server is configured the same as your old one with this query
 SELECT *
 FROM sys.Servers
 WHERE name like 'LOGSHIPLINK%'
Your linked server is now set up on your primary server. Repeat steps 2-4 on your secondary server using the same linked server object name.
Step 5
In order to set up your primary and secondary server in the monitor, we need to gather some info from the MSDB log shipping tables on both servers. We need the primary_id and secondary_id guids from each server, which should look something like this: 82365908-FF31-47F1-88E1-F6D5BA68DC43
On the primary server run this query
 USE MSDB
 GO
 SELECT
  primary_id
 ,primary_server
 ,primary_database
 ,backup_threshold
 ,threshold_alert
 ,threshold_alert_enabled
 ,history_retention_period
 FROM msdb.dbo.log_shipping_monitor_primary
 WHERE primary_database = 'AdventureWorks2012'
And on the secondary server run
 USE MSDB
 GO
 SELECT
  secondary_id
 ,secondary_server
 ,secondary_database
 ,restore_threshold
 ,threshold_alert
 ,threshold_alert_enabled
 ,history_retention_period
 FROM msdb.dbo.log_shipping_monitor_secondary
 WHERE primary_database = 'AdventureWorks2012'
 AND primary_server = 'HOSQL01'
NOTE: if you are doing log shipping for multiple databases you will need to get the id for each database on both your primary and secondary server. Re-run the same code for each database.
Step 6
Now that we have the IDs lets update the new monitor server so that it knows your servers exist and to expect data from them. We are going to add the primary and secondary id guids, the server names and database names, as well as the alert thresholds.
USE MSDB GO EXEC msdb.dbo.sp_processlogshippingmonitorprimary --Add the primary server details to the monitor @mode = 1 ,@primary_server = N'HOSQL01' ,@primary_database = N'AdventureWorks2012' ,@primary_id ='82365908-FF31-47F1-88E1-F6D5BA68DC43',@monitor_server = N'HOSQL04' --New monitor server ,@backup_threshold = 10 --set these to your desired alert thresholds ,@threshold_alert = 14420 ,@threshold_alert_enabled = 1 ,@history_retention_period = 5760 ,@monitor_server_security_mode = 1 EXEC msdb.dbo.sp_processlogshippingmonitorsecondary --Add the secondary server details to the monitor @mode = 1 ,@secondary_server = N'HOSQL02' ,@secondary_database =N'AdventureWorks2012',@secondary_id = 'D4BB6760-4BD1-49AC-B827-556CDF499D2E' ,@primary_server = N'HOSQL01' ,@primary_database = N'AdventureWorks2012' ,@monitor_server =N'HOSQL04'--New monitor server,@restore_threshold = 10 --set these to your desired alert thresholds ,@threshold_alert = 14420 ,@threshold_alert_enabled = 1 ,@history_retention_period = 5760 ,@monitor_server_security_mode = 1
NOTE: Again if you are shipping logs for multiple databases you will need to run this for each database and make sure to double check your ID guids.
Step 7
Finally, let’s update the log shipping tables on the primary and secondary node to point to the new monitor server. Once you run this step your servers will no longer update your existing monitor server and will start updating the new server. Same as before if you will have to do this for each database that is set up for log shipping along with making sure you are using the correct database IDs.
On the primary server, run:
USE MSDB GO UPDATE msdb.dbo.log_shipping_primary_databases SET monitor_server ='HOSQL04'--New monitor server,user_specified_monitor = 1 WHERE primary_id = '82365908-FF31-47F1-88E1-F6D5BA68DC43'
On the secondary server, run:
USE MSDBGOUPDATE msdb.dbo.log_shipping_secondarySETmonitor_server ='HOSQL04'--New monitor server,user_specified_monitor = 1 WHERE secondary_id = 'D4BB6760-4BD1-49AC-B827-556CDF499D2E'
That’s it. If everything was done correctly when your log shipping agent jobs run you should now see a fully functioning entry for your database(s) on your new monitor server.
Luke Campbell had a good write up on adding a log shipping monitor to a database that did not have one set up originally. It was super helpfull in figuring out where I needed to begin. You can find it here: http://www.sqlservercentral.com/articles/Log+Shipping/77295/