

Introduction
Azure Data Factory resources including pipelines, datasets, linked services, etc. should be maintained in a version control system. Also, the changes implemented in the Data Factory in Development Environment need to be deployed in higher environments, like Test and Production. Azure DevOps can be used with Azure Data Factory to fulfill the requirement of version control and deployment needs.
Here are the Azure Resources used:
- Azure DevOps. Microsoft Documentation Link: https://learn.microsoft.com/en-us/azure/devops/get-started/?view=azure-devops/
- Azure Data Factory. Microsoft Documentation Link: https://learn.microsoft.com/en-us/azure/data-factory/
Steps
I will explain the step-by-step process to configure the Data Factory Repository in Azure DevOps and then how to deploy the code in different environments.
Step 1: Go to the Manage Tab of the Azure Data Factory Studio. Then, select the GIT Configuration menu item. In the right panel, press the Configure button.

Step 2: In the Popup window, select Repository type as Azure DevOps Git and select the Azure Active Directory to be used for connecting the repository.

Step 3: In the next screen, provide the required details for the Repository and click on the Apply button.
A Collaboration branch should be created to keep all the code related to the Data Factory. The ADF Publish branch default name is adf_publish. Keep this field value unchanged.

Step 4: GIT Configuration details are now available in the Manage Tab of the Data Factory Studio. The Edit button can be used to disable publishing the Data Factory changes to the Publish branch.

Step 5: Create a new Data Factory Pipeline and modify any existing pipeline. Also, create/modify the other Data Factory resources like Datasets, Linked Services, Triggers. Press the Publish button in the top menu.
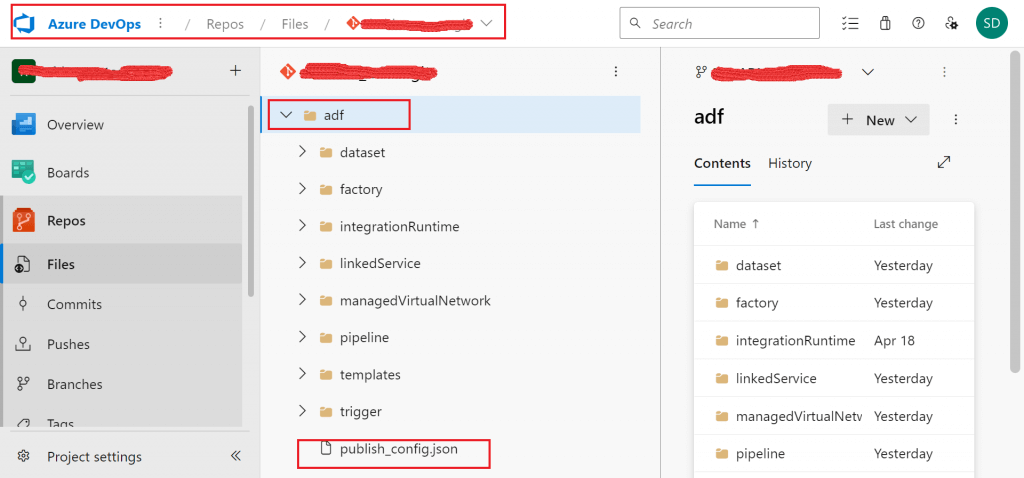
Step 6: Go to Azure DevOps. First, select the Collaboration branch. The adf folder contains all the resources in the respective subfolders. The file named publish_config.json contains the default name of the Publish branch i.e. adf_publish. In case, a different branch name is to be set as the Publish branch, publish_config.json file should be modified accordingly.
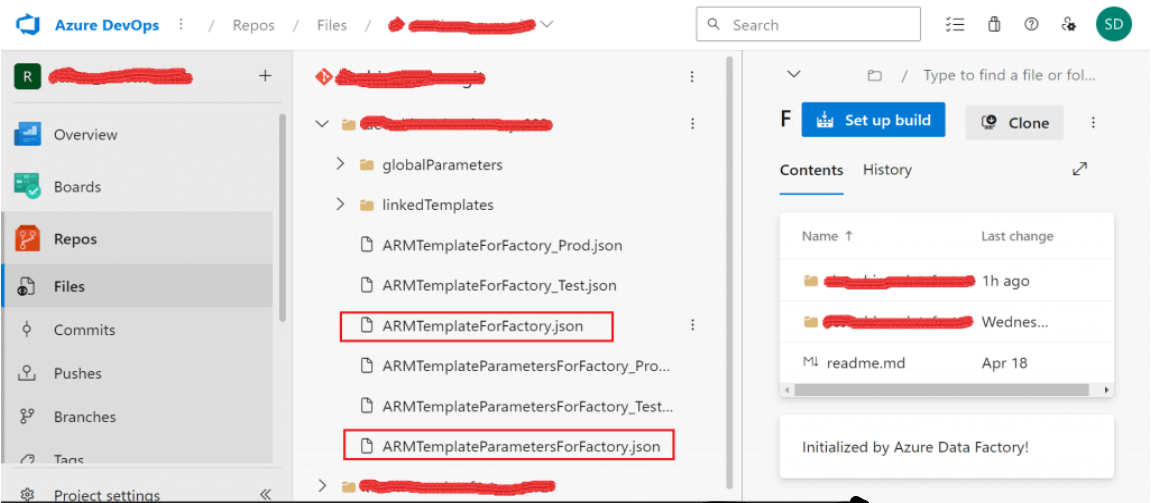
Step 7: Select the Publish branch. This branch has a folder named as the Dev Data Factory name. Insider this folder, ARM Templates for the Data factory and its parameters are available in JSON format.
Copy of these two files may be created with the specific set of configuration values for different environments. Here, two sets of template files are created for test and prod environments.
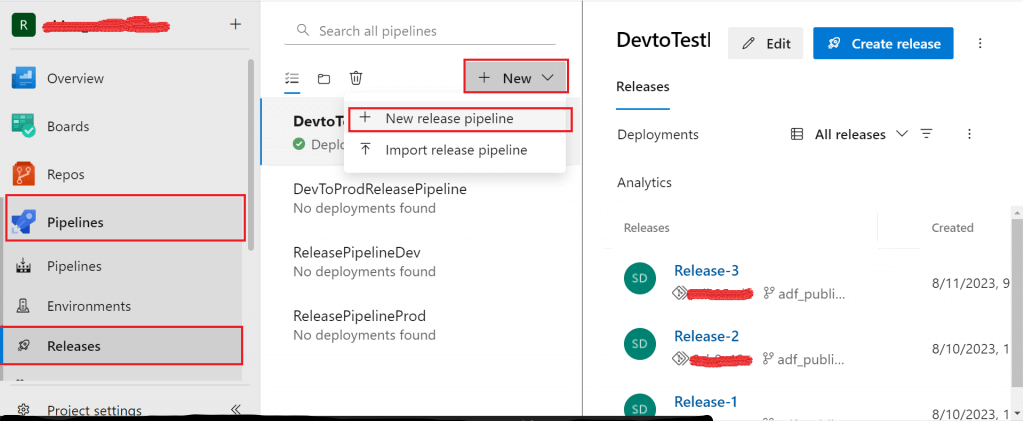
Step 8: The next step is to deploy the recent changes from the Dev Data Factory to the Test Data Factory. Releases link is selected from the Pipelines menu item. Press the New button and select the New release pipeline option.
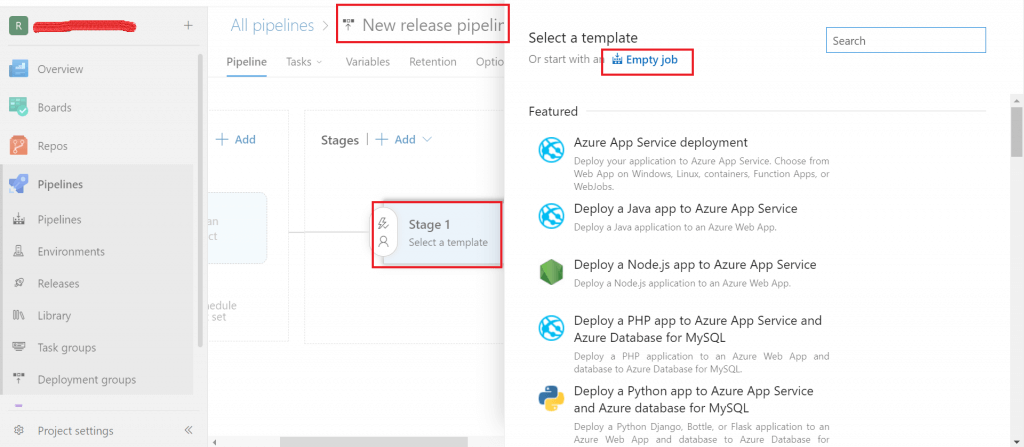
Step 9: In the next screen, Stage template needs to be selected for the new release pipeline. Empty Job is selected and name of the stage is set to as DeployDevToTest.
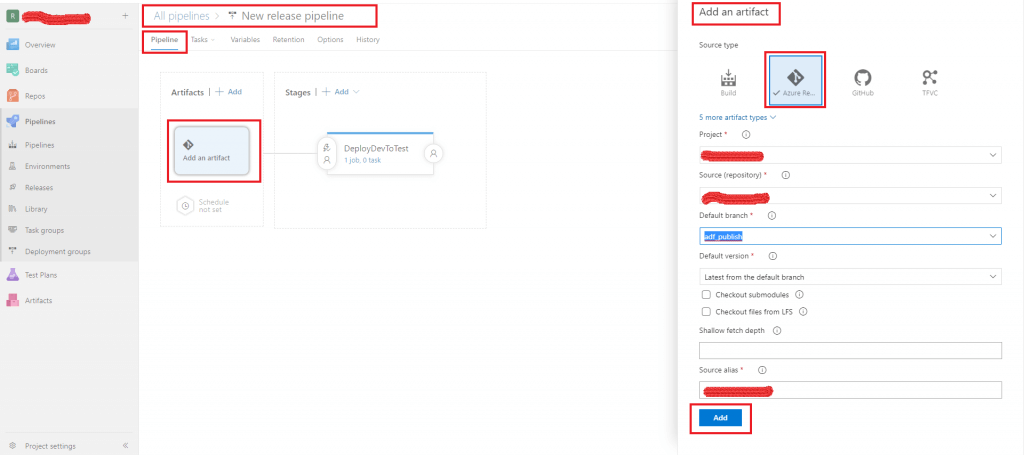
Step 10: Select the Add an artifact icon in the new release pipeline. Select the source type as Azure Repos Git. Provide the details about the Repository and press the Add button.
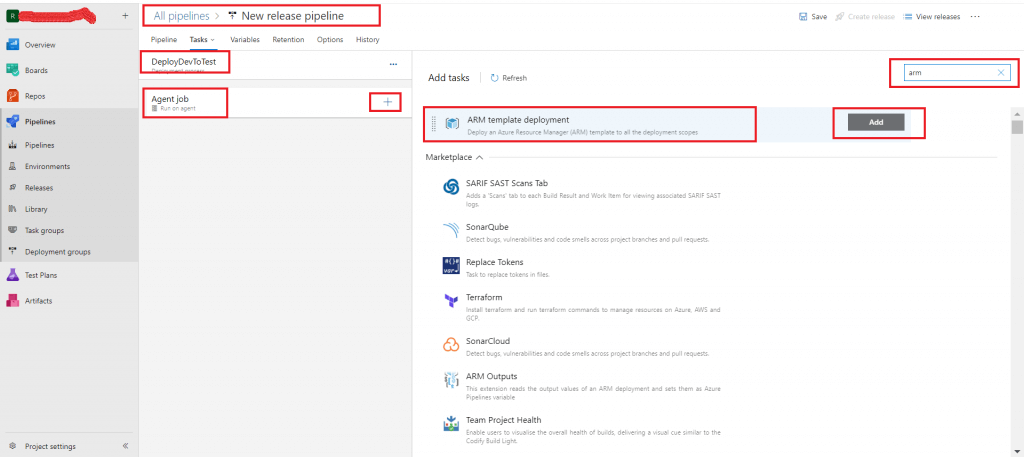
Step 11: Click on the "1 job, 0 task" link of the Stage DeployDevToTest. Click on the '+' link of the Agent Job. In the right window, search for 'arm' and then add the ARM template deployment task.
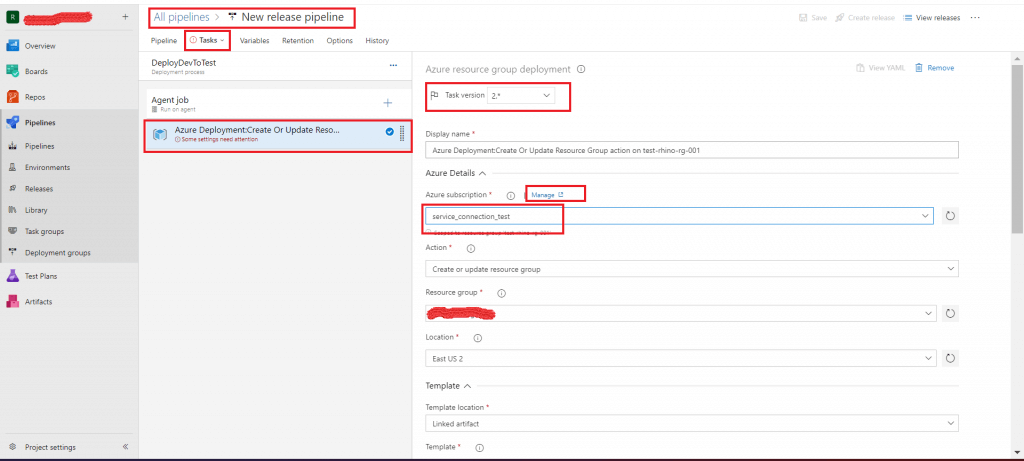
Step 12: In the next screen, the task related details are filled in. The task version is set as 2. In the Azure Subscription drop down, one available Service Connection is selected for the scope of the Test environment resource group. A new service connection can be created by clicking on the manage link, provided the user has administration access in the Subscription.
You action is selected as Create or update resource group. The resource group and location fields are also selected from the drop down.
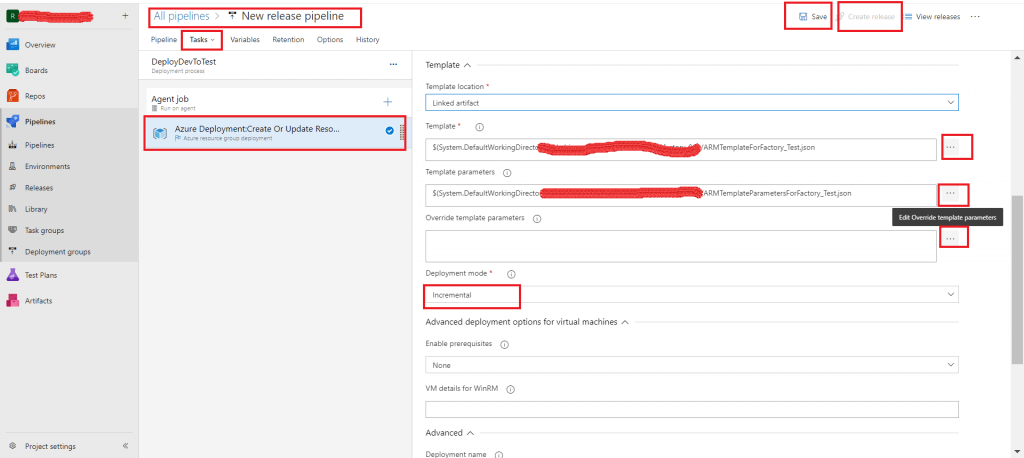
Template and Template parameters are set as the JSON files for Test environment as saved in the adf_publish branch folder. The template parameters can be overridden as required. Deployment mode is set as incremental which is the default option. Then, the Save button on the top menu is pressed.
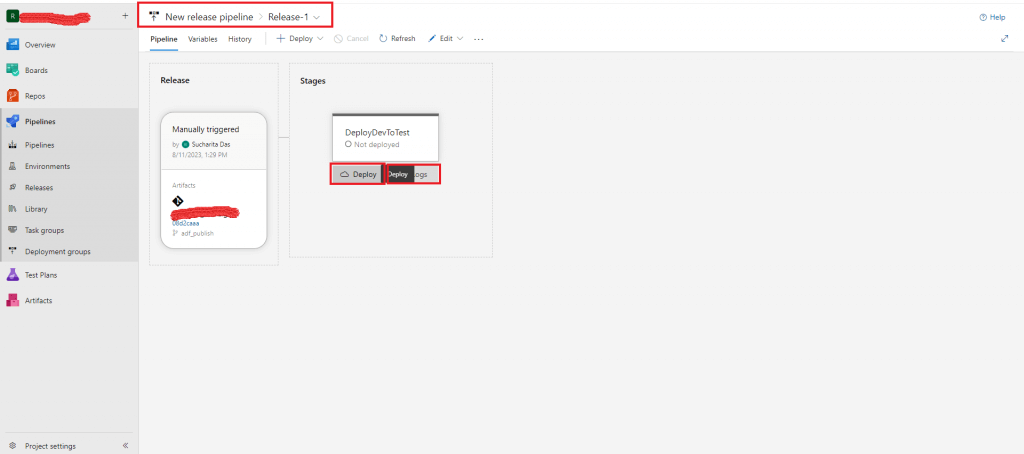
Step 13: Once the pipeline is saved, the Create release button is activated in the top menu. Press the Create release button. In the pop-up window, select the DeployDevToTest stage to be executed manually. Add any relevant comment in Release description text box and press the Create button.

Step 14: A new release is created for the pipeline. Go to the stage named DeployDevToTest and press the Deploy button to actually start the deployment of the Data factory code to the Test environment. Press the Logs button to review the detailed log of the deployment process.
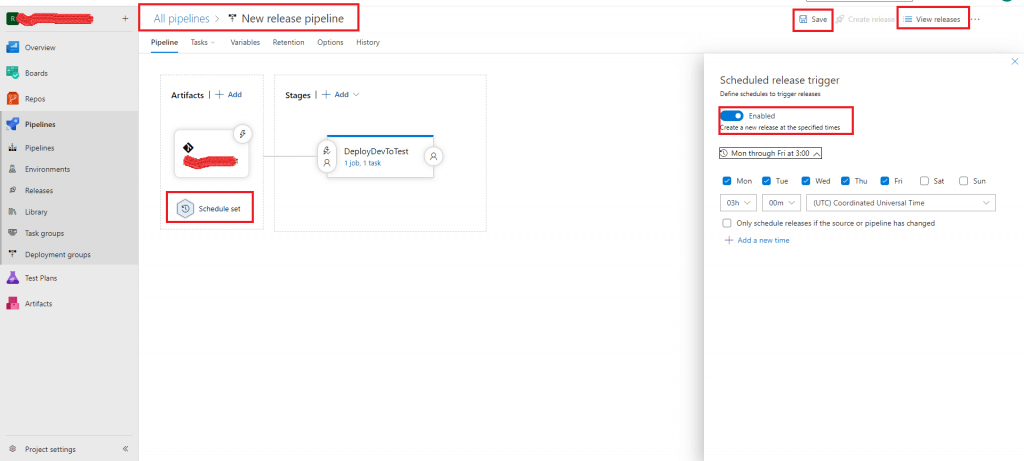
Instead of creating the release for manual trigger, release can be scheduled as well.
Step 15: Once the deployment is completed, review and test the Test environment. If any Storage Account key is used in the Linked Services, that need to be reentered in the environment where the deployment is done with the Release Pipeline.
Conclusion
GIT Configuration in Data Factory helps in Version Control of the code and publishing the code in the Publish Branch of Azure DevOps. Release Pipelines help in deployment of the code in higher environments using manual or scheduled trigger. The ARM Templates in the Publish branch can be modified with the configuration parameters of specific environments. A new release can be created every time there is a change in the codebase. Earlier releases of a pipeline can be deployed as and when required. GIT should be configured for the Data Factory of a single environment. The other environments should be updated with the deployment of release pipelines.
