In Part 1, I explored how to bend SQL Server Agent to our will and peek under the hood of Azure SQL Managed Instance (SQL MI), gaining full OS access to the container (all without relying on xp_cmdshell). But once I realized what kind of door I'd opened, curiosity pushed us further, tempting us to try even bolder tricks.
What if I could sneak an entire binary file into our SQL MI container and execute it natively?
For our tests, nothing fancy, just a Sysinternals diagnostic tool, but imagine the possibilities this could unlock for more advanced experimentation. But experimentation it is; keep in mind that once the container goes down, all is lost.
Today, we're taking that challenge head-on. We'll smuggle our binary payload across the SQL border, row-by-row, using nothing but T-SQL, PowerShell, and some creative SQL Agent job scheduling. This clever trick isn't just for SQL MI, it applies to any SQL Agent with a bit too much power. Grab your popcorn (or keyboard) and get ready for the next episode of this PaaS database espionage adventure!
PowerShell via one-time SQL Agent Job
To pull off this operation smoothly, let’s revisit the interactive agent-job approach we scripted in Part 1. By leveraging the stored procedure dbo.RunPowerShellViaAgent we previously crafted, we'll call our SQL Agent jobs interactively, setting the stage for our binary-smuggling mission.
To start were we left off, one test query before we really start the mission:
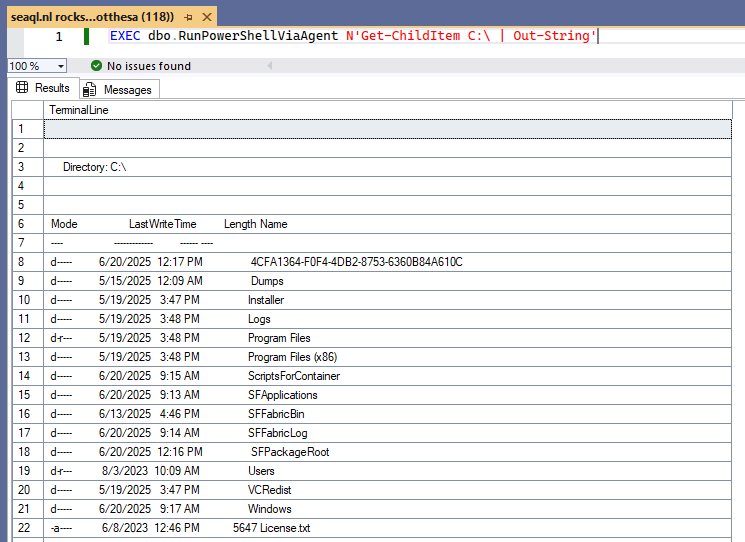
EXEC dbo.RunPowerShellViaAgent N'Get-ChildItem C:\ | Out-String'
This should get a formatted, readable terminal output, right inside SSMS, like this:

Smuggling 101: A Five-Step Mission Plan
Every good espionage story has a well-laid plan and ours is no exception. To successfully smuggle our binary payload into SQL MI territory, we'll execute a carefully crafted five-step operation. Think of this as our digital "heist movie" montage:
- A Home for Binaries
- Insert a File on the Source Server
- Sync It
- Extract from SQL MI to Disk
- Execute the Binary from Inside the Container.
Ready to see this stealthy SQL magic in action? Let’s go!
But before we start, ensure you've set up the prerequisites: a local SQL Server instance alongside your SQL MI, SQL Server Management Studio (SSMS), and PowerShell.
Step 1 — A Home for Binaries
Every heist requires a safe drop point, a secure place to store our smuggled goods. In our digital espionage, this means creating a simple yet robust transport crate: a table can be so flexible and hold our binary files.
So first, deploy this structure on both your local SQL Server and your target Azure SQL MI instance:
CREATE TABLE dbo.binaries
(
    Id INT IDENTITY PRIMARY KEY,
    FileName NVARCHAR(255),
    FileExtension NVARCHAR(50),
    FileData VARBINARY(MAX),
    Synced BIT
        DEFAULT 0
);
This table is our transport crate: lightweight, flexible, and perfect for silently moving binary data across database boundaries.
Step 2 — Insert a File on the Source Server
With our storage crate ready, it's time to load our binary payload. For our demo, I’m choosing the PsLogList utility: a handy diagnostic tool from the legendary SysInternals suite by Mark Russinovich. PsLogList lets us easily retrieve event log messages directly from the host machine, making it a perfect test candidate.
Let's carefully place our tool into our prepared container, ensuring it's ready for covert transport.
It's possible your local SQL Server instance first needs a quick, one-time setup to allow ad hoc distributed queries.
Run this setup to ensure smooth operations:
EXEC sp_configure 'show advanced options', 1;
RECONFIGURE;
EXEC sp_configure 'Ad Hoc Distributed Queries', 1;
RECONFIGURE;
After completing this one-time setup, insert your binary using the query below. Please customize it to match your local paths and binary:
INSERT INTO dbo.binaries
(
    FileName,
    FileExtension,
    FileData
)
SELECT 'psloglist64.exe',
       '.exe',
       BulkColumn
FROM
    OPENROWSET(BULK N'D:\tools\PSTools\psloglist64.exe', SINGLE_BLOB)
    AS FileData;
With our payload loaded, we’re one step closer to our SQL espionage mission. Time to synchronize!
Step 3 — Sync It
Now for the fun part: let’s initiate the covert transfer! This PowerShell script acts as our secret courier, identifying unsynced binaries from our source crate, quietly uploading them into SQL MI, and marking them as "delivered."
Sure, I could leverage the Managed Instance Link for synchronization, but that would require setting up our local instance as Always On Availability Group. And frankly, that’s not possible on all Windows editions. To keep things simple, stealthy, and widely compatible, we'll rely instead on good old-fashioned standard ADO.NET connections and parameterized SQL.
Nothing fancy, nothing suspicious, and most importantly, nothing blocked. Just pure, straightforward espionage via PowerShell.
# Save as Sync-BinaryFiles.ps1
# Load required .NET assembly for SQL connections
Add-Type -AssemblyName "System.Data"
# Create SQL connection strings
# NOTE: Replace "User" and "Password" with actual credentials or use a secure credential method (e.g., Get-Credential or Credential Manager)
$localConnStr = "Server=localhost;Database= REPLACE_ME;Integrated Security=True;MultipleActiveResultSets=True"
$remoteConnStr = "Server=free-sql-mi.database.windows.net,3342;Database= REPLACE_ME;User=REPLACE_ME;Password=REPLACE_ME;MultipleActiveResultSets=True"

# Create connection objects
$localConn = New-Object System.Data.SqlClient.SqlConnection $localConnStr
$remoteConn = New-Object System.Data.SqlClient.SqlConnection $remoteConnStr
try {

# Open both connections
$localConn.Open()
$remoteConn.Open()

# Step 1: Fetch unsynced binary records from local database
$fetchCmd = $localConn.CreateCommand()
$fetchCmd.CommandText = @"
SELECT Id, FileName, FileExtension, FileData
FROM dbo.binaries
WHERE Synced = 0
"@
$reader = $fetchCmd.ExecuteReader()
while ($reader.Read()) {

# Extract fields from local row
$id = $reader["Id"]
$fileName = $reader["FileName"]
$ext = $reader["FileExtension"]
$data = $reader["FileData"]

# Step 2: Insert record into remote database
$insertCmd = $remoteConn.CreateCommand()
$insertCmd.CommandText = @"
INSERT INTO dbo.binaries (FileName, FileExtension, FileData, Synced)
VALUES (@FileName, @FileExtension, @FileData, 1)
"@
$insertCmd.Parameters.Add("@FileName", [System.Data.SqlDbType]::NVarChar, 255).Value = $fileName
$insertCmd.Parameters.Add("@FileExtension", [System.Data.SqlDbType]::NVarChar, 50).Value = $ext
$insertCmd.Parameters.Add("@FileData", [System.Data.SqlDbType]::VarBinary, -1).Value = $data
$insertCmd.ExecuteNonQuery()

# Step 3: Mark file as synced in local database
$updateCmd = $localConn.CreateCommand()
$updateCmd.CommandText = @"
UPDATE dbo.binaries
SET Synced = 1
WHERE Id = @Id
"@
$updateCmd.Parameters.Add("@Id", [System.Data.SqlDbType]::Int).Value = $id
$updateCmd.ExecuteNonQuery()

# Feedback per file
Write-Host "Synced binary ID $id - $fileName"
}

# Always close the reader
$reader.Close()
}
catch {
# Handle exceptions with a meaningful error message
Write-Error "Error during sync: $_"
}
finally {
# Clean up resources
if ($localConn.State -eq "Open") { $localConn.Close() }
if ($remoteConn.State -eq "Open") { $remoteConn.Close() }
}
Execute this script on your local machine and our payload is moving across enemy lines. If your PowerShell session shows output similar to this:
…you’ve successfully smuggled your binary through SQL Server security checkpoints.
Just kidding! No real checkpoints here, of course. This is just a good old-fashioned table sync using ADO.NET. But admit it, the espionage theme made it a bit more exciting, didn’t it?
Step 4 — Extract from SQL MI to Disk
With our binary safely stored inside the SQL MI database, it's extraction time. Time to call upon our reliable operative: the interactive SQL Agent stored procedure. Execute the following via our one-time SQL Agent SP to initiate the extraction:
EXEC dbo.RunPowerShellViaAgent '
Add-Type -AssemblyName "System.Data"

$Id = 1
$OutputFolder = "C:\ExtractedFiles"
$ConnectionString = "Server=localhost;Database=REPLACE_ME;Integrated Security=False;User=REPLACE_ME;Password=REPLACE_ME;MultipleActiveResultSets=True"

if (-not (Test-Path $OutputFolder)) {
    New-Item -ItemType Directory -Path $OutputFolder -Force | Out-Null
}

$query = @"
SELECT FileName, FileData
FROM dbo.binaries
WHERE Id = @Id
"@

$connection = New-Object System.Data.SqlClient.SqlConnection $ConnectionString
$command = $connection.CreateCommand()
$command.CommandText = $query
$command.CommandTimeout = 600
$null = $command.Parameters.Add("@Id", [System.Data.SqlDbType]::Int).Value = $Id

try {
    $connection.Open()
    $reader = $command.ExecuteReader()

    if ($reader.Read()) {
        $fileName = $reader["FileName"]
        $bytes    = $reader["FileData"]
        $filePath = Join-Path $OutputFolder $fileName
        [System.IO.File]::WriteAllBytes($filePath, $bytes)
        Write-Output "Extracted: $filePath"
    }
    else {
        Write-Output "No file found with Id = $Id"
    }

    $reader.Close()
}
catch {
    Write-Error "Failed to extract file: $_"
}
finally {
    if ($connection.State -eq "Open") { $connection.Close() }
}
';
Please note that when running PowerShell via SQL Server Agent or with a SQL SP (like our trusty dbo.RunPowerShellViaAgent) it’s hard to capture the output of commands like Write-Host. Instead, you'll need to rely on Write-Output and Write-Error, which SQL Server can see and record.
If you spot output in SSMS similar to this:

Congratulations, you've successfully extracted your payload onto the disk of your SQL MI container. Mission nearly accomplished!
Step 5 — Execute the Binary from Inside the MI Container
With our payload quietly unpacked behind enemy lines, the final move is execution. Our binary is in position and ready to get launched. Let’s bring this mission home by running our smuggled executable right inside the SQL MI container, once more via dbo.RunPowerShellViaAgent:
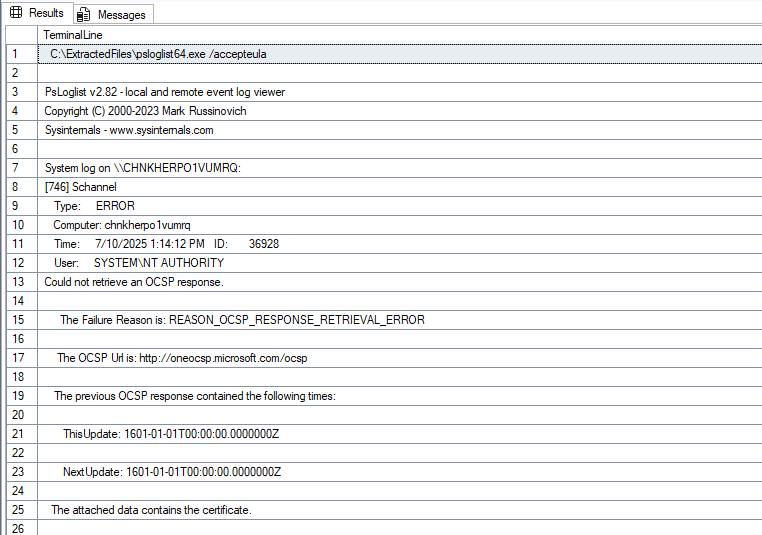
exec dbo.RunPowerShellViaAgent 'C:\ExtractedFiles\psloglist64.exe /accepteula'
The output took a little over 30 seconds but it’s everything we’ve hoped for:

Yes, you’re really running a downloaded binary from within the SQL MI container, orchestrated via SQL Agent. It's both remarkably simple and astonishingly powerful. And it proves that when creativity meets curiosity, exciting things happen even within Azure's supposedly restricted environments.
Where Does That Leave Us?
Our journey has taken us deep undercover into Azure SQL Managed Instance, pushing the boundaries of what's considered possible within Microsoft's managed database platform.
While today's exercise was playful, showcasing how easily a binary payload can cross database boundaries using nothing but native tools and ingenuity, it also underlines an important security takeaway: With great SQL Agent power comes great responsibility.
This playful espionage not only demonstrates how flexible SQL MI (and any SQL Agent) can be but also provides insights into potential vulnerabilities and creative workarounds. Armed with just T-SQL, PowerShell, and imagination, the possibilities for innovation or mischief are nearly endless.
What's Next?
Ready for even more adventure? In Part 3, we'll reverse our espionage flow, sailing in the opposite direction. Yes, we are bringing binaries directly from Microsoft back onto our local machine.
Get your SQL spy kit ready!


