Database DevOps techniques require an easy way to provision many copies of a database, even a large database, for development work and especially for testing work. Ideally, these databases should be disposable and easy to create; developers should be able to spin up a copy of a specific version of a database, complete with data, whenever they need it.
If this requirement sounds familiar, it's because Redgate has already developed a solution that will make this database provisioning burden easier: SQL Clone! This tool uses 'shadow copy' (image capture) and disk virtualization services that are built into any 64-bit Windows (7 and higher) operating system to allow teams to create copies, or clones, of even a very large database, very quickly and with minimal local diskspace requirements.
Redgate have always been open about this fact; it is reassuring for anyone who is considering the use of SQL Clone that it requires no specialised trickery that might be reliant on specific versions of SQL Server or Windows. Everyone has access to these services. Of course, in theory, this means anyone could use them to build the basics of a database cloning service that would help them get to grips with the technology and understand how it can be used in copying large databases.
This was the challenge I set myself for this article: to build a basic proof-of-concept system that could give a team some initial experience in working with the clone technology and the benefits it can bring to their Database DevOps processes.
The cost of DIY Clone
As a quick way to familiarize a DevOps team with the technology of database clones, my solution is free. However, it will require time and expertise to build it into a robust and automated solution that the team can rely on during development and testing, and it will have significant ongoing development, support and maintenance costs. It also uses one component (hobocopy) that, while it works fine in my testing, is no longer officially supported by the author.
If you are a development manager reading this article, the 'hidden costs' of this DIY solution might set some alarm bells ringing. Your Development and Ops teams are likely to spend quite a lot of their time building, checking, testing and maintaining it, writing the PowerShell to automate it into a self-service database provisioning system, as well as building a centralized way of managing and tracking clone deployments, all of which is built into SQL Clone, once you've paid the entry fee.
The cost of SQL Clone
The Redgate SQL Clone product is charged per terabyte per year.
All that said, if you are a one-man-team and super-skilled in PowerShell, Windows and on a tight budget; the DIY SQL Clone could be the solution. It might also be practical for DIY cloning of other Windows-based database systems with large data sizes, at least if the technical expertise exists in the team to make it happen and then maintain it. This might include databases like MongoDB or PostgreSQL that SQL Clone doesn't (currently) support. However, for any enterprise-scale developments, it would likely end up taking longer to deliver, and cost more, due to the development resources and supervision it requires, and the need to rely on long-term specialist knowledge to maintain it.
Emulating SQL Clone
SQL Clone creates one point-in-time image of the original database, and from this image it can create many clones, exact replicas with the same data, very quickly. Each clone has shared access to the data in the image, which is read-only, and any changes made to a clone are stored locally. This means that even databases that are hundreds of GB in size can be copied very quickly, because each clone requires only tens of MB of local disk space.
I won't explain all the details of how SQL Clone achieves this, as it is explained well enough in the documentation. However, I will draw the two basic stages involved in database cloning because these are the ones we need to mimic, as closely as possible, in our DIY Clone service.
The first step is to create the image, the Parent VHD (Virtual Hard Disk), which is a point-in-time, "virtualized" copy of the source database files.
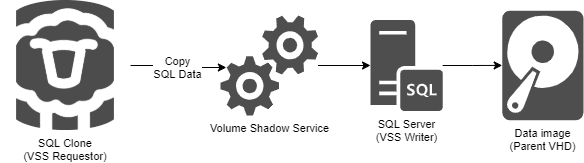
Figure 1. Create an image of your SQL Server database
The second step is to create clones from the image. For each clone, SQL Clone creates another VHD, called a differencing VHD (or Diff file), with a connection back to the parent (image) VHD.
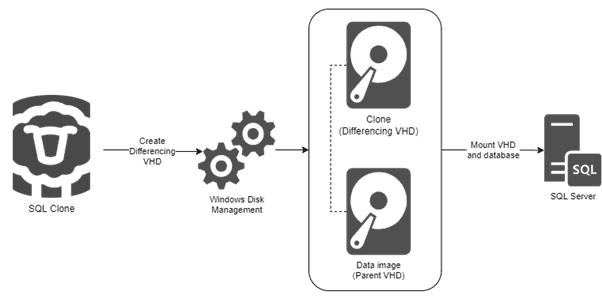
Figure 2. Create clones from the image
As I mentioned earlier, SQL Clone does all this using two Microsoft services and techniques that are built into Windows – the Volume Shadow Copy Service for copying 'live' database files, and the Windows Disk Management provider, for creating and mounting virtual hard disk (VHDx) files, to create the images and clones.
Building DIY SQL Clone
What we aim to do with our DIY Clone is to use these same services to achieve something similar. Our DIY clone service will copy the SQL Server data files from a live database and then mount them on a local SQL Server instance. Instead of just putting these files in a directory, it puts them in a parent VHD (the image) and from that creates a differencing disk that represents the data for a database. We mount the one or more differencing disks on the local SQL Server to host the clone(s).
Create an image of your SQL Server database
The Microsoft Volume Shadow Copy Service (VSS) allows you to back up application data without taking the application offline. These backups are called shadow copies. Well-known examples of making so-called shadow copies are Windows System Restore and Windows backup software (like Veaam).
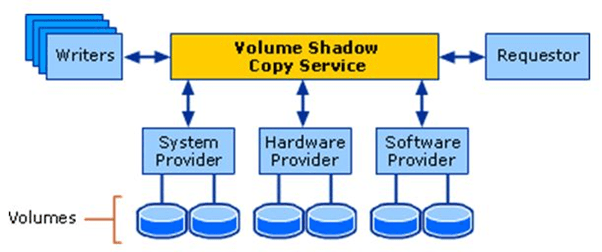
Figure 3: Architectural diagram of Volume Shadow Copy Service (copyright Microsoft)
VSS Requestor
If you try to copy files in windows Explorer or in PowerShell, it will give an error. Only a VSS Requestor can copy MDF files.
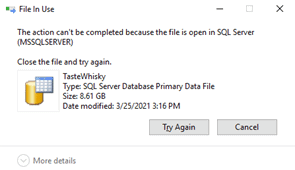
Figure 4: Files in use error when copying a MDF file
To make a copy of open files a VSS enabled Requestor must be used or written.
The Requestor can be any application that has the VSS API implemented. The VSS API is a set of COM and C++ APIs that third party developers can use to develop applications to create and manage shadow copies. If you are not so skilled with C++ there is also an open-source .NET library called AlphaVSS. To reveal a secret, that’s not only what Redgate is using, Redgate is also contributing to the project.
For the proof-of-concept we are not programming in C++ or .NET, but we keep it simple and use a CLI tool, created by Craig Andera, named Hobocopy. This is not a typo for robocopy. It is a tool inspired by both the name and functionality. The big difference is that hobocopy uses VSS to snapshot the disk before copying. And that is exactly what we want.
VSS Writers
Another important part of VSS are the Writers. The SQL VSS Writer does the magic for SQL Server related copies. This part guarantees that the MDF / LDF files, even though they are in use, can be copied if a Requestor, in our case Hobocopy, asks for it.
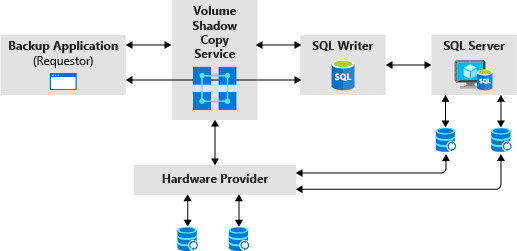
Figure 5: The role of the SQL writer in a VSS snapshot backup operation (copyright Microsoft)
The SQL VSS Writer does this by making a backup, with snapshot, in the background when the Requestor tries to copy the folder with MDF / LDF files. For the shadow copy, not the open MDF / LDF file is offered, but a snapshot of it.
Create a "snapshot" of the database files using Hobocopy
If you have your SQL Server data stored in F:\SQL\Data and want to copy the online database files to C:\Backup you can use this command:
hobocopy "F:\SQL\Data\" "C:\Backup\"
This code looks disarmingly simple but what happens 'behind the scenes' is a bit more complicated, and is explained in the sequence diagram of the VSS snapshot workflow on the Microsoft SQL VSS Writer documentation page. Below I tried to simplify the VSS Workflow, using Hobocopy as the Requestor.
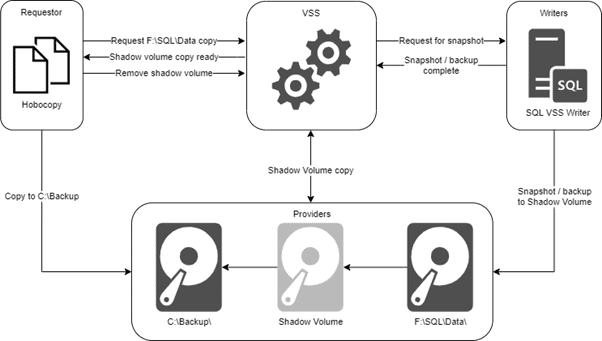
Figure 6: Simplified VSS Workflow for the hobocopy example
Virtual Hard Disks
We will not be copying the data files to a local disk but to a Virtual Hard Disk (VHD), which is just a file that acts like a disk.
To ensure that the VHD will always popup in the same location (drive letter), no matter what other drives are connected (such as removable USB), we need to mount the VHD as a NTFS folder. This Windows Disk Management feature can mount any partition as a folder, also physical drives.
For our DIY SQL Clone, we won't be using the Windows Disk Management GUI but the PowerShell Storage Cmdlets¸ built into Windows. For creating VHDx disks, we also need the help of a set PowerShell Cmdlets that are part of the Hyper-V module. This module is available for Windows via Add a feature or can be installed and activated with PowerShell. Please see Nicolas Prigent's article for more information on activating the Hyper-V Windows feature with PowerShell.
Create a parent VHD (the data image)
In the following example, we want to create a dynamically growing VHD that will be mounted to the folder, C:\mnt\parent\.
# declare variables
$ParentVhdPath = "C:\vhd\parent.vhdx"  # location of base VHD
$ParentVhdSize = 2048GB                # maximum size of a VHD, size is dynamically expanding
$ParentVhdMountPath = "C:\mnt\parent\" # NTFS folder mount point

# Create folder
New-Item -ItemType directory -Path $ParentVhdMountPath
# Create the parent VHD, Mount + format it
New-VHD -Path $ParentVhdPath -Dynamic -SizeBytes $ParentVhdSize  | Mount-VHD -Passthru | Initialize-Disk -Passthru | New-Partition -UseMaximumSize | Format-Volume -FileSystem NTFS -Confirm:$false -Force

# Mount the partition as a NTFS folder
Get-DiskImage -ImagePath $ParentVhdPath | Get-Disk | Get-Partition | Where-Object -FilterScript {$_.Type -Eq "Basic"} | Add-PartitionAccessPath -AccessPath $ParentVhdMountPath
Listing 1: Create a VHD and mount it to a folder
Here is the result:
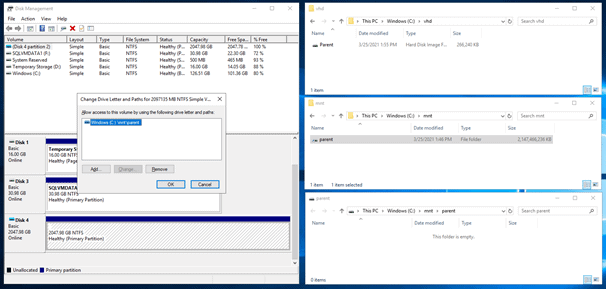
Figure 7: Result of the VHD creation and folder mounting
Now we will use hobocopy to copy all files that are in the folder F:\SQL\Data to C:\mnt\parent\, the folder mounted VHD we have just created.
# declare variables
$SQLDataPath = "F:\SQL\Data\"          # location of the MDF / LDF files

# Copy via VSS the SQL data to the VHD (NTFS Mount)
hobocopy $SQLDataPath $ParentVhdMountPath
Listing 2: Copy files with hobocopy to the VHD

Figure 8: Terminal output of the hobocopy command
Create the clone from the image
With hobocopy as VSS requestor and the parent VHD, we emulated the first stage of database cloning, it is now time to mimic the rest.
Differencing VHDs
The data image is created as a parent VHD, but it does not stop there. With VHDs on Windows we can use a technique to make Parent and Differencing disks.
These differencing disks (also called child disks) are seen by Windows as copy of the original VHD but with a fraction of the size. To be more precise the Differencing VHD only contains the differences from the parent VHD, and the VHDs together are seen by Windows Disk Management as just one disk.
The parent VHD must be set to read-only when used in a differencing use case. This means that any database clones created from the parent VHD all see the same 'immutable' data in the parent image, plus local changes (stored in the differencing disk). This makes a clone very quick and easy to reset back to its original state.
Storing all our SQL Server data on a parent disk and creating a differencing disk from it sounds a bit SQL Clonish, doesn't it? Spot on, this is exactly what SQL Clone does.
Create a differencing disk
It is now time to create the clone, which is a child VHD or in other words, a differencing disk for the parent VHD, which contains all the SQL data.
Before we create the child VHD, we first dismount the parent VHD and make it read only. We then create the new VHD and mount it to the folder, C:\mnt\clone<copy>\. The copy part can be used to make more than one clone copy, with the same script.
After creating and mounting the child VHD, we ensure that the disk will come online in Windows Disk Management. This extra step is needed to ensure that Windows changes the GUID of the drive. Repeatedly creating child VHDs causes duplicate GUIDs.
# declare variables
$Copy = 1
$ChildVhdPath = "C:\vhd\clone$copy.vhdx"    # location of Child VHD
$ChildVhdMountPath = "C:\mnt\clone$copy\"   # NTFS folder mount point

If (Test-Path $ParentVhdMountPath)
{
    # Dismount and remove NTFS folder mount
    DisMount-VHD -Path $ParentVhdPath

    # Make the parent VHD read only
    Set-ItemProperty -Path $ParentVhdPath -Name IsReadOnly -Value $true

    # Remove the NTFS folder (mount)
    Remove-Item $ParentVhdMountPath -force
}
# Create the differencing disk (Child VHD)
New-VHD -ParentPath $ParentVhdPath -Path $ChildVhdPath -Differencing

# Create folder for the mount
New-Item -ItemType directory -Path $ChildVhdMountPath

# Mount Child VHD
Mount-Vhd $childvhdpath

# Force the disk to go online, to solve the duplicated GUID
Get-DiskImage -ImagePath $ChildVhdPath| Get-Disk | Set-disk -IsOffline $False

# Mount the partition as a NTFS folder
Get-DiskImage -ImagePath $ChildVhdPath| Get-Disk | Get-Partition | Where-Object -FilterScript {$_.Type -Eq "Basic"} | Add-PartitionAccessPath -AccessPath $ChildVhdMountPath
Listing 3: Create a differencing VHD and mount it to a folder
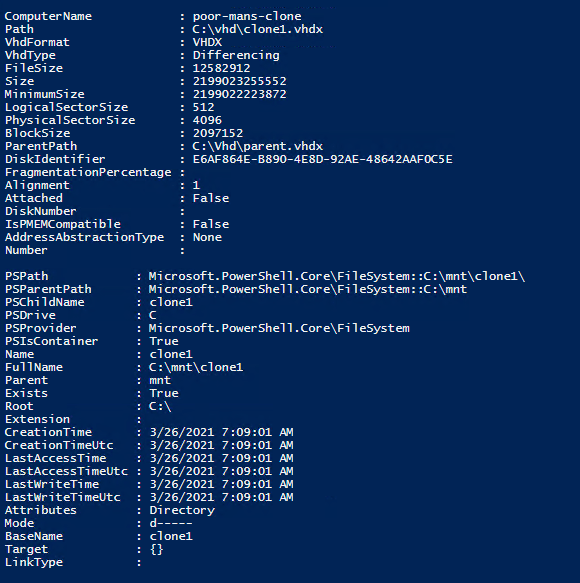
Figure 9: Terminal output when creating a differencing VHD and mounting it to a folder
Mount the database
At this point we have created a clone of the original VHD, the only thing left to do is attach the SQL Data files as a SQL 'clone' database.
The script can be used for both attaching and detaching the database. It also contains @Copy for more than one clone copy, with the same script.
DECLARE @Copy as int = 1
DECLARE @CloneDBName as VARCHAR(20) = CONCAT('Cloned-db', @Copy)
DECLARE @CloneMdfLocation as VARCHAR(100) = CONCAT('C:\mnt\clone', @Copy, '\WhiskyTrace.mdf')
DECLARE @CloneLdfLocation as VARCHAR(100) = CONCAT('C:\mnt\clone', @Copy, '\WhiskyTrace_log.ldf')

IF (EXISTS
(
    SELECT name
    FROM master.dbo.sysdatabases
    WHERE (
              '[' + name + ']' = @CloneDBName
              OR name = @CloneDBName
          )
)
   )
BEGIN
    EXEC master.dbo.sp_detach_db @dbname = @CloneDBName
    PRINT 'DB detached'
END
ELSE
BEGIN
    EXEC sp_attach_db @dbname = @CloneDBName,
                      @filename1 = @CloneMdfLocation,
                      @filename2 = @CloneLdfLocation
    PRINT 'DB attached'
END
Listing 4: Attach or detach the cloned database
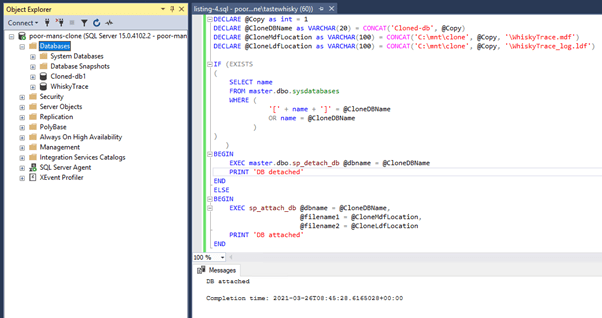
Figure 10: SQL Server Management Studio with database clone (Cloned-db1)
Cleaning up and other options
There are a few other parts to this process, such as removing a clone, making multiple clones, and changing the location for storage.
Remove the clone
After detaching the cloned database(s) we need to tidy up and remove the child VHD and folder mount.
# declare variables
$Copy = 1
# location of Child VHD
$ChildVhdPath = "C:\vhd\clone$copy.vhdx"
# NTFS folder mount point
$ChildVhdMountPath = "C:\mnt\clone$copy\"

# Dismount and remove NTFS folder mount
If (Test-Path $ChildVhdMountPath)
{
    DisMount-VHD -Path $ChildVhdPath
    Remove-Item $ChildVhdMountPath -force
    Remove-Item $ChildVhdPath -Force
}
Listing 5: Dismount Child VHD and remove NTFS folder mount
From this point on we can start again with Listing 3, to create one or more clones.
Cloning more than one database
The scripts provided in the listings are used with one database to prove the concept. They can easily be used to clone several databases, if the data files reside in the same folder.
VSS will automatically snapshots all the files in the source folder. This way the parent and child VHD will contain all the database files. The only thing to adjust is the attach / detach TSQL script. This way you could clone a whole instance of a database server.
Storing the image on a Network share
In this proof of concept, the parent VHD (the image) was copied to the local disk. If the parent VHD is copied to a Windows network share, more users can make use of the DIY SQL Clone.
The clones can be used if the Windows network share is available. This is exactly how Redgate SQL Clone works and the same limitations apply here.
Conclusions
So, as we can see, the technology behind SQL Clone is no secret and you can certainly look at creating a solution yourself which may seem very appealing in the short term, especially in terms of costs, but working like this creates more issues down the line, as the following table comparing Redgate SQL Clone to our DIY SQL Clone:
| Redgate SQL Clone | DIY SQL Clone | |
| DB Image creation | ||
| Instance image creation | ||
| Clone from Image | ||
| Automation Modules | ||
| Central Management GUI | ||
| Pricing model | License costs are a barrier for some organizations
| Looks free, but costs time from the team |
Redgate SQL Clone has had a full development team working on it from 2016, and since the launch in 2017 the product has been successfully implemented in hundreds of customer environments. The feedback Redgate received from their customers is based on many development scenarios in multiple environment configurations and has resulted in a robust and performant product far exceeding the capabilities of our DIY version.
Redgate will continuously fix bugs and make improvements, provides a rich PowerShell library, an extension for Azure DevOps and TFS and a number of integrations with Redgate SQL Change Automation and Redgate Data Masker. All fully supported by the Redgate engineering team.
And that is exactly where the shoe pinches. The DIY SQL Clone looks like a cost-effective solution initially, but who supports, maintains and develops it in the end?
This is an article by Tonie Huizer, Tonie is a Solutions Architect at Promicro, the independent & collaborative Microsoft professionals.
Related Content
To learn a bit more about SQL Clone, and its uses during database development, see:
- SQL Clone PowerShell Scripting: The Basics
Simple examples of how to use SQL Clone's PowerShell library for automating tasks such as creating and deploying clones from various images.
- SQL Clone for Unit Testing Databases
How to use SQL Clone to create 'disposable' SQL Server databases, for development and testing work.
- How to create and refresh development and test databases automatically using SQL Clone and SQL Toolbelt
A PowerShell automation script to build a SQL Server database from source control, seed it with data and then deploy multiple copies