

A Picture is Worth a Thousand Words.
Cliche or not, I take it for granted. Personally I learn a lot faster when I can visualize what I am talking about. And it is not different with database models.
SQL Server has several built-in tools that are poorly used by most developers, DBAs and Database Architects. One of my favorites is the Database Diagram tool (which I will call DDs from now on). It has existed on the SQL Server bundle for quite a while, and it is still there in SQL Server 2008. In fact, DDs is available in all SQL Server editions, including SQL Server EXPRESS, the free one.
DD is usually seen as a cosmetic feature. Many people didn't ever even take a look at it. If you also believe DDs is not worthy your time, think again. Don't think a user friendly tool is useless just because it is simple.
First of all, we have to keep in mind that database modeling and data integrity is really serious stuff. Data types, primary keys, foreign keys, alternate and/or surrogate keys exist to assure data quality. All in all, it doesn't matter how "fast" your application can store data if the data itself is not what it should be.
DD is not intended to be a full database modeling tool, and neither is it designed to be a powerful diagramming tool as VISIO. But it gives you a fast and inexpensive way to analyze and understand your database's physical model. In one phrase, it gives you the ability to see the big picture.
As a DBA, I use DDs every time to learn more about databases I work with. It is actually an important part of my personal toolbox.
DD is not limited to show the existing model; it allows you to create your database model from scratch. You can create tables, fields and their data types, primary and foreign keys, implement your favorite object naming convention and so on.
Below I will show you some simple examples on how to use DDs with SQL Server 2008.
Where to Find DDss.
DD is part of SQL Server Management Studio 2008. Diagrams are seen as regular objects of a database, just like tables and stored procedures, for instance. The diagrams are grouped together under the corresponding database node.
When opening SQL Server Management Studio, you should connect to your server, expand the Databases node and then expand the node corresponding to the database you want to work with. Finally you will find the Database Diagrams node, as shown in Figure 1.
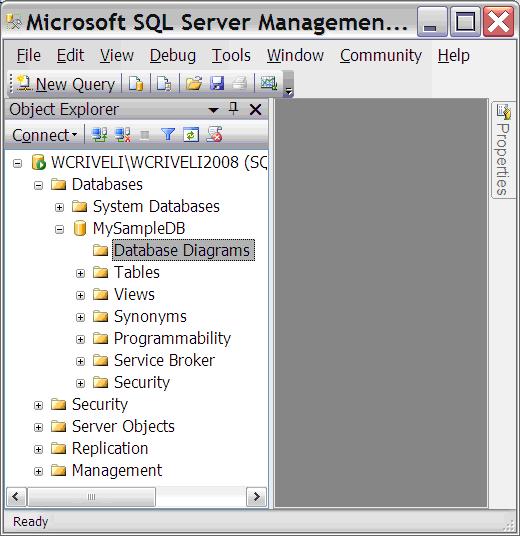
Figure 1: Finding DDs on SQL Server Management Studio 2008.
Creating the Diagram.
In Figure 1, you can see I will work with the database "MySampleDB", which currently has no diagram associated to it. This database already has several tables, although there is no diagram documenting what exactly this model is all about. So I will use DDs to create this diagram.
This is quite simple. Right click over the Database Diagrams node (Figure 1), choose New Database Diagram. A new window will show the existing tables in this database. This is a pretty small database model, so I picked all tables and clicked "Add". Figure 2 shows the result.
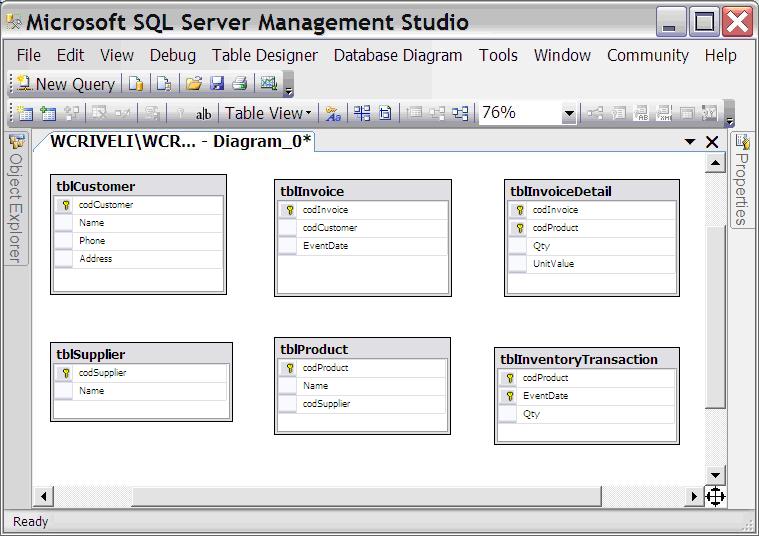
Figure 2: creating a new diagram.
In fact, DDs will analyze your existing objects and create a diagram for it. This diagram will map the existing tables, fields, data types, primary and foreign keys.
A security remark: although DDs is available to all database users to better understand the existing database model, only members of the database role db_owner can change the database through DDs.
Creating a New Table in the Model.
Coming back to our example, let's create a new table called "tblMySample". We can define the whole table structure. Just right-click on any empty place on your diagram and pick New Table. You will be prompted to give the table name. After that, you will see the standard SQL Server template to create tables. Fill in column names, data types and the property Allow Nulls.
Defining Primary Keys using DDs.
Let´s discuss something tricky in DDs. Primary keys are a must in any database. DDs will allow you to create primary keys only on empty tables. If you try to create the key to a table with existing records, DDs will show you an error message when you try to save the diagram. The diagram will not be saved until you exclude the new primary key.
Considering this limitation, it is pretty straightforward to create the keys. Just click over the field or fields (in case of a composite key) and then right click them. Then click Set Primary Key. In Figure 3 shows this step.
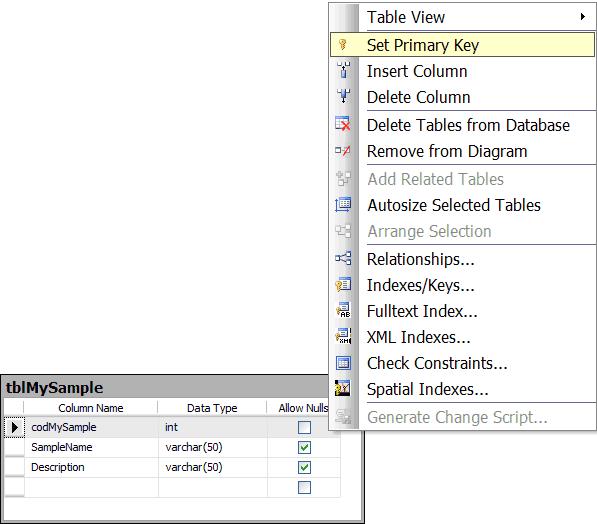
Figure 3: defining primary key on a new table.
Now It is Time for the Foreign Keys.
Foreign keys are a bit different. Let's take, for instance, the relationship between Products and Suppliers. Click the field that will receive the foreign-key constraint (that is "tblProduct.codSupplier"), drag-and-drop it to the referenced field, which is "tblSupplier.codSupplier".
A new window will pop up, asking for confirmation if the tool correctly recognized the desired relationship. You can also define the constraint's name as you like. Please check Figure 4.
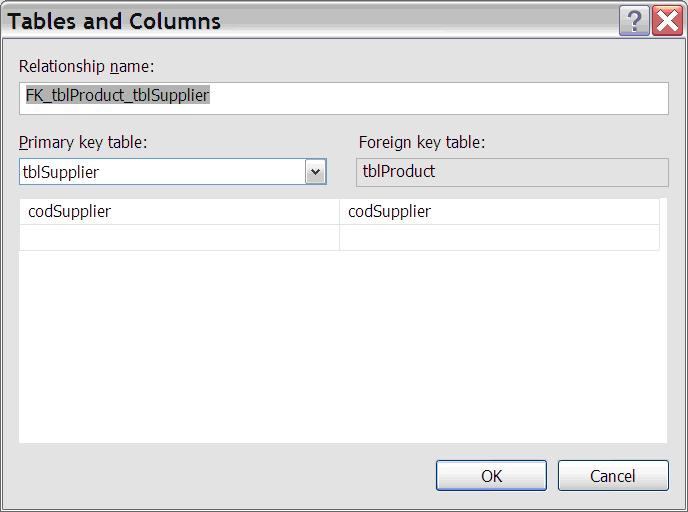
Figure 4: creating a foreign key
Viewing More Information.
Sometimes seeing table and field names is not enough.
In case you need to change the field definitions, you may change the way you show table information on the diagram.
Just select the tables you want analyze and click the button Table View on the toolbar, as shown in Figure 5.Then you might select the Standard view, for instance. You will then see field details, as data types and the Allow Nulls information. If you are a db_owner, you can edit these definitions as you like.
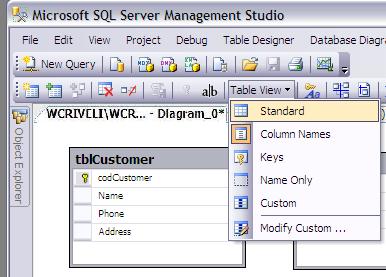
Figure 5: changing the Table View.
The Table View button is very useful, giving you the ability to show/hide extra information in your diagram. But it deserves an important remark: changing the table view will affect all the tables in the current diagram in a way you might end up if a polluted diagram on your screen. In fact, DDs is not so good in reorganizing those objects.
Saving the Changes to Your Model.
After you are done with all the tables, fields, data types, indexes and keys necessary to the model, you should save the diagram and give it a name. I named this one "myFirstDiagram".
At this point, an important thing happens. All the changes you are making will be validated against your environment. For instance, in case you don't have the permissions to alter the database model, the changes will not be saved, neither to the diagram, nor to the database itself.
Another validation that will happen when saving the diagram: in the case where your tables cannot hold the primary keys for some reason, you will see a new message, as in Figure 6.
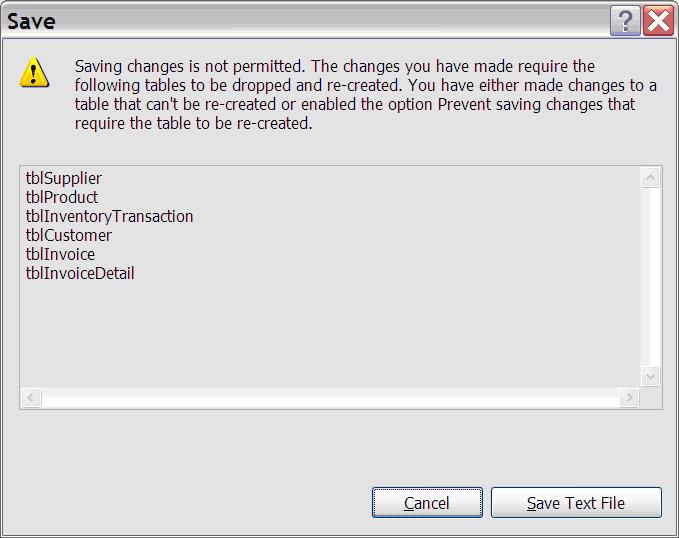
Figure 6: DDs validates the changes you try to do to the model.
In that case, you will need to add primary keys using a regular script. Then return to the diagram, refresh it and save.
Adding Notes.
To make it easier to understand your diagram, it is a good idea to add notes. Notes might be very useful to keep track of the release dates, people involved, changes to the model and so on. I also use notes to identity important detail within the model, such as special relationships and triggers. Just click the button New Text Annotation in the toolbar, write your notes. You might drag the box to wherever you like and also change fonts, styles and so. Figure 7 shows an example. 
Figure 7: adding notes to your diagram
Dealing with Large Database Models.
It won't take long for you to bump into a model too large to fit your screen. When zooming out won't be enough, you might adopt other strategies.
For instance, consider creating the diagram for sample database "AdventureWorks" (you can install it from here www.codeplex.com/MSFTDBProdSamples). This is not really a huge model, it has only 71 tables. But if you decide to create one single diagram with all tables, you probably won't see anything at all.
Personally, I don't like this approach by itself. Keeping a single, monstrous diagram makes it fairly difficult to identity the objects you are looking for. Besides you will have to zoom in the diagram all the time to understand the tiny "black boxes" you see in the big picture. Instead, I prefer to have the "big picture" diagram plus several, subject-oriented, smaller diagrams. Separating diagrams based on the existing schemas may be helpful.
With smaller diagrams it will be a lot easier to navigate through the objects. But make sure you adopt a proper naming convention for those diagrams.
Exporting Diagrams.
Well.... Now it is time for the bad news. DD is simple to use, gives you a good understanding of the database models and is also virtually cost-free. But it is really poor in exporting the diagrams you create.
Basically you can do two things and to be quite honest they don't have anything to do with really exporting the diagram. You can either print the diagram or copy it to the clipboard. Period.
Copying the diagram is an option available in the Edit menu among other places. When printing diagrams, you should try the button View Page Breaks on the toolbar. It will show you how the diagram will be printed.
Again this is useful for large models. Using the full database model for sample database "AdventureWorks", you can arrange objects in a way to use page breaks in more reasonable way. Figure 8 shows an example. Blue lines represent page breaks.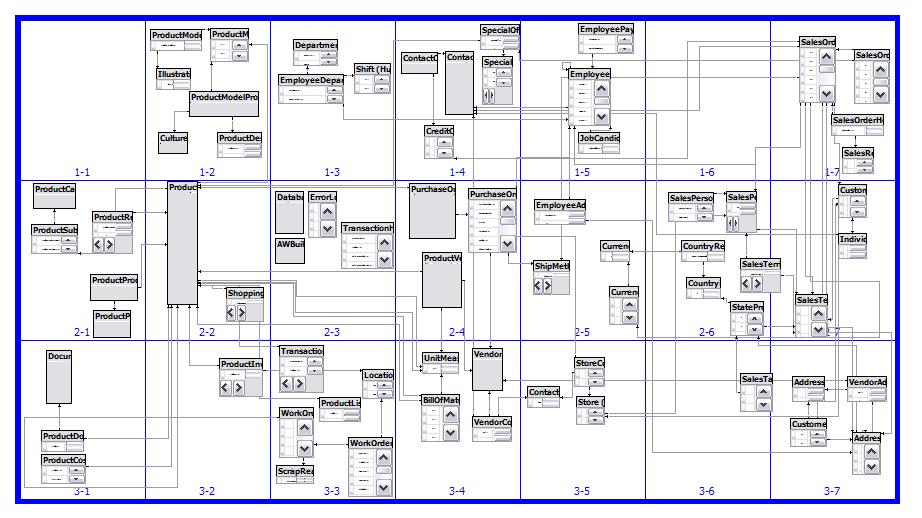
Figure 8: check diagram for db "AdventureWorks" (including page breaks)
Final Remarks.
DD is quite simple and I believe its beauty is exactly on this. Maintaining databases we know nothing about is quite more common than we DBA's would like to admit. DD gives you a fast and easy way to get basic information about a database model. And this information is essential in several tasks, such as index tuning, for instance.
