

Data driven subscriptions are a feature available in SQL Server, intended for dynamic and/or ever-changing report subscriptions. They make life easier for developers and analysts – instead of managing hundreds, or perhaps thousands of separate subscriptions, we’re able to control all subscription information from a single data source.
That’s great...except if you use the standard edition of SQL Server, where the data driven subscription feature is not available. Fortunately for us there are a couple of workarounds we can implement without having to pay for and install Enterprise. This article will describe a single solution utilising SSIS and Visual Basic to create and control dynamic subscriptions.
In this example, a sales report with two different parameter requirements will be exported to an Excel file. Note: For this, I am using AdventureWorksDW 2008 which can be downloaded in the following location: http://msftdbprodsamples.codeplex.com/releases/view/37109
Step 1 - Create a Configuration Table
The first step is to create a subscription table to feed to process. The subscription table will be where all subscription information is stored – including report paths, names, parameters. It can also be extended to include rendering choices, e-mail addresses, schedules and other useful data. Here, we will develop a straightforward solution that exports a sales report into an Excel file.
The subscription configuration file can be created using any method – it could be a static table maintained by the developer, or it could be a dynamic table updated by other processes.
For example, this is an Excel configuration file controlled by clients, which is then validated on a monthly basis via SSIS and imported into SSMS. During this process, the report server and path are updated using a stored procedure. Alternatively, this data could be included in the original data source - that may depend on your end-users.

Figure 1: Example Client File
The table can be created in whichever way best suits company requirements. Make sure a field is included for each report parameter – including any that usually have NULL values.
CREATE TABLE dbo.SSIS_RptAWDynamicSubscriptions
(RecordID INT IDENTITY(1,1) PRIMARY KEY,
 ReportServer VARCHAR(50) NOT NULL,
 ReportPath VARCHAR(100) NOT NULL,
 ReportName VARCHAR(30) NOT NULL,
 pCategoryName NVARCHAR(50) NOT NULL, --Report Parameter
 pOrderDateFrom DATE NOT NULL, --Report Parameter
 pOrderDateTo DATE  NULL, --Report Parameter can be NULL
 ReportURL VARCHAR(255) NULL --URL for the report is updated later
 )
Once the table is created and data loaded in, it should look something like Figure 2. This includes the ReportServer name, the path the report is saved in on the report server, the report name, any report parameters, and a field to create the report URL, which will be updated before we can proceed.

Figure 2: Example Configuration Table
Step 2 - Creating the Report URL
The report URL can be updated whenever is convenient; however it must be completed before the process to run the reports begins. It generally makes sense to do this whilst the configuration table is being loaded or updated so that it’s ready for processing.
To create the URL we must concatenate the report server, report path, report name and parameter fields. This must also be formatted to prepare for internet use. For example, the below script determines that any forward slashes (‘/’) after ‘ReportViewer.aspx?’ must be replaced with ‘%2F’. Likewise, any spaces must be replaced with a plus sign (‘+’) and any colons replaced with '%3A'. For more information on URL encoding, see: http://www.w3schools.com/tags/ref_urlencode.asp
The report parameters should use the RDL parameter names for the report to run successfully. These will all need to be converted to string values in order to concatenate the string.
As it’s possible for report parameters to take NULL values, the URL must be able to handle these. Using a CASE statement, test if the corresponding field value is NULL – if it is, use ‘%3Aisnull=True’ in place of a field value comparison.
Finally, the URL should instruct report server to render the report in Excel format.
UPDATE dbo.SSIS_RptAWDynamicSubscriptions
SET ReportURL = 'HTTP://' + ReportServer + '/ReportServer/Pages/ReportViewer.aspx?%2F'
+ REPLACE(REPLACE(ReportPath,' ','+'),'/','%2F') + '%2F' –-Report Path/
+ REPLACE(ReportName,' ','+') + '%2F' --Report Name/
+ 'ProdCat=' + pCategoryName --Parameters must use RDL parameter names (not labels!)
+ '&DateFrom=' + CONVERT(VARCHAR(10),pOrderDateFrom) --Parameters must be joined by &. They must also be converted to string values
+ '&DateTo' + CASE WHEN pOrderDateTo IS NULL THEN '%3Aisnull=True' ELSE '=' + CONVERT(VARCHAR(10),pOrderDateTo) END --CASE handles parameters that could be NULL
+ '&rs:command=Render&rs:Format=EXCEL' --Instructs Excel rendering
In this example, this produces two URLs, one for each row.

Figure 3: ReportURL values
Test a handful of URL’s using your web browser. Save the file when prompted, and check it has retrieved the correct reports with the expected parameters. If not, revise the URL by comparing it to a manually run report on the report server.
The table is now ready to be used by SSIS. Before the next step, create a new SSIS package in an existing or new project as appropriate.
Step 3 - Configure SSIS Variables and Connections
The first step is to plan and create all variables required by SSIS. The absolute must-haves are the report URL, parameter values and delivery instructions. In this example, the report parameter fields are used to create a dynamic file name – equally, this could have been created in the subscription configuration table.
Variable | Data Type | Default Value | Description |
pCategoryName | String | Product Category report parameter for filename | |
pOrderDateFrom | String | Order Date From report parameter for filename (YYYYMM) | |
fReportURL | String | Field: ReportURL | |
RptParamValues | Object | Query resultset | |
DestPath | String | \\servername\c$\temp\reports | Destination folder path (UNC) |
DestFileName | String | @[User::pCategoryName] + “_InternetSales_” + @[User::pOrderDateFrom] | Destination File Name |
Note that DestFileName uses an expression to build the aforementioned dynamic file name. If required, create the variable, then under the properties pane change the ‘EvaluateAsExpression’ property to True.
Next, click the ellipses in the ‘Expression’ property and build the variable as desired. In this example, the required format is ProductCategory_InternetSales_OrderDateFromYearMonth (e.g ‘Accessories_InternetSales_200401’). If the filename is held in the table, simply leave no default value – this can later be extracted in the same way as the other field values.
Once the variables are configured, two connections must be made:
• OLE DB Connection to the database holding the subscription table
• HTTP Connection to your report server (e.g http://adventureworks/reportserver)
Step 4 - Build the Package
When your subscription data table is complete, the first step is to get it into an SSIS result set, so it can be utilised by our task. Using an Execute SQL Task, create a query to extract the information required for the reports.
A quick consideration - if all subscription tables use the same format, and the file names are stored in the table, it is tempting to use a UNION join to run all subscriptions at once. Beware any performance implications for heavy loads, and consider consulting your trusty DBA before scheduling anything.
In the General properties of the Execute SQL task, use the OLE DB Connection created earlier. Next, set the ‘ResultSet’ property to ‘Full Result Set’. The T-SQL query to retrieve your table should be entered in the ‘SQLStatement’ property as shown in Figure 4.
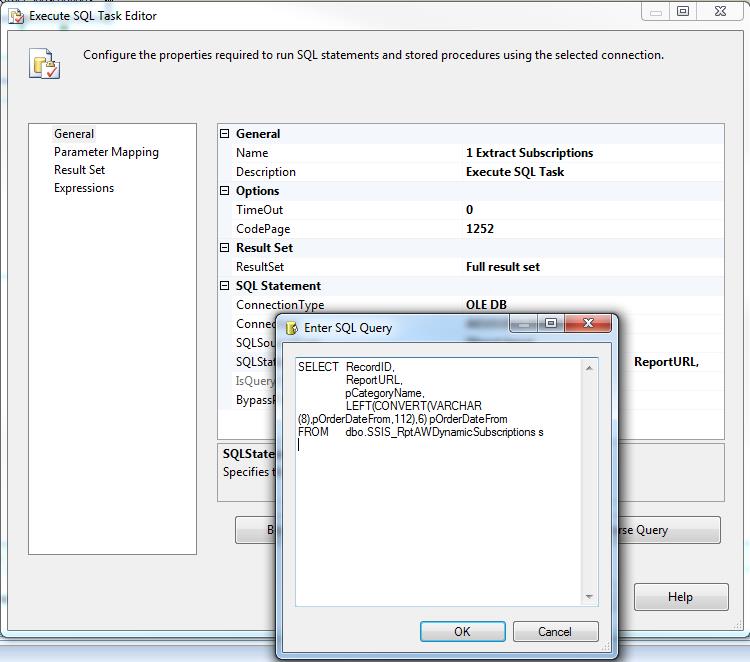
Figure 4: Execute SQL Task Editor
Ensure that any parameters being retrieved for file names and the like are converted to string values, in preparation for the SSIS expressions you build.
On the ‘Result Set’ tab, configure the variable to use the previously configured object variable (‘RptParamValues’), and give the result set a sensible name (in Figure 5, I've used rsRptParamValues).

Figure 5: Configure Result Set
The next step will require a For Each loop container. Any tasks inside this container will be performed for each row of the result set – in this exercise we will simply export and save an Excel rendered report for each row.
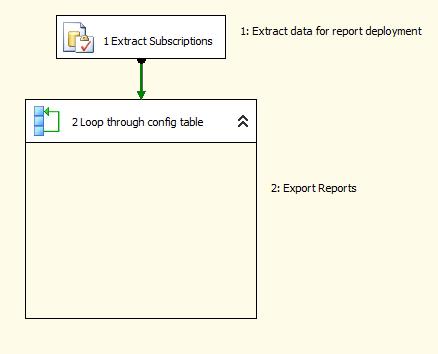
Figure 6: Adding a ForEach Loop Container
In order to prepare for the next step, double-click on the container and edit it. On the ‘Collection’ tab, change the ‘Enumerator’ property to ‘Foreach ADO Enumerator’.
Under ‘Enumeration Configuration’, use the result set variable. This will tell the container to loop through each record in the table and perform every task within the container, before moving onto the next record.
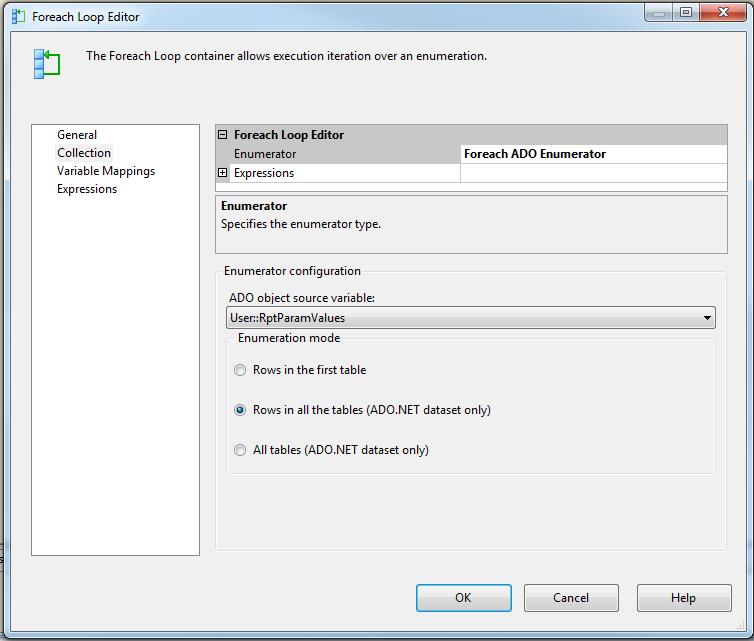
Figure 7: Enumerator Configuration
Lastly, on the ‘Variable mappings’ tab, add the parameters required to build and save the report. These need to be in the same index order as those extracted from the SQL query, so that it syncs correctly with the result set.
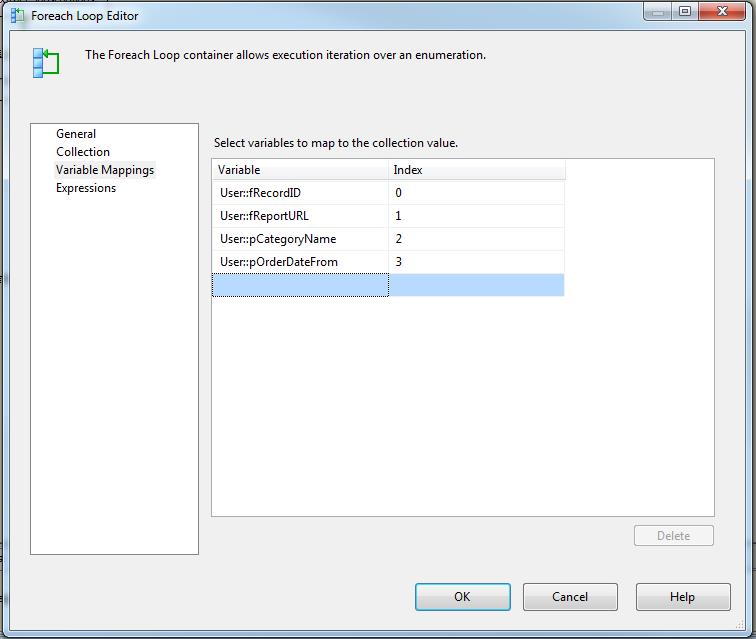
Figure 8: Map variables to collection
Step 5 - Script the Report Export
The next step is to add code to carry out the report extract. As mentioned before, this example will deal with save Excel rendered reports to a shared file location.
Add a Script Task into the ForEach Loop container configured in the previous step. Double-click the task to edit it and change the ScriptLanguage property to Visual Basic.
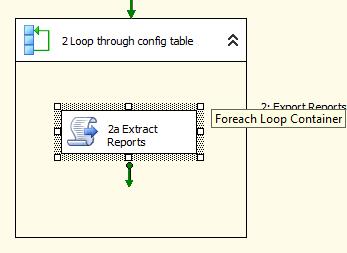
Figure 9: Add a Script Task
Click the ellipses next to the ‘ReadOnlyVariables’ property, and choose the variables DestFileName, DestPath and fReportURL.
Next, click Edit Script – a new window will open, allowing the addition of the extract code. The below will open a web connection, navigate to the report using ReportURL, and save the file according to DestPath and DestFileName.
Imports System Imports System.Data Imports System.Net Imports System.IO Imports System.Math Imports Microsoft.SqlServer.Dts.Runtime_ ("scriptmain",>_ Partial Public Class ScriptMain Inherits Microsoft.SqlServer.Dts.Tasks.ScriptTask.VSTARTScriptObjectModelBase Enum ScriptResults Success = Microsoft.SqlServer.Dts.Runtime.DTSExecResult.Success Failure = Microsoft.SqlServer.Dts.Runtime.DTSExecResult.Failure End Enum Protected Sub SaveFile(ByVal URL As String, ByVal DEST As String) 'Variables for web request Dim request As System.Net.HttpWebRequest Dim proxy As New WebProxy("http://tindog:1234") 'if required Dim response As System.Net.HttpWebResponse Dim dataStream As System.IO.Stream Dim fileStream As New System.IO.FileStream(DEST, System.IO.FileMode.Create, System.IO.FileAccess.Write) 'Variables for read/write loop Dim Bytes(256) As Byte Dim i As Integer = 1 Try request = CType(System.Net.WebRequest.Create(URL), System.Net.HttpWebRequest) request.Credentials = System.Net.CredentialCache.DefaultCredentials request.Timeout = 60000 '1 min timeout request.Method = "GET" response = CType(request.GetResponse, System.Net.HttpWebResponse) dataStream = response.GetResponseStream Do While i > 0 i = dataStream.Read(Bytes, 0, 256) fileStream.Write(Bytes, 0, i) Loop fileStream.Flush() fileStream.Close() Catch ex As Exception End Try End Sub Public Sub Main() Dim URL, DEST As String URL = Dts.Variables("URL").Value DEST = Dts.Variables("DestPath").Value & "\" & Replace(Dts.Variables("DestFileName").Value, "/", "") & ".xls" SaveFile(URL, DEST) End Sub End Class (false)>
Save the script and close the editor. It is extremely important that you carry out thorough testing on a development environment before putting the solution live, and make sure to test a number of different and realistically complex scenarios. The task can then be automated however is convenient – perhaps via a scheduled SQL Server Agent job.
Additionally, do not forget to implement error handling. As it’s likely that the task will run out of office hours, the errors need to be logged in a way that is quickly accessible for all responsible developers.
Further Thoughts
The above walk-through demonstrates a relatively simple example for side-stepping the missing data-driven subscription feature. In reality, a solution will probably require more complex features such as multi-valued parameters, varying delivery methods per subscription, or scheduling reports at different times. Before building the solution, it is wise to consider a number of possible scenarios and tailor the plan to cater for them.
As with many solutions of this kind, there is more than one method to get around dynamic subscriptions. Whichever technique you employ will likely depend on the other work you carry out and the resources available to you.
Think outside the box and get a bit creative with your solution – there is no 'one size fits all'.
