

With the release of SQL Server 2005 and its related Business Intelligence (BI) toolset, the role of the DBA is slowly changing. It is now expected that the DBA should have some understanding of the overall BI toolset, such as SQL Server Integration Services (SSIS), SQL Server Analysis Services (SSAS) and SQL Server Reporting Services (SSRS). This article will focus on SSIS, which is the new Extract, Transform and Load (ETL) toolset from Microsoft.
As with any new technological tool it requires time and effort to get familiar with the product, and SSIS is no exception. There are some resources on the Internet, but most of these are only snippets of what you may need. BOL does have some information on SSIS, but the lack of coverage mixed with vague explanation and fragmented code examples do make it difficult for the uninitiated. Most of the information that I found helpful are gleaned from the development community and articles found on the WWW (refer to the References section below). Therefore, in the spirit of reciprocity, I have written this article which I hope would encourage you to investigate further the extensibility part of SSIS.
Pre-requisites
The following knowledge will be assumed for the purpose of this discussion. It is expected that you have these products installed and accessible from your computer:
SQL Server 2005 (including SSIS), Microsoft Visual Studio 2005, .NET Framework v2.0, Visual SourceSafe 6.0 (or later versions)
In addition to the above, you should have at least a basic knowledge/understanding of the products as well as some familiarity with a scripting language well be using VB .NET for this project.
Purpose
There is a dual purpose to this project; firstly, to look at how to build a SSIS source component that will allow you to extract files from a version control system (such as Microsoft Visual SourceSafe); and secondly, to look at how to use this custom built component in SSIS, specifically to read the contents of files and to execute the SQL statements against a database. For the purpose of this discussion, it will be assumed that the contents of the files are valid T-SQL scripts.
Building the Common VSS Library Assembly
As part of the building blocks for the custom SSIS component, I have created a .NET class library Gww.Vss.CommonLibrary.dll. The assemblys main function is to connect to Visual SourceSafe repository and to extract the files based on latest version or based on the particular 'label' assigned to the files.
Begin by opening an instance of Microsoft Visual Studio 2005; create a new Visual Basic Windows project and select the Class Library project template. Enter the following: Gww.Vss.CommonLibrary for Name, C:\Programming\Development for Location, and SSIS for Solution Name. Click OK to continue.
In Solution Explorer click on the icon labeled Show All Files. Right-click the References node and select Add Reference from the context menu. Select the COM tab and scroll down to locate the component called Microsoft SourceSafe 6.0 Type Library (version 5.1 or a later version of SourceSafe). Select the component and Click OK to continue.
Next, select and replace the contents of class Class1 with the contents of Listing 1. It is not necessary to rename the class, so we will leave it as Class1 for now.
Still in Solution Explorer, right-click the project name Gww.Vss.CommonLibrary and select Properties. In the Application tab, clear out the content of the Root Namespace text box.
In order to register the assembly in the Global Assembly Cache (GAC), it is necessary that the assembly has a Strong Name. There is a utility called sn.exe that can be used for this purpose. However, for this project, navigate to the Signing tab, select Sign the assembly option, and select <New> from the drop-down list. Type a name for the strong name key file (I have used gww). Finally, uncheck the option to Protect my key file with a password. Click OK and save the project file.
The assembly is ready for its first build. Right-click on the project Gww.Vss.CommonLibrary and select Build. Verify that the build completed without any errors. Take the time to have a look at the contents of the folder C:\Programming\Development\SSIS\Gww.Vss.CommonLibrary and its sub-folders.
The final step is to register the component in the GAC. To do this, execute the batch file in Listing 2. To create a batch file, simply save the Notepad file in your local folder with the .bat filename extension. Double click the file to execute the batch commands. Verify that there were no errors. Check that the assembly has been registered in the GAC by executing the batch file in Listing 3: a gacListing.txt file is created in the directory where the batch file is executed. Confirm that both Gww.Vss.CommonLibrary and Interop.SourceSafeTypeLib are listed in gacListing.txt. If needed, create a separate batch file similar to Listing 2 to register the Interop.SourceSafeTypeLib assembly.
Building the Custom SSIS Component
Start a new instance of Microsoft Visual Studio 2005. As before, create a new Visual Basic Windows project and select the Class Library project template. Enter Gww.Dts.Pipeline for Name, C:\Programming\Development\SSIS for Location and uncheck the Create directory for solution option. Click OK to continue.
In Solution Explorer click the Show All Files icon. Expand the References node and right click the node to select Add Reference from its context menu. Select the .NET tab and scroll down to locate the following assemblies select each by using Ctrl+Left-Mouse-Click: Gww.Vss.CommonLibrary, Microsoft.SqlServer.DTSPipelineWrap, Microsoft.SqlServer.DTSRuntimeWrap, Microsoft.SqlServer.PipelineHost. Click OK to add the selected assemblies to the current project.
Next, select and replace the contents of class Class1 with the contents of Listing 4. It is not necessary to rename the class, so we will leave it as Class1 for now.
We are almost ready to build the component. In Solution Explorer right click the project node Gww.Dts.Pipeline and select Properties. Firstly, in the Application tab, clear out the content of the Root Namespace text box; secondly, select the Compile tab and scroll down to reveal the Build Events button. Copy and paste the scripts in Listing 5 to the Post-build event command line box. This will help with automatically registering the assembly in the GAC upon a successful build. Check that On successful build option is selected for Run the post-build event selection list; and lastly, select the Signing tab, select the Sign the assembly option, and select <Browse> from the drop-down list. Navigate to the folder where you created the file gww.snk earlier on or alternatively you can create a new SNK file. Press OK to continue.
The assembly is now ready for its first build. Right-click on the project Gww.Dts.Pipeline and select Build. Verify that the build completed without any errors. Also verify that the assembly was successfully added to the GAC by executing the batch file in Listing 3.
Using the Custom SSIS Component
Now the fun part. To use the custom component, start a new instance of Microsoft Visual Studio 2005. Create a new SSIS project by selecting Business Intelligence Projects and then Integration Services Project. Give the project an appropriate name and click OK.
The Control Flow tab should already be selected (top left-hand corner). Next, select Toolbox from the View menu. Under Control Flow Items drag and drop the item Data Flow Task onto the Control Flow pane. Perform this same step for the following three items: Foreach Loop Container, Script Task, and Execute SQL Task. Your designer should look something like Figure 1.
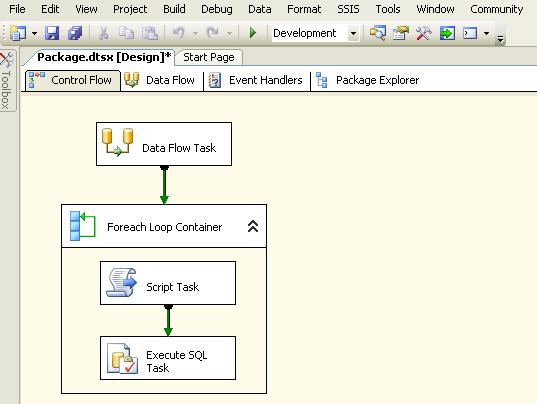
Figure 1
It is quite common to use variables in SSIS. For this project, we will create a variable of type object with a Package scope and two variables of type string with a Foreach Loop Container scope. To do this, right-click on an empty part of the Control Flow pane and select Variables from the context menu. Next, click on the Add Variable button to create a new variable. Enter rsFilepath for name and select object for Data Type. Leave the Variables window open and click on the Foreach Loop Container to select it (this step is important); click on the Add Variable button to create a new variable. Enter fpath for name and select string for Data Type. Create a third variable and enter ftext for name and select string for Data Type. Verify that the last two variables are assigned the Foreach Loop Container scope. Close the Variables window.
Double-click the Data Flow Task, which will take you to the Data Flow pane (second tab on the list). Next, select Toolbox from the View menu. Right-click anywhere on the Toolbox window and select Choose Items from the context menu. In a few seconds, the Choose Toolbox Items window appears. Select the SSIS Data Flow Items tab, scroll down to locate the assembly VssSourceAdapter and check the box to select the item. Press OK to continue.
The VssSourceAdapter component should now be visible in the Toolbox under Data Flow Sources. Note that the component type was declared as a SourceAdapter in Listing 4, which is the reason that it appears under the Data Flow Sources list: The other two forms are Data Flow Transformations and Data Flow Destinations.
Next, drag and drop the VssSourceAdapter component onto the Data Flow pane. Also drag and drop the Recordset Destination item (listed under Data Flow Destinations). Join the output from VssSourceAdapter to the input of Recordset Destination, as shown in Figure 2. The Recordset Destination is used as a sink to store the output from the custom component.

Figure 2
Double-click the VssSourceAdapter component to bring up its properties window. In the Component Properties tab, scroll down to Custom Properties and fill in the required parameters as per your environment. Click OK to continue.
Next, double-click the Recordset Destination component to bring up its properties window. In the Component Properties tab, enter rsFilepath for VariableName under Custom Properties. Navigate to the Input Columns tab and select the check box next to the name filepath. Click OK to continue.
This completes the configuration necessary for the Data Flow Task. The next configuration will involve the Foreach Loop Container. Click on the Control Flow tab to select it. Double-click the Foreach Loop Container to open its properties window. Click on the item labeled Collection from the left-hand pane. For Enumerator, select Foreach ADO Enumerator from the drop-down list. Under Enumerator Configuration select User::rsFilepath for ADO object source variable and select Rows in the first table for Enumeration Mode. Next, click on the item labeled Variable Mappings from the left-hand pane. Configure the column Variable as User::fpath and 0 for the Index column. Click OK to continue.
To configure the Script Task, double-click it to open the Script Task Editor window. Select the item labeled Script from the left-hand pane. Enter fpath for ReadOnlyVariables and ftext for ReadWriteVariables. Next, click on Design Script to instantiate Microsoft Visual Studio for Applications. Under ScriptMain, replace the existing script with the contents of Listing 6. Click OK to continue.
Lastly, double-click on the Execute SQL Task to open its properties window. On the left-hand pane, click on the item labeled Script. Under Result Set, select None from the drop-down list. Under SQL Statement, select OLE DB for Connection Type, select <New Connection> for Connection configure a valid SQL Server and database to execute the scripts against. Select Variable for SQLSourceType and User::ftext for SourceVariable. That is it! Press F5 to start execution of the SSIS package.
The Code
Here are all the various listings:
Conclusion
There are simply too many things to be adequately covered in an article such as this, including how to debug a SSIS component, how to build a component that supports an error output, how to use the Data Viewer, etc. Therefore, for those wishing to expand their knowledge a little further, I will simply refer you to the articles listed under References.
I have two particular use for the custom component; one is the ability to synchronise all my stored procedures and functions on a particular database on various servers I do this with my maintenance database, which contains all my DBA specific stored procedures and functions; the second use is for applying database upgrade scripts in a specific order. There are a couple of approaches to this, but I will leave it as an exercise for you to do at your own leisure, and at the same time exploring the rich functionality offered by SSIS.
References
One of the best articles on the web dealing with building SSIS custom component a digital copy of one whole chapter from a book. An excellent primer for SSIS extensibility:
http://media.techtarget.com/digitalguide/images/Misc/sqlserver_ch14.pdf
A very good article describing a similar project from SQLServer Magazine. You may need to be a paid subscriber to view its contents: http://www.sqlmag.com/Article/ArticleID/45801/sql_server_45801.html
An above average article from the msdn2 website Building, Deploying and Debugging Custom Objects:
http://msdn2.microsoft.com/en-US/library/ms403356.aspx#building
A readable article from the msdn2 website Developing a Custom Source Component:
http://msdn2.microsoft.com/en-us/library/ms136088.aspx
This is the SSIS Learning Centre from SearchSQLServer.com website:
