

An Azure Function is a lightweight, serverless compute option in Azure that lets you execute small chunks of code in response to events or schedules without managing servers. When connecting Azure Functions to Azure SQL Database, you need a secure way to authenticate without storing credentials. That’s where Managed Identity steps in. Managed Identity allows Azure resources (like Functions, VMs, Logic Apps) to access other Azure services securely by leveraging Azure Active Directory (AAD). In this article, we’ll explore how to connect a Python Azure Function to Azure SQL using Managed Identity. You’ll learn step-by-step setup, Python code implementation, troubleshooting, and best practices to ensure your solution is secure and scalable.
Why Use a Managed Identity with Azure SQL?
Storing passwords in configuration files is risky. A Managed Identity solves this problem by:
- Eliminating Secrets - No passwords, no connection strings with credentials.
- Centralized Identity Management - Uses Azure Entra authentication for consistency.
- Least Privilege Principle - Assigns only the required SQL permissions.
- Automatic Rotation - No need to update or rotate credentials manually.
This makes it the recommended authentication method when connecting Azure Functions to SQL Database. Prerequisites: Before implementing, ensure you have:
- An Azure subscription.
- An Azure SQL Database already created.
- An Azure Function App (Python runtime).
- Azure CLI or Portal access.
This guide assumes you already have a basic understanding of creating an Azure Function. If you need a refresher, please refer to our previous article on How to Create a Python Azure Function. Let's now see how to connect Python Azure Function to Azure SQL database using managed identity authentication. In this example we will fetch data from a public API and securely write it to an Azure SQL Database table..
Step 1: Set Up Your Azure SQL Database
In this guide, we’ll simulate fetching weather data from an API and storing it in Azure SQL. First, we begin by creating the WeatherData Table. Run the following SQL script inside your Azure SQL database:
CREATE TABLE WeatherData
(
    Id INT IDENTITY(1,1) PRIMARY KEY,
    City VARCHAR(100),
    Temperature DECIMAL(5,2),
    Humidity INT,
    ForecastDate DATETIME
);
Step 2: Enabling Managed Identity for Azure Function
Navigate to your Function App in Azure Portal. Under Settings ? Identity, enable System Assigned Managed Identity. Azure will create an identity in Microsoft Entra representing your Function. 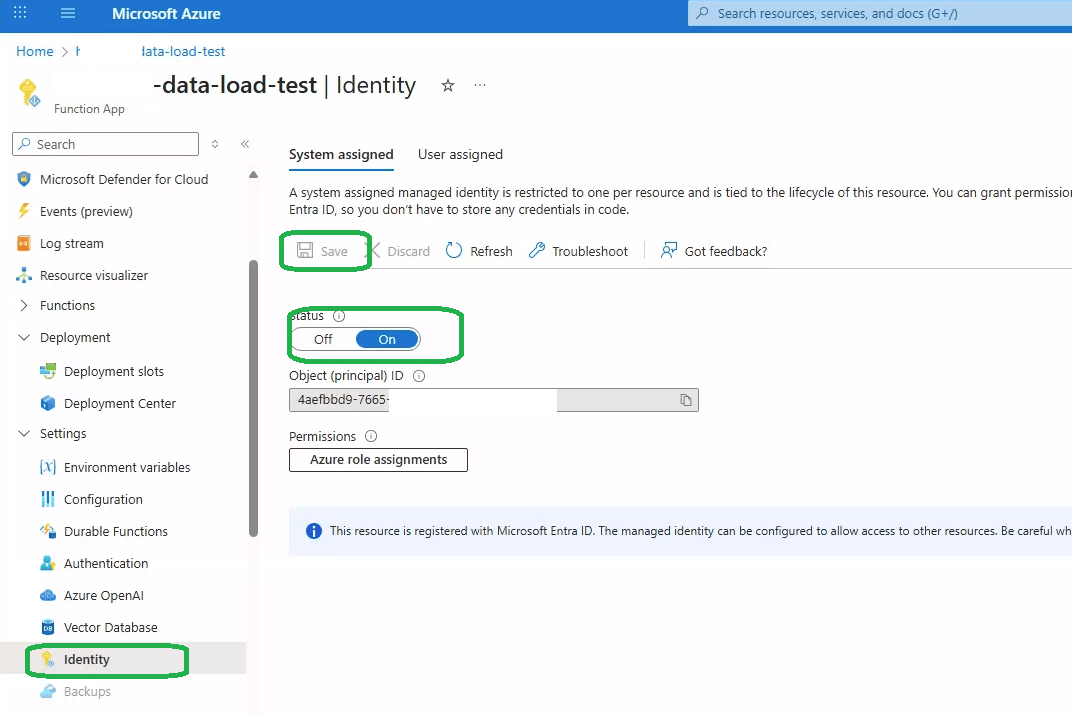
Step 3: Grant the Managed Identity Access to Azure SQL
We start by configuring an Azure Entra Admin. To allow a Managed Identity to authenticate, assign an Azure Entra admin for your SQL server.
- Go to Azure Portal | SQL Server | Active Entra Admin.
- Assign an Azure Entra user/group as the admin.
- Save changes.
Grant the permissions
Now, connect to to your Azure SQL Database using the Entra ID authentication. You need to grant the Managed Identity permission to write to the database. Use the following T-SQL commands, replacing <your-azure-function-name> with the name of your function. CREATE USER creates the identity inside SQL. ALTER ROLE gives write permissions to insert/update/delete.
CREATE USER [your-azure-function-name] FROM EXTERNAL PROVIDER; ALTER ROLE db_datawriter ADD MEMBER [your-azure-function-name];
Learn how to grant access to Azure SQL databases in this post.
Step 4: Configure Application Settings
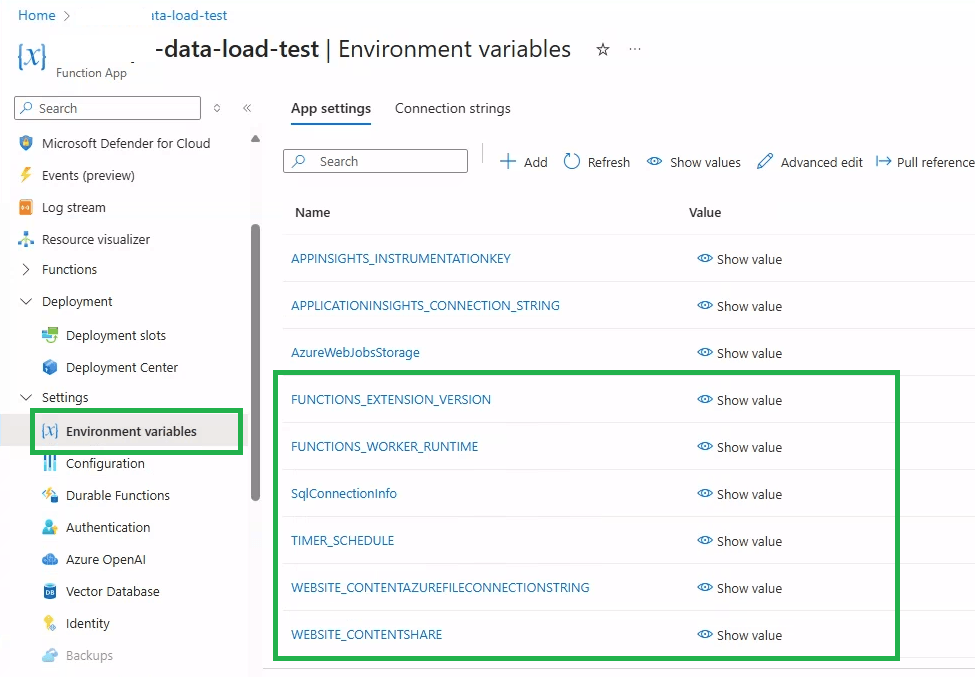
In the Function App Environment variables, define following variables.
- SqlConnectionInfo ? Server=<your-sql-server>.database.windows.net;Database=<your-db>;
- WEATHER_API_URL ? https://api.open-meteo.com/v1/forecast?latitude=60.17&longitude=24.94&hourly=temperature_2m,relative_humidity_2m
- TIMER_SCHEDULE ? 0 * * * * * (Runs every hour).
Step 5: Writing Python Azure Function Code
Now, it's time to write the code that will perform the data fetching and insertion. For this example, we'll use a Python HTTP-triggered function and the requests and pyodbc libraries. You will also need the azure-identity package to handle the Managed Identity authentication. We begin by installing the required packages. Add this code to requirements.txt:
azure-functions
requests
pypyodbc
Editor: don't just drop in code. Give a light explanation of what this does for the reader to follow.
The following __init__.py block contains the main Azure Function logic for retrieving weather data from an external API and storing it in Azure SQL Database. The function is triggered on a schedule using a timer trigger, making it suitable for periodic data collection jobs such as monitoring APIs, syncing external systems, or loading telemetry data.
The function first reads the API endpoint from environment variables and sends a request to retrieve the latest weather information. From the API response, it extracts values such as temperature and humidity. These values are then inserted into the WeatherData table in Azure SQL Database along with the current timestamp.
The SQL connection is created using Managed Identity authentication, which avoids storing database credentials directly in the code. The helper method get_sql_connection() reads the database connection details from configuration settings and creates an ODBC connection to Azure SQL Database.
The implementation also includes basic logging and exception handling so that successful executions and errors can be monitored through Azure Functions logs and Application Insights.
import azure.functions as func
import logging
import os
import requests
import pypyodbc

app = func.FunctionApp()

@app.timer_trigger(schedule="%TIMER_SCHEDULE%", arg_name="myTimer")
def load_weather_data_to_sql(myTimer: func.TimerRequest):

    if myTimer.past_due:
        logging.info("The timer is past due!")

    try:
        url = os.getenv("WEATHER_API_URL")

        response = requests.get(url)
        response.raise_for_status()

        data = response.json().get("current", {})

        temperature = data.get("temperature_2m")
        humidity = data.get("relative_humidity_2m")
        city = "Berlin"

        conn = get_sql_connection()
        cursor = conn.cursor()

        cursor.execute(
            """
            INSERT INTO WeatherData
                (City, Temperature, Humidity, ForecastDate)
            VALUES
                (?, ?, ?, GETDATE())
            """,
            (city, temperature, humidity)
        )

        conn.commit()

        cursor.close()
        conn.close()

        logging.info("Weather data inserted successfully")

    except Exception as e:
        logging.error(f"Error: {e}")


def get_sql_connection():
    conn_info = os.getenv("SqlConnectionInfo")

    parts = dict(
        item.split("=", 1)
        for item in conn_info.split(";")
        if "=" in item
    )

    server = parts.get("Server")
    db = parts.get("Database")

    # Depending on the Python version, select the appropriate ODBC driver.
    # For Python 3.12+, use ODBC Driver 18.
    # For older versions, ODBC Driver 17 may be required.
    conn_str = (
        f"DRIVER={{ODBC Driver 18 for SQL Server}};"
        f"Server={server};"
        f"Database={db};"
        f"Authentication=ActiveDirectoryMsi;"
    )

    return pypyodbc.connect(conn_str)
Step 6: Testing the Integration
Editor: We don't want to put a few headings together. You're leaning on lists too much rather than explaining what is happening. Just write in sentences to help the reader understand. This is a sketch of what to do. It doesn't explain things. We should rarely get to H4. Most of your H4s should just be a sentence explaining what is coming.
Before deploying the solution to Azure, test the function locally to make sure the API integration and SQL operations work as expected. Azure Functions Core Tools allows you to run the function on your local machine in the same way it will run in Azure. Configure the required environment variables in the local.settings.json file, including the SQL connection string and any API credentials. Once the configuration is complete, start the function locally and trigger the API endpoint to verify that the data is being retrieved and inserted into the database correctly.
After local testing is successful, deploy the function to your Azure Function App. This can be done directly from Visual Studio, VS Code, or through Azure CLI and CI/CD pipelines. Once deployed, monitor the execution logs using Application Insights or the Log Stream feature in the Azure portal. These tools help verify that the function is executing successfully in the cloud environment and make it easier to diagnose failures or performance issues.
During testing and deployment, you may encounter issues such as missing environment variables, SQL connection failures, timeout errors, or authentication problems with the external API. In most cases, reviewing the function logs in Application Insights will help identify the root cause quickly. Proper logging and exception handling in the function code can significantly simplify troubleshooting and maintenance.
Best Practices for Secure and Scalable Integration
Editor: This needs a bit of a summary of what the reader learned, but also needs a little more here. This is a very light set of things that don't quite explain what is happening
- When integrating Azure Functions with Azure SQL Database, security and reliability should be built into the solution from the start. Use the principle of least privilege by granting the function only the database permissions it actually needs. This reduces security risks and limits the impact of accidental changes.
- Store sensitive information such as connection strings and API keys in Azure Key Vault instead of hardcoding them in the application. This improves security and makes credential management easier.
- For monitoring and troubleshooting, enable Azure Monitor and Application Insights to track executions, failures, and performance metrics. This helps identify issues quickly in production environments.
- To improve reliability, implement retry logic for transient failures such as temporary SQL connectivity or network issues. Combined with proper logging and exception handling, this makes the integration more stable and scalable.