

Microsoft BI tools are widely used in Business Intelligence (BI) projects nowadays due to their end to end BI capabilities and lower licensing costs. We work in an agile world where the application teams are making use of various tools, like Jenkins, to speed up and automate their deployments, whereas we see that BI teams still follow a more traditional approach for deploying BI artifacts. We can get out of this rut by leveraging the excellent compatibility between the MSBI deployment utilities and PowerShell.
The traditional MSBI stack comprises the following tools:
- SSIS: an ETL tool for moving data between systems. This stands for SQL Server Integration Services.
- SSAS: an analysis tool for building cubes. This stands for SQL Server Analysis Services.
- SSRS: a reporting tool for displaying and exporting data. This stands for SQL Server Reporting Services.
Tools and Technologies
- SQL Server
- MSBI 2012 or above
- PowerShell ISE
Prerequisites
First, we must enable PowerShell execution on the server where you want to configure the deployment automation framework. To enable it, go to the Start Menu and search for "Windows PowerShell ISE". Right-click and choose Run as administrator. In the top part, paste this code:
Set-ExecutionPolicy Unrestricted
Now run the script. Choose "Yes" in response to the prompts.
Good to Have
Enable the Check for object existence option in SQL Server Management Studio (SSMS). This can avoid syntax errors in the script in the case where the object is already present on the target server and we are trying to deploy the updated version of it. To enable this, go to SSMS and click on the Tools menu. Then select Options and expand the SQL Server Object Explorer selection in the dialog. Select the Scripting option, then set "Check for object existence" to True. This needs to be enabled on each developer's machine who will be creating SQL scripts for deployment.

About the Deployment framework
Assuming that the project is being delivered in an agile way, we might have the following things to be deployed in every sprint/release.
- SQL Server scripts- There would be various SQL objects to be deployed in every release. The scripts could be for a database or for various databases on different servers.
- SSIS Builds- Considering that we are working in the SSIS project deployment model, where the deployment unit is a project (.ispac) file. The projects would be deployed to Integration Services catalogs.
- SSRS reports (Native mode) - SSRS reports to be deployed on the report server in a certain folder. Reports might have shared data sources or datasets
- SSRS reports (SharePoint integrated mode) - SSRS reports to be deployed on SharePoint site in a certain folder. Reports might have shared datasources or datasets.
Now, let's proceed towards a one-time configuration of the deployment automation framework. Follow the below steps to configure the PowerShell deployment framework for MSBI related deployments.
- Create a deployment folder (Deployments) anywhere on the development server. If we are using any source control tool (TFS, SVN, etc.), it is advisable to create the folder in the source control system. We can give any name to this folder.
- Download the attachment MSBI Deployment Framework.zip from the Resources files section of this article.
- Extract MSBI Deployment Framework.zip file and copy the contents (PS scripts and BuildFolderTemplate) from the extracted folder to the Deployments folder created in step1.
The folder would look something like the image below.
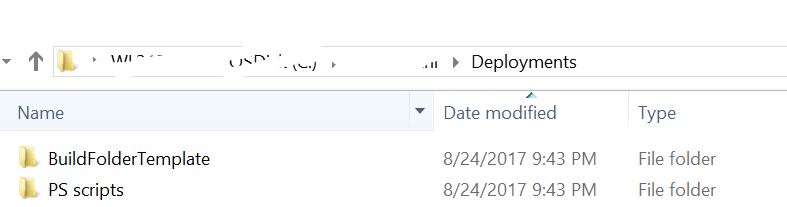
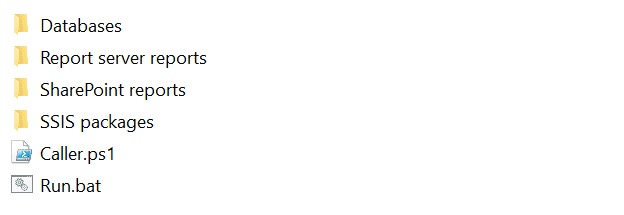
Now, we need to do one-time configuration and credentials settings for the PowerShell scripts to run. Open the "PS scripts" folder, and we will see various folders inside of it.
The Databases Folder
The Database folder will have a folder for each SQL Server database that needs to be configured for deployments. Each database-specific folder will have its own PowerShell script. For simplicity, the name of the database-specific folder could be the same as the database name. If we have two databases of the same name on different servers, we can give a more qualified name (ServerName_DatabaseName) to the folder as well as the underlying PowerShell script in order to distinguish them.
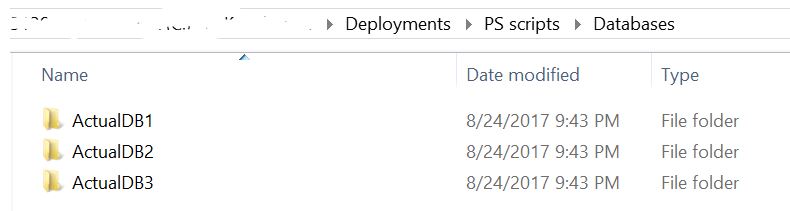
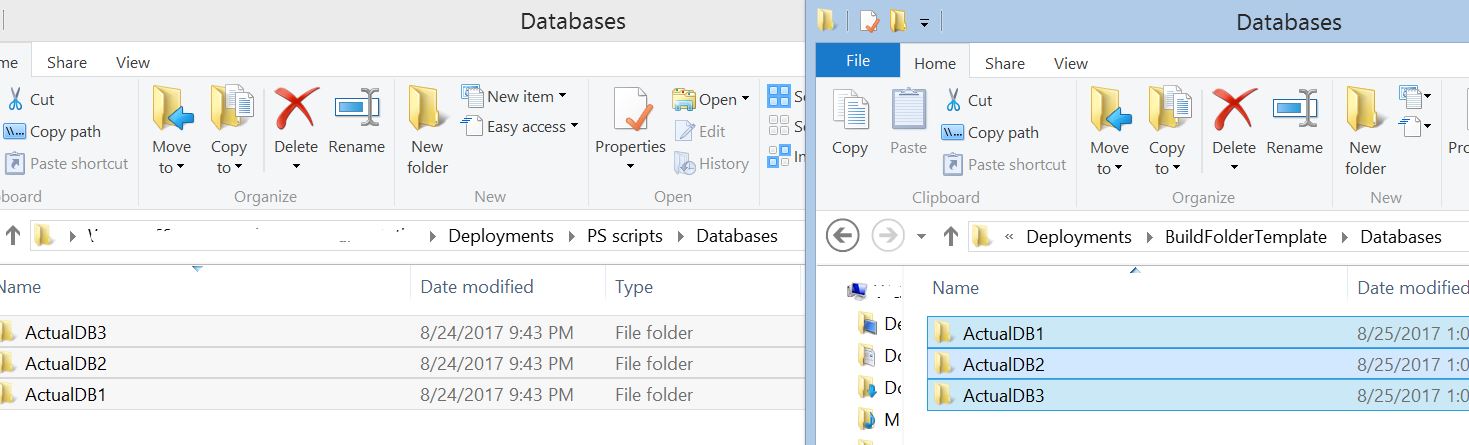
The "PS scripts/Database" folder has only one sample database folder along with the sample PowerShell script. If we have multiple SQL Server databases to be configured for deployments, we just need to make a copy of the sample folder (SampleDB) and rename the folder along with the underlying PowerShell script with the database name. E.g. if we have 3 databases, with names ActualDB1, ActualDB2, and ActualDB3, the Databases folder would look like the below image.
Open each database specific folder and edit the PowerShell scripts for configuring the connection details. Edit only the param section that is shown below. Change the server, database, and credentials to match your environment.
#Param
###################################################################################
$server = "SQL Server Instance Name"  ## mandatory
$dbname = "Database Name"  ## mandatory
$sqlserveruserName = "sqlserveruser"
$sqlserverPassword = "passwordforaboveuser"
###################################################################################
If we want to use Windows Authentication to connect to the database, the $sqlserverUserName and $sqlserverPassword variable values need to be removed along with the "=" sign. So, in this case, the parameter will look like below.
#Param
###################################################################################
$server = "SQL Server Instance Name"  ## mandatory
$dbname = "Database Name"  ## mandatory
$sqlserveruserName
$sqlserverPassword
###################################################################################
We need to repeat the same process for all the SQL Server databases which need to be configured for deployments.
The SSIS packages Folder
The SSIS Packages folder has PowerShell script to deploy SSIS builds (.ispac files) to SQL Server Integration Services Catalogs. We need to edit the param section of SSIS packages.ps1 script.
#Param
###################################################################################
$ServerName = "SQL Server Instance Name"
$SSISCatalog = "SSISDB"
###################################################################################
$ServerName is the SQL Server Instance name where we need to deploy SSIS builds (.ispac) files.
$SSISCatalog is the Integration Services Catalog name. It is usually SSISDB.
Note: The logged-in user or the user who will be running the scripts should have permission to deploy SSIS projects (.ispac files) to Integration Services Catalogs.
The Report server reports Folder
The Report server reports folder has a PowerShell script (Report server reports.ps1) to deploy the reports to the report server (SSRS configured in native mode). Edit the param section of the script with the environment-specific details.
#Param
###################################################################################
##Report server uri.
$reportServerUri = "http://<Server Name>/ReportServer/ReportService2010.asmx"
##Shared data source parent folder path - relative path
$DatasourceLibrary = "/path of shared datasource library/"
##Shared Datasets parent folder path
$DatasetLibrary = "/path of shared dataset library/"
##Set credentials that need to be used to deploy the reports to report server.

##This need not be necessary same as that of the logged in user.
$secpasswd = ConvertTo-SecureString "passwordfordomainusername" -AsPlainText -Force
$mycreds = New-Object System.Management.Automation.PSCredential (“domainusername”, $secpasswd)
###################################################################################
$reportServerUri is the report server uri. Locate the report server URI from Reporting Services Configuration manager.$DatasourceLibrary is the relative path of the shared datasource library on the report server. This will be used to set shared datasource paths in each SSRS report if applicable. $DatasetLibrary is the relative path the shared datasets library on the report server. This will be used to set shared dataset paths in each SSRS report if applicable.
The SharePoint reports Folder
The "SharePoint reports" folder has a PowerShell script (SharePoint reports.ps1) to deploy the reports to the SharePoint server (SSRS configured in SharePoint integrated mode). Edit the param section of the script with the environment-specific details.
#Param
###################################################################################
##Report server uri.
$reportServerUri = "http://<Server Name>/<Site Name>/_vti_bin/ReportServer/ReportService2010.asmx"

##Specify report/sharepoint server parent library path where we need to deploy the report
$targetParentreportLibrary = "http://<Server Name>/"

##Shared data source parent folder path
$DatasourceLibrary = "http://<Server Name>/Shared Data Soource Folder Path/"

##Shared Datasets parent folder path
$DatasetLibrary = "http://<Server Name>/Shared Data Sets Folder Path/"

##Set credentials that need to be used to deploy the reports to the report server.

##This need not be necessary same as that of the logged in user.
$secpasswd = ConvertTo-SecureString "passwordfordomainusername" -AsPlainText -Force
$mycreds = New-Object System.Management.Automation.PSCredential (“domainusername”, $secpasswd)
###################################################################################
$reportServerUri is the report server uri. Locate the report server URI from Reporting Services Configuration Manager.
$TargetParentreportLibrary is the path of the parent folder on SharePoint.
$DatasourceLibrary is the full path of the shared datasource library on the SharePoint server. This will be used to set shared datasource paths in each SSRS report if applicable.
$DatasetLibrary is the full path of the shared datasets library on the SharePoint server. This will be used to set shared dataset paths in each SSRS report if applicable.
The Build Folder
Now, it's time to configure the BuildFolderTemplate. Below are some quick guidelines.
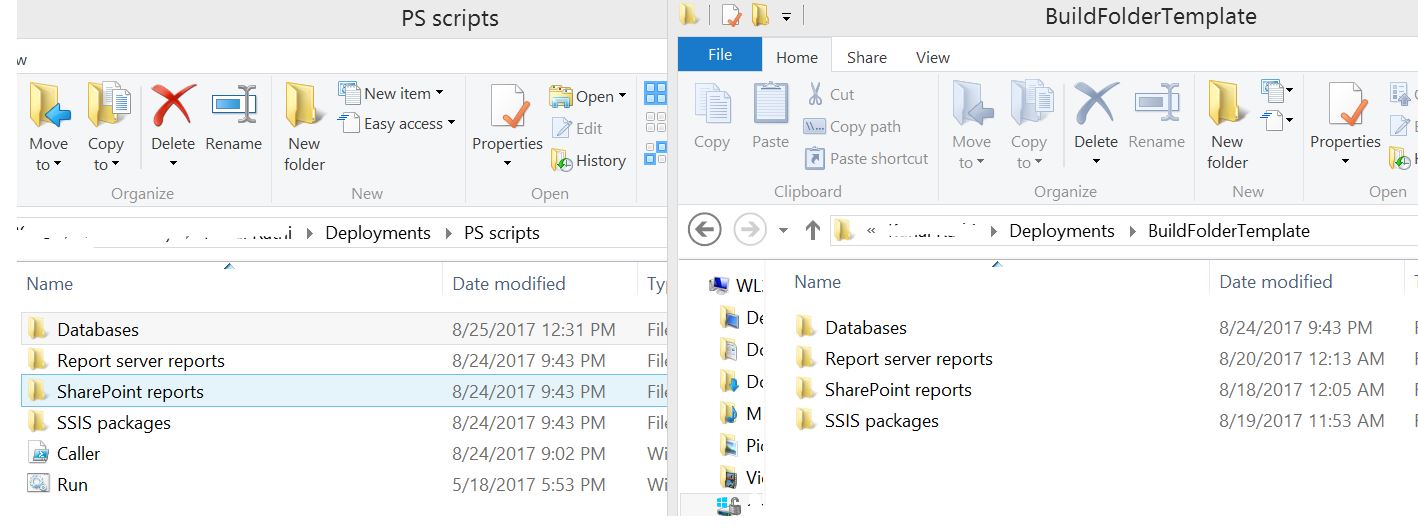
The BuildFolderTemplate folder that has been extracted from the attachment is the standard folder. Notice that the folders present in the BuildFolderTemplate have exactly the same names as that of the folders present in the "PS scripts" folder.
Make the below generic changes to the BuildFolderTemplate folder.
Databases - "BuildFolderTemplate/Databases" folder will have one folder corresponding to each database that has been configured under "PS scripts/Databases " folder.
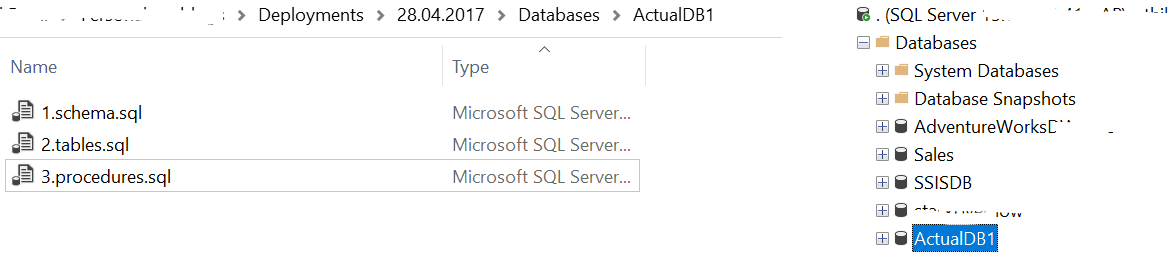
The actual deployment builds created out of BuildFolderTemplate in the future will hold .sql files under the respective database folders. PowerShell script framework lookup databases folder in the build from "PS scripts/Databases" folder and will deploy the objects from the respective database folder based on database connections configured in PS scripts. The Databases folders in "PS scripts" and BuildFolderTemplate would look something like the below image.
E.g Assume that we are preparing a build named "28.04.2017" and want to deploy some SQL scripts to ActualDB1, These .sql scripts should be copied under "28.04.2017/Databases/ActualDB1" as shown in the image below.
SSIS packages - "BuildFolderTemplate/SSIS Packages" is the location for SSIS projects (.ispac) files that need to be deployed to Integration Services Catalog.
When we will prepare the actual build from the template, we need to create subfolders under "SSIS packages" folder. The name of these subfolders should be the same as that of the respective folder name in the Integration Services Catalog.
The PowerShell script under "PS scripts/SSIS packages" iterates through each subfolder present in the build under "/SSIS packages" and will deploy all .ispac files to the server in the respective Catalog folder.
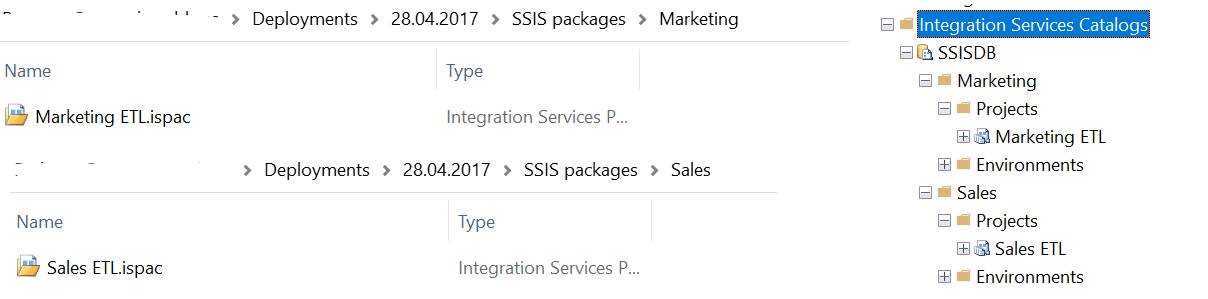
E.g In the build "28.04.2017", if we want to deploy Marketing ETL.ispac file to Marketing folder and Sales ETL.ispac to Sales in the Integration Services Catalog, we need to place the .ispac files in the respective folders under "28.04.2017/SSIS packages/" as shown in the image below.
Note: Folder list under "*/SSIS packages/" is not fixed and can vary in every deployment build. Also, we don't need to create these sub-folders under "PS scripts/SSIS packages/" folder.
Report server reports - "BuildFolderTemplate/Report server reports" folder is the location for SSRS reports (.rdl) that need to be deployed to the report server.
When we will prepare the actual build from the template, we need to create subfolders under "Report server reports". These sub-folders should follow the same folder structure as that of the report server portal folders.
The PowerShell script under "PS scripts/Report server reports" integrates through each subfolder present in the build under /Report server reports and will deploy all .rdl files to the server in the respective report server folder.
E.g. In the build "24.08.2020", if you want to deploy Marketing spends.rdl to Marketing/APAC folder and Global Sales Dashboard.rdl to Sales folder in the report server. we need to place the .rdl files in the respective folders under "28.04.2017/Report server reports/" as shown in the image below.

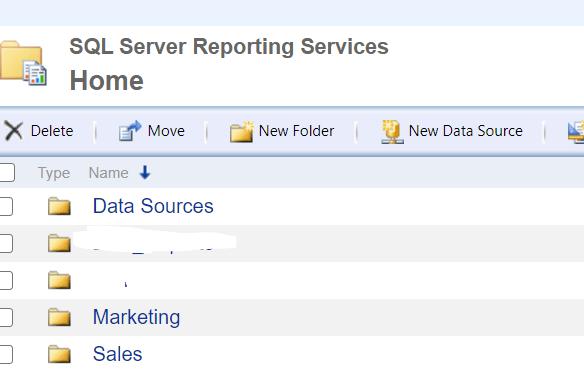
Note: If the reports that need to be deployed using this framework have some shared datasources or datasets, the names given in the report for such datasources or datasets should be exactly the same as that of the used shared object. All the shared objects (datasources or datasets) should be in some common (Data Sources) folder as shown in the below image.
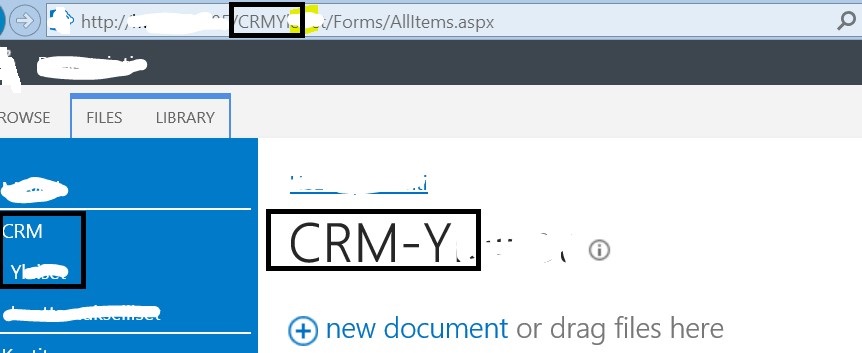
SharePoint reports - As stated above in Report server reports, we need to follow the same process for SSRS reports deployments to SharePoint. The only difference here is the name of the folders where we need to deploy reports. The name of the folders should be copied from the url as shown in the below image.
Note: If the reports that need to be deployed using this framework has some shared datasources or datasets, the names given in the report for such datasources or datasets should be exactly the same as that of the used shared object.
Validate the Setup
We should validate the configuration done so far, before configuring the build for deployment. Follow the below steps to validate the setup.
First, edit Caller.ps1 present in the "PS scripts" folder and change the variable $DeploymentFolderName to BuildFolderTemplate. This is the folder we have setup in "The Build Folder" section. And this will act as a template for our future deployment builds.
#Please give the deployment folder
$DeploymentFolderName = "BuildFolderTemplate"
Double click Run.bat file and it should open the command prompt like below.
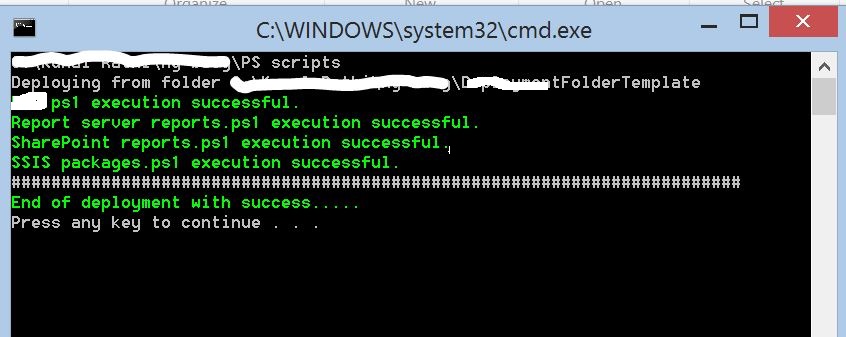
If the command prompt shows all green, congratulations!! We have done a great job so far.
Prepare the Build
Now, it's time to setup the build from the BuildFolderTemplate for a specific release. The typical build for a release may have .sql files to be deployed on various SQL Server databases, .rdl files to be deployed on Report Server or SharePoint server, SSIS build (.ispac) files, etc. Follow these simple steps to do that.
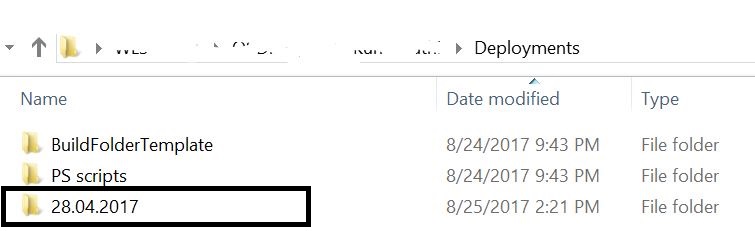
- Make a copy of the BuildFolderTemplate in the same folder where you have done the framework setup. Rename the copied folder with the name of the release. For simplicity, name it as per the data of release, e.g. DD.MM.YYYY.
- Now, place the deployable (.sql files, .rdl files or .ispac files, etc) in appropriate folders of the build DD.MM.YYYY as stated in the above steps.
We have been discussing "28.04.2017" build during BuildFolderTemplate creation. The build folder would like the below image.

Deploy the Build
First, edit Caller.ps1 present in "PS scripts" folder. Change the variable $DeploymentFolderName value to the name of the build we want to deploy (the folder name).
#Please give the deployment folder
$DeploymentFolderName = "28.04.2017"
Now that we have configured the build for deployment, double click the Run.bat file, and it should deploy the deployable to appropriate servers as per the configuration.
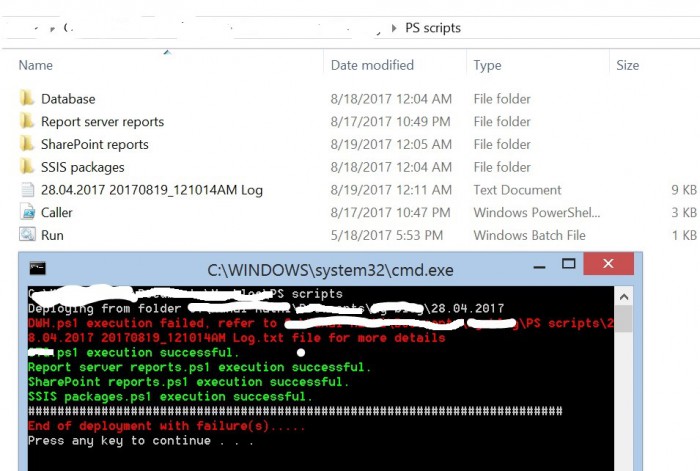
Review the Deployment Log
A deployment log gets created in the PS scripts folder, as shown in the above image. No matter what the command prompt shows, it is advisable to review the deployment log after every deployment in order to ensure that all the objects have been deployed as expected.
In case of failure(s), we can find out the detailed reason for failure from the log file. After corrective action is taken, we can re-run the build.
Deployment of the Builds in Different Environments
We need to do a one-time similar configuration of "PS scripts" in all the other environments (TEST, UAT, PROD) as what we have done for DEV. Assuming that all the environments are parallel (same database names, report server folder structures, SharePoint folder structure, and SSIS Catalog folder structures across all environments), the build that we have created in DEV, can be deployed to TEST, UAT or PROD without any future changes to build DD.MM.YYYY. We just need to copy the build from DEV to another environment at the deployment location.
Limitations
- Long-running .sql files, e.g. index creation scripts, might produce timeout error in PowerShell. For such scripts, it is recommended to run them manually.
- The SSIS package deployment model deployment is not covered in this framework.
- The setting of environments in Integration Services Catalogs and assigning environment variables configuration to SSIS projects in the catalog is not considered in this framework. For the first time, we need to do this activity manually for every new SSIS build deployed. Subsequent upgrades to the SSIS build will not require any changes to the configuration unless there is any configuration upgrade
- Deployment of shared datasources and datasets used in SSRS reports is not covered in this framework.
- SSAS project deployment is not covered in this framework.
Please feel free to share your feedback or suggestions on this deployment methodology.
