Now that we have our database under source control, we will want to share our work with other developers. If we are in a centralized source control system, our changes may be committed straight into the central repository.
When we are working in a distributed system, it means pulling down any changes from other developers, addressing any areas of conflict, and pushing our changes up to allow others to benefit from our work. This allows our changes to be synchronized with the changes other developers have made.
This level is principally about setting up a distributed source control system, namely Git, and how to commit database development changes to a local repository, before pushing them into a remote 'central' repository for sharing with other developers.
The next level will delve a little deeper into Git's versioning mechanisms, and show some examples of how to share database changes during development, and how to deal with conflicting changes.
Working with a Distributed VCS
When working with a Distributed VCS (DVCS), users each have on their client computer a local clone of the repository. Whereas in a centralized VCS the local client stored only the local changes, in a DVCS, each local instance of a distributed repository maintains the entire project history of all changes to the files, as well as other metadata. Every time we issue a commit to a repository in a DVCS, such as Git, it takes snapshot of every file in the directory. In other words, it tracks changes across all files collectively, rather than on a file-by-file basis.
The basic interactions between local working folder and local repository involve adding and committing files pretty much as we've seen before, but in order to share those changes with others requires pushing changes to a peer repository – either another users local repo or (more usually) a common remote repo (often referred to as "origin") to which all users synchronize. A usual practice is to have a common repository, conventionally referred to as "origin", because that is the default remote name the git creates, as an authoritative point on a central server to which all developers push their changes once they are committed locally. Figure 4-1 is reproduced with permission from the book SQL Server Source Control Basics, and depicts working with a DVCS, with an original repository.

Figure 4-1: Working with an origin server in a distributed system.
Note that the origin, or central server, should be properly secured and backed up! To get others' changes, we pull from the remote repo and then update our working folder.
In a DVCS, it is only necessary to communicate with other repositories relatively infrequently, to synchronize, as opposed to on every operation. This makes the distributed model much more suited to an environment where constant connection may not be possible. Of course, sharing those commits with other users, or a single centralized point, has to wait until the connection is there, but in doing this you don't lose or create gaps in the single greatest asset of source control: your commit history.
Setting up local and remote repos
To work through the examples in this level, you will need to set up both a remote and a local Git repository. The setup we show here is simplified version of one that a development team night use, in that we simply push and pull directly from the main repository, at the origin.
Another model would have the development team create a fork of the main original repo, then each member would clone it to their local workstation. Changes would be pushed to the forked (copy) at origin and pull requests issues to the original repository administrator.
Remote repository
One easy way to create a remote repository is to use Microsoft's cloud-based Visual Studio Online (VSO) service, using Git as the source control system. At the time of writing, this is free for up to 5 users, and may be included if you have a subscription to MSDN. An alternative route is to use GitHub, although this service does charge for personal or business use where the repository is not made publicly available. I'll use the example of Microsoft’s VSO service for this level.
Create a VSO account (either a personal account, or ask for details of your business account) and this will set up your account page, with a URL of the form https://username.visualstudio.com/. Go to your account page and click New under the "Recent projects and teams" section. This brings up Create New Team Project page, shown in Figure 4-2.
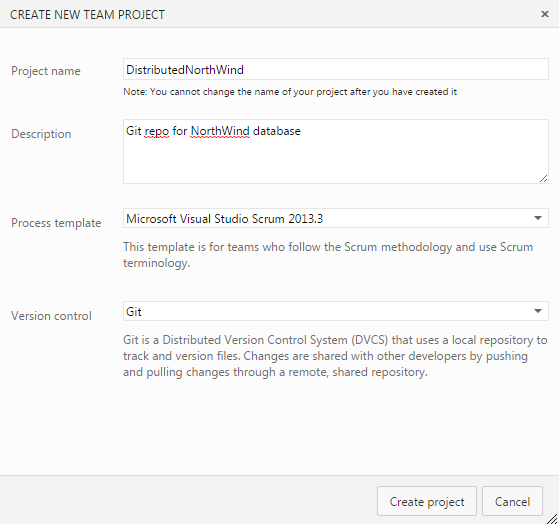
Figure 4-2: Creating a new team project in VSO
And that's it! You have created a remote, currently empty, Git repository called DistributedNorthWind.
Alternative credentials
If this is the first time that you have used Git as source control within VSO, you will be offered the chance to set-up alternative credentials which don't have special characters (such as the @ sign in an email address) in them. This can be helpful when using Git clients which don't accept these characters. If you later need to change these, they can be found by clicking on your user name in the top right of the default VSO screen, and going to "My Profile" and then selecting the Security Tab, and "Personal Access Tokens". You can create a new access token from this screen (Figure 4-3). Note that the description used becomes your username, and the password is supplied for you – make sure you select the correct validity period for the credentials.
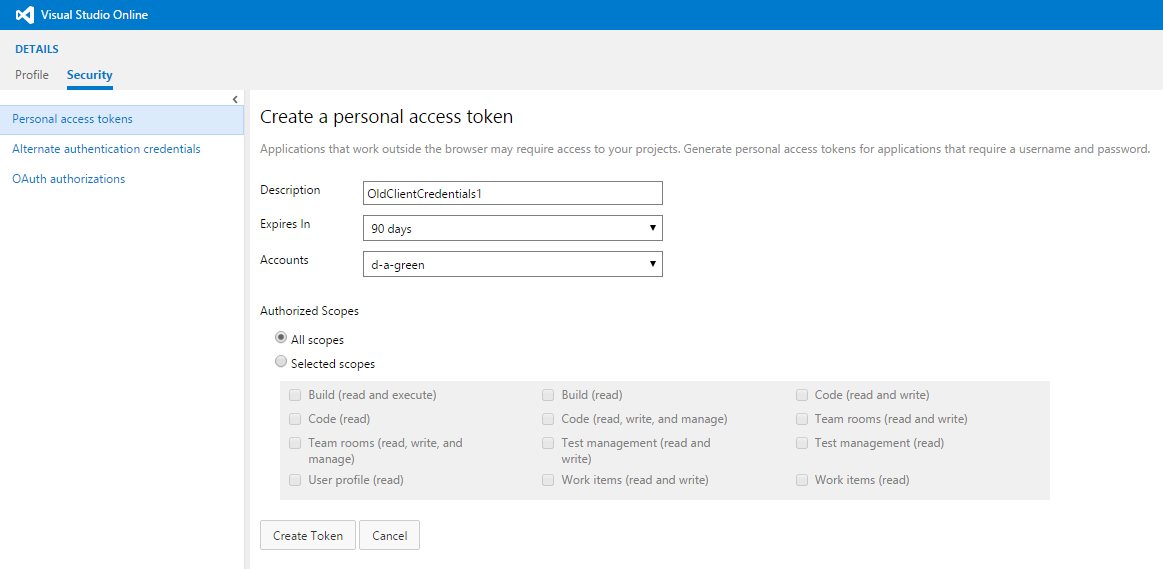
Figure 4-3: Creating a personal access token in VSO for use by command line clients
Having done this, we can push and pull changes to and from the remote repo from Visual Studio, or any other Git client. Note that if you created the 'origin' repository locally, such as in Visual Studio, then you can push this repo to the remote project. One of the advantages of creating a local repo in Visual Studio is that it auto-creates the gitignore and gitattributes files.
In our case, we simply have an empty remote repository as the origin, and to get our database under source control, we first need to clone this Git repository to our local machine so that we can work on it locally, before pushing any changes back to the remote repo, and pulling any changes pushed by others.
From the Home page for the project, within VSO, click the Code tab. This takes us to the source control window, where VSO provides the command that we need to run from the local Git client in order to create a local clone of the repository. This command is of the form:
git clone
https://username.visualstudio.com/DefaultCollection/_git/ProjectName
However, before we can clone the remote repository, first we need to set up and configure Git, and a Git client, on the local Windows machine.
Setting up Git and Git clients on the local machine
To install Git on a local windows machine, we can simply get the windows package from http://git-scm.com/download/win (although see the Command line client: PoshGit section shortly for a powerful, alternative way to set up Git).
For the Git client, we have a number of options, ranging from Visual Studio, to a third party GUI-based client such as Atlassian SourceTree, to the command line. In fact, even when using VS or another GUI client, there may still be some operations (mainly advanced operations such as rebasing, which we won't cover in this Stairway) that we need to perform from the command line. As such, it's useful to be familiar with command line operations, in addition to working with our preferred GUI client.
Visual Studio
Visual Studio, and SQL Server Data Tools, provide a powerful means to develop databases in a team environment, and push and pull changes to and from a remote repo. However, we will save until a later level details of team-based database development using VS/SSDT.
Atlassian SourceTree
You can download the installer for Atlassian SourceTree from http://www.sourcetreeapp.com/. SourceTree does require registration, but this is free of charge. The installation is wizard driven, and once you start the program you will be given a choice to automatically handle line endings, which I suggest you accept.
Dealing with Line endings
Git has its origins in Linux, and so uses Unix style line endings (LF). Windows however uses a different style (CRLF). When you install Git for the first time, you will be presented with options for how to treat line endings. The safest option, in terms of interacting with Windows software, is to check out in CRLF. However, this does mean that the files are subtly different in source control. This is more of a technical than practical detail however, and it is how I use Git, unless I am working across operating systems. For more information about per-repository settings for line endings, see: https://help.github.com/articles/dealing-with-line-endings/.
You should use the Tools | Options dialogue set your name and email, so that your commits are associated with you and the rest of the team can identify who has made changes to code.
Command line Client: PoshGit
If this is your first time using Git then the Using Git with Visual Studio 2013 Jump Start tutorial video describes a rather powerful way to set up and configure Git, plus other useful tools and packages. The technique described uses Chocolatey to install all the required components. Chocolatey is a decentralized framework, built on the NuGet infrastructure, and using PowerShell to deliver and install applications to your local environment. Once installed, we can use Chocolatey to install all manner of tools directly from the command line as simply as typing "cinst PoshGit".
Setting up Git and PoshGit
For further set up details, optionally using Chocolatey to install each component, please refer to the previously-referenced "Git with Visual Studio" video. Alternatively, provided as a download with this level is a condensed version of basic instructions for installing and configuring these tools.
The examples in this level use PoshGit for one local client. PoshGit is just Git but with integration into PowerShell, so that we can issue all the required Git commands directly from the PowerShell command line. It also provides some nice additional features such as auto-completion. A useful additional application to install is git-credential-winstore, which will store the repository login credentials so that we don't need to type them in at the command line every time we pull and push from and to the remote repo.
Having installed Git and PoshGit (and set the git path variable in Windows) we need to perform only minimal configuration in order to start using it execute Git commands directly from the PowerShell command line. You will need to provide your Git user name and email address as follows (from PowerShell):
> git config --global user.name "Dave Green"
> git config --global user.email "my@email.com"
When we issue a commit, part of the commit object stores the author of the commit and their email address.
Optionally, you can also change the editor that PowerShell uses by default from vi to whatever is your preferred editor:
> git config --global core.editor Notepadplusplus.exe
Clone the remote repository
On a PoshGit local client, we can clone the remote repository simply by creating a local Windows directory in which we wish to store our repositories (for example, C:\Users\username\source\repos), navigating to that directory in PowerShell, and then issuing the previously-supplied git clone command.
You will need to supply your Git username and password (or access token) to communicate with the remote repo. Winstore, if installed, will prompt you to enter credentials into a sign in pop-up window and supply them automatically thereafter. If you didn't install winstore, or for some reason it isn't working, the credential prompt will appear in the command line (and you'll have to sign in every time you need to access the remote repo).
It will create a new working directory, named after the cloned project, and within which you'll find the .git directory. When you navigate to the DistributedNorthWind working directory from PowerShell (PoshGit), it will automatically display the current branch of the repository, in this case master, since we currently only have a single branch (more on branches in Level 6).
Alternatively, we can clone the repository using a Git client such as Atlassan's SourceTree, In SourceTree, go to Clone | New, and clone the remote VSO repository, by filling in the URL, the destination of the local repo, and then supplying your credentials.
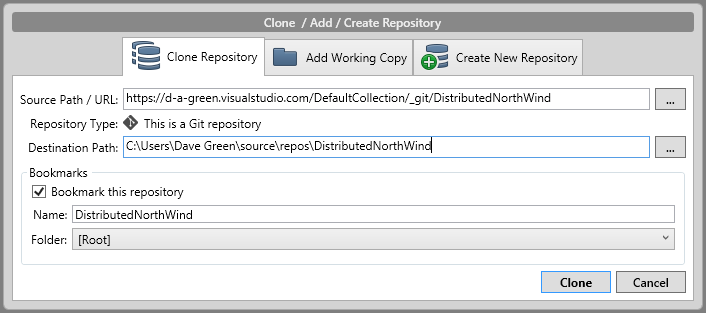
Figure 4-4: Cloning a remote repo in SourceTree
Getting the Northwind Database into Source Control
In Level 2 of this Stairway, I described in detail two ways to get a database into source control, either manually scripting the database into the required folder, or using SQL Source Control to link the database to the VCS, in which case the tool auto-generates the repository structure and scripts each database object to the appropriate folder.
Installing NorthWind
To work through these examples, you'll need to install a copy of the NorthWind database, or use an alternative. You can download the installer package (.msi) from the Microsoft website, although this installer will only work on instances running SQL Server 2008 or earlier. I've made available with this article the SQL script (edited to remove the references to obsolete objects) necessary to create the database and insert some data.
In this Level, I'm going to demo use of SQL Source Control, but feel free to use the manual scripting technique if you prefer. First, create a trunk folder within the DistributedNorthwind directory, and then create a Database folder within the trunk folder, to hold the database.
There are two ways to work with SQL Source Control when using a Git repo. Within SSMS, right click on Northwind in the object explorer and select the SQL Source Control option "Link database to source control". On this screen we can choose either to save changes made in SSMS to the local working folder, and from there commit to the local repository as a separate, manual step, or we can use a "custom preset" for Git that will allow us to commit changes directly to the local repository.
If you are working on database objects only, you might prefer to choose the Custom option and simply enter the working folder, and choose "Git" for the configuration file. However, my personal preference and the option I use here is to save the database objects to a working folder, as I like to commit the database changes and any related application changes in single, atomic commit. If you wish to do likewise, select the "working folder" option and link the DistributedNorthWind database to the trunk\Database sub-folder of your Git working directory.
Having linked the database, SQL Source Control will create a structure in our source control system but doesn't actually commit all our objects, so right-click on NorthWind, and select Commit Changes to source control. We see a long list comprising all the objects in the database. Click Save Changes to script the files to the working directory.
Having saved the database files within the working directory, our PoshGit client simply reports one change that is "untracked". The git status command identifies it as the trunk/ folder.
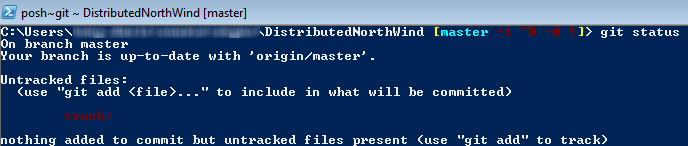
Figure 4-5: git status command
We can use the git add command to 'stage' the database files (git add --a to add them all). Having done this, PoshGit reports 38 new files added, but not yet committed.
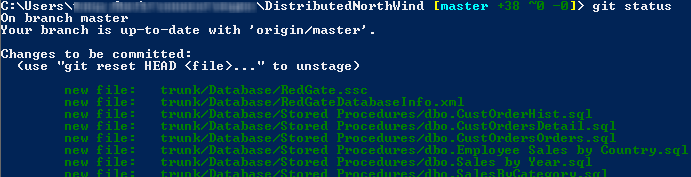
Figure 4-6: git add command
We can commit these files to the local Git repo, using the git commit command, and providing a commit message, as follows:
C:\...\DistributedNorthwind> git commit --m "Initial Commit of NorthWind database"
Note that this will commit only tracked (green) files. Any files that you saved to the working directory but didn't add (any files marked in red) will not be part of the commit.
We can see the commit history in our local repository either from the command line:
C:\...\DistributedNorthwind> git log
Alternatively, we can view the history from within SourceTree (Figure 4-4).

Figure 4-7: Viewing commit history in SourceTree
There is a lot of detail here, such as the hash value that identifies each commit, the link to the parent commit, and exactly what's "in" a commit. We'll ignore these details for now but discuss them in a little more detail in the next level, when we review how versioning works in a DVCS like Git, compare to a centralized VCS such as SVN.
Since Git is a distributed system, all this work is on the local machine. In order for another developer to start working on this database, we need to push these changes to the remote repository.
Pushing to remote
We have all our database objects committed to a local Git repo, but if we check the Code | Commits section of the DistributedNorthWind remote repository, on VSO, we'll see that it's still empty. In fact, for empty repositories, VSO lists in this section the command line commands we need to push changes to our remote repository.
In our example, we can push our initial commit to the remote repo using either PoshGit or SourceTree. From PoshGit, we can use the git remote –v command to see which destinations are currently available for us to push to and pull from. If necessary, we can add a new remote by providing a name (origin) and a URL:
>git remote add origin https://username.visualstudio.com/DefaultCollection/_git/DistributedGit
Then to push changes to the corresponding branch in origin (in this case, the master branch), we issue:
>git push -u origin --all
This synchronizes the changes with the hosted repository, and allows other users to pick up our changes.
To perform the same task in SourceTree, we simply click on the remote server (origin), in Figure 4-7, and select "push". If we need to synchronize with several remote repositories, it is in this Remotes section that we could configure and select the various repositories to which we wish to synchronize (we won't discuss this topic further in this Stairway).
We can now see from Figure 4-8 that the remote repository has our changes, and we can see the database objects in place. Note that empty directories are not stored in Git, which works at the file level. The good news is that these directories not being there won't faze SQL Source Control.
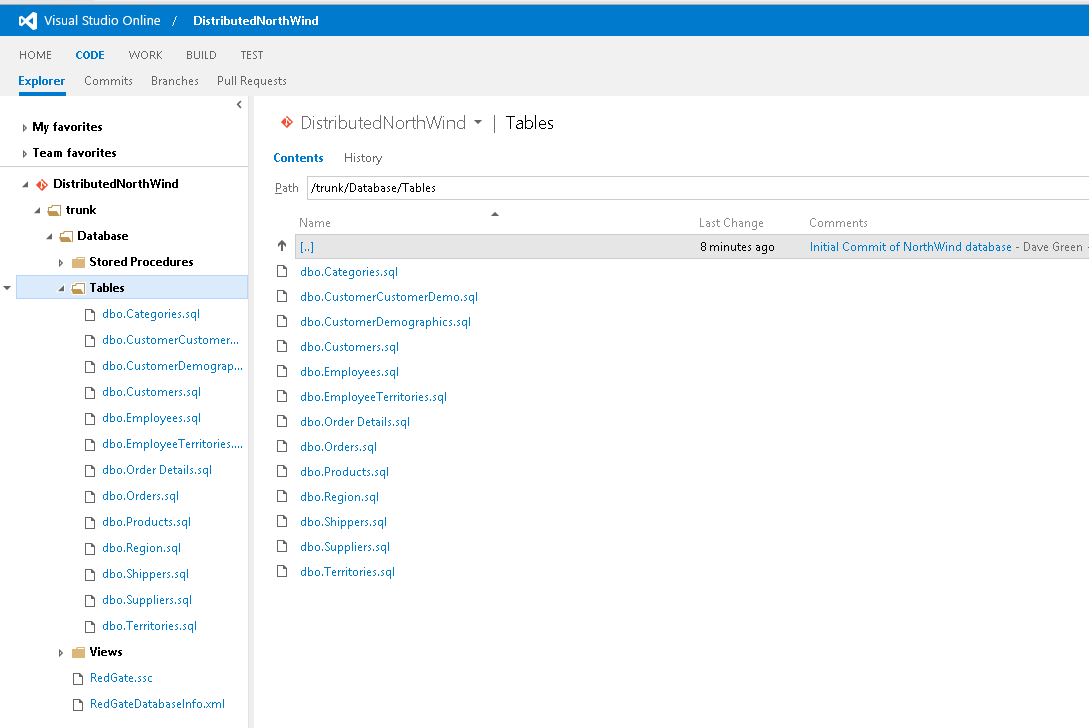
Figure 4-8: Viewing the remote (origin) in SourceTree, after pushing changes
You can force the inclusion of a directory by including in it an empty file called .gitkeep, and source controlling this file. That will force the directory to be created and stored in source control.
Pulling from remote
The process of getting others' changes from a remote repository is known as 'pulling'. This is actually two operations; fetching the changes, and merging them in with any changes in our own repository. These can be done as two operations (i.e. execute a git fetch followed by git merge), or alternatively (and more conveniently) as one 'pull' operation.
Each team member can 'pull' changes from the origin/remote repo to their respective local repositories. You can also push and pull to other places than the remote origin, for example branches, and we will cover this topic in a future level.
Assuming a second developer had already cloned the original empty repository, then he could retrieve the initial commit of all the DistributedNorthWind database objects simple right clicking on the remote server (origin) and selecting Pull, in SourceTree, or in PoshGit using the git pull command:
>git pull origin
Alternatively, if the second developer was starting from scratch, he could simply clone the remote repo, as explained previously.
Developer2 could then create a blank NorthWind database in his sandbox SQL Server instance, use SQL Source control to link the database to the trunk\Database folder in his working directory and then use Get latest to bring his working copy of the database up to the latest version.
Summary
This level has described a basic set up for source controlling a SQL Server database using a distributed version control system, such as Git. A prime advantage of a DVCS, to the development team, is that each member has a local, fully operational version control system, containing the entire project history of all changes to the files. This allows uses to work offline, and perform locally all the normal source control operations such as comparing versions (diffs).
We also discussed how to save development changes directly from SSMS to a local working folder, and then interact with the local and remote repositories, using either a command line client, such as PoshGit, or a GUI-based tool such as Atlassian SourceTree.
In the next level, we'll discuss in more detail the mechanics of versioning in Git, and then delve into practical examples of how a DVCS can enable team-based database development.