

The SQL Server Import and Export Wizard has been around for a while. It’s a simple and very useful tool for importing or exporting data. You simply need to give the Wizard a data source, name a destination, and let the Wizard do the magic, importing or exporting the data.
Imported data can be used for multiple needs, such as further massaging of the data, transforming it, or using the data to generate reports. The Wizard is designed for basic tasks. But even for basic tasks, there can be times when the SQL Server Import and Export Wizard fails to perform as intended, and is useless for exporting data.
This article will discuss a case study of utilizing a SSIS package to export data to an Excel file. My goal is to export data from a table to an Excel file. All of the supporting scripts and files are included in this article. The file “Current Process and Documents Described.txt” provides a description of the documentation, scripts, and their usage.
The Main Issue
For my case study, I would like to begin with a problem I encountered in real life while using the Microsoft Import and Export Wizard (which from now on I will simply call the Wizard.). I had a table named EmployeeHobby. This table had four columns:EmployeeNumber, LastName, FirstName, and Hobby. My goal was to export all of the data from EmployeeHobby into an Excel File. I first tried using the Wizard, but each attempt to export my data failed. After much experimenting, I finally found the source of the problem: if any of the columns (in my case the Hobby column) in a table has either a varchar (max) or a text data type, the Wizard will malfunction and fail to export data from the table. Nothing I tried could make the Wizard finish the job.
For a while, I was stumped. How was I going to get past this obstacle? I had a deadline which was approaching quickly, and I needed to get this problem resolved. I searched through all of the sources I could - books, white papers, articles on the internet and online forums, to no avail. Despite my best efforts, I could not make the Wizard work, and I was getting very discouraged.
A short personal reflection on problem solving
At the height of my frustration and my thwarted attempts to get the Wizard to work, I remembered an experience with an old professor and mentor. This was a man who was much admired and highly respected by all of his colleagues. The professor and I once had the chance to work closely together on a large project (for which we eventually won a gold medal and a cash prize.) During this period, he asked me to read his book. I obliged him, but I can´t say I was overly impressed. At the time I really didn´t understand why everyone considered him to be the best in his field.
It was not until many years later that I had the answer: this professor had the unique ability to analyze information compiled by many other people, and then bring this knowledge to a higher, abstract level to solve problems. I asked myself what my mentor would do in my shoes. I remembered times when the professor would face a sizeable problem, and how he would try hundreds of different methods to find a solution, (some of them perhaps unconventional!) never losing his sense of humor. Inspired by this memory, I stopped banging my head against the wall and resolved to keep searching. After many different attempts, I finally found a method that made a SSIS package work, and which I will describe in the next section,
The point of this short reflection is to tell you that I highly recommend that you read this article, even if you don´t have an immediate need to export data using columns containing the varchar (max) or text data type. The lesson I learned is that finding the solution to a tricky problem is probably not a matter of luck, chance, or some divine inspiration from a higher power. Most likely, the solution was generated on my subconscious level using all information from many different sources that I have ever absorbed. Who knows how reading this article may help you solve a future problem?
How I got a SSIS package to Work
As I mentioned already, I discovered that even a SSIS package will fail to export data with a varchar (max) or a text data type unless you employ one simple little trick. This section will show you how I was able to create, design, and prepare a destination file in Excel that will make a SSIS package work.
Here is my model of step by step solution with a SSIS package that you can apply to your own data:
First, I created an Excel file. This was the file to store the data extracted from the table EmployeeHobby. I named the file EmployeeHobbyExport.xlsx. I named the first tab in the file EmployeeHobby. Here is an image of the EmployeeHobby tab:

The first line in the file, line number one in the tab EmployeeHobby, contained the column names from the table EmployeeHobby with a prefix H_. This was done to make the Business Intelligence Development Studio (BIDS) work harder and more efficiently. I will explain this a bit further in the steps to follow.
The second and third lines contain data to be read and interpreted by a SSIS package and BIDS. Simply stated, I put five “A”s in every column that stores less than 255 characters of data in EmployeeHobby table. Note: if a column stores more than 255 characters, you will put a string containing 600 “A”s. In my case, I used the following T-SQL statement to generate six hundreds “A”s in the Microsoft SQL Server Management Studio:
select REPLICATE('A', 600);If a column has a numeric data type, put zero in the line two.
You may wonder how I came up with the number 600. The answer is that I started off using 300, and then tried 400. I finally used the number 600. After testing a lot of reports, I found that this number always worked for me.
The fourth line and an unlimited number of following lines may contain some static or even dynamic data required for a report. By static, I mean contents of a line that is manually written to a file from the very beginning (in the design stage,) and is not changed in the process.
By dynamic, I mean contents of a line that is generated based on various input parameters, and changes from one instance of a report to another. For example, values like a report run date with a cumulative total will change for each run of a report.
in my case, the static line is “A smile Can Save the World”, but one may have as many static or dynamic lines as one likes. One may also have images or pictures as static lines. Again, a static line does not change from one instance of a report to another instance. A dynamic line is first generated, and then is written to the file.
The fifth line has the reporting column names. Here the names are in plain English, as they are the ones to be read, used, interpreted and understood by the customers.
I am now going to hide the first three lines described in the previous steps. To do this, I will highlight the first three lines, right-click anywhere in the highlighted area, and click Hide.
Here is how the tab EmployeeHobby looks after the changes described in the last step:
The hidden lines cannot be seen by the customer, but can be used to help SSIS package to do the data Export.
I saved the Excel destination file, and then closed it. Now the file is ready for the data Export process. So my next step was to create a new SSIS package to perform the data Export. I opened the Business Intelligence Development Studio (BIDS), and I clicked File, New, Project
I selected Integration Services Project in the Templates section.
I entered ExportEmployeeHobbyTable in the Name window. Then I specified where to store this package in the Location window. In my case, it’s “F:\2014_Publish\SSIS_Store” directory.
Next, I clicked the OK button. BIDS will create a new SSIS package and open it. I renamed the Package.dtsx to EmployeeHobby.dtsx
Now it was time to create a connection to the database Tease. To do this, I right-clicked on the Connection Managers pane and selected New OLE DB Connection
On the Configure OLE DB Connection Manager page, I clicked New.
A short reflection on user-friendliness: I remember that I once supported a report that had 80 columns and more than 100,000 lines. The first 10,000 rows had blanks in the first 75 columns. A novice user would open this report, see a header and blank lines, and immediately send me a message stating “your file is empty”, even though the file size was 7-10 MB. A novice didn´t think to scroll down 10,000 lines or 75 columns to the right to see that the file had data, because a report starting with so many blanks was unimaginable. This experience made me think that when we write reports, we should try and make them customer-friendly and avoid buzzard/weird reports like the one I mentioned. Could we? Should we try?
On the Connection Manager page, I typed in the name of the Server in the Server name window. Then I selected the database from the “select or enter a database name” drop down list. In my case, the name of the database was Tease. This is the database where I stored my table ‘EmployeeHobby’.
I then clicked on the “Test Connection” button and got the Connection Manager page

The test connection was successful, and I clicked OK.
I then clicked OK on the Connection Manager Page. (Small note: in my opinion, this is another issue with the Microsoft design: in the last two steps, there are two separate pages with different contents. However, the contents have the same name. I believe that two different pages represent two sequential steps in the process and each one should have a unique name so they can be referred to without any miscommunication or errors. FYI: In the beginning, Bill Gates checked every written line of Microsoft code himself. Does this explain the success of the Microsoft Company?)
I clicked OK on the Configure OLE DB Connection Manager page.
Now I had created a new connection to the database,Tease, which I could see on the Connection Managers pane.

To create a connection to the destination Excel file, I right-clicked on the Connection Managers pane and selected New Connection.
On the “Add SSIS Connection Manager” page, I clicked the Excel line and then clicked the Add button.
On the “Excel Connection Manager” page, I clicked the Browse button, and navigated to the destination Excel File - EmployeeHobbyExport.xlsx. I selected the file and arrived at the following page:
Please note that “First row has column names” is checked. But in my design, even the first row is hidden SSIS will use the first line in the file.
I clicked the OK button. A new connection for the Excel file was created which I was able to see on the Connection Managers Pane.
Now that I had created all of the needed connections, I had to put in all tasks needed for the Export data process into the package. To do this, I clicked on the Toolbox located on the left upper corner of the Development pane, and dragged the Data Flow Task into the Control Flow tab.
I renamed the Data Flow Task to “Data Flow Task – Export EmployeHobby table”
I double clicked on the Data Flow Task. I clicked on the Toolbox and I selected the OLE DB Source.
I dragged the OLE DB Source into the Data Flow Task.
I double clicked on the OLE DB Source. I selected the OLE DB connection manager – the connection Manager to my server and database from the drop down list. This is the connection Manager I created in the previously.
I clicked on the “Name of the table or the view” drop down list, and I selected the dbo.EmployeeHobby table.

I clicked OK. Then I clicked on the Toolbox in the Minimize the Data Flow Sources section. I expanded the Data Flow Transformation section. From the Data Flow Transformation section, I selected the Data Conversion task.
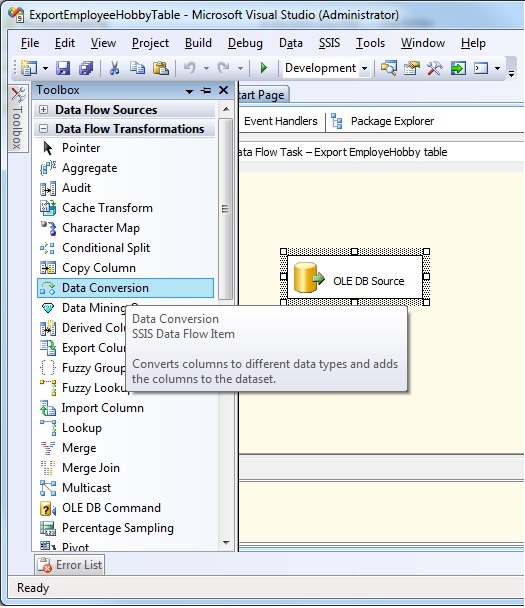
I dragged the Data Conversion task into the Data Flow Task pane. I then clicked on the OLE DB Source task, and I dragged the green arrow to the Data Conversion task that establishes the order in which the tasks were to be executed.
I double clicked on the Data Conversion task. I checked the box to the left of the Name column to select all columns – this should check all available columns. I changed the Data Type to Unicode string [DT_WSTR] and Unicode text stream [DT_NTEXT].

Please note that I did not need to click on the down arrow, I could simple double click on the data type and it showed me all available types. The reason I changed the data type of the columns is because SSIS and Excel use different data types. In order for a SSIS package to work, values from the source (pooled from the table) need to have the data type that an Excel file can understand and handle properly. If the data type of the output columns is not changed, the SSIS package will fail.
I renamed the Output Aliases. For example, I changed “Copy of EmployeeNumber” to “H_EmployeeNumber”.
Please note that now values in the Output Alias are exactly the same as the names I had in the first line of the Destination file. The change of the Output Aliases is done to allow the BIDS to automatically match the SSIS output columns and the Excel columns. BIDS will only do the match automatically if the names of the SSIS package and EXCEL columns are the same. I find this a very useful trick to use when I have more than twenty columns in a report, which I very often do. It saves me from wasting time on changing my Aliases. Another Microsoft bug?
I clicked OK. Then I clicked the Toolbox and minimized the Data Flow Transformations section. I then selected the Excel Destination from the Data Flow Destination section.
I dragged the Excel Destination component into the Data Flow Task Development Pane and clicked on the Data Conversion task. I then dragged the green arrow to the Excel Destination task.
I double clicked on the Excel Destination task. From the “Name of the Excel sheet” drop down list and selected EmployeeHobby/$. In my example, there was only one Excel Connection Manager, which BIDS automatically selected for me.
In my case, I had multiple Excel Connection Managers, and I selected the one I needed.
I clicked on Mappings. BIDS automatically connected the transformed Columns with the columns in the Destination Excel file.
I clicked OK. Once again, I manipulated the aliases (please see step 36) in order to leave the connection match between the SSIS output column/Excel columns to BIDS intact. This allowed me to avoid doing it manually on the Excel Destination Editor page. When I have more than twenty columns I really appreciate this little trick.
Here is how the SSIS package looked now:
From the menu, I clicked on Project, and I then clicked on ExportEmployeeHobbyTable_Properties.
I clicked on the Debugging under Configuration Properties section and selected False for Run64BitRunTime property. I clicked OK.
I clicked the Save All button. The package was now ready for work to be done.
I right clicked on the package EmployeeHobby.dtsx, then I clicked on the Execute package.
Voila! My package execution was successful, and all of the components changed to green, which is exactly what should happen after a successful package execution. For me, this was one of the most exciting moments of the process – a successful execution means that one more task could be crossed off my “to do” list. But it was also the saddest moment because I realized that my problem-solving journey for the issue described in this article had come to an end and it was time to move on to new, unknown challenges.
I clicked on the “Package Execution completed. I could then click here to switch to the design mode or to select Stop Debugging from the Debug menu” link under the Connection Manager Section.
I clicked on the Execution Results tab.
I reviewed every step I executed in my SSIS package.
I clicked File, and then clicked “Save all” to save the newly created package. I then closed the BIDS.
Finally, I opened the Excel File and reviewed the report.
You might wonder why it makes sense to use a SSIS package when one could simply copy and paste the result of a query into an Excel spreadsheet. Why bother with a SSIS package? My answer is that yes, simply copying and pasting data is an option, but what if you needed to put your extract or report on a daily schedule. What could you do if you need it to run multiple times on demand? Are you going to do it manually every day?
In my opinion, the solution described in this article is the best and most efficient way to deal with data types varchar(max) and text. When I have a scheduled job, I use a template Excel file to generate a report. A SSIS package can populates the template with data, save and rename the template (and add a timestamp), and send it out to customers. A SSIS package can also copy a template to the current directory, and then use the same template in a next run.
All of the supporting scripts and additional documentation are included in this article. The file “Current Process and Documentation Described.txt” provides a detailed description of the documentation and scripts.
Disclaimer: all names and hobbies in this article are purely fictional.
Credits
My family, my teacher Ilya Petrenko, and my new mentor Mindy.
How to: Run the SQL Server Import and Export Wizard - http://technet.microsoft.com/en-us/library/ms140052(v=sql.105).aspx