Tables, you gotta love ‘em! Virtually every database system uses them in some form or other, certainly in the relational space. How does Snowflake deal with tables? What types of table are there, and what are they for? Let’s find out!
Table Types
Snowflake supports a variety of tables, although it’s worth saying not all of these actually are tables! In the physical sense, anyway.
- Permanent table
- Temporary table
- Transient table
- External table
- Apache Iceberg table
- Hybrid table
- Directory table
- Event table
- Dynamic table
Wow, that’s quite a list! This article will explain what each table is for, and we’ll explore the table types and how to use them in future stairway steps.
Permanent Tables
This is your common or garden table. It’s created as a permanent, physical structure. The table consists of a set of micro-partitions, which Snowflake maintains as data changes within the table. Tables can be clustered using a clustering key. This approach helps prevent data skew, which should lead to better performance.
Permanent tables exist within a schema and contain individual columns. You can use all of the usual relational table bits and pieces here, such as primary keys, foreign keys, nullable/not nullable columns, default values, identity columns and constraints. These tables also have a fail-safe period, which helps you with disaster recovery.
Permanent tables are managed using the CREATE TABLE, ALTER TABLE and DROP TABLE statements. There’s also a handy UNDROP TABLE statement, which allows you to restore the most recent version of the dropped table using the magic of Time Travel.
Temporary Tables
Temporary tables work in just the same way as they do in SQL Server, Oracle, MySQL and other RDBMS platforms. The temporary table only exists within the session in which it is created, and once the session is closed the table is deleted – assuming it wasn’t specifically deleted previously, of course! As you may imagine, temporary tables have to utilise storage, so the longer you keep them around, the more money they cost you. Make sure you drop them as soon as you’re done with them!
Here's an interesting little Snowflake feature when it comes to naming temporary tables. Snowflake doesn’t enforce uniqueness on temporary table names. You can have a permanent table and a temporary table in the same session with the same name. I know, sounds bizarre! How would Snowflake know which table to query? The temporary table takes precedence, and in effect hides the permanent table. This happens even if you create the temporary table before the permanent table!
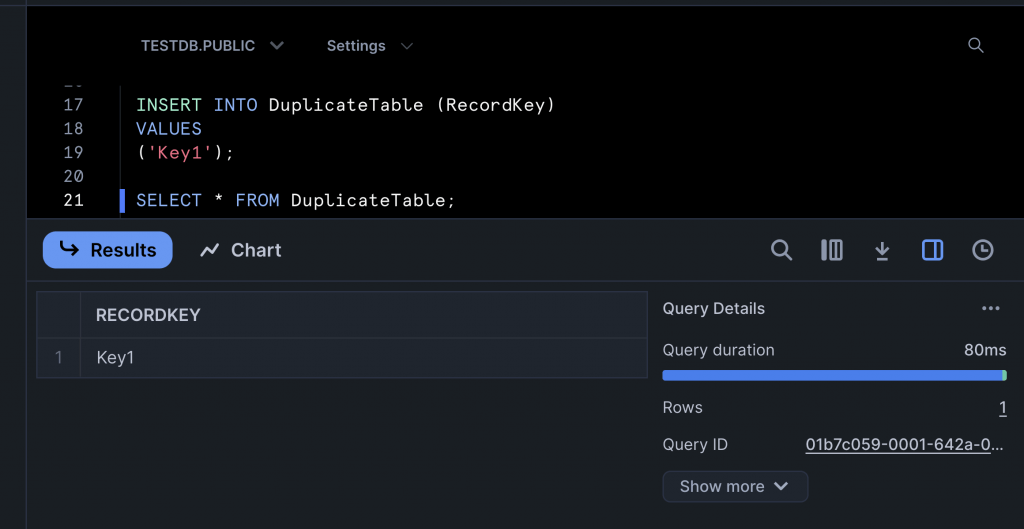
Temporary tables are created with the CREATE TEMPORARY TABLE statement, which is really the CREATE TABLE statement with a clause specified (that’s the case for pretty much all the CREATE TABLE statements you’ll encounter in this article). Here’s a little script which creates a permanent table and a temporary table, both with the same name. The permanent table contains three rows, the temporary table contains one row.
CREATE TABLE DuplicateTable
(
 RecordKey  VARCHAR(100)
);


INSERT INTO DuplicateTable (RecordKey)
VALUES
('Key1'),
('Key2'),
('Key3');


CREATE TEMPORARY TABLE DuplicateTable
(
 RecordKey  VARCHAR(100)
);


INSERT INTO DuplicateTable (RecordKey)
VALUES
('Key1');


SELECT * FROM DuplicateTable;
Running the SELECT statement returns just the one row, as it hits the temporary table.
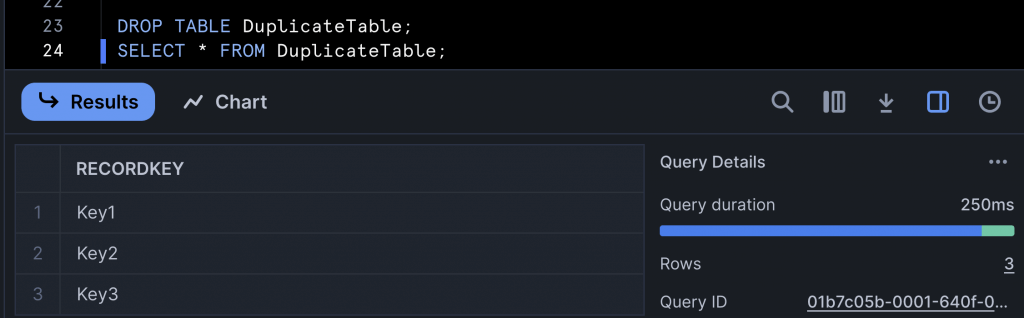
If the table is dropped and the SELECT statement executed again, what do you think happens? Spot on, the temporary table is dropped and the three rows from the still remaining permanent table are returned!
Obviously, it’s not a great idea to give temporary tables the same name as a permanent table, but it can be a helpful development tool if you want to test some code but don’t want to affect the permanent version of the table. If you are developing and need to store some data on a temporary basis to share amongst multiple developers, temporary tables may not be ideal for you. But don’t worry, Snowflake has you covered!
Transient Tables
This is sort of a super version of a global temporary table. You use a transient table to store data that you don’t necessarily need forever, but you need between sessions. A transient table is available until it is explicitly dropped, and it’s available to all users who have been given access to the table.
A transient table is exactly the same as a permanent table, but with one key difference – there is no fail-safe period. Once a transient table is dropped, that’s it – it’s gone!
You won’t be surprised to hear you create a transient table using CREATE TRANSIENT TABLE. You can also create transient databases and schemas. Many Snowflake developers build solutions using transient tables as it reduces costs. You should use these tables if you know you can restore the data without Snowflake’s help.
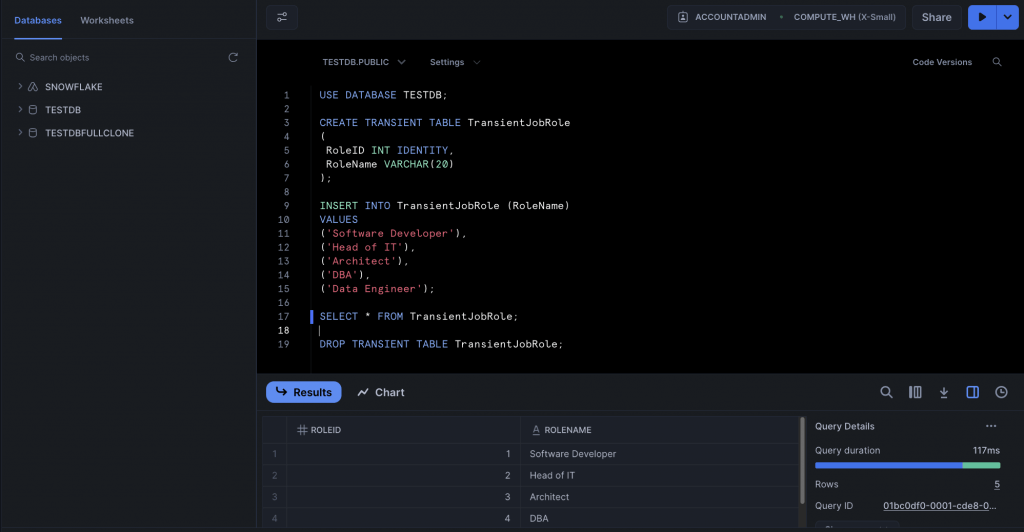
Here's a simple script which creates a transient table.
USE DATABASE TESTDB;


CREATE OR REPLACE TRANSIENT TABLE TransientJobRole
(
 RoleID INT IDENTITY,
 RoleName VARCHAR(20)
);


INSERT INTO TransientJobRole (RoleName)
VALUES
('Software Developer'),
('Head of IT'),
('Architect'),
('DBA'),
('Data Engineer');


SELECT * FROM TransientJobRole;


DROP TABLE TransientJobRole;
And here’s the output from that script, without executing the DROP TABLE command.
You can create a transient table as a clone of a permanent table. If you do this, the transient table doesn’t utilise any storage, as it points at the data in the permanent table. If any changes are made to the data within the transient table, these changes are maintained in separate micro-partitions – there is no effect on the data in the permanent table. What if you delete the permanent table before the transient table? Not a problem, Snowflake will maintain the data for the transient table until that table is dropped. You can even create clones of the clone!
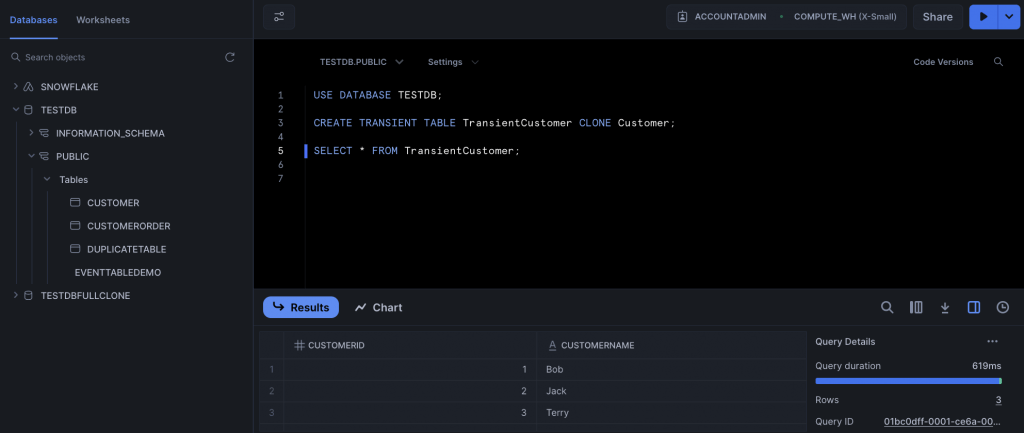
To create a transient clone, you need to use the CLONE keyword in the CREATE TABLE statement, in conjunction with the table name.
CREATE TRANSIENT TABLE TransientCustomer CLONE Customer;
Running a SELECT on this table will return the rows as they existed in the customer table when it was cloned. If you add additional rows to customer, the rows will not be shown when you query the transient version of the table. You would have to drop the transient table and recreate it to access the additional rows.
Permanent, Temporary and Transient Tables Summary
These three tables constitute the main types of table in Snowflake. Here’s a quick rundown of the differences between them.
- Temporary tables only exist for the duration of a user session. Permanent and transient tables exist until they are explicitly dropped
- Permanent tables support Time Travel for up to 90 days (in Enterprise Edition). Only 1 day is supported for temporary and transient tables
- Fail-safe is only supported for permanent tables
External Tables
Now, what could this be? Snowflake would like you to house all of your data in the platform, but you may not necessarily want to drop all of your data into Snowflake. If you’re holding information in Azure, AWS, GCP or some other cloud platform, you’re unlikely to want to pay twice for data storage. Snowflake gives you a nice little workaround with external tables. An external table points at the data in the external location, which means it’s read-only. You can use external tables in joins and queries, and you can create views against them too. You can also create a materialized view to improve performance, although this obviously carries a storage cost.
Before creating the external table, you have to create an external stage, which points at the files you want to access via the external table. You can then create the table and query it. External tables is a pretty deep subject, so we’ll give it an article all of its own in an upcoming stairway step!
Apache Iceberg Tables
Another area which will require its own stairway step! Back in the 2000s and even well into the 2010s, it was possible for data professionals to specialise in just one platform and have a good career. Now you need to be aware of and have some knowledge of a plethora of systems, languages and components. Apache Iceberg is one such component. It’s an open source table format, used for analytics. If you have existing data or delta lakes in cloud systems outside of Snowflake, you can create an Iceberg table within Snowflake to access those data. This sounds a little similar to external tables, but Apache Iceberg tables offer many more features than files. They support ACID and offer an abstraction layer over a set of files. Snowflake supports Iceberg tables which utilise Parquet files.
There are a number of steps involved in connecting up Apache Iceberg tables in Snowflake.
- Configure data storage and Apache Iceberg tables outside of Snowflake.
- Create an external volume within Snowflake, which connects securely to your external cloud Iceberg tables. This volume can support multiple Iceberg tables.
- Create a catalog integration, if needed. This connects Snowflake to an external Iceberg catalog. You must use a catalog integration if your Iceberg tables are managed by AWS Glue. Alternatively, you can use Snowflake as the catalog.
- Create the Iceberg table.
Iceberg tables can be used just like any other table. You can query the table and modify data within the table. The point of Snowflake is to allow you to avoid data silos, allowing all of your data to be queried from within Snowflake. However, it’s clear most customers do not want to pay multiple times to store the same data, which is why the system allows you to create external links to data like this.
Hybrid Tables
Snowflake is primarily an OLAP platform, but it does offer transactional features. And Hybrid tables is one such feature, being a table that is optimised for transactional and analytic queries. For the developer, there is no difference when it comes to using hybrid tables in queries – you just write the query as you normally would, and Snowflake does the rest. You can join hybrid tables to other table types and transactions also work seamlessly.
I said there are no noticeable differences when querying hybrid tables – but there are quite a few unique things to be aware of behind the scenes!
- A hybrid table must have a primary key
- Secondary indexes can be created on any column
- Locks are held at the row level
You create a hybrid table using the rather obviously named CREATE HYBRID TABLE statement. These are worth playing about with, especially if your queries are going to return small numbers of rows – this is exactly the kind of scenario hybrid tables exist for.
Earlier, we saw a transient table which held job roles. This kind of lookup table is ideal for hybrid tables, as you can see in the script below. You’ll note the script is almost identical to the transient table script, essentially the word “transient” has been substituted with the word “hybrid”! It’s all about how things work behind the scenes, we’ll delve into the more technical aspects as this stairway progresses.
There is one key difference – RoleID has been declared as a primary key. Remember, a hybrid table must have a primary key.
USE DATABASE TESTDB;
CREATE OR REPLACE HYBRID TABLE HybridJobRole
(
RoleID INT IDENTITY PRIMARY KEY,
RoleName VARCHAR(20)
);
INSERT INTO HybridJobRole (RoleName)
VALUES
('Software Developer'),
('Head of IT'),
('Architect'),
('DBA'),
('Data Engineer');
SELECT * FROM HybridJobRole;
DROP TABLE HybridJobRole;Directory Tables
The directory table is an interesting concept. They are principally used to query unstructured data. If you ever wanted to pull a directory listing out of SQL Server in the old days, you had to use .NETCLR or enable xp_cmdshell. It’s not that complicated with Snowflake – you just create a directory table against a stage, and you’re good to go!
Directory tables don’t exist as physical objects. You begin by creating a stage. We briefly touched on stages when discussing external tables. Snowflake supports internal and external stages. A stage points at a location containing files, and we’ll definitely be delving into them later in this stairway (we’ll introduce them in the very next stairway step, in fact!). When the stage is created, you can use the DIRECTORY parameter to enable the directory table. This makes the stage queryable. Here’s a sample SQL script, which creates a directory table-enabled stage for CSV files.
USE DATABASE TestDB;

CREATE OR REPLACE FILE FORMAT CsvFormat
TYPE = CSV;

CREATE OR REPLACE STAGE TestStage
DIRECTORY = (ENABLE = TRUE AUTO_REFRESH = TRUE)
FILE_FORMAT = CsvFormat;
You’re not just limited to CSV – stages support JSON, AVRO, ORC, Parquet, XML and custom file formats.
The AUTO_REFRESH clause is key – you always need to refresh a stage whenever any file is uploaded to it. You can also refresh manually:
ALTER STAGE TestStage REFRESH;
If you don’t refresh, querying the directory table will not include the files you’ve uploaded.
Once the directory table is enabled and refreshed with data, you can write SELECT statements against the stage to retrieve metadata about the files in the stage, such as file name, date created and so on. You can also create views over the directory table. You can even filter on the fields, such as file size. You have to use a special syntax to query a directory table.
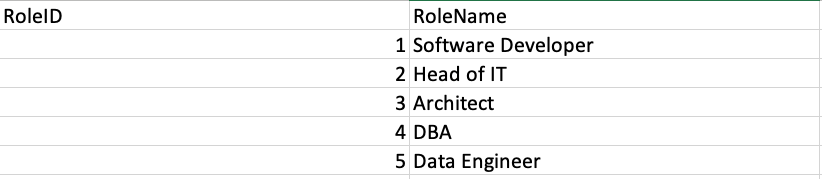
Of course, it’s no good querying a stage unless it contains some data. Here’s a CSV file, containing the job roles we used earlier.
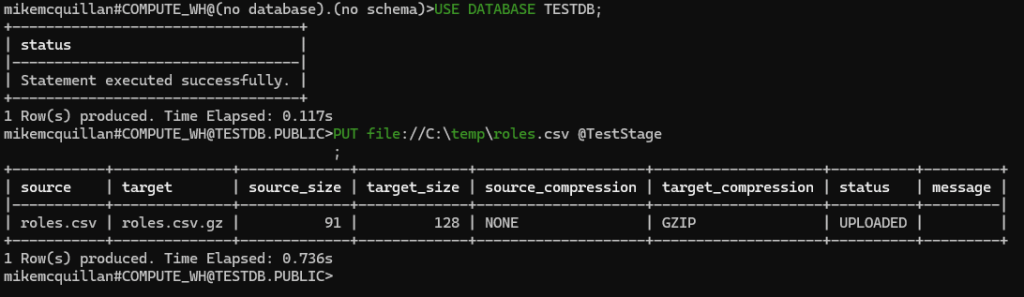
To upload this file, we need to use the SnowSQL client. Assuming you have a file called roles.csv (which is attached to this article) in a folder called C:\Temp, you can upload the file to the stage like so (make sure you run these statements in SnowSQL):
USE DATABASE TESTDB; PUT FILE://C:\temp\roles.csv @TestStage;
Here’s a successful effort to upload this file:
And you can then use the LIST command in Snowsight, to ensure the file is available in the stage:
LIST @TestStage;
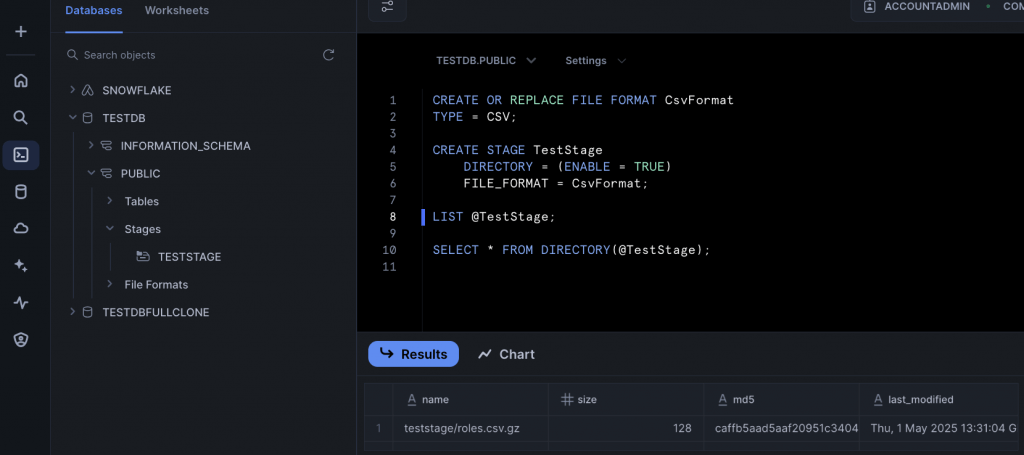
And finally, we can now query the directory table.
SELECT * FROM DIRECTORY(@TestStage);

You can create a view over a directory table if you want to hide the special syntax. You can also use directory tables in joins and queries, like any other table.
Event Tables
You might think event tables were something to do with streaming, but no! This is where you can query the telemetry data Snowflake generates – in other words, logging. Yes, this is a great debugging tool. Snowflake automatically creates a default event table, but you can create your own if you wish. Collecting telemetry has a cost, so you need to enable this option if you want to use it. The default telemetry table is called SNOWFLAKE.TELEMETRY.EVENTS, and there is also a view called SNOWFLAKE.TELEMETRY.EVENTS_VIEW. If you want to create your own event table, you can use something like this:
CREATE EVENT TABLE TestDB.Public.EventTableName;
To make this active, use:
ALTER ACCOUNT SET EVENT_TABLE = TestDB.Public.EventTableName;
If you want to use the default table, you can run:
ALTER ACCOUNT SET EVENT_TABLE = snowflake.telemetry.events;
To deactivate events, you can type:
ALTER ACCOUNT UNSET EVENT_TABLE;
When you create stored procedures and user-defined functions, you can output telemetry from them and the logs will end up in your specified event table. This is useful if you need to check the values of variables or check the logic of your code whilst you’re debugging. This is quite a big subject, so keep your eyes peeled for a dedicated stairway step all about event tables at a SQL Server Web site near you soon! But to whet your appetite, here’s a quick script to demonstrate how things work, using the default event table.
USE DATABASE TestDB;
ALTER ACCOUNT SET EVENT_TABLE = snowflake.telemetry.events;
ALTER ACCOUNT SET LOG_LEVEL = INFO;
ALTER ACCOUNT SET TRACE_LEVEL = ON_EVENT;
CREATE OR REPLACE PROCEDURE SimpleSP()
RETURNS STRING NOT NULL
LANGUAGE JAVASCRIPT
AS
$$
snowflake.log("info", "Running SimpleSP.");
return 'Hello, this is a simple SP in Snowflake.';
$$
;
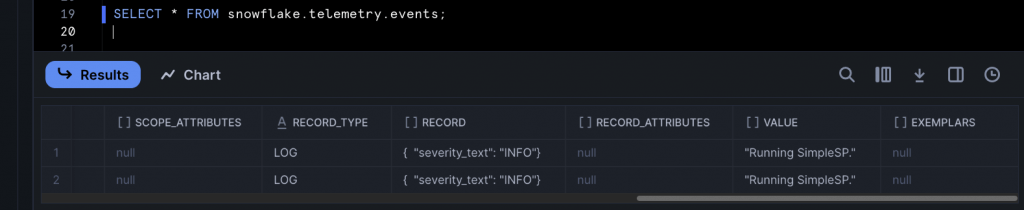
CALL SimpleSP();
SELECT * FROM snowflake.telemetry.events;The CALL SimpleSP() statement will execute the snowflake.log line as part of the SP, causing a logging line to appear in the event table.
Dynamic Tables
Wow, Snowflake really does have a lot of table types, doesn’t it? You’ll be thrilled to know this is the last one we’re going to discuss. Dynamic tables are used to transform data on a fixed interval, or lag. They are one of the many options Snowflake provides when it comes to transforming data in a pipeline. The dynamic table is created based upon a query, much like a view. A lag interval is specified as part of the CREATE DYNAMIC TABLE statement, and the dynamic table is then updated at regular intervals, based upon the target lag value. You may have surmised that a dynamic table is really a special type of materialized view.
Dynamic tables utilise compute resources, so the shorter the lag interval, the higher the compute cost, as Snowflake will run the query more often.
Change tracking must be enabled on the tables used by the event table. If change tracking isn’t enabled on any of the tables used in the query when you create the dynamic table, Snowflake will attempt to enable it. If you recreate an object upon which the dynamic table depends, you’ll need to turn change tracking on again for that object.
We’ll take a proper look at dynamic tables in the future, but for now here’s a SQL example which will create a dynamic table that is updated every forty minutes.
CREATE OR REPLACE DYNAMIC TABLE DYNAMICTABLEXAMPLE TARGET_LAG = ’40 minutes’ WAREHOUSE = targetwh REFRESH_MODE = auto INITIALIZE = on_create AS SELECT C.CustomerID, C.CustomerName, CO.OrderId FROM Customer C INNER JOIN CustomerOrder CO ON C.CustomerID = CO.CustomerID;
In this example, the dynamic table will be initialised with data as soon as it is created. You can choose to schedule this instead. Three refresh modes are supported. INCREMENTAL attempts to update just the data that changed since the last refresh. FULL enforces a complete refresh, whilst AUTO will attempt an incremental refresh first, but will switch to a full refresh if the incremental refresh cannot be completed.
Summary
Snowflake offers a huge variety of table types, something to cover your every need. Have a play around, and we’ll take a look at some of these table types in more depth in future stairway steps. We’ll do this in the very next step, as we take a deeper look at external tables.