

To conclude this short series of articles, I would like to extend the techniques which I described in the last two articles, ("Add styles to your Reporting Services reports" and "Centralising Reporting Services stylesheets using Custom Assemblies and reference data tables") by showing you how to:
1. Create and use report templates which contain predefined elements such as:
- Headers
- Footers
- Logos
- Stylesheet links (custom assembly references)
2. Manage extensive style libraries in a corporate setting
3. Store Logos and other images in a centrally accessible database table.
This way you will have an arsenal of tricks and techniques at your fingertips to increase your productivity and ensure a uniform presentation for your Reporting Services reports.
Using report templates
In enterprise reporting most reports will be based on a standardised format, with predefined corporate logo, header and footer presentation and of course a colour palette and specific font families, amongst other things.
Fortunately Reporting Services allows for the creation of standard templates as a basis for report creation. These templates are simply customised reports that you store in a specific directory, and which you specify as the model when creating a new report.
Of course, templates have been around for nearly five years now, and are nothing new in themselves. However when they contain all the necessary stylesheet references as well as links to graphic elements, then they start living up to their potential more fully. Essentially everything that I described in the previous two articles is already in place to minimise the time that you spend formatting and reformatting reports.
What you must remember is that the templates are not interactive – that is if you change a template, it will have no effect on reports which are based on it, except for the dynamically defined styles. So you really need to define your templates as early as possible in the report specification and creation process as you can, if you want to gain as much time and waste as little effort as possible.
This approach is best described with a simple example. Points 2 & 3 are the important ones.
1. Open BIDS, and create a new report. Add all the elements which make up the corporate look and feel of your report. Remember that this can include:
a. Report size
b. Logo(s)
c. Header & footer elements such as: Page numbering, print date, user name.
2. Assuming that you are going to use a database-driven stylesheet, add a reference to the custom assembly "DynamicStyleLibrary" described in the previous article.
3. Set all stylistic attributes using variable references, based on the following code:= DynamicStyleLibrary.DataDrivenStyleLibrary.dbStyle ("Header", "Color"). Of course, you will have to use your own style attribute name, and style type definition.
4. Save the report file using a suitably descriptive name. In this example I chose "CalidraTemplateList.rdl".
5. Copy the file that you just created from its current directory to the template directory (this is usually: C:\Program Files\Microsoft Visual Studio 8\Common7\IDE\PrivateAssemblies\ProjectItems\ReportProject).
Finally, you can create a new report based on the template. To do this:
1. In BIDS, right-click on "Reports" and select "Add New Item". The Add New Item dialog will appear.

2. Click on the report template which will serve as a model for your new report.
3. Change the name suggested by Reporting Services, and click "Add".
Your new report now has all the attributes of the template, including styles and corporate look and feel.
In my case, my template file looked like this:

And every new report based on this template was a copy of this file, with all styles set, ready for customisation.
If you cannot find the folder for your templates, search for a file called "Report.Rdl". This file should be in the templates folder.
Corporate Style Management
The following are a simple set of guidelines to use these styling techniques in a corporate report production environment.
Report Families
Frequently, you will need different report formats to handle different report types (by department as well as by content, for instance "ExecutiveSummary", "Accounting", "Marketing"). It can help to define a report matrix, specifying which department needs which type of report. Then you can build, for instance, an initial report template for the sales department, get it approved (this is the hard bit), and then base all the remaining templates for the sales department on this particular template, thus ensuring visual conformity across the range of reports.
Style management
I strongly advise that you use one stylesheet (Custom Assembly) per style of report (if defining attributes in a Custom Assembly), as this is considerably easier to manage than having one repository for all style definitions for all reports. One code base for corporate reporting can grow to unmanageable proportions very quickly.
Conversely, if you are basing your style definitions on a database, then adding an extra field to the Sys_ReportStyles table described in the previous article to categorise style families can be very helpful. For instance, extend the table with the following code snippet:
ALTER TABLE [dbo].[Sys_ReportStyles]
ADD
     [StyleFamily] [nvarchar](50) NULL
Then add the relevant family descriptor to each style definition – "ExecutiveSummary", "Accounting", "Marketing" etc…, to use the analogy cited above.
To use this new management attribute, you will need to extend the code in thedbStylefunction given in the previous article to handle a new filter parameter.
Imports System.Data
Imports System.Data.SqlClient
Public Class DataDrivenStyleLibrary
    Public Shared Function dbStyle(ByVal inputStyle As String, ByVal InputStyleType As String, ByVal InputStyleFamily As String) As String
        ' Declare and initialise any variables
        Dim sStyle As String
        Dim MyConnection As SqlConnection
        sStyle = ""
        ' Set up the command and connection objects
        MyConnection = New SqlConnection("server=localhost;uid=USERNAME;pwd=PASSWORD;database=RSStyles")
        Dim cmd As New SqlCommand
        cmd.Connection = MyConnection
        ' Open the connection
        cmd.Connection.Open()
        ' Set the command to use the stored procedure
        cmd.CommandType = CommandType.StoredProcedure
        cmd.CommandText = "pr_GetStyle"
        ' Add any parameters
        cmd.Parameters.Add(New SqlClient.SqlParameter("@StyleType", SqlDbType.VarChar, 50, ParameterDirection.Input))
        cmd.Parameters("@StyleType").Value = InputStyleType
        cmd.Parameters.Add(New SqlClient.SqlParameter("@StyleFamily", SqlDbType.VarChar, 50, ParameterDirection.Input))
        cmd.Parameters("@StyleFamily").Value = InputStyleFamily
        ' Read the data, and get the required value
        Dim ddlValues As SqlDataReader
        ddlValues = cmd.ExecuteReader()
        While ddlValues.Read
            If UCase(ddlValues.GetString(0)) = UCase(inputStyle) Then
                sStyle = ddlValues.GetString(1)
                Exit While
            End If
        End While
        'Close any open connections
        cmd.Connection.Close()
        ' return the selected value to the calling proceure
        Return sStyle
    End Function
End Class
And the stored procedure will now be:
ALTER PROCEDURE [dbo].[pr_GetStyle]
(
@StyleType VARCHAR(50),
@StyleFamily VARCHAR(50)
)
AS
SELECT    StyleCode, StyleDefinition
FROM Sys_ReportStyles
WHERE     StyleType = @StyleType
          AND StyleFamily = @StyleFamily
… Not forgetting to modify the calling code in your reports to:
= DataDrivenStyleLibrary.dbStyle ("Header", "Color", "Marketing")Team use
Of course, this is a personal development tool for the moment. You will need to store the .Rdl and .Dll files in a network share & inform report developers to copy them to the directories given in this, and the previous articles and to use them! Note that the directory you use to store the custom assembly dll in must be available on all developer machines, or better still, in a network share, so choose where to store it before adding the external reference wisely!
Image Management
As well as styles, images that you will use frequently (corporate logos for instance) can also be managed centrally, either by making them available via an intranet or internet web server (which I am presuming does not require any explanation) or by storing tem in a database. It is this latter approach that I will now describe, as it extends the paradigm that is used by database-driven styles management.
There is, unfortunately, one very large caveat to this technique – images stored in a database cannot be used in the report header or footer! These, unfortunately will have to be accessed as images stored on a web server, and accessed using a URL.
So, assuming that you will be using certain images in the body of a report, first you will need a table to hold any frequently used images. The following T_SQL snippet will create a simple table. Once again, place this in any database which is accessible to Reporting Services.
CREATE TABLE [dbo].[Sys_ReportImages](
     [ID] [int] IDENTITY(1,1) NOT NULL,
     [ImageName] [nvarchar](50) NULL,
     [ImageFile] [varbinary](max) NULL
) ON [PRIMARY]
You will then need to add one or more image files to the table. The following code will do this:
INSERT INTO dbo.Sys_ReportImages(
ImageName,
ImageFile
)
SELECT
'CalidraLogo',
(SELECT * FROM OPENROWSET(BULK 'C:\Calidra\ArtWork\CalidraLogoLarge.bmp', SINGLE_BLOB) AS MyDoc )
Of course, you will have to use your own image name and path to the image file.
Once this is done you can add an image to the body of a report as follows:
- Firstly you will need to create a data source which selects the image from the Sys_ReportImages table. Right click on "Shared Data Sources" in the Solution Explorer, and select "Add New Data Source" from the context menu.
- Give the shared data source a suitable name. In this example I have used "ImageDataSet". Enter the connection string to the server containing the Sys_ReportImages table (or click the Edit button to generate the connection string). Click "OK" to confirm the creation of the data source.
- Click on the "Data" tab to select it, and select "New DataSet" from the DataSet popup. Add a Dataset name (I am using ImageDataSet) and enter a query string such as: SELECT ImageFile FROM dbo.Sys_ReportImages WHERE ImageName = 'CalidraLogo'. You will have to use the image name that you used when loading your image file into the data table. You should see a dialog like this:

- Click "OK" to finish creating the dataset.
- Open or create a reporting services report. In the Toolbox, click "Image" and draw the image object on the report body. The following dialog will appear:
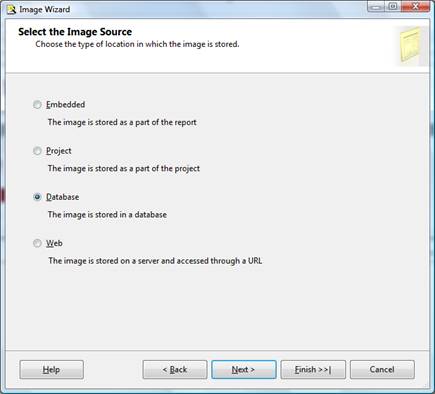
- Select "Database" and click "Next". The following dialog will appear:
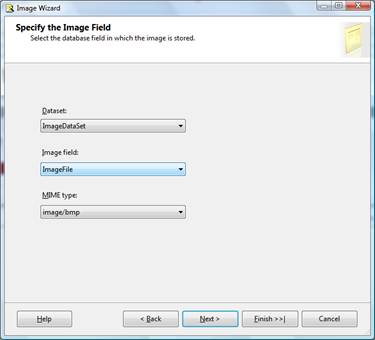
- Select the dataset corresponding to the image.
- Click "Finish" twice.
Note that the image will not appear instead you will see something like this:
![]()
However, when you preview and display the report, the image will be displayed.
It is worth noting that you will have to create a dataset for each image that you wish to add to a report - or a report template – file.
Tips
In a production environment do not forget to add error-trapping code. This has been voluntarily omitted here to simplify the code and make the objectives of the process easier to follow.
Conclusion
These three articles have shown you how to rationalise and manage the presentation attributes of Reporting Services in a choice of simple and efficient ways. You can now centralise the definition of attributes like colour, border thickness and font in an easily manageable – and easily updateable way. You can also define report templates which refer to predefined styles, and contain boilerplate items, and use them when you create new reports.
Happy report programming!
References:
Visual Studio Express can be downloaded from:
http://www.microsoft.com/express/download/default.aspx#webInstall
