

In a previous article I explained how to use Custom Code to create stylesheets for Reporting Services to help report developers gain time and also standardise report presentation. This article will explain how to extend the stylesheet paradigm to centralised style definitions using Custom Assemblies and finally using interactive style definitions stored in SQL Server table which is itself accessed using a Custom Assembly.
Using custom assemblies is more complicated to set up and deploy than embedded code, certainly. However it is an effective way to go beyond the limits of the custom code approach, and create extensive and easy-to-manage stylesheets for Reporting Services which can control virtually all aspects of report formatting.
In these examples I will be using VB.Net, as most of the Reporting Services developers that I know are at ease with this language, as it is the language used for expressions and for embedded code. Of course you may use C# if you prefer (or any .Net language). Also, using VB.Net allows for a smoother transition from the custom code example that I gave in the previous article.
Using a Custom Assembly
To circumvent the limitations of the embedded code approach to stylesheets, let’s create a stylesheet using a Custom Assembly. As you will see, this is more an evolution of the embedded code technique used in the previous article than any form of revolution. It does, however have the following advantages:
§ All code is in a, Dll and so there is no need to copy and paste code between reports.
Then, there are the advantages of being able to use the Visual Studio IDE:
§ The ability to work in a complete development environment, and not in a small code window.
§ A full and powerful debugging environment.
§ Instant compilation of the final Dll.
It is, of course, possible to create and compile the Dll that is the final "stylesheet" using notepad and VBC.Exe, but why suffer? Even if you do not have the Full Visual Studio available, you can always download Visual Studio Express edition, which is sufficient to handle the development of Reporting Services custom assemblies.
Before beginning, let’s be clear about what we intend to produce. The objective is to create a .Net dll containing all the stylesheet elements required to define colour, font and border attributes for Reporting Services reports. Once the dll is created, we will reference it from a Reporting Services report, and deploy the dll so that Reporting Services can use it in production.
So, assuming that you will be using a version of Visual Studio, here is the VB.Net code that can be compiled into an assembly. It is essentially an extended version of the embedded code that I described in the previous article, only this snippet contains several functions, one for each of several attribute types. This code will therefore handle Colour, Font size, font family and border width:
Public Class MainStyleLibrary
    Public Shared Function StyleColor(ByVal Style As String) As String
        Select Case UCase(Style)
            Case "HEADER"
                Return "LightBlue"
            Case "FOOTER"
                Return "SkyBlue"
            Case "MAINTITLE"
                Return "Purple"
            Case "SUBTITLE"
                Return "DarkBlue"
            Case "TABLETITLE"
               Return "DarkBlue"
            Case "TABLETEXT"
                Return "LightBlue"
            Case "TABLEEMPHASIS"
                Return "DarkBlue"
            Case "TABLEALERT"
                Return "Red"
            Case Else
                Return "White"
        End Select
    End Function
    Public Shared Function BorderWeight(ByVal Style As String) As String
        Select Case Style
            Case "MAIN"
                Return "0.75pt"
            Case "HEAVY"
                Return "3pt"
            Case "LIGHT"
                Return "0.5pt"
            Case "MEDIUM"
                Return "1.25pt"
            Case Else
                Return "0pt"
        End Select
    End Function
    Public Shared Function BorderColor(ByVal Style As String) As String
        Select Case Style
            Case "STANDARD"
                Return "Blue"
            Case "EMPHASIS"
                Return "Grey"
            Case "SECONDARY"
                Return "LightBlue"
            Case Else
                Return "White"
        End Select
    End Function
    Public Shared Function FontFamily(ByVal Style As String) As String
        Select Case Style
            Case "STANDARD"
                Return "Arial"
            Case "EMPHASIS"
                Return "Arial Black"
            Case "SECONDARY"
                Return "Times New Roman"
            Case Else
                Return "Arial"
        End Select
    End Function
    Public Shared Function FontSize(ByVal Style As String) As String
        Select Case Style
            Case "STANDARD"
                Return "10pt"
            Case "LARGE"
                Return "14pt"
            Case "XTRALARGE"
                Return "18pt"
            Case "SMALL"
               Return "9pt"
            Case "TINY"
                Return "8pt"
            Case Else
                Return "10pt"
        End Select
    End Function
End Class
Step by Step, this means:
- Launch Visual Studio, and create a new Class Library project. I suggest calling it FixedStyleLibrary.
- Change the name of the .VB file in the Solution Explorer to HardCodedStyleLibrary.vb.
- Paste in the code given above.
- Click Build/Build FixedStyleLibrary.
Unless there are any problems, you should see "Build succeeded" in the Visual Studio status bar, and you should have a dll called FixedStyleLibrary.dllin the bin\debug directory under the file HardCodedStyleLibrary.vb. I will assume that you have created this in a directory called C:\RSStyles.
You now have to:
a) Add a reference to the Dll from the report.
b) Deploy the Dll for reporting services.
c) Alter the colour references to refer to the custom assembly.
a) Add a reference to the Dll from the report
1. To make the styles available to the report by adding a reference to the Dll that you have just created, click Report/Report properties and click the References tab. Then click the ellipse button to the right of "Assembly Name", to open the "Add Reference" dialog, and select the "Browse" tab. Navigate to the directory where you stored the Dll, select it and click "Add". Click "OK" to confirm, and you will see the following dialog:
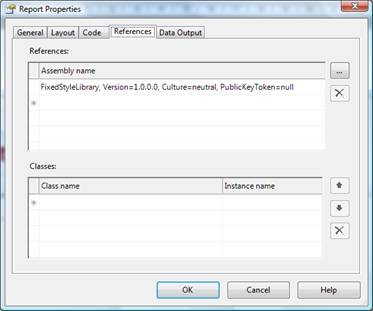
2. Click "OK" to close the dialog.
Note that you will not need to add anything to the "Classes" section of the dialog, as we are using static (or "Shared") members in our Dll.
b) Deploy the Dll for reporting services
1. Copy the file to the two following locations:
- § C:\Program Files\Microsoft Visual Studio 8\Common7\IDE\PrivateAssemblies
- § C:\Program Files\Microsoft SQL Server\MSSQL.3\Reporting Services\ReportServer\Bin
Notes:
The second of these two directories might vary slightly depending on your SQL Server installation, and the number of SQL Server instances. If in doubt, search for the ReportServer folder.
If you are using SQL Server 2008, then the first directory reference will probably be: C:\Program Files\Microsoft Visual Studio 9\Common7\IDE\PrivateAssemblies.
c) Alter the colour references to refer to the custom assembly
To use the "Stylesheet" dll, replace the reference to the style in the embedded code in your report with =FixedStyleLibrary.MainStyleLibrary.StyleColor ("Header"), and preview the report.
You now have a "Stylesheet" in the form of a custom Dll that can be added as a reference to any Reporting Services report. Once this is done, - unlike when using embedded code – you do not have to copy and paste code between .Rdl files if you make any changes to the Dll, as all style mapping is now centralised in the Dll, and always available to all reports containing the reference to it.
The only caveat is that if you make any changes to the style definitions in the VB.Net code, then you have no choice but to recompile the Dll and redeploy it to the directories where it was initially deployed.
Using an SQL Server table with a Custom Assembly
The final extension to the Reporting Services stylesheet process in this article is to make style modification an interactive and instantaneous process. As I noted above, while the major advantage of making a custom assembly act as a stylesheet is that any modification can affect multiple reports without any modification to the reports themselves, the drawback is that deploying a modified custom assembly is laborious, and in any case, hard-coding anything - even something as simple as colour mapping - is not good programming practice.
So here is a final variant on the theme: we will have an SQL Server table that holds the style to attribute definition, and a much simplified custom assembly which will use the data in this table to return information to each Reporting Services report.
What is more, this final approach will categorize styles by the attributes they represent – Colour, size, width etc. Although this is not strictly necessary, if does help you to approach the problem in a more rational way, and makes it easier to manage different attribute types coherently.
First we will need an SQL Server table. You can, of course, place this in any database you choose, or even create a specific database to hold it. Despite the fact that this table is to be used with Reporting Services, I do not advise placing it in either of the two Reporting Services databases ReportServer or ReportServerTempDB. However I do advise placing this table, even if it means creating a database specifically to contain it, on the SQL Server which hosts Reporting Services. This will minimise latency when looking up style data from the database when generating reports.
The table DDL is the following
CREATE TABLE [dbo].[Sys_ReportStyles](
     [ID] [int] IDENTITY(1,1) NOT NULL,
     [StyleType] [nvarchar](50) NULL,
     [StyleCode] [nvarchar](50) NULL,
     [StyleDefinition] [nvarchar](50) NULL,
     [StyleComment] [nvarchar](500) NULL,
     [LastUpdated] DATETIME NULL
) ON [PRIMARY]
You can see that I have added a StyleType field to help categorize styles (after all, colours are not the same as line widths), and a comments field and a LastUpdated field whose use is, I hope, self-evident.
Once the Styles table is created, you will need to add some data. Here is a script to add a few rows:
INSERT INTO dbo.Sys_ReportStyles (StyleType, StyleCode, StyleDefinition, StyleComment)
VALUES('Color','Header','Blue','Main Header colour')
INSERT INTO dbo.Sys_ReportStyles (StyleType, StyleCode, StyleDefinition, StyleComment)
VALUES('Color','Footer','Green','Main Footer colour')
INSERT INTO dbo.Sys_ReportStyles (StyleType, StyleCode, StyleDefinition, StyleComment)
VALUES('Color','BodyText','Black','Text colour')
To simplify the example, we will only add colour styles here. In practice you could add styles for oter attribute types as well.
As a precaution and as the custom assembly will be calling data from a database, I suggest the following simple SQL Server stored procedure to access data from the data table in the custom assembly
CREATE PROCEDURE [dbo].[pr_GetStyle]
(
@StyleType VARCHAR(50)
)
AS
SELECT    StyleCode, StyleDefinition
FROM Sys_ReportStyles
WHERE     StyleType = @StyleType
Now for the custom assembly. The code is extremely simple, and let’s assume that you have created a Visual Studio project named DynamicStyleLibrary, and a VB.Net file named DataStyleLibrary.vb, into which you paste the following code snippet:
Imports System.Data
Imports System.Data.SqlClient
Public Class DataDrivenStyleLibrary
    Public Shared Function dbStyle(ByVal inputStyle As String, ByVal InputStyleType As String) As String
        ' Declare and initialise any variables
        Dim sStyle As String
        Dim MyConnection As SqlConnection
        sStyle = ""
        ' Set up the command and connection objects
        MyConnection = New SqlConnection("server=localhost;uid=USERNAME;pwd=PASSWORD;database=RSStyles")
        Dim cmd As New SqlCommand
        cmd.Connection = MyConnection
        ' Open the connection
        cmd.Connection.Open()
        ' Set the command to use the stored procedure
        cmd.CommandType = CommandType.StoredProcedure
        cmd.CommandText = "pr_GetStyle"
        ' Add any parameters
        cmd.Parameters.Add(New SqlClient.SqlParameter("@StyleType", SqlDbType.VarChar, 50, ParameterDirection.Input))
        cmd.Parameters("@StyleType").Value = InputStyleType
        ' Read the data, and get the required value
        Dim ddlValues As SqlDataReader
        ddlValues = cmd.ExecuteReader()
        While ddlValues.Read
            If UCase(ddlValues.GetString(0)) = UCase(inputStyle) Then
                sStyle = ddlValues.GetString(1)
                Exit While
            End If
        End While
        'Close any open connections
        cmd.Connection.Close()
        ' return the selected value to the calling proceure
        Return sStyle
    End Function
End Class
Of course, you will have to replace the database name, user name and password with your own elements – and add a reference to System.Data, by right-clicking the project name (in the Solution Explorer window) and selecting "Add reference" from the shortcut menu, then selecting "System.Data" from the .NET list of available references.
The points to note in this function are:
- The StyleType is now part of the function. This obviates the need for multiple functions, and allows you to use identical names for different aspects of a style. For example, you can have a style named "Header" for Colour, LineThickness and FontSize If you wish. This allows you to group styles that you are likely to use together under the same name, and so avoid memorising an excessive number of style names.
- The function that you use in Reporting Services must contain the StyleType too.
- This function could avoid looping through the data returned, and use the StyleType along with the StyleName to return a scalar value using ExecuteScalar if you prefer. The choice is yours as to how you want to call data from the database.
- The connection string is hard-coded. I am presuming that Reporting Services servers are not going to change too often, and this way all the code is self-contained, without external dependencies.
And that is all! These few lines of code will select the style name and style definition from the data table, and return the appropriate value to the Reporting Services report. There are no changes in the way that data is returned to Reporting Services, except that the procedure and/or assembly name might be different, and the StyleType is now added to the function. So in the case of the example given above, the expression used in Reporting Services to apply a colour would be:
=DynamicStyleLibrary.DataDrivenStyleLibrary.dbStyle ("Header", "Color")The second parameter specifies the type of attribute that you wish to return from the data table.
You can add multiple references to several different custom assemblies if you wish, but I strongly recommend using a single assembly with all your styles (or a single assembly with a database link). It will make report creation and management much easier.
The advantage here is that any change to the style definition – or any further styles added to the collection of styles that are in the data table will be available immediately to Reporting Services. So you have the best of all worlds:
- § Centralised style management
- § Instantaneous updating
- § Little or no deployment hassle.
It is true that report generation can be fractionally slower using this technique, but most users will not be able to tell the difference, and if you are using cached reports or snapshots then the performance hit will be even less frequent in any case.
Tips
The following can help when updating the "stylesheet" Dll: Create a Cmd file to compile & deploy the Dll. For instance, consider the following code
vbc /target:library /out: C:\RSStyles\DynamicStyleLibrary.dll C:\RSStyles\DataStyleLibrary.vb
COPY C:\RSStyles\DynamicStyleLibrary.dll "C:\Program Files\Microsoft Visual Studio 8\Common7\IDE"
COPY C:\RSStyles\DynamicStyleLibrary.dll "C:\Program Files\Microsoft SQL Server\MSSQL.3\Reporting Services\ReportServer\Bin"
This will compile the Dll and distribute it automatically.
Here I am assuming that VBC.exe is in your computers PATH, otherwise you will need to add the requisite path to the command file.
It is worth noting that embedded code and references to custom assemblies can coexist in the same report file. However I find it easier to stick to one approach or the other, as it makes styling and debugging reports a whole lot easier.
It is easier, I find, to house each VB.Net file (each "Stylesheet") in a separate project, as this will avoid compiling every file into a single Dll, with all the risks of name conflicts that can ensue.
It is easy to get lost in all the names of projects, files and classes, so remember:
- The .vb file name is irrelevant
- The style is applied using =DLLName.ClassName.FunctionName (or NamespaceName.ClassName.FunctionName if you used C# to make the Dll).
Conclusion
You have now seen how to centralise style definitions for reporting services reports in a simple yet manageable way. Style definitions can even be instantaneously updated in reports by storing them in a database table – and applied instantaneously to a whole group of reports. The next (and final) article in this series will explain how to add stylesheets to Reporting Services templates, and more generally how to use these, and other, techniques to enhance corporate report production.
