

In this blogpost we will see the step by step installation and few details about SQL Server 2019.
For SQL Server 2019 Installation, We have following System Requirements
- SQL Server 2019 setup
- A computer / Server that has a 1.4 GHz or faster x64 processor (2 GHz recommended)
- 1 GB of memory (4 GB recommended)
- 6 GB of available hard-disk space
- Super VGA 800 x 600 or higher resolution display
- Internet connection to download software, as described in applicable chapters.
- Depending on your Windows configuration, you might require local administrator rights to install or configure SQL Server 2019 and related products.
For SQL Server 2019 installation its assumed that you have SQL Server 2019 setup downloaded and extracted
Navigate to the Install location and click on ‘SETUP’ application file.
This will bring ‘SQL Server Installation Center‘ window.

Choose New SQL stand-alone installation option from Installation Page.

AT the start of Installation Product edition will be asked
As of now 5 editions are available
- Express is a free edition for use. The functionality is quite limited, the most tangible limitation of the Express version is the maximum base size of 10 GB. This edition is suitable for small projects such as student work or SQL/T-SQL learning.
- Standard is a full-fledged paid edition, but many functions still do not. The maximum amount of RAM that SQL Server can use is 128 GB, and there are no AlwaysOn accessibility groups or other components. Standard is designed for applications in small organizations.
- Enterprise includes all possible functions and components, there are no limitations. Enterprise edition is usually used by large corporations or companies that need the functionality of this version.
- Developer edition as well as Enterprise edition has no limitations and can be used for free, but it can be used only for application development and testing.
- Web edition is almost the same as standard, except for stronger limitations in functionality and correspondingly lower licensing costs.
And for evaluation purpose another license is available called as evaluation which will be available for 180 Days and used for evaluation purpose of SQL feature.
If you are selecting the paid version than you have to enter the product key.

Next will be SQL Server 2019 Setup window where navigate to Product Updates and click Next.
Accept the license terms and conditions. Please note the message written here that SQL Server
Transmits information about installation experience in performance data to Microsoft to help improve the product.

After Product Updates next will be Install Rules.
it checks for the Global rules and give status information about successful, failed rules. If there are any failed rules, we need to fix those before proceeding with the installation.

select the features, we need to install with this installation.

In this next page we have to decide about the Name of SQL server we can give our preferred name to instance or we can use Default instance.
If its second installation on same server and first one is already default then we have to give name for the second instance.

you can specify service account to use for SQL Server services. Let us move with the default service account and collation. We can change service accounts later from SQL Server configuration manager.

Check properly about Collation and use proper collation based on application requirement.

Next will be Database Engine Configuration where the Authentication mode can be selected. SQL Server 2019 offers two types of Authentication Mode – Windows authentication mode or Mixed Mode
You also have to Specify sql server administrator account. You can select the current account which is used for installation.

Click on Data Directories and we can specify the data, log files, backup directories here.
You can mention their directories in a different drive.
Ideally , there should be different drive/ directories should be used for MDF, LDF, and backup and Temp DB.

Click on TempDB to configure the TempDB configurations.
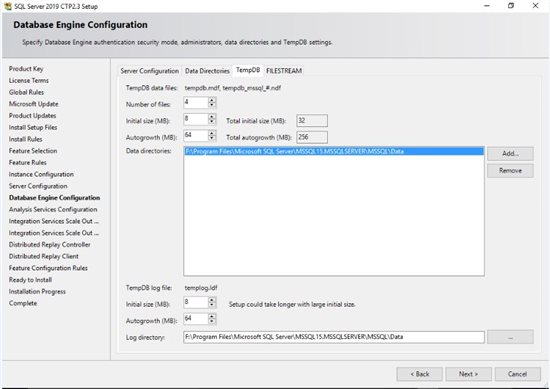
If we want to enable Filestream, enable this option else to leave and click on Next.

Select Settings for SSAS in next Page


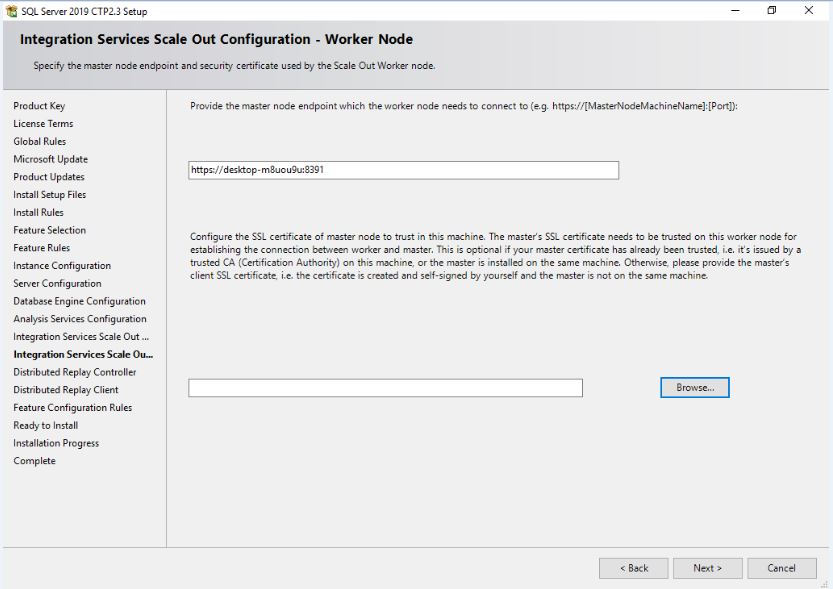
Next select Config for Integration Services.
make sure that 8391 port should open or you can give a different port

Specify the Controller name, And user who has permission for Distribution Replay Controller


Once this all completed in next screen we will be able to see all this configuration we have option to show this in file different location also for future use.
Click Install on this page

After Successful installation we will be greeted with below screen which will ask us to reboot the Server.
