

It used to be that the only way to use SQL Server Management Studio (SSMS) against Azure SQL Database Managed Instance (SQLMI) was to create a VM on the same VNET as SQLMI and use SSMS on that VM. That VM was usually called a jumpbox (see instructions here).
But about a year ago Microsoft added a way to use SSMS without using a VNET (announcement) by allowing you to enable a public endpoint for your SQLMI. This made it easy for me to access a SQLMI database on my laptop.
I am posting this blog because I found a lot of people don’t know this (it’s not mentioned under “Quick start” when you are in the Azure portal for the SQL managed instance). Plus there are a couple of quirks to be aware of to get it to work.
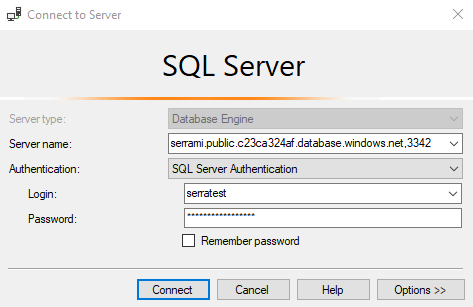
The directions to set this up are at Configure public endpoint in Azure SQL Database managed instance. The part easily missed is at the end where the article explains the connection string. This is where you will find the server name to use in SSMS to login to your SQLMI database. It will look like serrami.public.c23ca324af.database.windows.net,3342. Notice the “public” in the name and the “,3342” at the end.
When you created your Azure SQL Database Managed Instance, you where prompted to create an admin login and password, as the screenshot below shows. This info will also be used to login via SSMS.

So, to login via SSMS, gather the server name and admin login/password mentioned above, choose to connect to a database engine in SSMS, and then you will enter that info into the connection screen similar to the one below, using SQL Server Authentication. Again, note the “public” in the server name and the “,3342” at the end of the server name:
The result is you connect to SQLMI without a VNET. Hope this helps!

![]()