

Flat files are frequently used to transfer data from one system to the other. In most cases, it’s ideal to load the flat files into staging tables before processing them into destination tables. In a previous article, we saw a design pattern to load delimited flat files. Another flavor of flat files is fixed width in which the columns are defined by a fixed width (or number of positions).
In this article, I’ll provide a design pattern and demonstrate an SSIS package that loads delimited flat files to staging tables.
Design Pattern
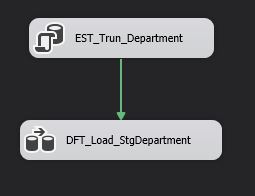
The following diagram shows the design pattern used to load flat files to staging tables. Each of these steps is described below.
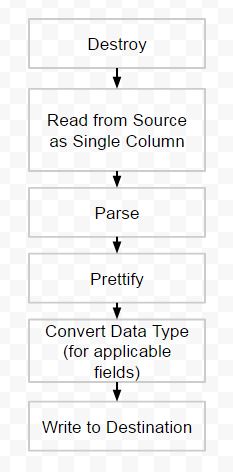
Destroy
The first step is to remove any existing data from the staging table that has already been loaded in the destination. This ensures that we begin from scratch each time without the risk of reprocessing the same data and possibly duplicating it.
Read Flat File Source
The next step is to read the source flat file. SSIS provides an option to consume fixed width files. You simply have to select Fixed Width or Ragged Right as the Format in the Flat File Connection Manager editor and configure the columns using the fixed positions. SSIS will then parse columns while reading the flat file. This is also called parsing at the source. However, I find the GUI where you configure the columns to be unfriendly. It might take a couple of attempts to scroll left or right and find the correct column position when there are hundreds of columns.
I demonstrate an alternative to the usual parsing at the source in this article. You read the source flat file as a single column. Then you introduce transformations to parse columns after they are read from the source. This is called parsing in the data flow.
Note that this is my preference. I'm not suggesting that you change your existing packages. Both methods work similarly behind the scenes. Instead of parsing at the source, SSIS reads the rows as if there was only one column into its own buffers and will parse columns using a derived column transformation. In almost all cases, parsing in the data flow pefroms better than parsing at the source, if not at the same performance level.
Prettify
Since the columns are fixed in length, you’ll have trailing spaces if the data length of a column value is less than the fixed length. For example, imagine that the column width is 10 and the value is a 3 character string such as ‘ABC’. In the file it is stored as ‘ABC ‘, using the full 10 characters with trailing spaces at the end. SSIS reads this field as it is in the file while loading to the table.
Moreover, if the value is unknown or unavailable you’ll see a blank string, such as ‘ ‘. It is often better to convert these blanks to NULL. You can off course load the blank value to database column without any transformations, and I think it's again my preference to convert it to NULL. However, if the blank values have any meaning in your data, then I suggest loading it as it is without changing anything.
Convert Data Type
At this point everything in a flat file is a string, even if it’s non-string data. So, for example, if a field is a 6 character number, you’d need 8 bytes to store this numeric field as a string using VARCHAR(6) data type (one byte for each character plus 2 bytes for overhead, according to Books Online). Instead, if you convert it to an INT data type, you’d need only 4 bytes. It’s better to convert non-string data and use appropriate data types in the staging table. You can also consider converting between non-Unicode and Unicode to use VARCHAR instead of NVARCHAR in SQL Server.
Write to Destination
Lastly, you write data to the staging table in the destination. Notice that I'm not using transactions or error handling. The reason is this: any error will cause package execution to stop. Then you fix the error data and rerun the package. The package will then truncate existing data in the first step and attempt to reload everything.
In some situations, when an error occurs, you may want to capture the error rows and process the good rows without failing the package. This can be achieved by configuring an error output, which is beyond the scope of this article.
Setup
If you’d like to follow along with this demonstration, create a flat file named Department.txt with the contents shown in the image below and save it to your local directory. This sample flat file along with the SSIS package we'll create later can be downloaded from the Resources section at the end of this article.

This file is a fixed width file without any header information in the first row. Unlike in a delimited file where columns are separated using a delimiter, columns in a fixed width file always have a fixed number of positions. For example, the above sample file has four columns. The first, second, third, and fourth columns always begin at positions 1, 7, 57, and 107.
Make a note of the path as you’ll need it later in the SSIS package. I saved my text file in C:\temp_store\ssis\Department.txt.
Use the following T-SQL to create a new database, SSISPatterns, and a staging table named dbo.stgDepartment in that database.
USE master;

GO

IF EXISTS ( SELECT  *
            FROM    sys.sysdatabases AS s
            WHERE   s.name = 'SSISPatterns' )
    PRINT 'Database SSISPatterns already exists.';
ELSE
    BEGIN
        PRINT 'Creating SSISPatterns Database...';
        CREATE DATABASE SSISPatterns;
        PRINT 'Database SSISPatterns created successfuly.';
    END;
GO

USE SSISPatterns;
GO
IF EXISTS ( SELECT  *
            FROM    sys.tables AS t
            WHERE   t.name = 'stgDepartment' )
    DROP TABLE dbo.StgDepartment;
GO
CREATE TABLE dbo.StgDepartment
    (
      DepartmentID INT NULL ,
      Name VARCHAR(50) NULL ,
      GroupName VARCHAR(50) NULL ,
      ModifiedDate DATETIME NULL
    );
Note that I’ve excluded some house-keeping columns from the staging table that are typically used for logging and auditing purposes for this demonstration.
Creating the SSIS Package
Now that we have completed our setup steps, we are ready to create the SSIS package. First, open SQL Server Data Tools (SSDT-BI), and rename the package that already exists to StageDepartment.dtsx.
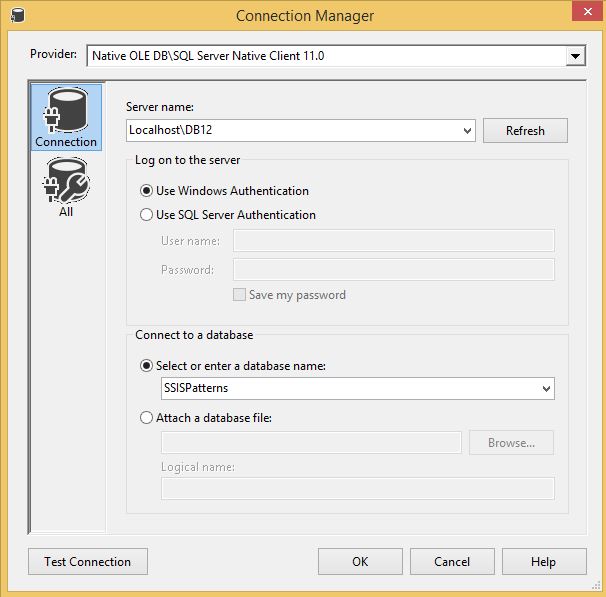
Then create two connection managers. The first one is an OLE DB Connection pointing to the SSISPatterns database we created in the setup process. To do this, right-click in the connection managers window, and select New OLE DB Connection. Then in the Configure OLE DB Connection Manager window, click New, and specify the server and database names as shown below. Lastly, rename the OLE DB Connection to OLEDST_SSISPatterns.
The second connection is a Flat File connection pointing to the Department.txt we created earlier. To create the Flat File connection manager, again right click in the connection managers window, and select New Flat File Connection. This opens the Flat File Connection Manager Editor. In the general page of the editor, give a name for the connection manager, specify the file and it’s properties.
Remember, we want to read contents of the file as a single column without using the fixed width positions that define individual columns. We’ll parse columns in the next steps. So, select Delimited as the Format property, and since the file don’t have a header, leave Columns in the first data row check box unchecked. The General tab after configuring all properties is shown below.

In the columns tab, by default, you should see Comma {,} as the Column delimiter. Since our file doesn’t actually contain any delimiter, select the text Comma {,} and hit backspace on your keyboard to remove it. The columns page after you’re done should appear as shown below.

Notice that there is only column labelled Column 0. This is what we want.
Destroy
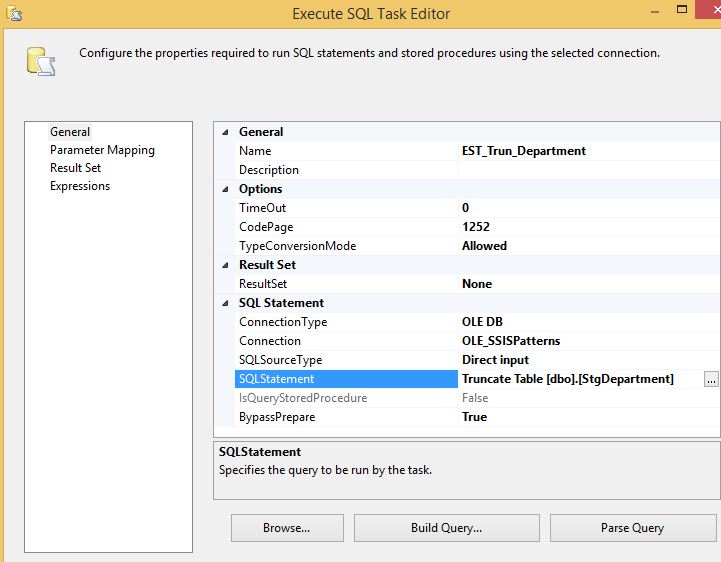
In T-SQL, we use the TRUNCATE statement to remove data from a table. In SSIS, we use an Execute SQL Task that would in turn execute a SQL statement.
Drag an Execute SQL Task to the Control Flow area. Double-click to open the editor. Leave OLE DB as connection type and Direct input as SQLSourceType respectively. Choose a connection from the drop-down. If you’re using the same names as I, it’d be OLEDST_SSISPatterns.
Add the following T-SQL in the SQLStatement property and click OK.
Truncate Table dbo.stgDepartment
Your Execute SQL Task Editor should appear as shown in the image below.
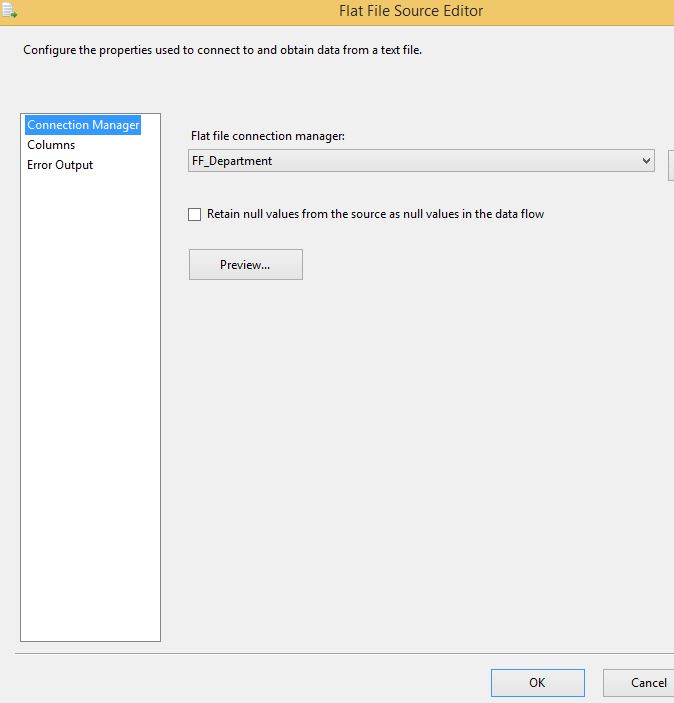
Read Flat File Source
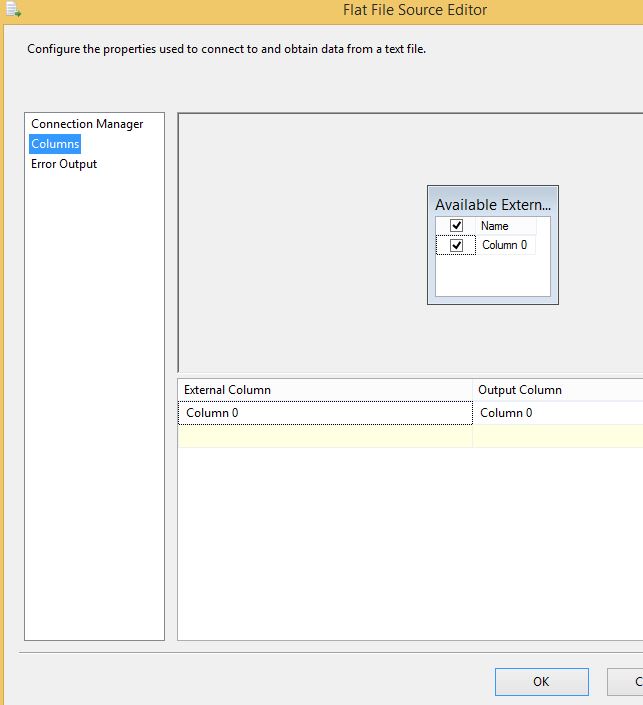
Add a Data Flow Task to the Control Flow area and connect it to the Execute SQL Task. Double-click on the Data Flow to open the editor. Drag a Flat File Source adapter to the Data Flow area and double-click to open the editor. Select the Flat File connection manager in the Connection Manager page and ensure that all columns are selected in the Columns page as shown in the below images.
Parse
We’re reading the data as a single column using the Flat File Source Adapter. To parse the columns (splitting into multiple appropriate columns), we use SUBSTRING expression in a Derived Column Transformation.
Drag a Derived Column Transformation and connect it to the output of Flat File Source Adapter.
Then double-click to edit the Data Conversion Transformation. Enter DepartmentID as the Derived Column Name. Select add as new column under Derived Column dropdown, and use the following as the expression.
SUBSTRING([Column 0],1,6)
This is a simple SUBSTRING expression that accepts [Column 0] as the column – name from upstream -, start position, and end position. 1 and 6 are the start and end positions respectively for DepartmentID.
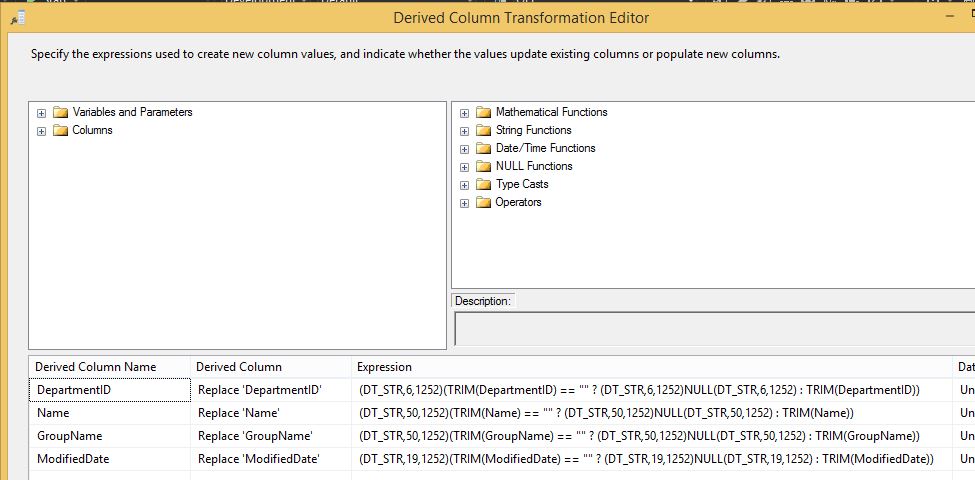
Repeat these steps to create three more columns: Name, GroupName, and ModifiedDate. After configuring the columns, the Derived Column Transformation Editor should appear as shown below.

Prettify
Add a Derived Column Transformation and connect it to the output of DER_Parse. Enter DepartmentID as the Derived Column Name. Select replace DepartmentID under Derived Column dropdown, and use the following as the expression.
(DT_STR,6,1252)(TRIM(DepartmentID) == "" ? (DT_STR,6,1252)NULL(DT_STR,6,1252) : TRIM(DepartmentID))
This expression will both convert blank values to NULL and trim to remove leading or trailing spaces in the column value. The editor with all columns is shown below.
Convert Data Type
So far, data type of all columns is String. But DepartmentID contains numerical data and ModifiedDate contains date values. To convert the data type of these two columns, we use Data Conversion Transformation.
Drag a Data Conversion Transformation and connect it to the output of the Derived Column Transformation.
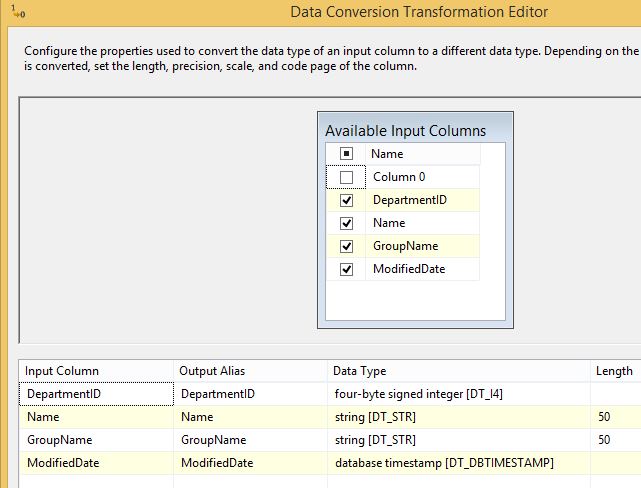
Then, double-click the Data Conversion to open the editor. Select DepartmentID as the Input Column. Enter iDepartmentID as the Output Alias. Select four-byte signed integer [DT_I4] as the Data Type. Next, select ModifiedDate as the Input Column. Enter dtModifiedDate as the Output Alias. Select database timestamp as the Data Type.
After configuring the properties for Data Conversion, your editor should appear as shown in the image below.
Write to Destination
We’re finally ready to write records from source file to the destination. Drag an OLE DB Destination adapter to the Data Flow area and connect it to the output of Data Conversion Transformation.
Double-click to open the editor. Notice the connection manager is already populated because there is only one OLE DB connection in the package. Select the connection manager if it’s not already populated for you. Select dbo.stgDepartment in the Name of the table or view property.
In the Mappings page, you’ll notice that Input and Destination columns are already mapped based on matching names. There is one problem with this though: we transformed some of the columns. We want to use columns from the Data Conversion for those columns that we changed the data type. We can use the remaining columns from upstream.
Leave the mapping for Name as GroupName columns since we didn’t change their data type, but for DepartmentID and ModifiedDate, remove the existing mappings and use iDepartmentID and dtModifiedDate respectively from Available Input Columns.
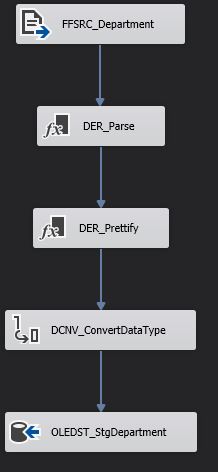
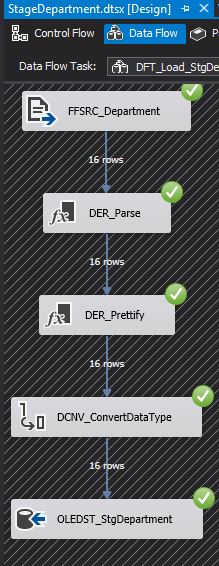
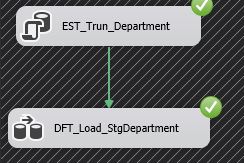
If you are following along, your Data Flow and Control Flow should appear as shown in images below.
Testing the SSIS Package
Code - yes, SSIS is also code - is neither complete nor working unless it’s tested. To test the package, press F5 on your keyboard or click Start Debugging (green arrow) on the menu bar. You should see green tick marks everywhere. In addition, number of rows in the Data Flow should match the number of rows in the source file. There are 16 in this case.
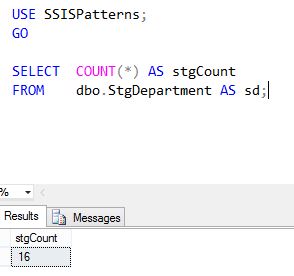
You can also verify the count of rows in the staging table. Also 16 in this case.
Summary
In this article, I provided a SSIS design pattern to load fixed width flat files into staging table. You Destroy (truncate existing data in staging table), Read From Source Flat File as a single column, Prettify (trim trailing spaces, and convert blank values to NULL), Convert Data Type, and Write to Destination.
Data Type conversion step applies to non-string data only, and is optional. If you want, you can store non-string data, such as dates and numbers, as text in SQL Server, but know that it uses up additional storage unnecessarily and could degrade performance.
When there are several flat files, manually creating the SSIS packages and staging tables can be redundant and time consuming. In the next article, I’ll provide a solution that automatically generates SSIS packages for this pattern.
