A few months back I introduced you to the world of SSIS deployments with this introductory article: SSIS Deployments. The article described several methods to get the job done. However, it didn’t discuss the possibilities of deployment for Integration Services in SQL Server 2012. This article will fill this void and introduce you to new methods available in SQL Server 2012.
The Deployment Models
SSIS has changed significantly in the 2012 release and this is largely due to the introduction of the concept of deployment models. SSIS 2012 has two deployment models: the package deployment model and the project deployment model.
The package deployment model is just a name for how you have been doing things since SSIS 2005 through SSIS 2008R2. This involves setting package configurations to change your package between environments and using one of the methods described in the SSIS Deployments article to deploy your package to a server. The important thing to remember here is that you can deploy packages individually, something that is not possible in the project deployment model.
This project deployment model is brand new and introduces the concepts of parameters and projects. You use these parameters to make your packages flexible and dynamic between servers. That’s right, no more package configurations, parameters are the way to go. A project is now a real SSIS object, and it contains all the SSIS packages defined in the project, together with the project parameters and the project connection managers. This is in contrast with previous versions of SSIS, where the project was simply a Visual Studio concept, but once you deployed your packages this concept was completely lost. In SSIS 2012, the unit of deployment is a project. This lets you deploy everything at once: all the packages, parameters and connection managers. This has, of course, impact on how you need to structure your deployments: when you alter a package to fix a bug, you cannot deploy this single package. You need to deploy the entire project.
This article discusses only the deployments methods of the project deployment model, so a more detailed discussion of the project deployment model is out of scope.
Building the Project
The target of our deployments is the SSIS catalog, the central repository for the SSIS projects inside SQL Server 2012. When you use the project deployment model, you can only deploy to the catalog. But before we can do this, we need to build the project. With a successful build, a .ispac file is created. This is what we are going to deploy to the server. In reality the .ispac file is just a zip file that contains all the packages, parameters, connection managers and project info. Change the extension and check it out.
To build the project, simply right-click on the solution and choose Build.

The build will create the .ispac file in the /bin/development folder inside the directory of your SSIS solution. Now we are ready to deploy our project!
Using the Wizard
The easiest method is to use the deployment wizard that comes with SSIS. The process has been greatly simplified compared to the previous versions: there’s no need to create a DeploymentManifest like you used to. Right-click the solution and choose Deploy. The wizard will automatically detect your .ispac file. The next step will ask for the destination server and the path where your project will be stored in the catalog. Enter the appropriate values, as shown below.
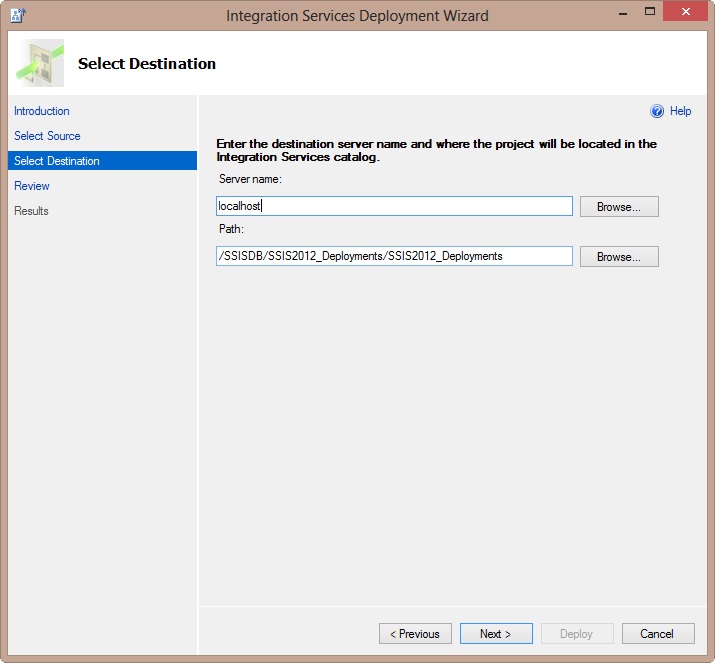
The next step gives you a summary of the deployment process and the last step deploys the project to the server.

An interesting fact is that the deployment wizard will change the protection levels before the deployment (step 3 in the process). In the package deployment model, you can use the protection level used during design time on the server. However, in the project deployment model, the ServerStorage protection level is automatically chosen for projects in the catalog. This leads to a better security of sensitive data inside the packages.
That’s it. Your project is now deployed to the server with just a few mouse clicks. This method is of course not suited to deploy projects to the production server (shame on you if you tried), but good enough to deploy projects from SSDT (or was it SSDTBI?) to the development or test server. Don’t forget that after the deployment, you probably have to change the values of the parameters, or configure them to work with environments.
Using the ISDeploymentWizard.exe utility
The name pretty much gives it away: this is the .exe that runs in the background when you launch the wizard of the previous step. The sweet thing is you can also run this .exe from a command line. A little more for the die hard fans, but you can incorporate this into a batch file, which can be run by your DBA. You know how they love scripts to deploy stuff to servers. It is a bit similar to dtutil – which you can use in the package deployment model – but it is limited in its actions: it can only deploy projects, while dtutil can do so much more.
You can find the .exe file in the following location: <SQL Server Installation Directory>\110\DTS\Binn. When you run the command “ISDeploymentWizard /?”, you get a pop-up with the possible switches for this utility, as shown below.

A typical deployment command for an .ispac file could look like this:
ISDeploymentWizard /Silent /SourcePath:"<project folder>\bin\Development\SSIS2012_Deployments.ispac" /DestinationServer:"localhost" /DestinationPath:"/SSISDB/SSIS2012_Deployments/SSIS2012_Deployments"
At the last step of the interactive wizard, you can choose the save the report of the deployment. This is an XML file with all sorts of information and it contains the command line arguments used to deploy the project.
Using T-SQL
In SSIS 2012, you can use T-SQL to manage about everything in your SSIS catalog. You probably guessed it: you can use T-SQL to deploy projects to the catalog. For this, you use the stored procedure catalog.deploy_project. This MSDN page explains how you can use it: Deploy and Execute SSIS Packages using Stored Procedures. An example:
DECLARE @ProjectBinary VARBINARY(MAX);

DECLARE @operation_id BIGINT;

SET @ProjectBinary = (SELECT * FROM OPENROWSET(BULK '<project folder>\bin\Development\SSIS2012_Deployments.ispac', SINGLE_BLOB) AS BinaryData);

EXEC catalog.deploy_project @folder_name = 'SSIS2012_Deployments', @project_name = 'SSIS2012_Deployments', @Project_Stream = @ProjectBinary, @operation_id = @operation_id out;
The stored procedure catalog.deploy_project expects that the destination folder is already created. If this is not the case, you can create it with the stored procedure catalog.create_folder.
With some slight modification to the script you can also use it to deploy projects between servers. The real power here is that you can easily automate your deployments using T-SQL.
Using PowerShell
That’s correct. They did not only introduce a T-SQL API for SSIS in SQL Server 2012, they also made a PowerShell API! The deployment of a project uses the CatalogFolder.DeployProject method. An example:
$ProjectFilePath = "<project folder>\bin\Development\SSIS2012_Deployments.ispac"

$ProjectName = "SSIS2012_Deployments"

$FolderName = "SSIS2012_Deployments"

$loadStatus = [Reflection.Assembly]::Load("Microsoft.SqlServer.Management.IntegrationServices, Version = 11.0.0.0, Culture = neutral, PublicKeyToken = 89845dcd8080cc91")

$ISNamespace = "Microsoft.SqlServer.Management.IntegrationServices"

$sqlConnectionString = "Data Source = localhost;Initial Catalog = master;Integrated Security = SSPI;"

$sqlConnection = New-Object System.Data.SqlClient.SqlConnection $sqlConnectionString

$integrationServices = New-Object $ISNamespace".IntegrationServices" $sqlConnection

$catalog = $integrationServices.Catalogs["SSISDB"]

$folder = New-Object $ISNamespace".CatalogFolder" ($catalog, $FolderName, "Put your description here")

$folder.Create()

[byte[]] $projectFile = [System.IO.File]::ReadAllBytes($ProjectFilePath)

$project = $folder.DeployProject($ProjectName, $projectFile)
This is of course a very basic script. You might want to expand it to include environments for example.
Using .NET
The last method uses the managed .NET API – Management Object Model – to deploy a project. The set-up is similar to the PowerShell script, but in .NET of course. A very simple deployment script would look like this:
class Program
{
                const string ProjectFileLocation = @"<project folder>\bin\Development\SSIS2012_Deployments.ispac";
                static void Main(string[] args)
                {
                                var server = new Server("localhost");
                                var store = new IntegrationServices(server);

                                var catalog = store.Catalogs["SSISDB"];
                                var folder = new CatalogFolder(catalog,"SSIS2012_Deployments","Put your description here");
                                folder.Create();

                                var project = Project.OpenProject(ProjectFileLocation);
                                folder.DeployProject(project);
                }
}
You can incorporate code like this in a script task inside an SSIS package to do your deployments, or you can create your own application. The possibilities are endless.
Conclusion
This article has presented a couple of methods on how to get your SSIS 2012 project into the SSIS catalog on the server. Some are manual, but most of them can be automated in order to support deployments of SSIS projects between servers.
Be sure to check out this article by Matt Masson (blog | twitter) on deployment automatization: Can I Automate SSIS Project Deployment? Another good reference is chapter 19 of the book SQL Server 2012 Integration Services Design Patterns (of which Matt is also a co-author).