

The aim of the new Database Recovery Advisor in SQL Server 2012 is to simplify the task of piecing together a recovery sequence from multiple backup files, comprising full, differential, and log backups. My previous article, Simplified Restores with SQL Server 2012 Recovery Advisor, explained how to use the tool to fully recover a database from a multiple backup files that originated from multiple servers. In this article, I'll demonstrate how the tool also makes it easier to plan for, and perform, a point in time recovery from a series of backups, in order to recover data that may have been lost due to an application bug, or user error.
The Missing Sales Data
In order to demonstrate how the Database Recovery Advisor (DRA) can simplify point in time recovery operations, we'll use an example based on the AdventureWorks2012 database, operating in FULL recovery model, which uses the following backup scheme:
- 6:00AM – Full backup
- 6:46AM – Transaction log backup
- 7:05AM – Transaction log backup
- 7:10AM – Differential backup
- 7:15AM – Transaction log backup
- 7:20AM – Transaction log backup
- 7:25AM – Transaction log backup
At 7:30AM, a user reports that they cannot retrieve the details for any past sales orders in the application and further investigation shows that the Sales.SalesOrderDetail table is empty.
At some point, the DBA will be keen to find out who deleted that data and how, but the immediate concern is getting that data back online with minimal or no loss. In order to do this, we need to determine when the data was deleted and then recover the database to a point in time just before that happened. A common way to do this would be to restore a copy of the database, in STANDBY mode (i.e. restore the full backup WITH STANDBY), to a separate file system location. This enables us to query the restoring database. We can then then apply to the Standby database each subsequent backup, in sequence, until we reach the one that contains the records for the transaction that erroneously removed the data. Having identified the backup where the data disappears, we can start working towards recovering the data with the least amount of data loss from the restored database. The missing data can be copied into the original table from the restored database using Transact-SQL scripts, or using SSIS, as necessary.
Prior to SQL Server 2012, this was a painstaking, manual process, but the DRA provides some new features that make this sort of operation significantly easier.
Point in time recovery with the DRA
Right-click on the AdventureWorks2012 node is Object Explorer and select Tasks | Restore | Database… from the context menu. This will open up the Restore Database dialog, as shown in Figure 1.
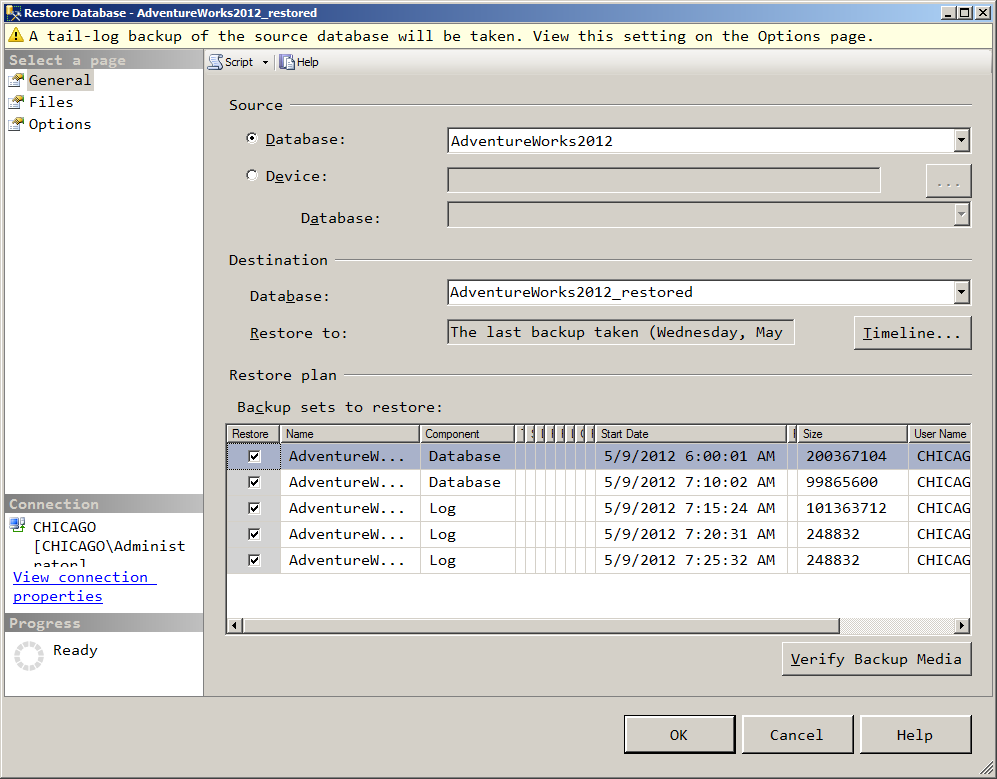
Figure 1 – Restore Database dialog default
As you can see, SQL Server has analyzed the backup history tables in msdb, for the AdventureWorks2012 database, and pre-populated this dialog with the ideal recovery set, to restore the database to the current point in time.
However, the recovery plan generated from msdb doesn't show the log backup taken before the differential, and this could be the point where the data was deleted and so in this particular case, we need to restore the logs since the full backup, not the differential backup. As such, we need to change the Source from Database to Device, and then select all of the backup files taken within the period of time that we are investigating. Figure 2 shows all of the backups for the AdventureWorks2012 database, according to the previously described backup scheme.
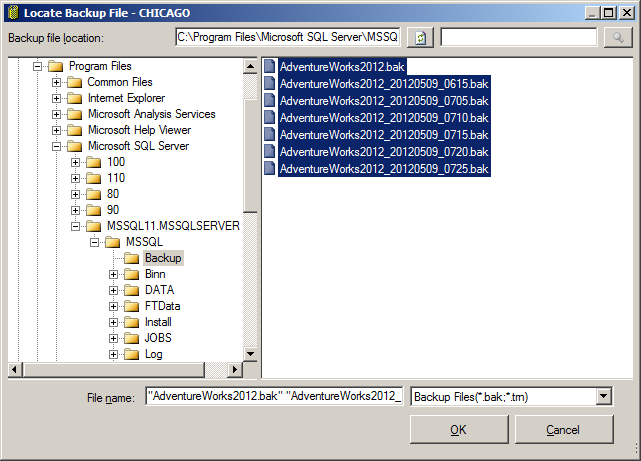
Figure 2 – Available AdventureWorks2012 backup files
Having selected all of the backup files, the DRA will recalculate the recovery plan and once again, as shown in Figure 3, it excludes any transaction log backups taken between the full and differential backups.
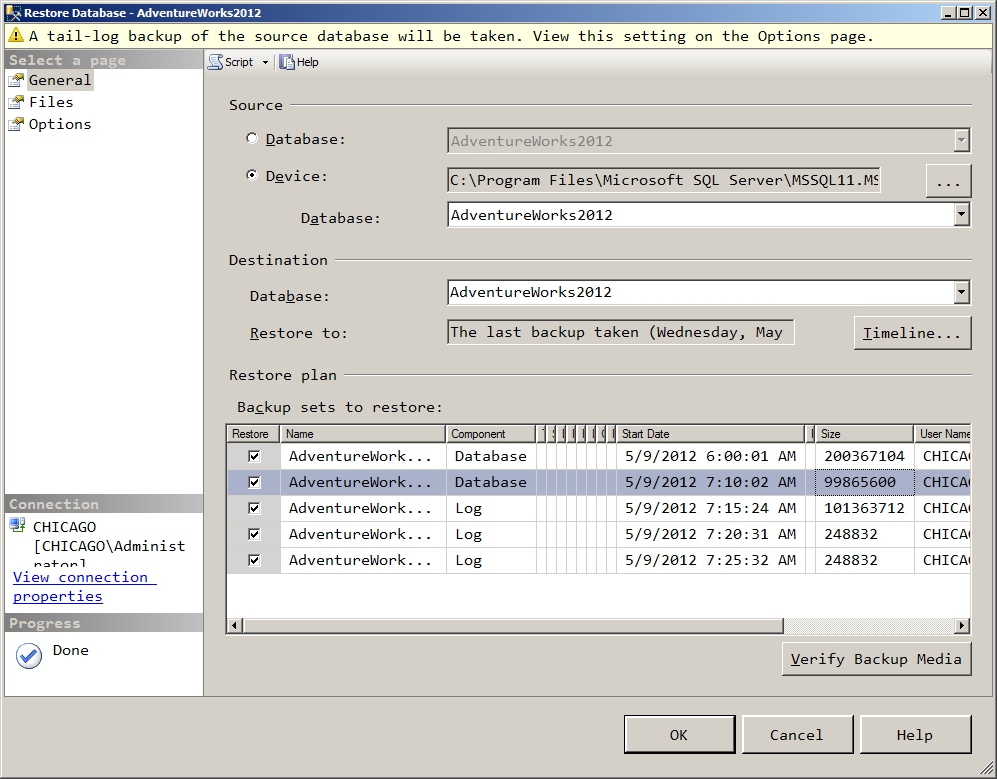
Figure 3 – Recovery Plan based on all available backups
This is an interesting "feature" of the DRA and I don't really care for the way in which it's implemented. The only way to see all of the transaction log backups is to remove the differential backup from the selected backup files, as shown in Figure 4.
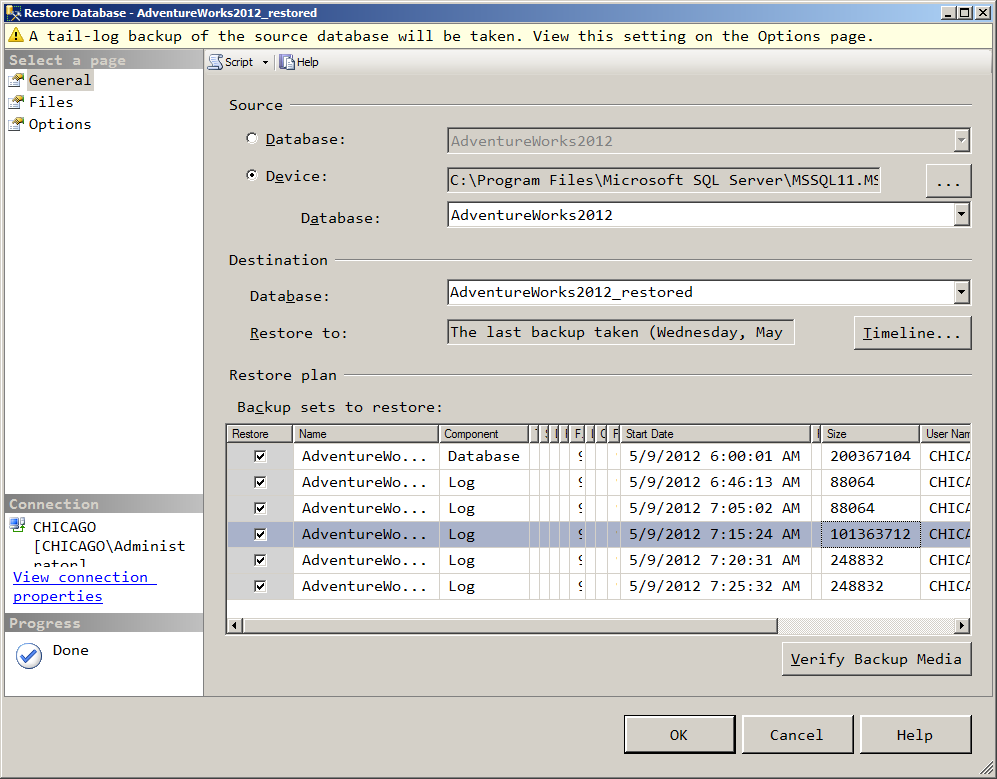
Figure 4 – Recovery Plan without Differential Backups
As noted earlier, we need to make certain that we restore the database to a different file system location. Pre-SQL Server 2012, we'd need to edit each of the file locations manually. However, now we can simply set the new paths once, in the Files page of the new Recovery Advisor, as shown in Figure 5, and the DRA applies them to the RESTORE operations.
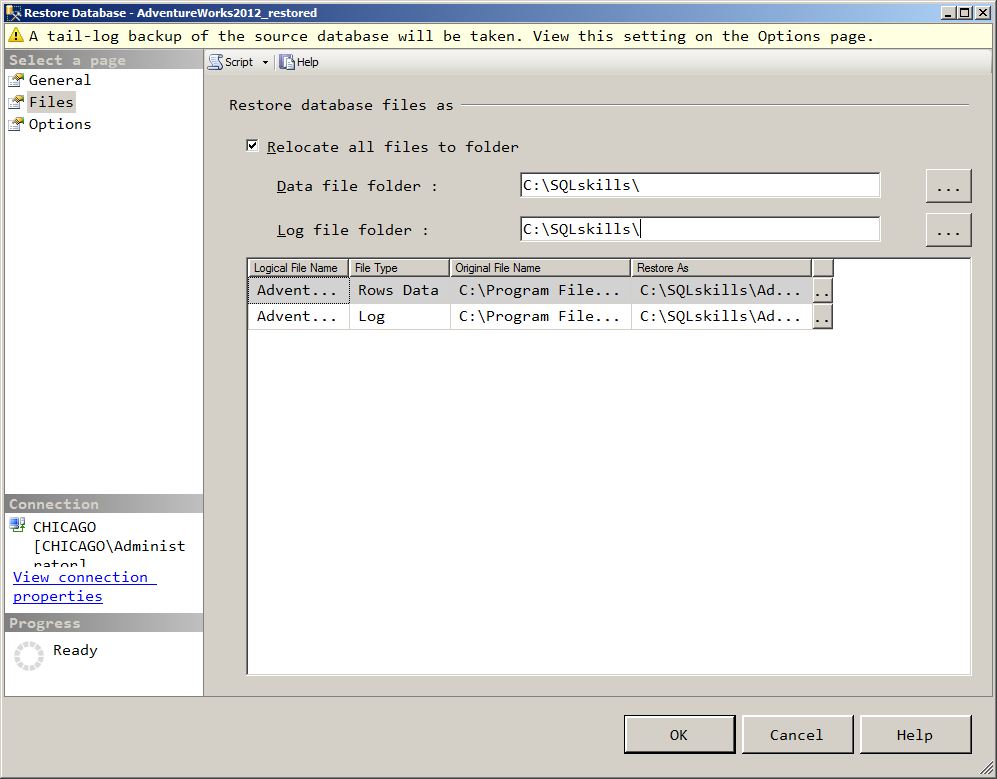
Figure 5 – Relocating files during a restore
Now, if the table that was the target of the accidental DELETE operation was large, then deleting all of its contents would have generated a significant amount of log activity, and so we could get a pretty good idea of when the DELETE operation occurred just by looking at the transaction log backup sizes.
What do we do, however, if the log backups are all similar in size and so we can't tell when the accidental DELETE occurred? Click on the Options and you'll find a new feature that makes it very easy investigate the contents of the log backups that comprise a restore sequence, namely the "Prompt before restoring each backup" option, as shown in Figure 6.
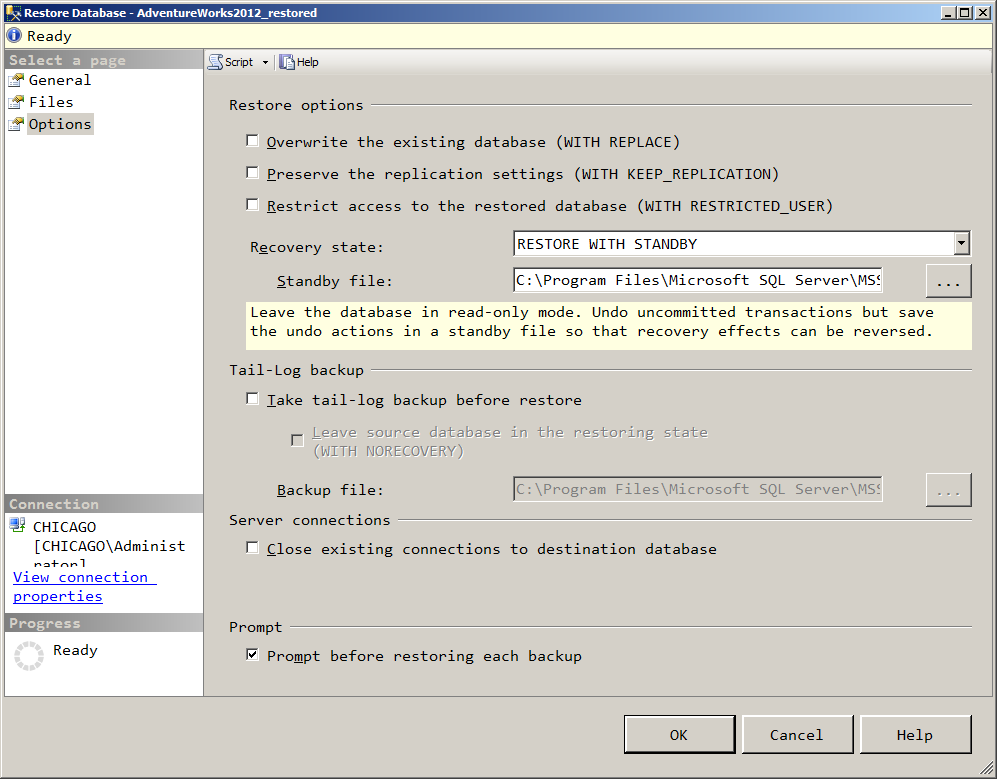
Figure 6 – Prompt before restoring each backup Option
When this option is checked, the DRA pauses between each RESTORE operation and prompts you to decide whether to continue with the next RESTORE operation in the recovery plan, as shown in Figure 7.
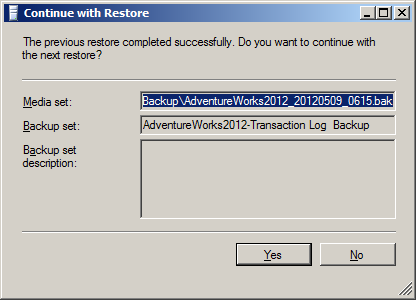
Figure 7 – Recovery Advisor Prompt between RESTORE operations
When the prompt shows up between RESTORE operations, the restoring database can be made available by taking it into Standby mode, using RESTORE…WITH STANDBY, as shown in Listing 1, and then the table can be checked to determine if the current restore point still contains the data.
RESTORE DATABASE AdventureWorks2012_restored
WITH STANDBY = 'C:\SQLskills\AW_Standby.rst';
GO
SELECT  COUNT(*)
FROM    AdventureWorks2012_restored.Sales.SalesOrderDetail;
GO
Listing 1: Restoring WITH STANDBY
If the current point still has all of the data that we are expecting, we can then click Yes in the recovery prompt and the Recovery Advisor will restore the next backup in the sequence, which will be the one shown in the Media Set textbox. If the backup we just restored contained the DELETE operation, then the COUNT in Listing 1 will return zero and we have found the last backup where we had all of our data, and can then begin planning our point in time recovery to restore that data.
In this example, the query in Listing 1 returns zero rows, after restoring the 7:15AM log backup results, meaning that the DELETE operation occurred between 7:05AM and 7:15AM.
With this information, we can click No on the prompt, in order to stop the current RESTORE operation, and the Recovery Advisor will return to the previous Restore Database dialog.
On the General page, click on the Timeline button, and we can use the new Timeline slide to repeat the entire RESTORE operation, but this time setting the exact target time for our point in time recovery point, gradually walking forward in in time, until we identify the exact time when the data was deleted, as shown in Figure 8.
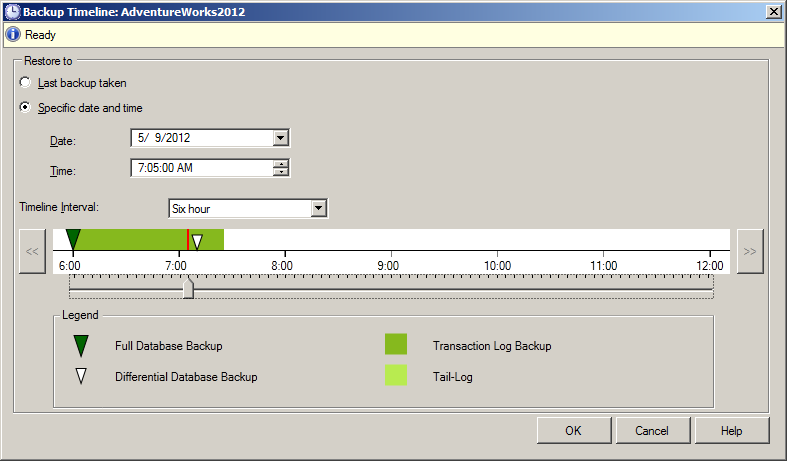
Figure 8 – Backup Timeline for Point in Time Recovery
Summary
These new SQL Server 2012 DRA features greatly simplify the process of restoring a database to a point in time, or performing incremental restore operations to determine the timeframe when a problem first occurred. As with any new feature, it is best practice using it, and become familiar with its functionality and "features", before using it in a production environment for an actual recovery.
