

Overview
In this article we are going to present a business problem and solve it using a ETL approach with SSIS and also developing our own SSIS Custom Transformation Component for our Toolbox. The primary reason to develop our own custom component is reusability of the business logic in solving other request. The basic advantages are that you will be able to source and target any platform once the logic is incorporated into a component.
I am writing this article from the perspective of how to make the sample code provided work and then take you through all the steps necessary to recreate the solution. I like to start with the end in mind. By this I mean in this article we will first install and run the completed component. Next we will walk though the steps necessary to develop it.
The Business Problem
To provide some background, the component is being developed for marketing company In this case we are targeting locations for placing vending machines.
They have selected Duval County as a target. Jacksonville is located there and they provide an excel file of all occupational licenses filed within the last month. This file is replaced each month containing all the new licensees from the previous month. The name of the company, its address, as well as its description (Vending Machine Company, General Contractor, etc.) is specified in this file.
The file as well as all the source code is available at Actuality Business Intelligence LLC.
To recap, our SSIS ETL process will accomplish three basic processes:
- Extract
- Read from an Excel file
- Transform
- Develop Transformation Rules
- Identify companies that have vending machines
- Split the address information that exist in one field into three separate field (City, State and Zip)
- Assign a campaign id of 345
- Load
- Write to target tables
- Good Data(Victims)
- Bad Data
This diagram represents the Microsoft hierarchy of software that will be needed.
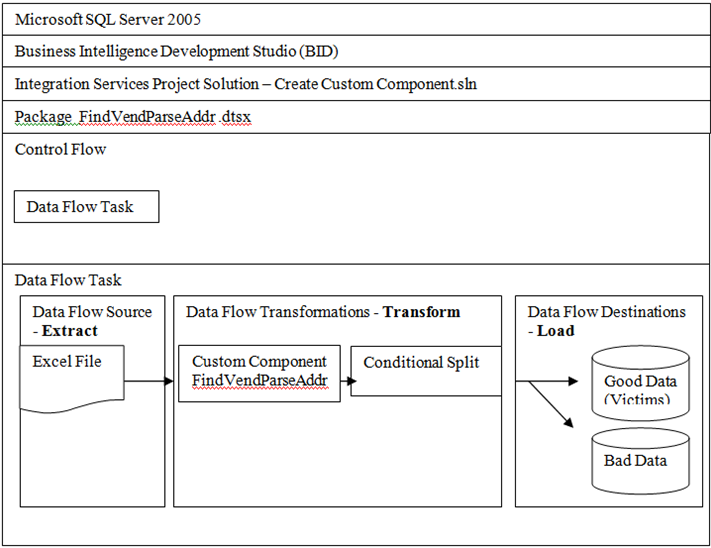
Completed SSIS Package

Getting Started
Open the excel file you will see many other columns such as ADDR1 and OWNER_CITY.
These fields are the address information for the entity specified by OWNER_NAME.
The SITUS_ADDRESS1 and 2 fields are what we need. Unfortunately, the data for city, state, and zip is merged together in SITUS_ADDRESS2 instead of separated out in the case of the owner’s personal address information. This data will have to be cleaned up to fit our target marketing database.
Let review our target table. The T-SQL script to create the Victims and Baddata table is provided in the source download
Figure 8-1 Tables required.
CREATE TABLE [dbo].[Victims](
[VictimID] [int] IDENTITY(1,1)NOT NULL,
[CampaignID] [int] NULL,
[VictimName] [nvarchar](255)NOT NULL,
[Description] [nvarchar](255)NULL,
[Address1] [nvarchar](255)NOT NULL,
[Address2] [nvarchar](50)NULL,
[City] [nvarchar](50)NOT NULL,
[State] [nchar](10)NULL,
[Zip] [nvarchar](50)NOT NULL,
CONSTRAINT [PK_Victims] PRIMARY KEYCLUSTERED
(
[VictimID] ASC
)WITH (IGNORE_DUP_KEY = OFF)ON [PRIMARY]
) ON [PRIMARY]
CREATE TABLE [dbo].[BadData](
[ACCT_ID] [float] NULL,
[YEAR] [float] NULL,
[LICENSE_NO] [float] NULL,
[BUS_NAME] [nvarchar](255)NULL,
[DBA_NAME] [nvarchar](255)NULL,
[OCC_DESC_01] [nvarchar](255)NULL,
[OWNER_NAME] [nvarchar](255)NULL,
[ADDR1] [nvarchar](255)NULL,
[OWNER_CITY] [nvarchar](255)NULL,
[OWNER_STATE] [nvarchar](255)NULL,
[OWNER_ZIP] [nvarchar](255)NULL,
[OCC_PAID_TOTAL] [float] NULL,
[STATUS_DESC] [nvarchar](255)NULL,
[SITUS_ADDRESS1] [nvarchar](255) NULL,
[SITUS_ADDRESS2] [nvarchar](255) NULL,
[NEW_BUS_DATE] [datetime] NULL
) ON [PRIMARY]
The table consists of eight columns. The VictimID is an identity and will be auto populated for us.
The CampaignID maps to a Campaigns table which contains information about which marketing campaign the company is currently being bombarded with.
The rest of the fields are self explanatory. To populate the CampaignID field the component will set its value to 345. This is the ID used by the marketing company to designate the marketing campaign.
The SITUS_ADDRESS2 field of the Excel file is a conglomeration of city, state, and zip, a regular expression will need to be created to parse this field and populate the address fields.
![]()
Installing and Running the Sample
First, you will learn how to configure the completed custom component on your machine. Afterwards, I will explain what classes and methods you must consider to develop any custom components.
Open Microsoft Visual 2005 or SQL Server 2005, Select the sample and Open the FindVendParseAddr solution file Integration Service Project.
Right Click the FindVendParseAddr project then click Rebuild. After building the DLL, the DLL file is displayed FindVendParseAddr.DLL in your Program files Microsoft SQL Server 90 DTS Pipeline Components directory.

Figure 8-1
First, create an Integration Services Project and Click the Data Flow tab. Open your Toolbar. Select SSIS Data Flow Items. The completed package is included in the samples FindVendParseAddr.dstx package. You can open it and follow along.
Add Component to SSIS Data Flow Toolbox
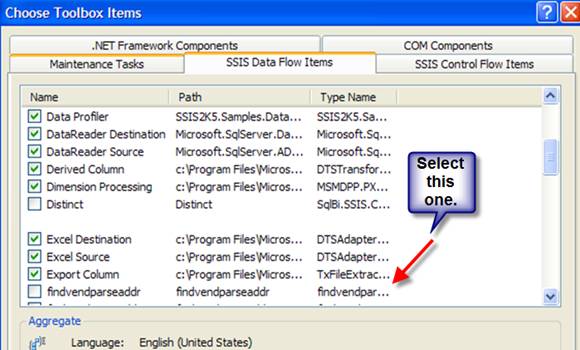
Click Tools, and then click Choose Toolbox Items. Now you have to reset the toolbar. Click Reset then click Yes in response to warning for Default Settings. Once the window has refreshed, the FindVendParseAddr is shown on the left. Click the Name checkbox to the left of FindVendParseAddr. Click Ok.
Figure 8-2
Click the Toolbox to the left. The component is displayed under heading FindVendParseAddr. Drag and drop FindVendParseAddr to the data area.

Figure 8-3 Completed Package
Next, select Data Flow Sources “Excel Source” to connect to the Excel file. Double-click the respective file on Excel Source to make the connection with our Excel File. Click Browse and open the file from the selected directory for the sample.
Select the columns as shown in below:
- BUS_NAME
- OCC_DESC_01
- OWNER_NAME
- SITUS_ADDRESS1
- SITUS_ADDRESS2
Click OK.
We are now going to connect our source to our custom component.
Now, attach connect the Excel Source to your FindVendParseAddr transform. Double Click the FindVendParseAddr. Transform. To review the output columns, click the Input and Output Properties.
We are using BadData to differentiate Victim data from BadData. Victim data has “Vend Mach” or “Vending Mach” in the OCC_DESC_01 field. An address can be a city name consisting of one or more words followed by a space and then a two character state code followed by another space and finally a 9- or 5-digit ZIP Code. BadData is data that fails to meet this criterion. You will see the following columns under Output Columns:
- BadData
- Campaign ID,
- City
- State
- Zip
FindVendParseAddr will parse field SITUS_ADDRESS2and put the data in their respective fields for example City, State, and Zip.
The next step will separate Victim data from BadData. Click the Conditional Split transform from the Toolbox, and drag it to the data area as displayed in Figure 8-4.
Figure 8-4
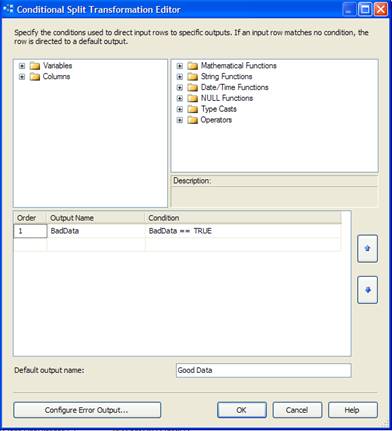
Enter the Output name is BadData. Under Condition, type Baddata = = True. Click OK.
Now you need to run the CreateSampleVictimTables.sql script in the database of your choice.
Create two OLEDB Destination connections. We are using the same database as in Article.
Select Victim because it is your GoodData. Click on Mappings . City, State, and Zip are automatically mapped. Address1 is mapped with SITUS_ADDRESS1 and Map BUS_NAME with VictimName. Map OCC_DESC_01 with Description. Click OK.
Now for Baddata, select the Baddata Table. You can see here that it is already mapped. Click OK. See Figure 8-5
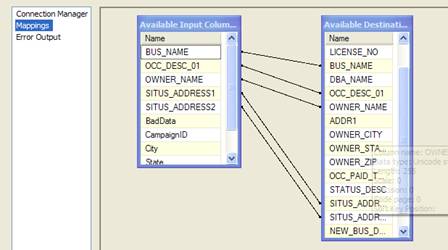
Figure 8-5
You can also add Data Viewers to each Output for review.
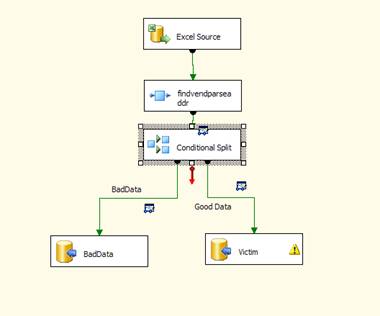
Figure 8-6
Now, execute this package. See Figure 8-7. Note, 1342 rows processed from the Excel source 1325 were good data (Victims) and 17 rows were bad data.

Figure 8-7
If you added Data Viewers you can see that GoodData rows have valid City, State and Zip fields. You will also note that rows with “Vend Mach” or “Vending Mach” have a Campaign Id of 345 assigned.
Figure 8-8 Excel Source Data Viewer

Figure 8-8 Baddata Viewer – Notice SITUS ADDRESS2 invalid column contents.
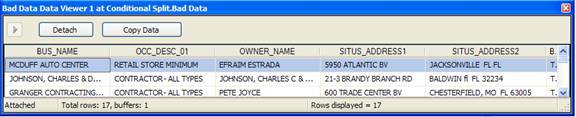
 Figure 8-10 Good Data Viewer – Notice City, State and Zip Fields and Campaign Id for CABANA GOLD LAS VEGAS
You now know how to run this project from Visual Studio as well as how to install custom components.
Extending Versus Scripting
As you can see it is relatively strait forward to install a custom Transform Component as opposed to using a Script Component. The sample we have just walked through was meant to provide a real world example of implementing business logic that would need to be shared. In this case whenever the Marketing company needs to process additional files from the Tax Collector for Duval County or other counties the client can simply drag the Transform from the Toolbox as needed.
Environment Setup
Here we are using five input columns from the Excel Sheet:
- BUS_NAME
- OCC_DESC_01
- OWNER_NAME
- SITUS_ADDRESS1
- SITUS_ADDRESS2
Separate variables are defined for each output column. The variables are BadData, City, State, Zip and CampaignID. As discussed from the Business Scenario from Article the SITUS_ADDRESS2 field contains all three field in a single column, they are City, State, and Zip. We are going to populate the City, Sate and Zip columns by parsing the SITUS_ADDRESS2 column with regular expressions.
| Column Name | Data Type | Size | Description |
| BadAddress | DB_BOOL | N/A | Flag if record contains a bad address. |
| City | DT_WSTR | 50 | Field containing extracted city name. |
| State | DT_WSTR | 2 | Field containing extracted state abbreviation. |
| Zip | DT_WSTR | 9 | Field containing extracted zip code. |
| CampaignID | DT_I4 | N/A | Field containing the CampaignID for Greasy Spud |
Create Project
Create a new Visual C# Class Library Project inside Visual Studio 2005 called FindVendParseAddr. The file as well as all the source code is available at Actuality Business Intelligence LLC.
First select the Add Option from the Projects menu, and select the Assemblies, which are shown below:
First add reference to the ‘Microsoft.SqlServer.PipelineHost’ assembly which provides the base implementation of a pipeline component. Then add a reference to the ‘Microsoft.SqlServer.DTSPipelineWrap’ assembly which provides an interop wrapper around the pipeline object model.
using System;
using System.Collections.Generic;
using System.Text;
using Microsoft.SqlServer.Dts.Pipeline;
using Microsoft.SqlServer.Dts.Pipeline.Wrapper;
using Microsoft.SqlServer.Dts.Runtime.Wrapper;
using Microsoft.SqlServer.Dts.Runtime;
using System.Text.RegularExpressions;
using System.IO;
using System.Data;
Declare the use of the ‘Microsoft.SqlServer.Dts.Pipeline’ namespace, change the namespace of your class to findvendparseaddr, and change the name of the class to SampleProject: Then derive the SeeBufferComponent class from the default base component implementation, PipelineComponent:
Add the DtsPipelineComponent attribute to your component class. This will allow you to also set the name of the component that will show up in the toolbox, as well as describe whether this is a Source, Transformation or Destination component.
namespace findvendparseaddr
{
[DtsPipelineComponent(DisplayName = "findvendparseaddr", ComponentType = ComponentType.Transform)]
public class SampleProject : PipelineComponent
{
internal class DTSColumnInfo
Component Settings
namespace findvendparseaddr
{
[DtsPipelineComponent(DisplayName = "findvendparseaddr", ComponentType = ComponentType.Transform)]
public class SampleProject : PipelineComponent
{
The Display Name is set to FindVendParseAddr and the Component Type is transform. We did not use a custom icon.
The Code
First, you will need to create a simple class SampleProjectand inherit the DtsPipelineComponent. This is the class that is used when developing pipeline component. We have to inherit this class in our SampleProject.
We are defining one internal class, DTSColumnInfo in which we are defining variables which are public like BufferColumnIndex. We will add variables for all output columns.
As you see below, first create you need to define variables with a specific data type then assign those values in that variable using their indexes. Then create those five Output Column variables and parameters with their correct data type and size.
namespace FindVendParseAddr
{
[DtsPipelineComponent(DisplayName = "FindVendParseAddr",ComponentType = ComponentType.Transform)]
public class SampleProject : PipelineComponent
{
internal class DTSColumnInfo
{
public Int32 BufferColumnIndex = 0;
public DTSRowDisposition ColumnDisposition;
public Int32 LineageID = 0;
public string ColumnName = string.Empty;
public Int32 FinalColumnIndex = 0;
public Int32 CityIndex = 0;
public Int32 StateIndex = 0;
public Int32 ZipIndex = 0;
public Int32 CampaignIDIndex = 0;
public Int32 BadDataIndex = 0;
}
Now create a list DTSColumnInfo which contains all the information for these variables. We will use this later in our code, in our private list DTSColumnInfo.
private List<DTSColumnInfo> _dtsColumnInfos;
Design Time Validation
Now, we will add the Validate method. One variable is declared with status as validate. We will be checking for ComponentMetaData.InputCollection. This is the input columns collection whether input columns are selected or not from Integration Services. For example, if the user selects input columns like SITUS_ADDRESS2, the function will check whether any input column exists. The function ComponentMetaData.InputCollection[0].InputColumnCollection.Count returns the number of the input columns. When no Input column exists, the returned value less than 0. If columns exist then we will move on to creating the outputColumnsCollection.
public override DTSValidationStatus Validate()
{
DTSValidationStatus status = base.Validate();
if (ComponentMetaData.InputCollection[0].InputColumnCollection.Count < 0)
{
return DTSValidationStatus.VS_ISBROKEN;
}
else
{
IDTSInputColumnCollection90 inputColumnsCollection = ComponentMetaData.InputCollection[0].InputColumnCollection;
IDTSOutputColumnCollection90 outputColumnsCollection = ComponentMetaData.OutputCollection[0].OutputColumnCollection;
Now we have to initialize three variables for configuring our outputColumnsCollection. We are basically defining three flags as Address, BadDataFlag, and CampaignID.
If Address is True we have to create output columns for City, State and Zip.
//output.OutputColumnCollection
bool Address = false;
bool BadDataFlag = false;
bool CampaignID = false;
foreach (IDTSInputColumn90 inputColumn in inputColumnsCollection)
{
if (inputColumn.CustomPropertyCollection != null)
{
if (inputColumn.Name.Equals("SITUS_ADDRESS2"))
{
foreach (IDTSOutputColumn90 outputColumn in outputColumnsCollection)
{
if (outputColumn.Name.Equals("City"))
{
Address = true;
}
}
Note the Method AddOutputColumns to simplify column createion.
if (!Address)
{
AddOutputColumns("City", 50);
AddOutputColumns("State", 2);
AddOutputColumns("Zip", 9);
}
}
We have created a Method AddOutputColumns utilizing newOutputColumn..
private void AddOutputColumns(string columnName, int outputStringSize)
{
IDTSOutputColumnCollection90 outputColumnsCollection = ComponentMetaData.OutputCollection[0].OutputColumnCollection; //output.OutputColumnCollection
IDTSExternalMetadataColumnCollection90 externalMetaDataColumnCollection =
ComponentMetaData.OutputCollection[0].ExternalMetadataColumnCollection;
IDTSOutputColumn90 newOutputColumn;
IDTSExternalMetadataColumn90 exColumn;
// Add the column
if (columnName == "BadData")
{
newOutputColumn = outputColumnsCollection.New();
newOutputColumn.Name = columnName;
newOutputColumn.SetDataTypeProperties(DataType.DT_BOOL, 0, 0, 0, 0);
exColumn = externalMetaDataColumnCollection.New();
exColumn.Name = newOutputColumn.Name;
exColumn.DataType = DataType.DT_BOOL;
exColumn.Precision = 0;
exColumn.Scale = 0;
exColumn.Length = 0;
}
else if (columnName == "CampaignID")
{
newOutputColumn = outputColumnsCollection.New();
newOutputColumn.Name = columnName;
newOutputColumn.SetDataTypeProperties(DataType.DT_I4, 0, 0, 0, 0);
exColumn = externalMetaDataColumnCollection.New();
exColumn.Name = newOutputColumn.Name;
exColumn.DataType = DataType.DT_I4;
exColumn.Precision = 0;
exColumn.Scale = 0;
exColumn.Length = 0;
}
else
{
newOutputColumn = outputColumnsCollection.New();
newOutputColumn.Name = columnName;
newOutputColumn.SetDataTypeProperties(DataType.DT_WSTR, outputStringSize, 0, 0, 0);
exColumn = externalMetaDataColumnCollection.New();
exColumn.Name = newOutputColumn.Name;
exColumn.DataType = newOutputColumn.DataType;
exColumn.Precision = newOutputColumn.Precision;
exColumn.Scale = newOutputColumn.Scale;
exColumn.Length = newOutputColumn.Length;
}
Finally we check that BadData and CampaignID have already been add to the collection and if not then we add them.
foreach (IDTSOutputColumn90 outputColumn in outputColumnsCollection)
{
if (outputColumn.Name.Equals("BadData"))
{
BadDataFlag = true;
}
}
foreach (IDTSOutputColumn90 outputColumn in outputColumnsCollection)
{
if (outputColumn.Name.Equals("CampaignID"))
{
CampaignID = true;
}
}
}
if (!BadDataFlag)
{
AddOutputColumns("BadData", 0);
}
if (!CampaignID)
{
AddOutputColumns("CampaignID", 0);
}
}
}
return status;
}
That’s it for our Transform validation. You can now test this design time behavior out in the designer.
Load Indexes via PreExecute
PreExecute as it name implies is called prior to ProcessInput to cache the columns and prepare for a call to ProcessInput.
You will take all Input Columns in the loop for each Input Column Collection. Note how we get the location of the input column in the buffer via ComponentMetaData.InputCollection[0];
Then we need to create the metadata for our output columns. For example if the Output column name is SITUS_ADDRESS2 then it goes inside this for loop and sets the indexes via three output columns (City, State and Zip).
public override void PreExecute()
{
base.PreExecute();
IDTSInput90 inputCollection = ComponentMetaData.InputCollection[0];
IDTSOutputColumnCollection90 outputColumnCollection =
ComponentMetaData.OutputCollection[0].OutputColumnCollection;
DTSColumnInfo columnInfo;
_dtsColumnInfos = new List<DTSColumnInfo>();
foreach (IDTSInputColumn90 inputColumn in inputCollection.InputColumnCollection)
{
columnInfo = new DTSColumnInfo();
// get the location of the input column in the buffer
columnInfo.BufferColumnIndex = BufferManager.FindColumnByLineageID(inputCollection.Buffer, inputColumn.LineageID);
columnInfo.ColumnDisposition = inputColumn.ErrorRowDisposition;
columnInfo.ColumnName = inputColumn.Name;
columnInfo.LineageID = inputColumn.LineageID;
if (inputColumn.Name.Equals("SITUS_ADDRESS2"))
{
columnInfo.CityIndex = 0;
foreach (IDTSOutputColumn90 outputColumn in outputColumnCollection)
{
if (outputColumn.Name.Equals("City"))
{
// get the location of the output column in the buffer
columnInfo.CityIndex = BufferManager.FindColumnByLineageID(inputCollection.Buffer, outputColumn.LineageID);
}
Next we similarly set the indexes for the remaining columns and throw exceptions for any missing columns.
if (outputColumn.Name.Equals("State"))
{
columnInfo.StateIndex = BufferManager.FindColumnByLineageID(inputCollection.Buffer, outputColumn.LineageID);
}
if (outputColumn.Name.Equals("Zip"))
{
columnInfo.ZipIndex = BufferManager.FindColumnByLineageID(inputCollection.Buffer, outputColumn.LineageID);
}
}
if (columnInfo.CityIndex == 0)
{
throw new Exception("Missing the expected " + columnInfo.ColumnName + " column.");
}
}
columnInfo.BadDataIndex = 0;
foreach (IDTSOutputColumn90 outputColumn in outputColumnCollection)
{
if (outputColumn.Name.Equals("BadData"))
{
columnInfo.BadDataIndex = BufferManager.FindColumnByLineageID(inputCollection.Buffer, outputColumn.LineageID);
}
}
if (columnInfo.BadDataIndex == 0)
{
throw new Exception("Missing the expected " + columnInfo.ColumnName + " column.");
}
columnInfo.CampaignIDIndex = 0;
foreach (IDTSOutputColumn90 outputColumn in outputColumnCollection)
{
if (outputColumn.Name.Equals("CampaignID"))
{
columnInfo.CampaignIDIndex = BufferManager.FindColumnByLineageID(inputCollection.Buffer, outputColumn.LineageID);
}
}
if (columnInfo.CampaignIDIndex == 0)
{
throw new Exception("Missing the expected " + columnInfo.ColumnName + " column.");
}
_dtsColumnInfos.Add(columnInfo);
}
}
Create Output Columns
The ProcessInput method is called to do the actual processing. Here we set up a basic loop and process every row until buffer.EndOfRowset is True. We have implemented the basic logic via Regex(Regular Expresions) for parsing the address field. First we initialize several variables for utilizing the Regex.
public override void ProcessInput(int inputID, PipelineBuffer buffer)
{
string intialValue = string.Empty;
string FinalValue = string.Empty;
string address2 = string.Empty;
Regex _normalizeStringRegex = new Regex(@"(\s+)|(\s+)|(\s+(?=\s.))", RegexOptions.IgnoreCase);
Regex _validAddressRegex = new Regex("^([A-Z ]*)[ ]([A-Z]{2})[ ]([0-9]{9}|[0-9]{5})$", RegexOptions.Compiled);
Regex _occRegex = new Regex("(VENDING MACH)|(VEND MACH)", RegexOptions.Compiled);
Match match=null;
if (buffer.EndOfRowset == false)
{
try
{
while (buffer.NextRow())
{
if (_dtsColumnInfos.Count == 0)
{
}
foreach (DTSColumnInfo columnInfo in _dtsColumnInfos)
{
buffer.SetBoolean(columnInfo.BadDataIndex, true);
if (!buffer.IsNull(columnInfo.BufferColumnIndex))
{
intialValue = buffer.GetString(columnInfo.BufferColumnIndex);
if (columnInfo.ColumnName == "SITUS_ADDRESS2")
{
if (intialValue != null)
{
address2 = _normalizeStringRegex.Replace(intialValue, " ").Trim();
match = _validAddressRegex.Match(address2);
if ((match != null) && (match.Groups.Count == 4))
{
buffer.SetBoolean(columnInfo.BadDataIndex, false);
buffer.SetString(columnInfo.CityIndex, match.Groups[1].Value);
buffer.SetString(columnInfo.StateIndex, match.Groups[2].Value);
buffer.SetString(columnInfo.ZipIndex, match.Groups[3].Value);
}
else
{
buffer.SetBoolean(columnInfo.BadDataIndex, true);
}
}
}
else if (columnInfo.ColumnName == "OCC_DESC_01")
{
if (_occRegex.IsMatch(intialValue))
{
if (intialValue != null)
{
buffer.SetBoolean(columnInfo.BadDataIndex, false);
buffer.SetInt32(columnInfo.CampaignIDIndex, 345);
}
}
}
else
{
buffer.SetBoolean(columnInfo.BadDataIndex, true);
}
}
else
{
buffer.SetBoolean(columnInfo.BadDataIndex, true);
}
}
}
}
catch (System.Exception ex)
{
bool cancel = false;
ComponentMetaData.FireError(0, ComponentMetaData.Name, ex.Message, string.Empty, 0, out cancel);
throw new Exception("Could not process input buffer.");
}
}
}
Additional Runtime Extensibility via the Advanced Editor
At his point we have completely converted the Article sample from a script component to an custom transform component, however we have one remaining task. As you note the input columns were hard wired in the code. In order to utilize the Advanced Editor capabilities you need to make the following changes to your code.
Obviously you would like to provide the user the ability to not only select different files for this process, but also to select different columns and set the campaign id at run time.
You could have created a custom UI , however for most Transforms the advanced editor should suffice and is much easier to implement.
Here is an example of our transform with the Advance Editor displaying the address, occupational and campaign id selections. See Figure 8-9
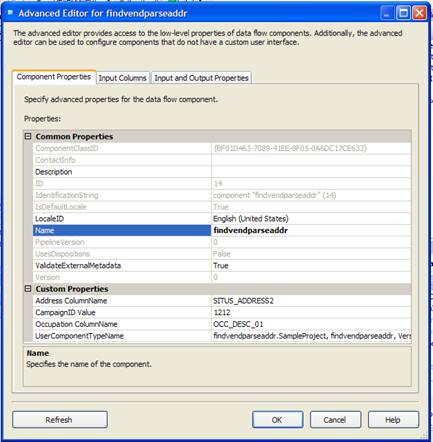
Figure 8-
Code Changes
First add three variables for address column name, occupational column name and campaign id.
public IDTSCustomProperty90 AddrColumnName;
public IDTSCustomProperty90 OccupationCol;
public IDTSCustomProperty90 CampaignIDValue;
Next modify the Validate , PreExecute and ProcessInput sections to refelct the new variable names.
AddrColumnName = ComponentMetaData.CustomPropertyCollection["Address ColumnName"];
OccupationCol = ComponentMetaData.CustomPropertyCollection["Occupation ColumnName"];
CampaignIDValue = ComponentMetaData.CustomPropertyCollection["CampaignID Value"];
Third Party Assemblies
I’d like to briefly review several example of using the Custom Transform to integrate third party assemblies. We will specifically look at an covering address parsing
In this case of we could have also taken the approach on integrating an existing dll or commercial dll to further simplify our development effort. For instance there in a readily available address parsing component called NetAdddress from The Software Company at www.softwarecompany.com .
Let’s take a quick look at how implementing this existing component and see how it would have simplified our effort.
This sample proect is called NetAddressSSIS and is available for download at Actuality Business Intelligence LLC.
Code Changes
First we would add the reference for NetAddress.NetAddress and iniitialize NetAddress.
namespace findvendparseaddrNA
{
[DtsPipelineComponent(DisplayName = "findvendparseaddrNA", ComponentType = ComponentType.Transform)]
public class SampleProject : PipelineComponent
{
private NetAddress.NetAddress NetAddress = null;


Then we can replace the Regex logic with the following
NetAddress.Address_In = intialValue;
NetAddress.Numeric_Street_Conv = true;
NetAddress.CSZ_InSameField = true;
// NetAddress Class "Parse" method - Standardize & parse the input address
NetAddress.Parse();
buffer.SetString(columnInfo.CityIndex, NetAddress.City);
buffer.SetString(columnInfo.StateIndex, NetAddress.State);
buffer.SetString(columnInfo.ZipIndex, NetAddress.Address_Out);
The Regex looked like this:
match = _validAddressRegex.Match(address2);
if ((match != null) && (match.Groups.Count == 4))
{buffer.SetBoolean(columnInfo.BadDataIndex, false);
buffer.SetString(columnInfo.CityIndex, match.Groups[1].Value);
buffer.SetString(columnInfo.StateIndex, match.Groups[2].Value);
buffer.SetString(columnInfo.ZipIndex, match.Groups[3].Value);
In considering when to use a third party component, you have to examine the long term business requirement as well as the short term coding effort.
There is a balance between purchasing a component and reducing development time as well as adding increased functionality. Primarily you should focus your effort son custom development of logic that is specifically oriented to you business and use third party components for well defined or generic task, such as address parsing, address correction.
The commercial component will provide more sophisticated parsing capabilities as well as Address Correction. For instance if the file has only two out of three field City and State or State and Zip the third field can be determined. This is another example of coding smarter not harder.
Summary
We have created a synchronous Custom Transform. The completed extensible component now can support easy reuse of the business logic required for the marketing example a user can now select their own source files, use any column names they wish and set the campaign id at run time. We have also discussed creating Asynchronous transforms. We have provided several additional case studies covering an Asynchronous Transform for Data Profiling as well as additional Third Party Assemblies. Additionally a custom UI for this component could be added to further extend the components ability to handle other County files.
