

Data Modeling using ERWIN and SQL Server 2000
In this write up I will try to demonstrate how to use one of the very
powerful industry standard Data Modeling tools, ERWIN. This is not a product
review. It is a step by step example showing how to create a simple Data
Model, while keeping in mind the real world Data Modeling scenarios.
Let's get our hands dirty straight away.
Environment: I tested all this on SQL Server 2000 and Erwin Data Modeler r7
Step 1
======
- Start Erwin
- Select File -> New
- Select the Logical/Physical radio button and click OK
- Ensure you have 'SQL Server 2000' selected.
- Select View -> Toolbar and ensure all options are selected. Specifically the 'Toolbox' option.
- Click on Entity and click on a clean area in the designer.
- Right click on the entity icon and select 'Entity Properties...'
- Enter 'Employee' without the quotes for the 'Name:' textbox and click OK
- Right click on the icon again and this time select 'Attributes...'
- Click on 'New' and enter 'EmployeeId' without the quotes for the 'Column Name:' and 'Attribute Name:' textbox
- Select ##Number click 'OK'
- In the 'General' tab select the 'Primary key' checkbox
- Click on 'New' and enter 'EmployeeName' without the quotes for the 'Column Name:' and 'Attribute Name:' textbox
- Select String click 'OK'
- In the 'Datatype' tab observe that Erwin has defined the datatype as varchar(20). You can change the datatypes here, but for now this is fine.
- Click on 'New' and enter 'DepartmentId' without the quotes for the 'Column Name:' and 'Attribute Name:' textbox
- Select ##Number click 'OK'
- Click OK again
Step 2
======
- From the Toolbar toolbox, once again
- Click on Entity and click on a clean area in the designer.
- Right click on the entity icon and select 'Entity Properties...'
- Enter 'Department' without the quotes for the 'Name:' textbox and click OK
- Right click on the icon again and this time select 'Attributes...'
- Click on 'New' and enter 'DepartmentId' without the quotes for the 'Column Name:' and 'Attribute Name:' textbox
- Select ##Number click 'OK'
- In the 'General' tab select the 'Primary key' checkbox
- Click on 'New' and enter 'DepartmentName' without the quotes for the 'Column Name:' and 'Attribute Name:' textbox
- Select String click 'OK'
Step 3
======
- From the Toolbar toolbox
- Click on 'Non Identifying Relationship' and first click on the department
icon and then on the employee icon.
- Just click 'Ok' on the ensuing popup, which says the name already exists. Observe it will add the letters (FK) in the Employee entity for the DepartmentId attribute
- This step has created a Zero-or-One-to-Zero-One-or-More relationship between the Department and Employee entities
- Double click on the relationship line/icon and select the 'RI Actions' tab
- Ensure 'NONE' is selected in all the six dropdowns in this tab, under the subheading 'RI Actions'
- Click OK
Step 4
======
At this stage we have created a simple Logical model. We are ready to convert into a physical model and create the tables in the database.
- Select 'Physical' from the drop down at the top/center of the window. See how the diagram changes. Also a lot in the left pane tree changes.
Just not to confuse, I have retained the same names for the logical and physical models. In the real world these will be completely different. For example while creating the logical model, the analyst will not know what are all the numeric and character datatypes a target database will support. So the he/she will just define the attributes as Numeric or String. It is is the Data Modeler's job to map these appropriately.
I wish to keep this write up as simple as possible, for Data Modeler's new to Erwin to get the hang of it soon and easily.
Step 5
======
- Now select Tools -> Forward Engineer -> Schema Generation
- In the 'Options' tab select 'Table' from the left pane and and select the 'Drop table' check box. This will delete the tables you are trying to create, first, and then create the tables in the model.
- Select the 'Column' entry from the left pane and uncheck the 'Physical Order' checkbox. This will ensure the columns are created in the same order as you have designed in the modeler.
- Click on Preview.
You can now see the exact DDL statements Erwin is going to execute in the target database. This code is plain SQL that you can cut paste and run it in Query Analyzer, but we are going to let Erwin do that job for us, to complete the full cycle of a simple Data Model.
Here is the code:
--=======================================================================================================

DROP TABLE Employee
go
DROP TABLE Department
go
CREATE TABLE Department
(
DepartmentId  integer  NOT NULL ,
DepartmentName  varchar(20)  NULL
)
go
ALTER TABLE Department
ADD CONSTRAINT  XPKDepartment PRIMARY KEY   NONCLUSTERED (DepartmentId
ASC)
go
CREATE TABLE Employee
(
EmployeeId  integer  NOT NULL ,
DepartmentId  integer  NOT NULL ,
EmployeeName  varchar(20)  NULL
)
go
ALTER TABLE Employee
ADD CONSTRAINT  XPKEmployee PRIMARY KEY   NONCLUSTERED (EmployeeId
ASC,DepartmentId  ASC)
go
ALTER TABLE Employee
ADD CONSTRAINT  R_1 FOREIGN KEY (DepartmentId) REFERENCES
Department(DepartmentId)
go
--=======================================================================================================
- Click on Generate and select the right database properties. Very simple step for database guys.
- Click on Connect
- When you do this step, for the first time alone, it will give errors for the 'Drop table' commands. Just click 'Continue'
- Now you can execute the 'Generate' step any number of times, without problems.
At this stage you should see two new tables created in your database. So Awesome isn't it!!!
Erwin is a very powerful tool. I have shown just the tip of the iceberg, but I am sure, I have shown the crux of it. Also creating a simple model like this may look like child's play. But we got to make the start somewhere. Real world models could involve hundreds of tables with even more number of relationships between them, making the model as complex as possible. Also we can set various properties, which seem endless in the product.
I will try to cover some of them, which I feel are important, and leave at a stage where you will be comfortable enough to take on and proceed.
Step 6
======
Let us start applying some features. Note that unless I specify specifically, the drop down in the top/center of the designer shows 'Physical' for all of the examples below.
Look at the DDL. While I am comfortable with the Primary key naming style that Erwin uses, for example something like 'XPKEmployee', but not with the foreign key naming scheme which is something like 'R_1'. Let us try changing it to some style we wish to name foreign keys with.
- Be back in the designer. Right click on the relationship icon and select 'Relationship Properties'
- In the 'General' tab enter the name of your choice for 'Foreign Key Constraint Name' textbox
- I am entering for example 'FK_Department_Employee' and click OK
- Select Tools -> Forward Engineer -> Schema Generation and click on Preview
You should see the changed code, with the new name. (here is the snippet)
ALTER TABLE Employee
ADD CONSTRAINT  FK_Department_Employee FOREIGN KEY (DepartmentId)
REFERENCES Department(DepartmentId)
go
Step 7
======
Let us add a CHECK constraint
- Right click on Employee entity icon in the designer and select 'Columns'
- Select the 'Constraint' tab
- Select the 'Validation Constraint' checkbox
- Click on '...'
- If Erwin asks for saving, just say ok.
- Click on 'New'
- Enter 'CHK_Employee_EmployeeID_LessThanHundered' for both logical and physical Names and click OK
- In the 'SQL Server Rule:' textbox enter "EmployeeId
- Select the 'CHECK Constraint' radio button
- Click on OK
- Change the Name to 'CHK_Employee_EmployeeID_LessThanHundered' from that weird looking name which is there by default
- Click on OK
- Select Tools -> Forward Engineer -> Schema Generation and click on Preview
You should see the following modified snippet, showing the changes you made
CREATE TABLE Employee ( EmployeeId integer NOT NULL CONSTRAINT CHK_Employee_EmployeeID_LessThanHundered CHECK ( EmployeeIdStep 8
======We can do many many many things like this, but before closing, I am going to stop here and show one other important feature that every data modeler should know like second nature: Maintaining the model. Let us do this by adding two new entities to the model. This is also a way to implement a many to many relationship in the model.
- From the Toolbar toolbox, once again
- Click on Entity and click on a clean area in the designer.
- Right click on the entity icon and select 'Entity Properties...'
- Enter 'EmployeeProjectMapping' without the quotes for the 'Name:' textbox and click OK
- Right click on the icon again and this time select 'Attributes...'
- Click on 'New' and enter 'EmployeeId' without the quotes for the 'Column Name:' and 'Attribute Name:' textbox
- Select ##Number click 'OK'
- In the 'General' tab select the 'Primary key' checkbox
- Click on 'New' and enter 'ProjectId' without the quotes for the 'Column Name:' and 'Attribute Name:' textbox
- Select ##Number click 'OK'
- In the 'General' tab select the 'Primary key' checkbox
Step 9
======
- From the Toolbar toolbox, once again
- Click on Entity and click on a clean area in the designer.
- Right click on the entity icon and select 'Entity Properties...'
- Enter 'Project' without the quotes for the 'Name:' textbox and click OK
- Right click on the icon again and this time select 'Attributes...'
- Click on 'New' and enter 'ProjectId' without the quotes for the 'Column Name:' and 'Attribute Name:' textbox
- Select ##Number click 'OK'
- In the 'General' tab select the 'Primary key' checkbox
- Click on 'New' and enter 'ProjectName' without the quotes for the 'Column Name:' and 'Attribute Name:' textbox
- Select String click 'OK'
Step 10
=======
- From the Toolbar toolbox
- Click on 'Non Identifying Relationship' and first click on the Employee icon and then on the EmployeeProjectMapping icon.
- Just click 'Ok' on the ensuing popup, which says the name already exists. Observe it will add the letters (FK) in the EmployeeProjectMapping entity for the EmployeeId attribute
- This step has created a Zero-or-One-to-Zero-One-or-More relationship between the Employee and EmployeeProjectMapping entities
- Double click on the relationship line/icon and select the 'RI Actions' tab
- Ensure 'NONE' is selected in all the six dropdowns in this tab, under the subheading 'RI Actions'
- Click OK
- From the Toolbar toolbox
- Click on 'Non Identifying Relationship' and first click on the Project icon and then on the EmployeeProjectMapping icon.
- Just click 'Ok' on the ensuing popup, which says the name already exists. Observe it will add the letters (FK) in the EmployeeProjectMapping entity for the ProjectId attribute
- This step has created a Zero-or-One-to-Zero-One-or-More relationship between the Project and EmployeeProjectMapping entities
- Double click on the relationship line/icon and select the 'RI Actions' tab
- Ensure 'NONE' is selected in all the six dropdowns in this tab, under the subheading 'RI Actions'
- Click OK
Step 11
=======
- Now select Tools -> Forward Engineer -> Schema Generation
- Click on 'Filter' and have only the 'EmployeeProjectMapping' and 'Project' tables in the right pane and click on 'Close'
- Click on Preview. (Click On Generate.)
You should see only the DLL required to create the new tables and relations. Should look something like this.
--=======================================================================================================
DROP TABLE EmployeeProjectMapping
go
DROP TABLE Project
go
CREATE TABLE EmployeeProjectMapping
(
ProjectId  integer  NOT NULL ,
EmployeeId  integer  NOT NULL
)
go
ALTER TABLE EmployeeProjectMapping
ADD CONSTRAINT  XPKEmployeeProjectMapping PRIMARY KEY   NONCLUSTERED
(ProjectId  ASC,EmployeeId  ASC)
go
CREATE TABLE Project
(
ProjectId  integer  NOT NULL ,
ProjectName  varchar(20)  NULL
)
go
ALTER TABLE Project
ADD CONSTRAINT  XPKProject PRIMARY KEY   NONCLUSTERED (ProjectId  ASC)
go

ALTER TABLE EmployeeProjectMapping
ADD CONSTRAINT  R_6 FOREIGN KEY (EmployeeId) REFERENCES
Employee(EmployeeId)
go
ALTER TABLE EmployeeProjectMapping
ADD CONSTRAINT  R_7 FOREIGN KEY (ProjectId) REFERENCES Project(ProjectId)
go
--=======================================================================================================
Step 12
=======
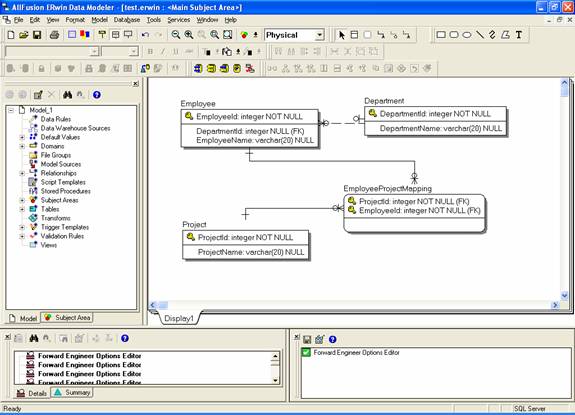
- Close all boxes and be in the designer
- Select Format -> Table Display and select 'Attribute Datatype', 'NULL Option', 'Primary key Designator' and 'Foreign Key Designator'
The diagram should like image-1
Conclusion
Erwin is a very powerful Data Modeling tool used by major Corporations for modeling their real time data. I have shown just a glimpse of that powerful tool. I am confident you will be able to take on from here. Real world data models could be as complex as possible, but once designed meticulously, it is very convenient and easy to maintain the model for a long long time. I have demonstrated Forward Engineering in this write up. Erwin is also capable of 'Reverse Engineering' a database to bring out a logical model, using which analysts could incorporate major changes to the model and push it back into the system.
Data modeling is an interesting subject in itself. My focus in this article is primarily on how to use Erwin for Data Modeling and not Data Modeling per se. I would love to do that too, but let us see.
Thankz for reading!