

Web applications built on top of the modern stack use a single-page app architecture that follows the 3-tier pattern shown below:
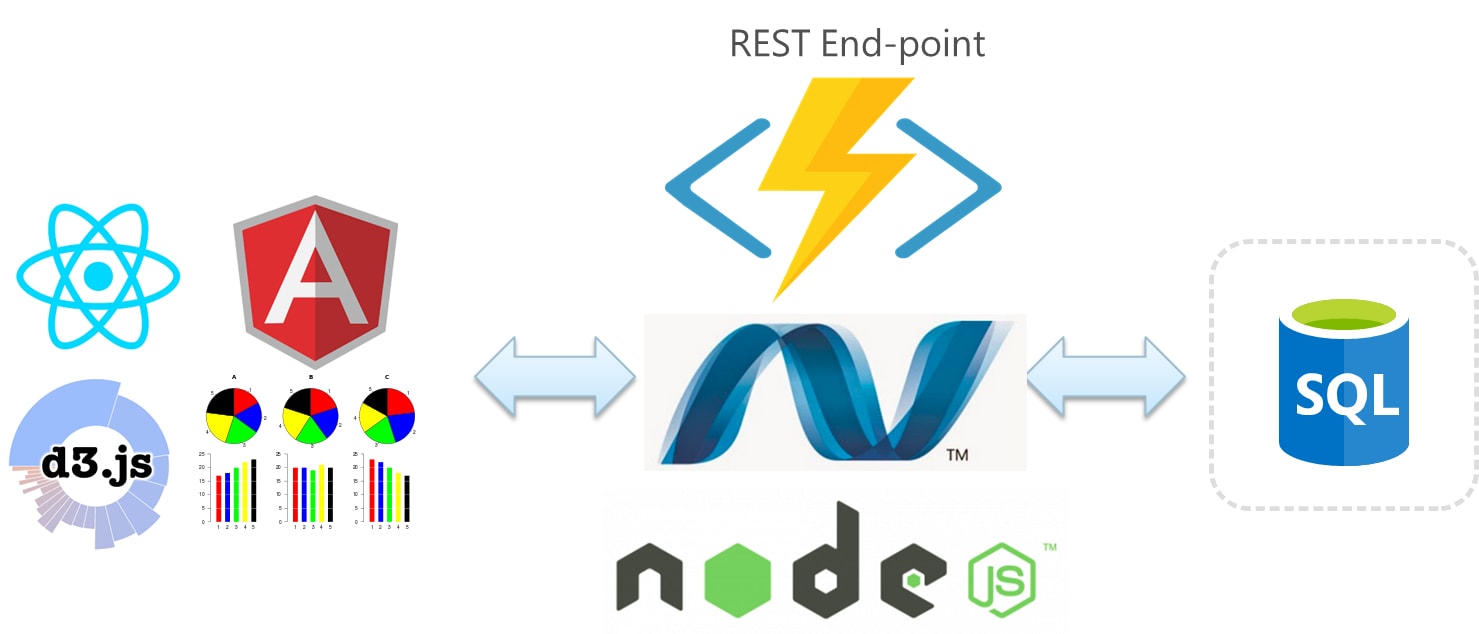
The client-side usually includes popular front-end libraries like Angular, React, Vue.js and D3. The front-end code runs in the browser and then makes API calls to the REST endpoints. The REST API can be built on top of Node/Express stack, PHP/Laravel, ASP.NET etc. The communication between the client-side and the server-side is usually in terms of JSON objects. The server then maps the API calls to database queries for retrieving or storing data.
Why SQL Server?
The de-facto database software that works with JSON is MongoDB. NoSQL databases are preferred over SQL because of the ease of working with JSON documents rather than relational-style tables. The client makes API calls and sends a JSON object as an input by appending the JSON into the request's body or params. The server accepts the request, and the request goes through a series of middlewares and this is where data validation and database query usually happen.
When you're using SQL to retrieve data, you would need additional layers in the server to map API requests to database queries. You will need a data access component, popularly known as a Object Relational Mapper to query data. Apart from that, you will also need a View Model to populate the results of the query and then a JSON serializer to format the output into JSON code. The objects can then be sent to the front-end application.
JSON PATH to the rescue
SQL server added support for JSON format back in 2016 so that you can easily export your SQL data using REST API. You can append a FOR JSON clause into your standard queries and that would force SQL Server to return data in JSON format rather than the usual tabular structure.
SELECT *
 FROM Product
 FOR JSON PATH
As you can see here, the query returns a JSON that you can then pass on to the single-page application without any significant modification. This lets you integrate Azure SQL and Azure object storage with your front-end application.
For instance, if you're creating a Node API endpoint using Express middleware, you don't need to be concerned about the data model access, the view layer or the ORM. Instead, you can focus just focus on running the query and returning the JSON objects. The rest of the tutorial will talk about it in action.
Set up the Environment
To set up the environment, you will need to have Node and npm installed beforehand. You can then use npm to initialize a basic npm project using npm init. You can install express middleware by running
npm install --save express
Apart from that you will also need a data access middleware that takes care of running queries and fetching the database results in the background. You can do that using the following package:
npm install tedious --save
Tedious is an open-source implementation of the TDS protocol created using JavaScript. It is intended to be a fairly slim implementation of the protocol, with not too much additional functionality. The Tedious library exports two useful functionalities: Request and Connection. The Connection API can be used to create a connection with the SQL Server. The code below demonstrates the process of connecting an express application to a SQL server database.
 var Connection = require('tedious').Connection;

  var config = {
    userName: 'test',
    password: 'test',
    server: '192.168.1.210',

    // If you're on Windows Azure, you will need this:
    options: {encrypt: true}
  };

  var connection = new Connection(config);

  connection.on('connect', function(err) {
    // If no error, then good to go...
      executeStatement();
    }
  );
The parameters to connection constructure are username, password and host server. Apart from that, there is an options object that's empty in this example. The callback gets invoked when either an error happens or connection has been successfully established and authenticated.
Basic REST API Calls
Once the connection has been established, you can use the Request functionality from the tedious package to create instances of the Request object. The arguments to request's constructor are a query statement and a callback function. You can then use the request.on method to traverse through the columns of that particular row.
var Request = require('tedious').Request;

  function executeStatement() {
    request = new Request("select 42, 'hello world'", function(err, rowCount) {
      if (err) {
        console.log(err);
      } else {
        console.log(rowCount + ' rows');
      }
    });

    request.on('row', function(columns) {
      columns.forEach(function(column) {
        console.log(column.value);
      });
    });

    connection.execSql(request);
  }
A row event is emitted for each row that satisfies the query condition. The columns in that particular row are arranged inside an array and hence we can use columns.forEach function to retrieve the column data. The line, connection.execSql(request), is responsible for executing the actual statement.
Apart from Tedious, there are other popular SQL drivers for node like node-mssql that you can use to connect and run queries. This is what your code will look like if you use mssql.
var express = require('express');
var app = express();

app.get('/', function (req, res) {

    var sql = require("mssql");

    // Configuration object for your database
    var config = {
        user: 'admin',
        password: 'mypassword',
        server: 'localhost',
        database: 'Test'
    };

    // connect to the database
    sql.connect(config, function (err) {

        if (err) console.log(err);

        // create Request object
        var request = new sql.Request();

        // query to the database and get the records
        request.query('select * from User', function (err, recordset) {

            if (err) console.log(err)

            // send records as a response
            res.send(recordset);

        });
    });
});

var server = app.listen(5000, function () {
    console.log('Server is running..');
});
If you want to return JSON results, you can add the FOR JSON query parameter into your queries.
 request.query('select * from User FOR JSON PATH', function (err, jsonResponse) {
…
}
Persisting JSON Model in the Database
Client-side applications need to store the state and are heavily reliant on how the data flows between the store and the client. There are frameworks like Redux that help you implement a store that keeps the state logic away from the UI. Traditionally, if you want accept JSON objects from the client-side/ you'd have to parse through the JSON, create a data transfer object and then use ORM to save that into the database.
JSON helps you simplify the process of persisting JSON models into the database. All the latest versions of SQL server have an OpenJSON function that parses JSON and creates tabular data based on the JSON and then insert the results directly into the database.
  var request = new sql.Request(transaction);
            //7.
            request.query("Insert into EmployeeInfo (EmpName,Salary,DeptName,Designation) values ('T.M. Sabnis',13000,'Accounts','Lead')")
        .then(function () {
                //8.
                transaction.commit().then(function (recordSet) {
                    console.log(recordSet);
                    dbConn.close();
                }).catch(function (err) {
                    //9.
                    console.log("Error in Transaction Commit " + err);
                    dbConn.close();
                });
            })
Summary
SQL server and Azure SQL Database have implemented support for JSON objects in 2016, and it has been easier to integrate SQL server with the JavaScript stack ever since. This is because you can now use the same format to transfer data between the client-side and the server-side which simplifies the whole process for the developer.
If you have any thoughts to share, let us know in the comments.

