

Introduction
In this article, we will access an Azure SQL Data Warehouse (ASDW) and create a table using C#. We will also insert some values to the table and finally we will get the information inserted. We will create a C# Console Application Project for this purpose.
Requirements
- Visual Studio Installed (in this example, we are using Visual Studio 2015)
- An Azure subscription
- An ADWH already created. In this example, the Azure SQL Server name is sqlcentralserver and the database name is sqlcentralwarehouse. If you do not have an Azure SQL Database already installed, please follow the steps of your Azure Machine Learning article in the getting started section, step 1 to 3.
Getting started
We will do the following:
- Enable a firewall rule in Azure
- Copy and paste the connection information from the portal
- Create a table in C#
- Insert data into the new table in C#
- Display the information inserted in C#
Enable a firewall rule in Azure
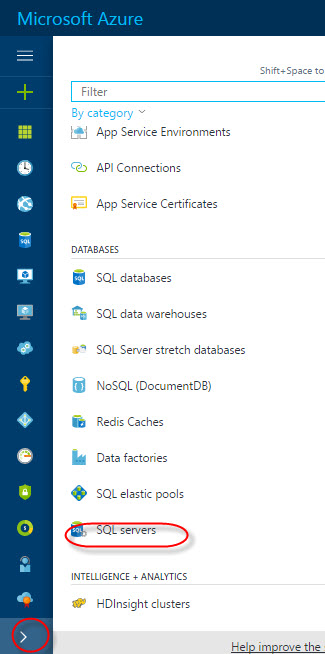
In the Azure Portal, press the > icon and select SQL Servers:
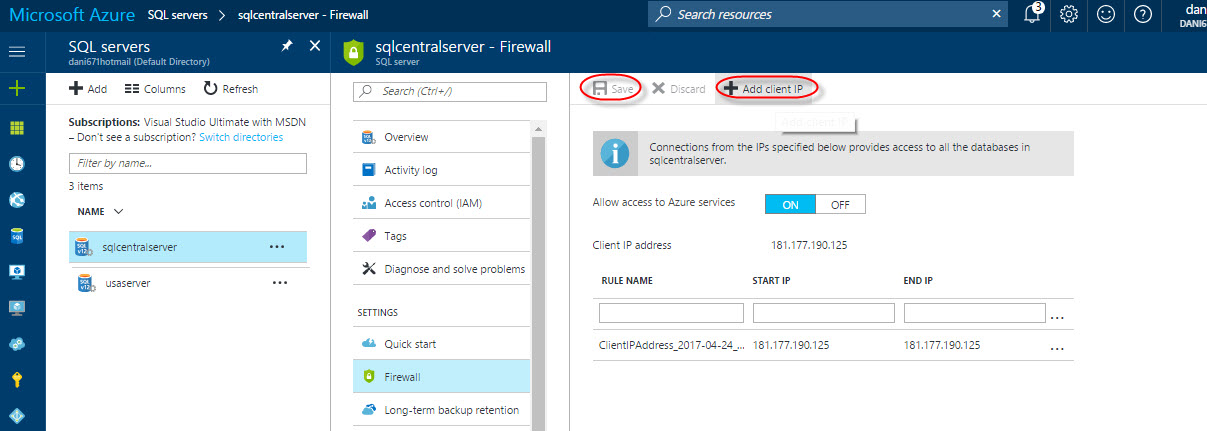
Select the sqlcentralserver Server (created in the requirements) and go to Firewall. If your local machine is the machine with Visual Studio, press the Add client IP option and save the configuration. This option will enable your local machine to access with the local IP to the ADWH:
Copy and paste the connection information from the portal
Press the SQL icon and select the sqlcentralwarehouse database:

Go to Properties and in CONNECTION STRINGS, select Show database connection strings:

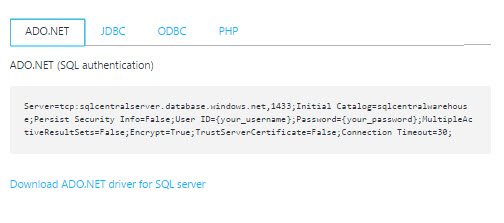
We will create an ADO.NET connection right now. To do it, click on the ADO.NET and copy the connection string. You can download the ADO.NET drivers if you do not have them:
Create a table in C#
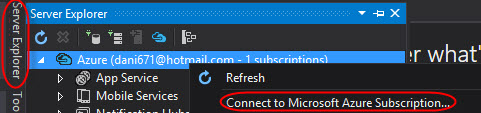
In Visual Studio, go to Server Explorer and right click on Azure. Press the Connect to Microsoft Azure Subscription and specify your Azure Portal credentials:
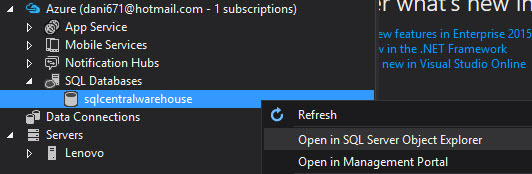
Expand the SQL Databases and right click the sqlcentralwarehouse database and select Open in SQL Server Object Explorer:
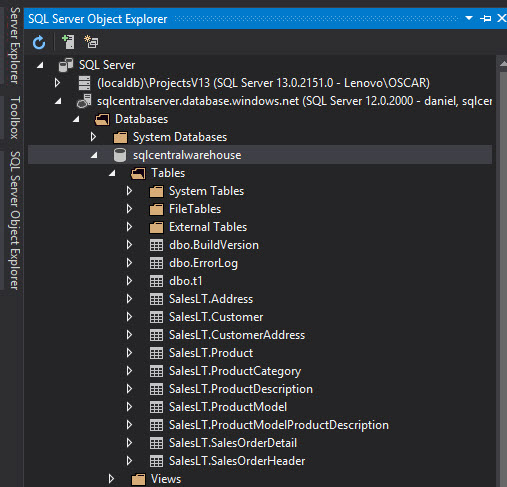
In the SQL Server Object Explorer, you will be able to see the sample tables created by default:
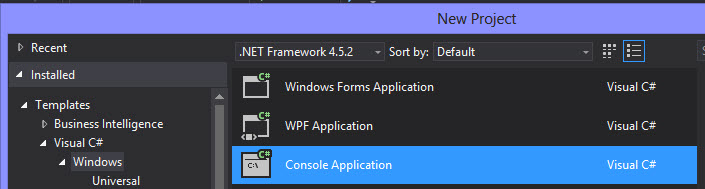
In the Visual Studio menu, go to File>New>Project

In this example, we will create a Console Application in Visual C#:
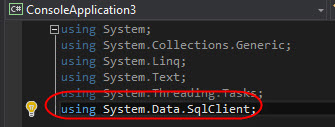
In the namespace section of the code, add the System.Data.SqlClient. This namespace will allow you to connect to ASDW:
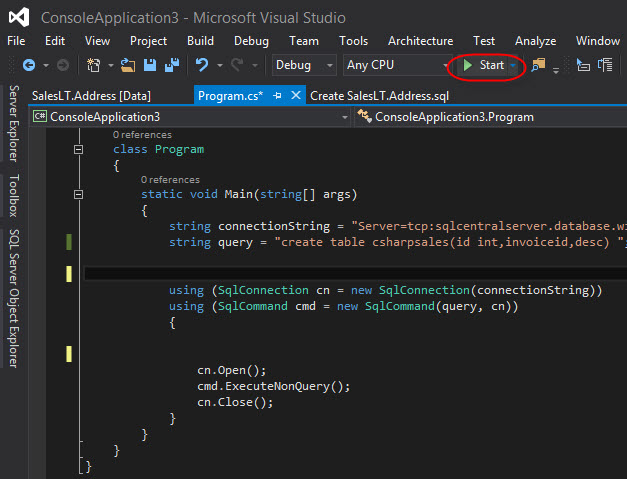
In the static void main section, add the following code:
          static void Main(string[] args)
        {

            //create connection
            string connectionString = "Server=tcp:sqlcentralserver.database.windows.net,1433;
Initial Catalog=sqlcentralwarehouse;Persist Security Info=False
;User ID=daniel;Password=MysupperStrongPassword234@#$$;MultipleActiveResultSets=False
;Encrypt=True;TrustServerCertificate=False;Connection Timeout=30";

            //T-SQL to create a table named csharpsales
            string query = "create table csharpsales(id int,invoiceid int,description varchar(40)) ";

            //Use the connection and query
            using (SqlConnection cn = new SqlConnection(connectionString))
            using (SqlCommand cmd = new SqlCommand(query, cn))
            {

                cn.Open();
                //Execute the T-SQL
                cmd.ExecuteNonQuery();
                cn.Close();
            }
}string connectionString = "Server=tcp:sqlcentralserver.database.windows.net,1433; Initial Catalog=sqlcentralwarehouse;Persist Security Info=False ;User ID=daniel;Password=MysupperStrongPassword234@#$$;MultipleActiveResultSets=False ;Encrypt=True;TrustServerCertificate=False;Connection Timeout=30";
- First, we will create the connectionString variable. This variable can be get from the Azure Portal in the connection string section. We only need to modify the User ID and the Password. The credentials are defined when you create the ASDW (see the prerequisites).
- Server is the Azure SQL Server name, 1433 is the port used to connect to the Azure database.
- The Initial Catalog is used to specify the Azure database name. Persist Security Info set to false means that the sensitive data is not returned if the connection is open.
- MultipleActiveResultSets is to handle several result sets. In this case, this is not required.
- Encrypt is to encrypt the informaion and TrustServerCertificate is used to use certificates in the connection. Finally, you can specify the Timeout in seconds.
- ID
- Invoiceid and
- Description
string query = "create table csharpsales(id int,invoiceid int,description varchar(40)) ";
            using (SqlConnection cn = new SqlConnection(connectionString))
            using (SqlCommand cmd = new SqlCommand(query, cn))
                cn.Open();
                //Execute the T-SQL
                cmd.ExecuteNonQuery();
                cn.Close();
Press the Start icon to run the code:
Go to the SQL Server Object Explorer and in Tables, make sure that the new dbo.csharpsales was created successfully:
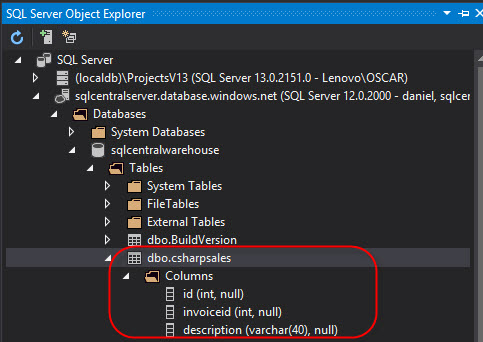
If everything is fine, you should be able to see the new table created.
Insert data into the new table using C#
The following code will show how to insert data into the table:
query = "insert into csharpsales values(@id,@invoiceid,@description) ";
using (SqlConnection cn = new SqlConnection(connectionString))
using (SqlCommand cmd = new SqlCommand(query, cn))
{
cmd.Parameters AddWithValue("id", 1);
cmd.Parameters.AddWithValue("invoiceid", 2);
cmd.Parameters.AddWithValue("description", "Caloi bike sold");
cn.Open();
//Execute the T-SQL
cmd.ExecuteNonQuery();
cn.Close();
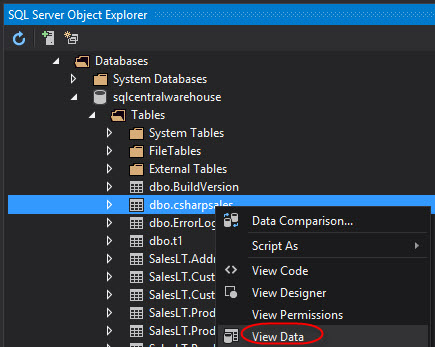
}We will have 3 parameters. Each parameter will be used to store information for each column. The example will insert the values 1,2 and "Caloi bike sold" information. To verify that the information was inserted, execute the console application in Visual Studio and go to SQL Server Object Explorer. Right click the table and select View Data:
If everything is OK, you will be able to see the information inserted into the table:

Display the information inserted in C#
Finally, the code will retrieve the information from the table:
string query = "select id,invoiceid,description from csharpsales";
using (SqlConnection cn = new SqlConnection(connectionString))
using (SqlCommand cmd = new SqlCommand(query, cn))
{
cn.Open();
SqlDataReader dr = cmd.ExecuteReader();
while (dr.Read())
{
Console.WriteLine("id:" + dr[0]);
Console.WriteLine("invoiceid:" + dr[1]);
Console.WriteLine("description:" + dr[2]);
Console.ReadLine();
cn.Close();
}
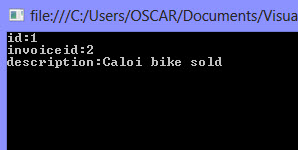
}In the string query, we define a select of the columns of the csharpsalestable. We use the SqlDataReader to read the information. Using a while we read the information. The first column is the column dr[0] and the third column is the column dr[2]. If we execute the application Column, we will be able to see the information from ASDW:
Conclusion
As you can see, Azure is easy to use with programming languages. You only need to add a Firewall rule to access from your local machine to the ASDW. After that, the connection information can be get from the Azure Portal.
Visual Studio can help you to easily handle your tables in Azure like local tables. In this article, we learned how to create an ASDW table with C#, how to insert and select data.
