

Introduction
Most of the applications created today need to maintain a database. The data itself is so important these days and critical for customers, so maximum care has to be taken in creating and using the database.
Microsoft SQL Server is becoming very popular ever since the release of the SQL Server 2000 version. The major reasons for this are the ease with which the database server can be maintained and the flexibility in using various tools. In this article, we will look into various ways to deploy a SQL Server database for a specific application and also how to create SQL Server installation using Visual Studio in detail.
Methods of deployment
The methods for deploying a database can be classified into two categories: Manual and Automatic. In manual mode, we can:
- Restore the backup files.
- Run SQL script for database creation.
- Create database manually at the time of application installation. (rarely done)
In automatic mode, we will create a separate application to:
- Restore the backup files.
- Execute the SQL Scripts.
In addition to the above two options, it is also possible to create an MSI/EXE installer to do the SQL Server installation. Various third party tools are available for creating an MSI/EXE file. If you already have a copy of Visual Studio installed then it would be very easy to create an installer without any additional cost.
The application presented here can be created in any .NET language of your choice.
Creating an MSI/EXE with Microsoft Visual Studio 2005
Follow the steps below for creating a simple installation package for SQL Server database.
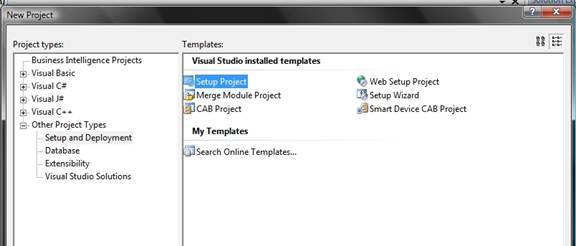
Open Visual Studio 2005 and create a New Project by selecting "Setup Project" in the Setup and Deployment section.

A new project will be created. In Solution Explorer, right-click the solution and Add a New C# Class Library project. So now, the solution has two projects.
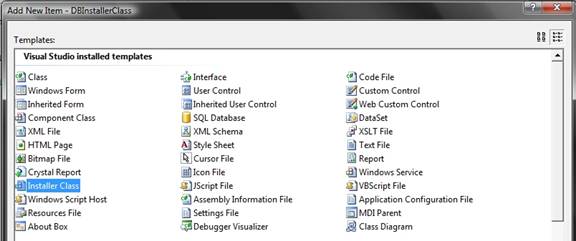
Right click on the DBInstaller project and click "Add New Item". Select the new item as "Installer Class".
The installer class is part of the "System.Configuration.Install" namespace. This is the base class for all the custom installers in .NET framework.
- Add the SQL Server script files in the DBInstaller project. Set the "Build Action" property of each SQL Script file to be Embedded Resource. By default, it will be Content.
- Open the code window for the Installer class and override the Install, Commit, Rollback, and Uninstall methods. It is not required to override all the methods. For example, if just the installation has to be done, then only override the Install method. If any specific task has to be performed during un-installation, override the Uninstall method.
- Write the logic for reading and executing the SQL Script files in the Install method. Reading of SQL script files can be done using various functions from System.IO namespace (check sample code attached). Execution of the SQL Files can be done using the ADO .NET classes. You can also check for error conditions and throw exceptions. These exceptions will be reflected in the installer MSI/EXE. (For more details look at the sample setup)
- Right-click the Setup Project MyDatabaseInstallation and add the DBInstallerClass project as the project output.
- Build the MyDatabaseInstallation project and if no errors, the MSI/EXE for SQL Server is ready for distribution.

Sample Setup
The sample setup will install a database ("MyTestDb") on the local instance of SQL server. Sample setup can be enhanced by adding SQL scripts for creating tables, stored procedures and other database objects.
Conclusion
Automating the deployment task will reduce the SQL Server configuration time and complexity involved. As it happens most of the time, people who perform installations do not have required knowledge about the configuration of the database. They need a step-by-step guide to get it done. This process can be replaced by a simple executable that will do all the application specific modifications to the SQL Server.