


In my earlier post I have explained the steps that we have followed to move the MSDTC and Quorum drive to the new SAN. In this post let us go through the steps that we have followed to move the System,Resource and User databases to the new SAN.The environment that we are talking about is running on windows 2008 server and SQL server 2008
When this task assigned to me, I did not had any idea about the steps that need to be followed. The first thing came in mind was copying the entire contents of each drive to the respective new drive and change the drive letter, but that is a time consuming process and need lot of down time. After spending lots of time, we came up with a plan with minimal downtime. Let us go through the steps.We stared our process from Wednesday and finished on Sunday. I will explain the steps that we have followed on each day.
Wednesday
- Give proper resource name for each disk in the available storage: This can be done right clicking the disk and selecting the properties option and change the resource name.This will help us to identify the disks in the future steps.I suggest to do it for old disk also for easy identification of disks.In many places it will never show the drive letter.
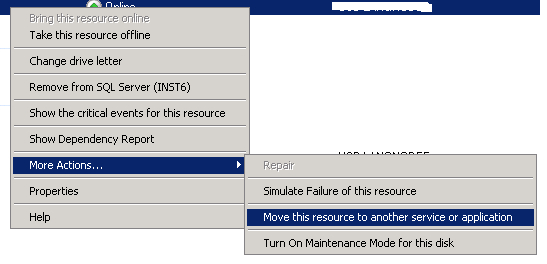
- Move the new disk to resource group : This can be done right clicking on the available disk and selecting more actions.
 Do this for each disk and move to appropriate application group(SQL instance)
- Add dependency on the disks for the SQL server instance : This can be done by selecting the right instance under the Services and Application group available in the left pane. Then right click on the SQL server engine resource (which will listed under the Other resource in the detail pane) and select the properties.On the dependencies tab add the new disks.
- Test the failover to make sure that the disks are failing over to the other nodes with out any issue.
Thursday
- Change the recovery model of the user database which are in simple recovery to full recovery.Note down the list of database which were in simple recovery.This will help us to revert back the database to simple recovery after moving to new SAN.
- Schedule a full backup on friday early morning of all availabe user database in that instance. This can be changed depend on the environment and backup policy.The output of the below script can be used to schedule the full backup of all user database.
SELECT 'Backup database ['+name +'] to disk =''R:\DISKmoveFullBackup\'+ REPLACE(name,' ','')+'_Diskmovefriday.bak'' with password =''Password@121''' FROM sys.databases WHERE name NOT IN ('MAster','model','msdb','tempdb','distribution')- Take a copy of current database file location to excel file.It will be helpful if you need to refer the location at the later stage. I have copied the output of the below query to excel sheet.
SELECT database_id,DB_NAME(database_id),FILE_ID,type_desc,name,physical_name,state_desc FROM sys.master_files
Friday
The first task on Friday is to restore all user database as _New in the new disk. In our environment we have equal number of new disks. As a first step we need create the same folder structure new disk as in the old disk. As it is data drives , the folder structure may not be complicated to create. You can ignore the folder structure where the system files resides. At later point we will be copying the entire folder to the new drive.This script can be used to generate the restoration script based on the latest full backup.
The next step is to change the default data/log path and backup path. To do that on the server node in the object explorer and select properties.On left pane of the property window select the database settings and change the default location of data and log. Using the regedit change the value of BackupDirectory key under the HKEY_LOCAL_MACHINE\Software\Microsoft\Microsoft SQL Server\MSSQL10.instname\MSSQLSERVER
Disable any full backup job that is schedule to run before the disk movement maintenance windows. Any full backup will break the backup chain.If the environment have the mirroring/replication , prepare complete script to remove and create replication and mirroring.
Sunday : The Big Day
Take differential backup of all user database and apply on top of the _new database which we created on Friday.The output of the below script can be used to take the differential backup.Before starting the differential backup, disable all the transaction log backup jobs and make sure that none of the transaction backup jobs are running at the point.
SELECT 'backup database ['+name +'] to disk =''R:\DiskMoveDiffBackup\'+REPLACE(name,' ','')+'_diffsunday.bak'' with DIFFERENTIAL'FROM sys.databases WHERE name NOT IN ('Tempdb','Master','model','msdb', 'distribution') AND name NOT LIKE '%_new'
To restore the differential backup, this script can be used. Once the restoration of differential backup completed, the actual maintenance window starts. It will take minimum of 30 minutes ,depends on the number of database and time required to recover the database after the transaction log restoration. In our environment (with around 60 database and approx 1 TB size) it took around an hour to complete the process. Recovering the database after the transaction log backup is the most time consuming process.
Follow the below steps once the maintenance window start:
- Disable all logins used by the application. This will be helpful to avoid unnecessary connection request from the application.
- Stop the SQL server agent service from the cluster admin window.
- Kill all existing user session especially from application and agent service.
- Remove mirroring and replication using the script which we have prepared on Friday.
- Take transition log backup of all user database and rename the existing database as _OLD.
- Restore the transaction log backup on top of _new databases with recovery.
- Rename _new database (remove the _new).Each section of this script will help us to perform the the steps 5,6 and 7.
- Detach and attach the distribution database to new drive.
- System databases and resource database will be there in one of the disk and moving them to new disk is a tedious task. We followed following step to do that
- Identify the drive in which the system database and resource database resides .In our case it was M drive and associated new drive is U.
- Alter all database file which is there in M drive (many _old database) to point to U drive.This script will be useful to perform this task.
- Alter all database file which is there in U drive (newly restored databases) to point to M drive.This script
will be useful to perform this task.
- Alter the tempdb database to point the data and log file to new disk.
- Bring down the instance offline through the cluster admin tool. Make sure that that, disks are online.
- Copy the system database root folder from M drive to U drive with all sub folders. We have used the XCOPYcommand to move the all the files along with folder structure to the new drive.
- Swap the drive letter M and U. We can perform this task through the cluster admin.
- Bring the instance online.
- Set up the replication
- Enable the logins disabled in the step 1 and the instance is ready to use.
- Set up the mirroring.
- Change recovery model to simple for those recovery changed as part of Thursday task.
- Enable all backup jobs.
- Drop the _OLD database and remove the dependency on old disks.
- Now the old disks will be available under the 'Available disk group'. Right click on each one and delete.
- Inform your SAN team
Thank you for reading such long post !
If you liked this post, do like my page on FaceBook at http://www.facebook.com/practicalSqlDba
www.PracticalSqlDba.com
![]()