

XAMPP is an essential support software for website administrators and programmers, but installing XAMPP is not easy. Most of the time during the installation process, users often encounter an error that cannot start MySQL. In the following article, we will provide you with a way to fix MySQL cannot start error in XAMPP for your reference. Stay tuned.

In the following article, we will share with you two ways to fix MySQL failed to start error in XAMPP, corresponding to two main reasons.
1. Fixed failure to start MySQL in XAMPP because MySQL in XAMPP could not start
If you encounter the case where MySQL cannot start in XAMPP then follow the 2 steps below:
Step 1: On the computer screen, navigate to the Xampp folder
Step 2: Next, go to the MySQL directory to run the following 3 files:
- mysql_uninstallservice.bat
- resetroot.bat
- mysql_installservice.bat
After performing the above 2 steps, but MySQL still cannot start, the cause of MySQL failed to start error in XAMPP is not that MySQL will not start, but Apache.
2. Fixed failure to start MySQL in XAMPP because Apache in XAMPP would not start
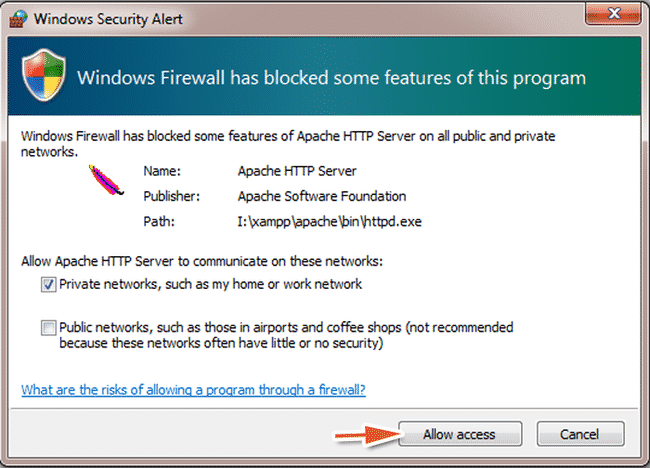
2.1 Firewall does not allow running Apache
You need to select Allow Access to allow Apache to run if you encounter a security warning. If you do not do this step, then Firewall blocks Apache from there, resulting in you unable to enable MySQL in XAMPP. At this point, the main thing to do is to restart the computer, run the XAMPP control panel and select as shown below:
2.2 Replace port 443-HTTPS with a port that is not the same
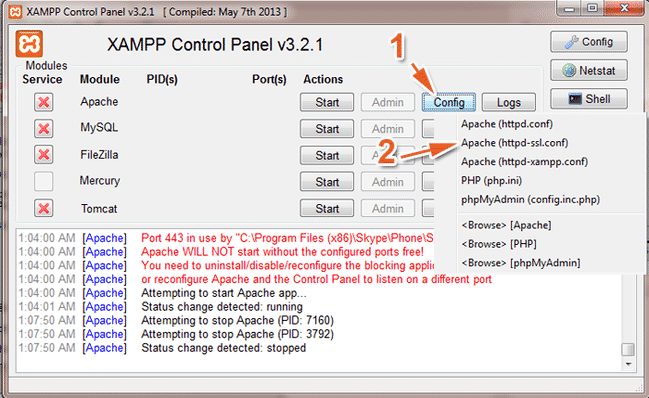
For applications that take up Apache’s port 443, you just need to move Apache to another port. Open the XAMPP control panel, then select Config, then left-click Apache to build the httpd-ssl.conf file using Notepad.
Then enter the following parameters:
- Find what: enter 443
- Replace with: enter 4433
Then choose Full Replace to replace 443 with 4433. Next, press Ctrl + S to save.
2.3 Replace port 80 – HTTP with another port

Open the XAMPP control panel, then click on Config, choose Apache (httpd.conf) to open the httpd.conf file using Notepad.
After you have opened the httpd.conf file in Notepad, choose Ctrl + H to display an alternate window as shown below:

Then you enter the following parameters:
- Find what: enter 80
- Replace with: enter 8080
Then you press Ctrl + S to save. Then instead of typing in the address bar of the website browser as “localhost”, type localhost to go to XAMPP’s website.
2.4 Check for software that occupies port 80-HTTP

As the picture above shows, Apache fails to boot because Skype software occupies both ports: port 80 and port 443 of Apache, so Apache cannot boot. At this point, you need to quit Skype to have enough power to run Apache.
In case you do not want to quit Skype or other software is taking up port 80, you need to move the Apache to other ports:
- If the software is occupying port 443, you need to switch Apache to a different port (say 4433).
- If the software is occupying port 80, you need to switch Apache to another port (say 8080).
The article on RealSQLGuy has instructed you to fix the error that can not start MySQL in XAMPP for your reference. Hopefully, through the above article, you will know how to fix the error. If you have any questions related to the above article, please contact us for the fastest answer. Do not forget to visit the website http://realsqlguy.com for more useful information.
The post Fix The “can’t start MySQL in XAMPP” Error in a Simple Way appeared first on RealSQLGuy.