


I know if you are a SQL Server DBA using Azure SQL DB, you’ve been sorely missing the agent. Enter Elastic Jobs to help you schedule jobs more easily against Azure SQL DB. I will cover setting up and scheduling Elastic Jobs to execute Ola index maintenance. If you’ve used Elastic Jobs in the past, there are some very nice improvements with the recent GA release, so don’t feel discouraged if you didn’t like it in the past—it’s way better now!
TL;DR: Set up a user-managed identity and Elastic Job agent in the Azure portal, and then you can use the T-SQL script in my Github repo to do the rest. But don’t forget to add monitoring after running the T-SQL scripts. The monitoring can be set up from the portal.
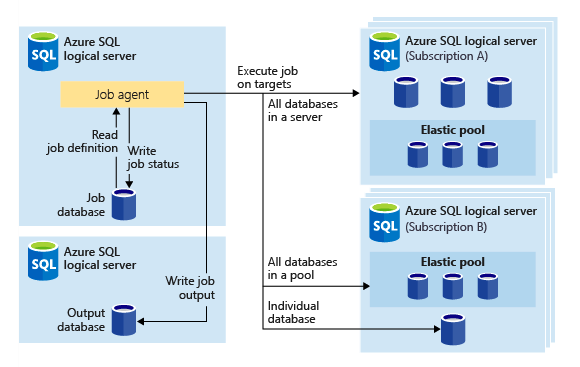
What Are Elastic Jobs?
The Elastic Jobs in Azure are like SQL Server Agent for managing repetitive tasks across multiple databases or Azure SQL Database instances. Whether you need to run jobs on a schedule or on demand, this service has you covered. Plus, it offers centralized monitoring and logging features to inform you about job execution status and performance metrics. Elastic Jobs helps you boost operational efficiency and keep your database infrastructure in Azure running smoothly by simplifying routine database tasks. Microsoft’s advice on when to use Elastic Jobs.
I will mainly work through this with T-SQL, but if Powershell is your thing, here is guidance from Microsoft. Microsoft also has the equivalent T-SQL one here if you want to see more examples.
Creating an Elastic Job Agent
Agent prerequisites
There are some things you will need before you create your agent.
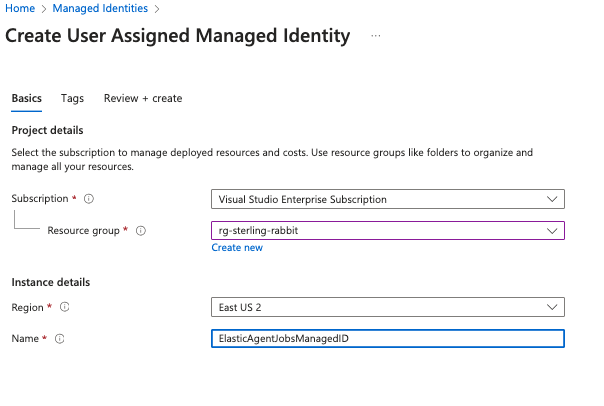
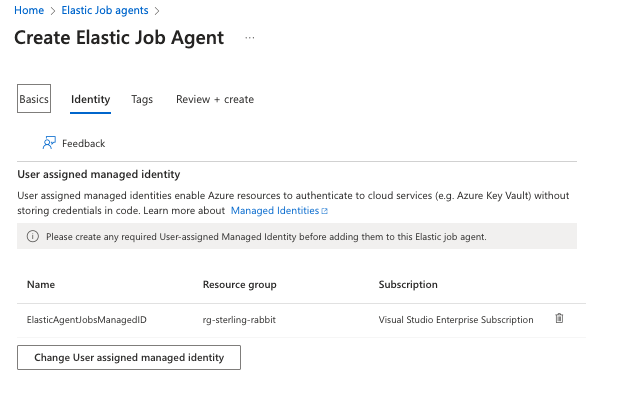
User-managed identity—I prefer this over using a credential. It’s so much easier to maintain. Search for managed identity in the Azure portal and add one with your chosen name. Note: When I set up this managed identity, it took several hours for my Elastic Jobs agent to see it.
You will need to add this managed identity to your SQL dbs. In each db, execute the following script. You might wonder why it needs db_owner, and I wondered about this, too. I tried with lower perms, but it couldn’t see certain tables. I needed it to see with lesser perms, which was very odd.
CREATE USER ElasticAgentJobsManagedID FROM EXTERNAL PROVIDER;
ALTER ROLE db_owner ADD MEMBER ElasticAgentJobsManagedID;
In master db, execute this, which will ensure any servers added to your target groups in your Elastic Job agent will be able to have their databases enumerated:
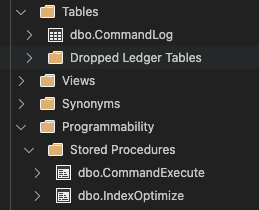
CREATE USER ElasticAgentJobsManagedID FROM EXTERNAL PROVIDER;You will also need the Ola scripts for index maintenance in your SQL dbs. Ensure your db has that one table and those two stored procedures.
You can either set up an S1 or higher Azure SQL DB now or create a new one during the agent creation process.
Creating the agent
Search for Elastic Job agents and create a new one. I will put the agent in the same resource group as my databases and put the Elastic Jobs database on one of my existing servers. This database must be at least S1, so I’m choosing S1 to save on costs.
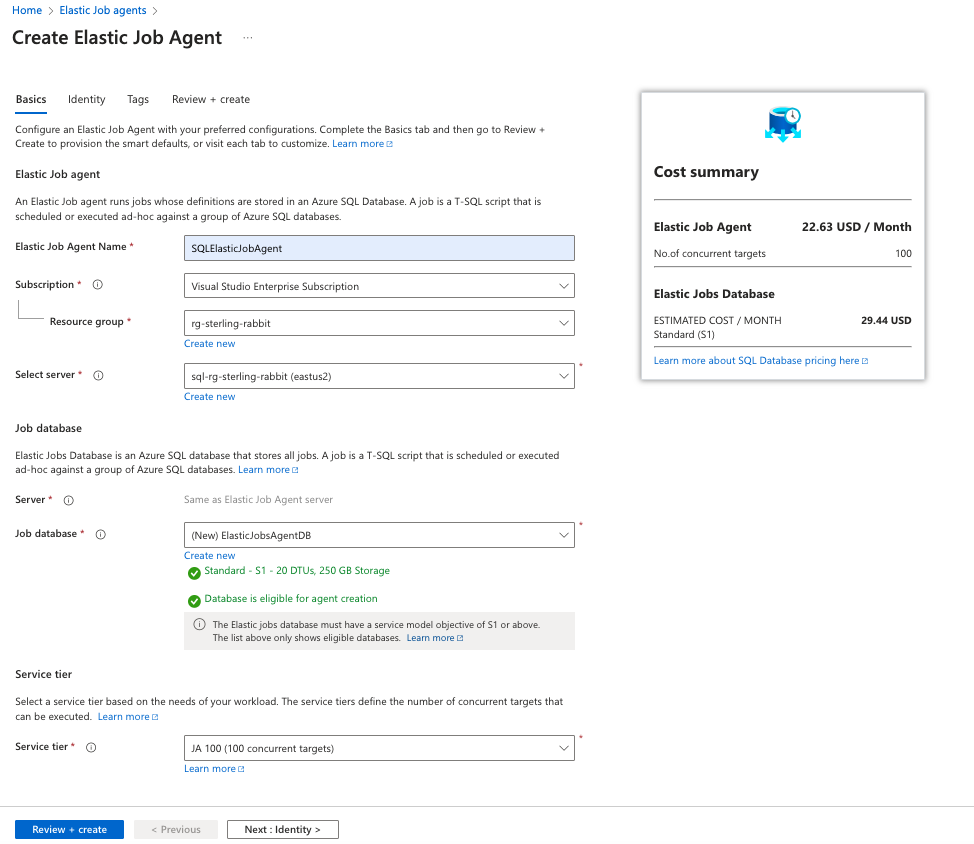
Then, I will add the identity I set up previously. Note again: When I set up this managed identity, it took several hours for my Elastic Jobs agent to see it.
I will do the rest of the setup with T-SQL. You can do all this in the portal, but I prefer T-SQL. I found some glitches with removing targets in the portal, but it works fine with T-SQL. I’ve also found the job history easier to look at with T-SQL.
If you want to do the next bits via the portal, they are in the Elastic Jobs agent in these areas.
Setting Up Targets
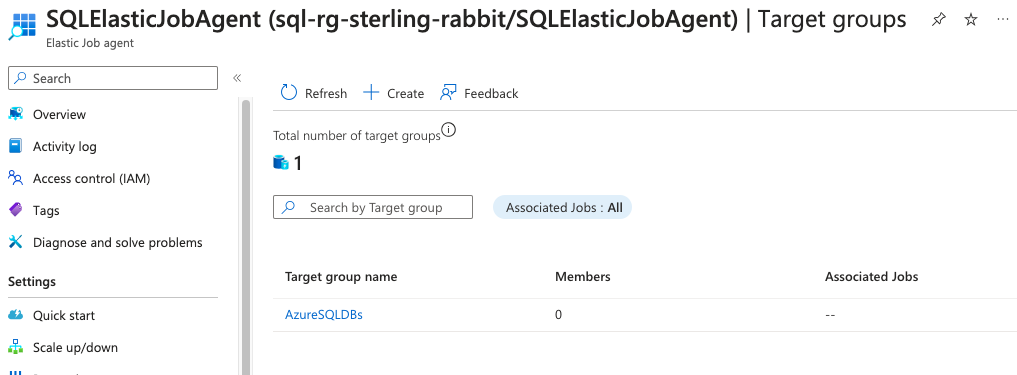
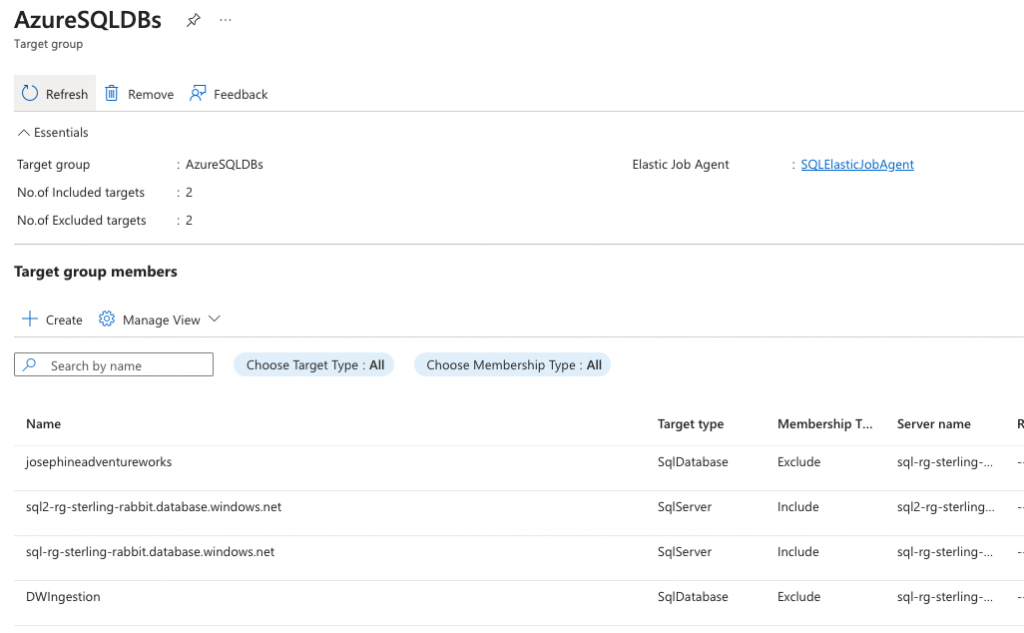
Since I will probably have one of these per environment (dev, qa, uat, and prod), I will create a target group called AzureSQLDBs.
EXEC jobs.sp_add_target_group 'AzureSQLDBs';In the portal view, you will see that a group with 0 members has been added.
You can add members differently, either as a whole server, select databases, or pool. In this case, I want a job executed against all the databases on this server.
EXEC jobs.sp_add_target_group_member
@target_group_name = 'AzureSQLDBs',
@target_type = 'SqlServer',
@server_name = 'sql2-rg-sterling-rabbit.database.windows.net';
But in this case, I have some straggler random databases on this db server, so I don’t want to hit those. I will exclude those after adding the server on which they all live. You may not need to do this exclusion or could include only certain databases alternatively.
EXEC jobs.sp_add_target_group_member
@target_group_name = 'AzureSQLDBs',
@target_type = 'SqlServer',
@server_name = 'sql-rg-sterling-rabbit.database.windows.net';

EXEC jobs.sp_add_target_group_member
@target_group_name = 'AzureSQLDbs',
@target_type = 'SqlDatabase',
@server_name = 'sql-rg-sterling-rabbit.database.windows.net',
@membership_type = 'Exclude',
@database_name = 'DWIngestion';

EXEC jobs.sp_add_target_group_member
@target_group_name = 'AzureSQLDbs',
@target_type = 'SqlDatabase',
@server_name = 'sql-rg-sterling-rabbit.database.windows.net',
@membership_type = 'Exclude',
@database_name = 'josephineadventureworks';
You can execute these queries to see your groups and members.
SELECT * FROM jobs.target_groups;
SELECT * FROM jobs.target_group_members;
This is what all those scripts above will look like in the portal.
If you have an elastic pool, you must use a different target type: SqlElasticPool.
If you need to remove groups or members later, you can use these stored procs or go into the portal. The thing is, there was a glitch removing members in the portal the last time I tried. It would say it’s removed, but they were still in the group. I had to remove the entire group and start over. This is why I switched to T-SQL to set up all the agent’s innards.

Setting Up Jobs and Steps
This is very similar to the commands/syntax in SQL Server Agent. I never really used those much, though.
Adding a job
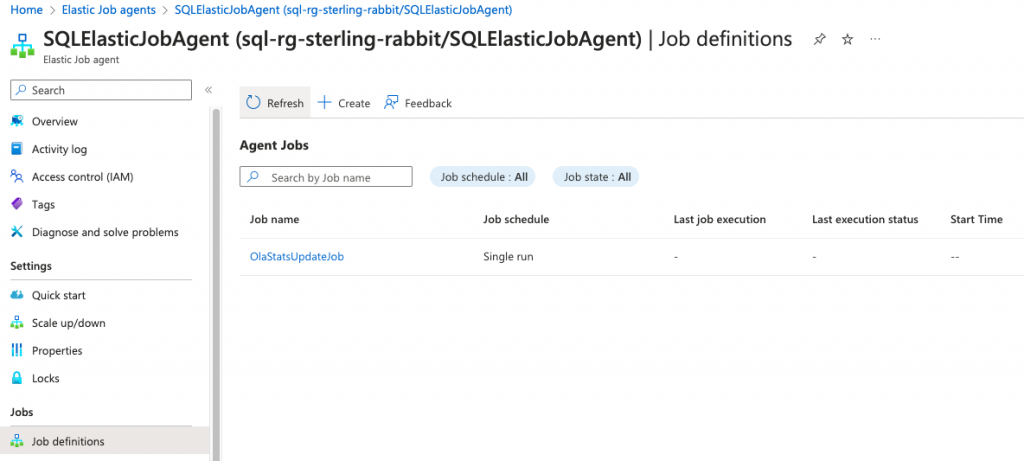
Adding a job is this simple.
EXEC jobs.sp_add_job
@job_name = 'OlaStatsUpdateJob',
@description = 'To run stats update nightly with Ola scripts';
To see the jobs, you can query the jobs view.
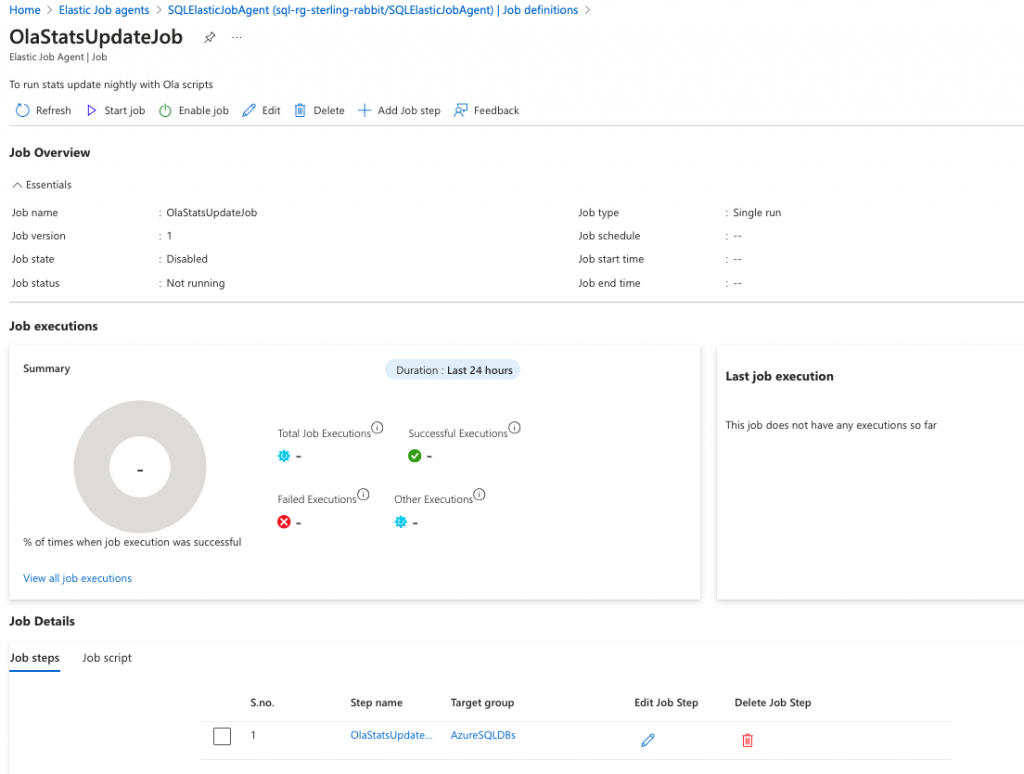
SELECT * FROM jobs.jobs;You will now see this in the portal.
Adding steps to your job
Let’s add the Ola stats update step in there now.
EXEC jobs.sp_add_jobstep
@job_name = 'OlaStatsUpdateJob',
@step_name = 'OlaStatsUpdateStep',
@command = N'EXECUTE [dba].[IndexOptimize]
            @Databases = ''USER_DATABASES'' ,
            @FragmentationLow = NULL ,
            @FragmentationMedium = NULL ,
            @FragmentationHigh = NULL ,
            @UpdateStatistics = ''ALL'' ,
            @LogToTable = ''Y'';',
@target_group_name = 'AzureSQLDBs';
Then, query to see the current version of the steps for the job.
SELECT js.* FROM jobs.jobsteps js
JOIN jobs.jobs j
  ON j.job_id = js.job_id AND j.job_version = js.job_version;
It will look like this in the portal.
Executing the Job
Let’s start this job now and see what errors we get. 
EXEC jobs.sp_start_job 'OlaStatsUpdateJob';You can watch for job execution info with this query.
SELECT job_name, step_name, target_server_name, target_database_name, target_type,
        last_message, start_time, end_time, is_active, lifecycle, current_attempts
        FROM jobs.job_executions
WHERE is_active = 1
ORDER BY start_time DESC;
The results of my job execution.

In the portal, you can see job successes and failures.

Scheduling the Job
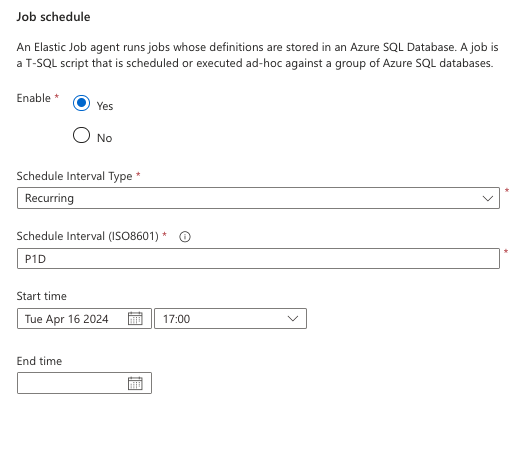
You will invariably want to schedule this job so you don’t have to manually run it each time you need it. You can add a schedule to the job with this script. This will set it to run once a day, starting at the specified date and time set in the @schedule_start_time. Note: The start time is in UTC.
EXEC jobs.sp_update_job
@job_name = 'OlaStatsUpdateJob',
@enabled=1,
@schedule_interval_type = 'Days',
@schedule_interval_count = 1,
@schedule_start_time = '2024-04-16 23:00:00';
The schedule will look like this in the portal.
Monitoring the Job
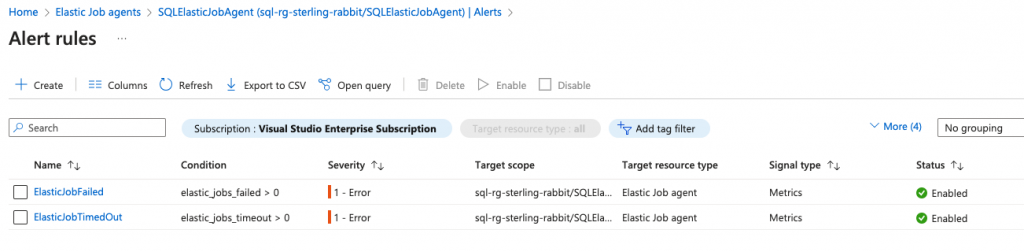
You will need alerting, especially when your job fails. You can do this in the Azure portal.
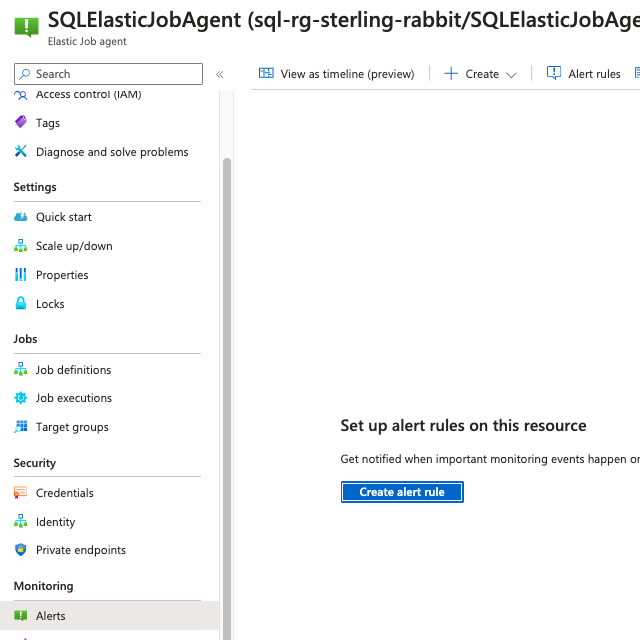
I will create an alert rule for this.
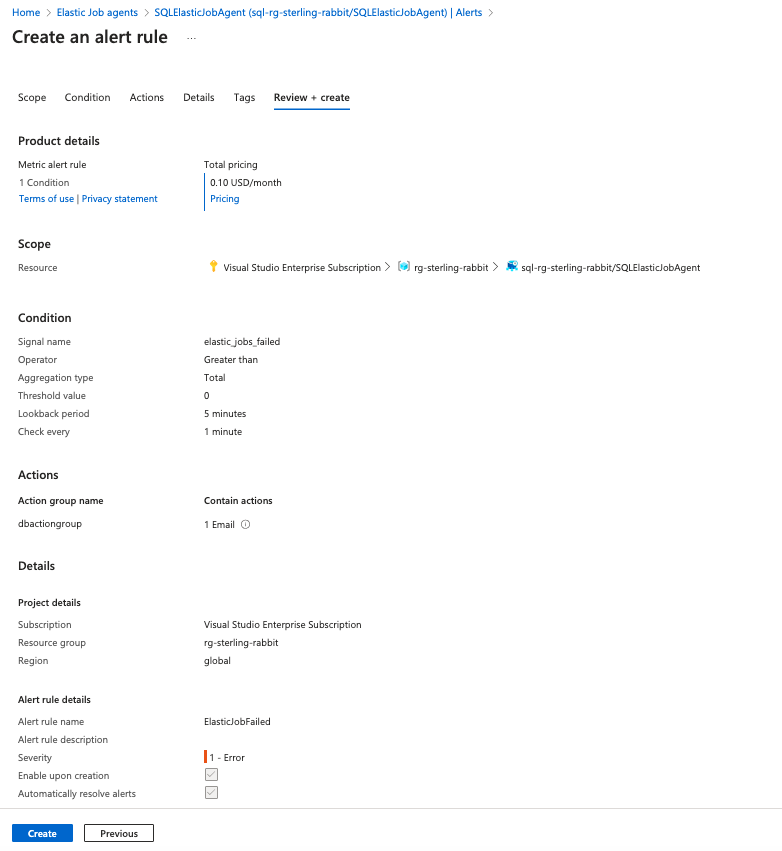
You could also add another alert rule for it timing out, as well, as that may indicate an error you will need to resolve.
Cleanup Step (Optional, but highly recommended)
One thing you won’t have to worry about is cleaning up job history in your Elastic Jobs agent SQL db, as it only keeps 45 days. If you want to keep less, you could run sp_purge_jobhistory to clean out more, but it doesn’t seem necessary.
But you will want to ensure your CommandLog table doesn’t get big. I’m going to keep 30 days. To facilitate that, I will add an index to the start date.
CREATE NONCLUSTERED INDEX NIX_CommandLog_StartTime
        ON dbo.CommandLog (StartTime ASC);
Then, I will add a step to the job to run a cleanup query to remove those older than 30 days.
EXEC jobs.sp_add_jobstep
@job_name = 'OlaStatsUpdateJob',
@step_name = 'OlaCommandLogCleanup',
@command = N'DELETE FROM [dbo].[CommandLog]
WHERE StartTime <= DATEADD(DAY, -30, GETDATE());',
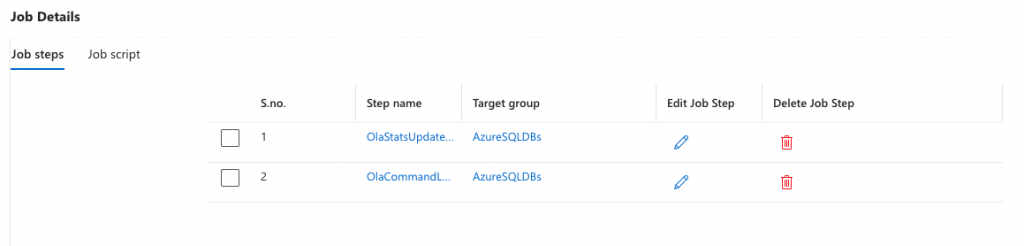
@target_group_name = 'AzureSQLDBs';And how it will look in the portal.
Let’s set this job off to see if it runs both steps without error.
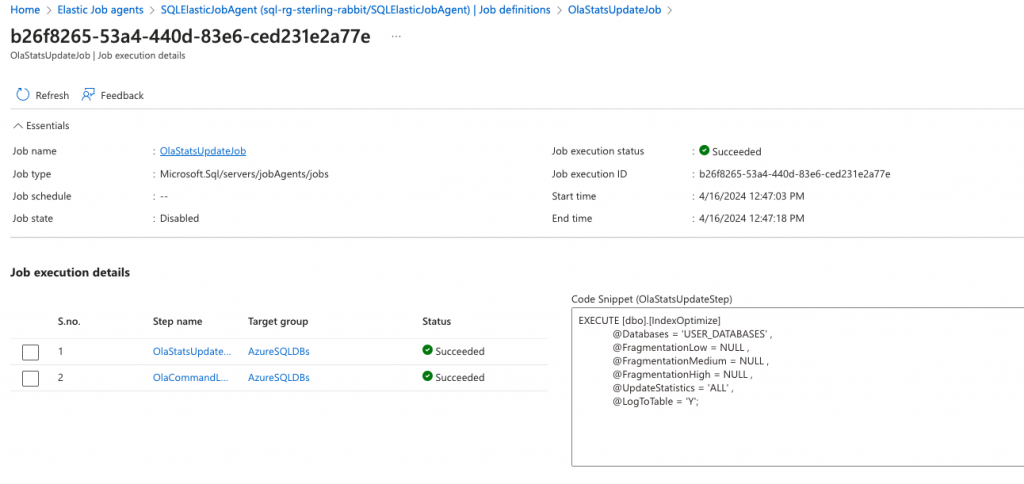
Query results to show job success.
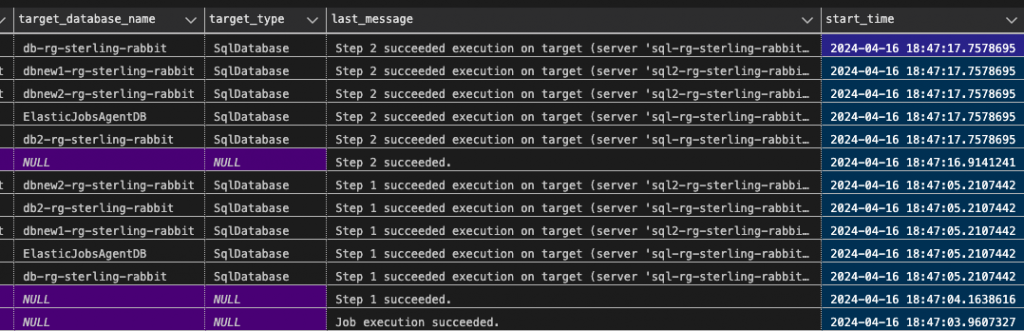
Job execution details from the portal to show success.
I will also set up a separate job to handle weekly index maintenance. Here is the script for that.
I love this updated Elastic Jobs agent and its jobs! It’s so much like SQL Server Agent. I tried doing this maintenance other ways, but it just wasn’t nearly as easy with Azure Data Factory, Runbooks, Functions, or Containers. This is very nice! The next step is to figure out how to Bicep this into place as we put all our infra in place with code, and Terraform doesn’t have support for Elastic Jobs agent, and its associated settings and jobs yet.
The post Elastic Jobs for Azure SQL DB appeared first on sqlkitty.