

In my last
article, I spoke extensively about the theory behind clustering a Windows 2000
and SQL Server machine. This week, I’ll detail how to actually accomplish this
task in a step-by-step guide. In this guide, I’ll use Windows 2000 Advanced
Server with SQL Server 2000 Enterprise to create an Active/Active cluster. These
two software components are the minimum requirement in a 2000 environment to
cluster SQL Server 2000. If you have not read my article on Clustering
SQL Server 2000 from 500 Feet, I would recommend that you do so before moving
forward since this guide will use terms that I assume you know from the last
article.
Common question: One of the number one questions I received after writing this article was how do you do an Active/Passive cluster. Essentially, you can follow this guide to cluster your SQL Server but stop before you add the second SQL Server. That's all it takes!
Note: As with any type of configuration and installation,
there are multiple ways of doing this. I will show you towards the end of this
article how I configure clustering for optimal performance. This may not be the
best method of optimizing things in your environment.
Tip: Before attempting clustering, I would recommend
that you install service pack 2 for Windows 2000. There are a number of bug
fixes between the two service packs related to clustering.
Goal #1 – Cluster Windows 2000 Advanced Server
Before we
even install SQL Server, you will want to ensure that your Windows environment
is successfully installed and clustered. Although it is possible to cluster SQL
Server after it is installed, it makes it much easier if you have already have
this piece complete. If you already have this part done, SQL Server will
automatically detect that it is in a clustered environment when you try to
install it. Before you begin, make sure all of your drives you plan to share are
formatted. You will also want to ensure that your network is fully configured.
- Create
an account for Microsoft Cluster Service (MSCS) to use
. This account will need to be a domain account and bean administrator. Make sure you make the password non-expiring.
- Stop
the second node that will be in
the cluster
.This is only a precaution and is generally not required.
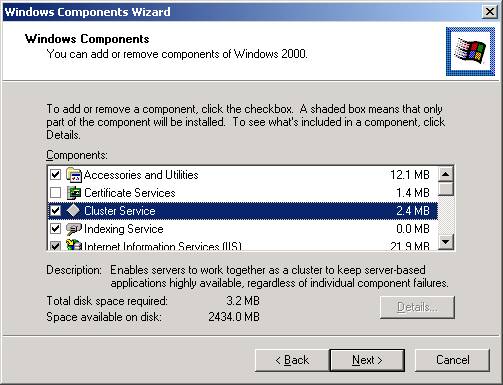
- Add
the Cluster Service component
.You can do this by going to Control Panel, clicking on Add/Remove Programs,
and then clicking on Windows Components. Click on Cluster Service as shown
below. Notice that some components of Internet Information Services (IIS)
are also added when you click Cluster Services. This small component of IIS
is required for Cluster Services to work properly.
Note: When
you install Windows 2000, you can also check this box when choosing your
components to install. After Windows boots up for the first time, you’ll be
able to launch the wizard by going to Control Panel and click on Add/Remove
Programs. The Configure Clustering option will be highlighted.
- When
you click Next, this will start the Cluster Service Configuration Wizard.
Click Next to continue in the wizard. This will take you to the Hardware
Configuration screen. You will need to make sure that all the equipment in
your cluster is on the Hardware Compatibility List (HCL). After looking at http://www.microsoft.com/hwtest/hcl
to confirm this, click I Understand and then Next.
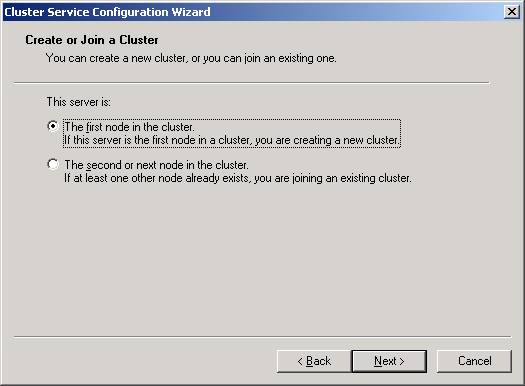
- You
will then need to select that this is the first node in the cluster.
By doing this, you’re creating a new cluster. The next node is much easier
to configure because you’ll only have to select the last option and much
of the configuration is read from the first node.
- You
will now need to provide a name for your cluster
. This name will be used by many Windows tools like PerformanceMonitor to designate the “floating” name for the cluster. If one machine
fails in your cluster, this name will move to the surviving node. I’ve
chosen the name CLUSTEREXAMPLE for this article.
- Next,
specify the account we created in Step 1
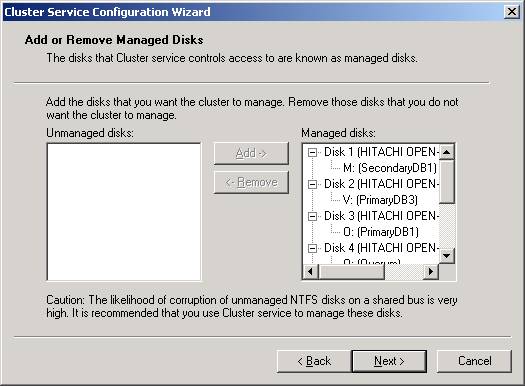
. This account will be used to start the Cluster services. - After
clicking Next, specify each of the shared drives that you’d like to
cluster
. Eachdrive you specify is then managed by MSCS. I would recommend that you allow
all the shared drives to be managed my MSCS. Otherwise you risk corruption
of the drives. By default, all the drives will be selected but if you wish
to add more or remove some drives you can highlight the drives and click Add
or Remove. After you’ve added all the drives you need, click Next.
- Specify
your quorum drive
.The Quorum drive holds log files and health information about your cluster.
If one node fails, the surviving node depends on the quorum drive to start
the services. For simplicity, I always call my quorum drive the Q drive. It
should be about 815 MB in size typically, although much of that space will
go unused. After selecting the drive, click Next.
- You
now must configure the cluster’s network
. Read the message about the types of networks that can beconfigured and click Next. Essentially, you can configure the cluster to
communicate over a private network and/or a public network. I prefer to have
the heartbeat connection over a private network for security and everything
else go over the public network.
- Configure
each network card
.You will be presented a screen to configure each network connection. To use
the each network connection, click the Enable This Network For Cluster Use
and then select the type of use it will have. For example, if you want all
traffic to go out on a single network card, select All Communication (mixed
network). If you only configure you cluster for one connection, you will
receive a warning stating that you now have a single-point of failure.
Acknowledge the warning to proceed.
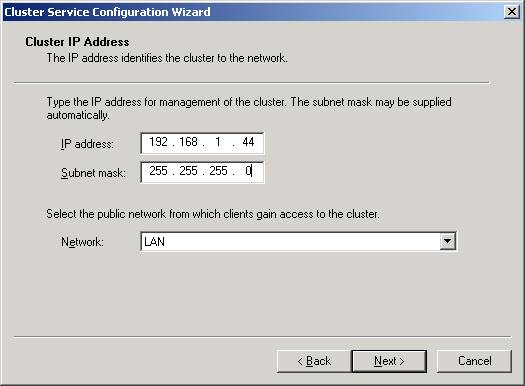
- The
last step in this node is to specify a virtual IP address for the cluster.
You will also need to specify the subnet for the IP address and which
connection will be used by clients to connect to the cluster.
- You’re
now done with the first node! Not too bad, is it? Now click Finish to
complete the wizard and acknowledge that the service was successfully
started. No reboot is required after installing a cluster.
- Boot
up any servers that need to be in the cluster
. - Repeat
the same steps on the second node to launch the wizard again
. This time select the Second Node option as shown inStep 5. By selecting that option and specifying a security account for
Windows to use, the wizard will read the configuration from the first node
and almost automatically configure itself.
Note: This is a multi-page article. To see the other pages, use the below tabs or the numbers below.